Well, the Houston crew has what they’re, for, as the night spot, an industrial park across town, which they have an arrangement where they can set up a track, lie a few packs and have some fun.
Now. I have not in years past, made it out to the night track because it’s a little dangerous for your quads right, but I haven’t found myself with the time to get out and get some packs on the weekends. So I needed to get some packs. So I didn’t want to fly. One of my normal race builds there. So what greater opportunity to make a quad that was as low-budget as possible, test out a few components test out some 3d printing and go out to the night spot, and that’s why I set up for this project to make the concrete quad.
I also wanted to be able to get a lot of these parts during the Black Friday sales and the total Black Friday price. If you’ve got all these parts, for you know, let’s say 12 % off, I think was the average sale. This comes out to about a hundred and seventeen hundred and seventy five bucks for this entire racing quad. So I’m going to go through the components in a second on the article, but first I want to show a quick sneak peek of the articles that the Houston crew would constantly put out all last year trying to get everybody to come out and race at the Night spot, if this was the one that sealed the deal for me guys.
Okay, so I mean we had the nice baton here we do and fun. I mean everybody always complaining about the trees, the rivers, the waters and everything it’s concrete. So what I break more on grass, you need to come out here more. Let’S have fun, let’s practice together on the concrete, so, as you can see after that, I just had to get this built up we’ll go through the build, but spoiler. This bang held up better than I could have ever imagined.

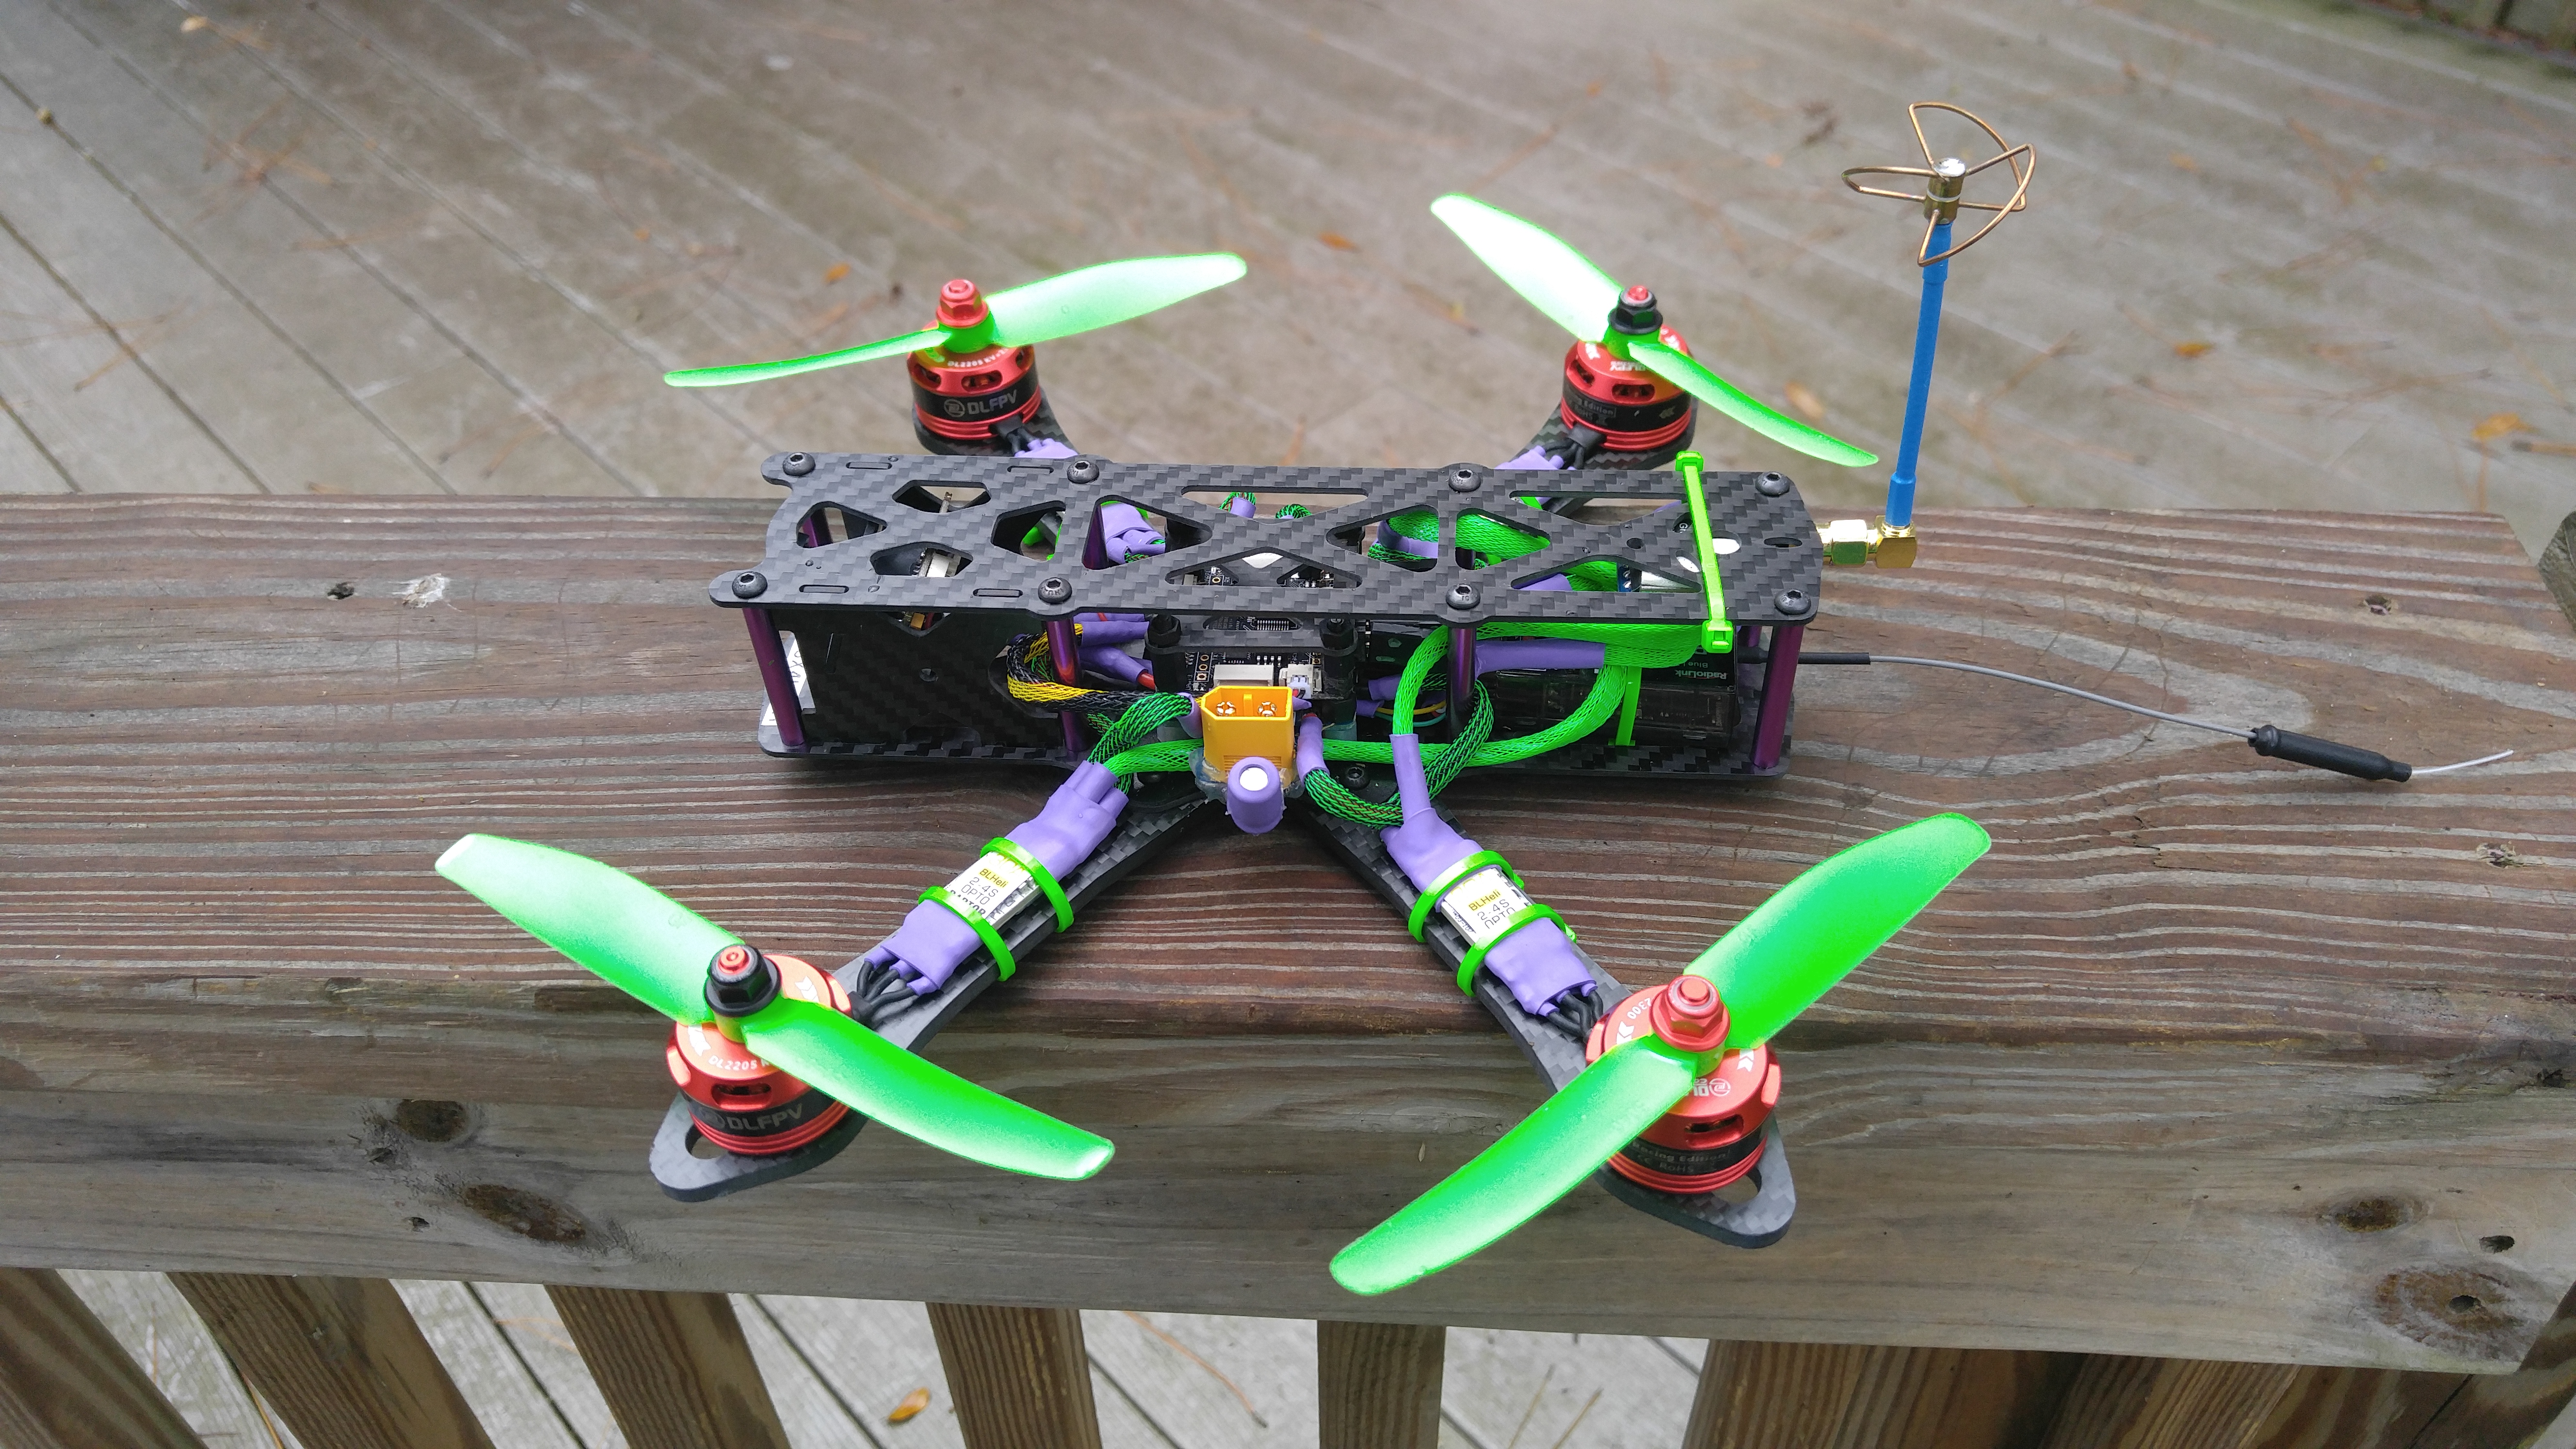
So here’s the concrete quad guys and the goal of this again was be to be able to have a cheap, build with easily replaceable parts, and that means parts for the quad itself, as well as parts on the quad such as these motors. That’S why I am going for these hyper light emitters. E stands for everyone can afford these, not eco, like some of the other ones out there, and these e-series motors are beautiful indeed, and you can see that to differentiate that from the primary hyper light line, they have reversed the color scheme, having the brilliant type of Light orange, which matches the middle mid plate on the floss three quite well on the top and hyper light blue on the bottom.
A couple of other things that I have done to get this ready for concrete. Is I printed out these feet? I have the ones for the back here still that I still need to put on, and I printed out a spare for myself. They will go on there. In addition to that, I have added a nice juicy capacitor at the back. This is Panasonic’s best capacitor that I like to use for all my bills: blue, it’s the one thousand thirty-five capacitor on there.
I also printed out this camera holder. I wanted a beefier one, I’m using the run cam nano 2 in there just to keep the costs down. This print didn’t come out super great and that’s more due to my printing skills, but it’s pretty strong and I like that. It leaves you a little bit of extra room in there and it is a fixed camera mount so since this is going to be taking, some hard hits potentially wanted to keep that beefed up.
This is the stock. This is the stock antenna holder at the rear. End, I’m using a very inexpensive real ACC stubby youxi eyes Anton, and I don’t expect that to perform, as well as the luminaire AXI of course. But since I’m racing this on concrete, very close proximity, I’m going to go ahead and try out this cheap $ 6 and tenant’s super cheap. In addition to that, let’s go to the rest of the build I’m using the eraser star anniversary $ 25 on sale $ 30 at full price esc.
That has been tried and true and some of my most longest-running builds. I’M learning that ESC. So I’m doing that for this one to keep the costs down, this is the rev. It’S the mellow Reister star, mellow ESC, that I kind of showed on the blog want to go ahead and get that up in the build and the notable thing about this is because I will likely be trying for point one right now. It’S on 4.0 on this flight controller.
This has the built-in speedy B, so you can to very easily in the field as well as switch some of those settings and, of course, using the X and plus receiver on top and an akk race, article transmitter, whether it’s a article. So that means that this bill comes out exceptionally cheap. Let’S just go over the cost frame $ 45 motors $ 56 camera 18 dollars, the ESC $ 24. The flight controller 28 dollars article under $ 10, the receiver $ 12, the antenna $ 6, the props $ 3 for a grand total of 203 dollars for this entire build, including the props.
Now, as I go out to the concrete’s spot the night spots, I’m going to also be bringing this battery protector that I generally use all the time, but I’m especially going to be using it on concrete. It does add a good 12 or 14 grams. So your overall build weight, but that is totally fine with me. If I can keep my batteries just a little bit safer, you can see this one has seen some action. It’S going to see some more action tomorrow night.
The other thing you may notice is, I don’t, have a turtle mode solution, yet I did print this fin. I had a little bit of a hard time getting it to fit on there. So now I have to decide. Do I want to try to squeeze on there or print another option? I have basically one shot until tomorrow, so I’ll figure out what I’m going to do there or do I just live without Turtle mode for a day. In addition, since it is going to be some potentially banging around, I’m going to be bringing a couple of spare arms just in case.
I need to swap any of these also going to be bringing any spare top plates and just see how things goes. I’M going to be bringing several of the quads as backups. This isn’t a competitive race, so I’m not going to be going with the intention of pushing it extremely hard, but anytime you’re on concrete. You want to be able to recover from that quickly. So quite pleased with how this build came out, I really took my time to kind of show some of those nice build skills.
I used casters 6337 solder throughout this build, as well as Mike Hester’s flux, pin to make sure that all my solder joints were nice and shiny, and it came out quite good really like this floss three. If I had to do it all over again, do I use the floss tree light? I do have one of those coming up on all of that stuff very soon so stay tuned for that now, let’s go out to the field to see how did this thing hold us? Fine, I hit that.
I hit that tree. That was going. I was a good one. Alright, so here is the after footage of the concrete quad after two visits to the night spot and as you can see, it really doesn’t look that different staying no damage. I did a couple of car crashes upside down like that, and all that I did was just kind of scratch up this motor, not right here. If you can see that, but everything else I didn’t even lose, I didn’t even lose.
One of these into holder thing is these Hyperlight été motors, I almost said eco they’re, not eco, cirqueo reminded me. These are E for Everyone, because everyone can afford these beautiful motors and the only thing that I broke during that entire session. I actually have been out there twice. This is, after the second time, I’m going to show some footage at the end, so you can see the wreckage.

These are protectors, performed and did their job beautifully. The arms still look new. I didn’t even break an arm. This fan did crumple, but my printer is not a hundred percent doll then, but that’s like what I can replace this 426, so no problem at all there. I basically ran the same set of props almost for the entire both sessions each sessions were going really hard. We were just going pax pax pax pax pax.
I probably flew across both sessions – 35 pax – maybe between the two nights. I did take a couple of spills, but there was no damage had a very little slight scratch at the top of one of these prop nuts. But just amazing, so if you want to race over anywhere, that is pre curious. This is a beautiful recipe to use all have links to in the description below for everything that I used, and this is kicking off a new series for me, where we’re going to do budget builds and the concrete quad is a perfect example of this.
You don’t have to break the bank in order to race or freestyle everything today, especially with the new version, as a beta flight can fly exceptionally well and feel exceptionally well. I didn’t even bother to do very much tuning on this and you’ll probably see that the tube wasn’t that good. But I didn’t care I wanted to just get out there get on the track, compete with my buddies and see who ended up faster and a lot of these guys that hang out at the knight spa all travelled to Temple Texas to participate in one of those Big races and we were able to set up some elements from that track prior to and it helped Houston to take.
I believe, first place third place and first place in the sportsman class, so way to go guys on that. What are you going to be racing for the 2020 season? I am still going through. Several options got the new 533 switchback. I got the catalyst machine works raging groaner. I got the Mayday designed fusion frame that I still have in the mix, so many great options. So many affordable option is so many durable and amazing components.
What a time to fly fpv guys. Can you believe that you can get three Racing quads built up for a full race season for the price that it would have cost you to get one in a couple of batteries a few years ago? It’S amazing how much better everything is, how much cheaper is getting every day if you are wanting to know more about how to build a quad check out my other articles for the beginner series, and if you want to be able to stay in tune to get These type of sales build a cheap quad of your own join FPV, sells alerts group where I am able to help everyone by all the partnerships that I have yes, a lot of those are affiliate links that helps the blog helps me get new things in for Review, but it also helps me in order to get larger and larger discount codes, especially for that group and the codes are not just from banggood guys I have saw.
I also have six partners across the United States and North America, including Canada. So if you’re, a part of that group, you are likely to save and if I’m not working with your favorite shop and they have a great show going on, feel free to go in there and post it. Let us all know I want to get the cheapest parts that I can keep flying and stay in the air too. So thanks guys and [ Laughter, ]


