The bad news, however, is that, even with these improvements, a lot of websites still won’t magically turn into speedy experiences. I mean think about it for a second, if you had a bus station and click on a link in your Twitter feed, you wait five seconds.
You wait. 10, you keep thinking. It must be amazing content. If it takes so long to prepare and write, then you get pulled back into reality. A full screen interstitial asking me to buy sunscreen, please, like me, dialog that’s, set to scratch from the content and make the page so small, you can’t even scroll and as if that was enough, a bunch of competing analytics scripts in the background at party hard.
Every second and kill your phone’s battery, or maybe the analytics scripts, just want to stop the phone from suffering and put it out of its misery quickly. I really don’t know in all seriousness, though: all of this wouldn’t be such a big deal for the publishers of those sites. If you were just willing to continue to suffer, but you don’t you’re furious about the current state so furious, then you either don’t bother and click off and studies to just a 40 % of users drop off after just three seconds or decide to install an ad Blocker clicking off is a lose-lose situation.
You are frustrated because you didn’t get to read the article. Your friends post it and publishers are frustrated because they didn’t get a chance to show you other great stuff and relevant ads to help pay to create that free content. An ad blockers might work for you as a reader, but hand the business model of many publishers that depend on ads to help pay for the content offered. But here’s the thing, publishers, obviously don’t – purposely – try to slow down pages.
They add all of these extras to try to increase the monetization of their site and attract more and more readers to help keep the site on business, and then they end up in a tough spot where they feel they need to decide between improving the user experience Or focusing on monetization and user acquisition, these overloaded user unfriendly web sites aren’t a new problem and some have tried to come up with solutions.
The FIR our walled gardens that lock you to a specific content distribution platform. Now you have to implement a custom solution for every single platform and your content cannot be discovered through search engines or link to from other websites by by open web, or you could create a native app and lose even more advantage. The web offers like effortless entry without install or easy distribution of content not terribly attractive either.
We felt this was a problem in need of a simple and elegant solution, a new way to implement an issue, a beautiful, streamlined, wicked, fast content web pages. Without all the extra clutter that is built on the openness of the web and doesn’t try to replace it, it allows everyone to participate and collaborate that publishes platforms and developers all stand behind and benefit from. That’s short.
What accelerated in the open the EM project dramatically improves the performance of mobile sites on the web, often to the point where their load appears to be instant. It’s an open source initiative that relies on existing web technologies and is built in collaboration with many different partners. Many technologies today come with super complicated, build processes, but not so with amp. In fact, an amp 8 is just a normal HTML website with a couple of restrictions and extras no build process, no extra step, because of that it doesn’t require a lot of additional work.
Unlike having to build custom, apps and products for a myriad of platforms and social outlets, in fact, if your website doesn’t use custom JavaScript and is mostly static, you probably don’t even have to create a second version of it for app. Every amp document includes the MJS JavaScript library that delivers optimum performance by adding and validating a few important rules in your markup when looking at an amp document.
The biggest difference you see is that some elements, like the image tag, are replaced with custom elements. That’s done to ensure staying in Fastlane in two critical situations. First, it allows MJS to control the entire load chain and prioritize certain elements and requests over others. In practice. This means that most third-party content and elements below default I’ll load it after the main content arise.
So your users can start reading as soon as possible. Second, ms custom properties strictly required a width, height or other aspect ratio defining attributes to be set. This way, mj’s knows exactly how your page will look like before any assets are loaded and can layout the page. In advance, this prevents the famous flash of unstyled content, the ugliness of a half lured website. That then starts to jump around by loading more stuff, as well as the need to re-render and do additional layout calculations, a browser task that can be very slow.
Every single imitational addition to amp documents is carefully designed to end up the speed of the page 211 and implement rail. A user experience focus performance model, but the chrome team came up with and because MJS comes with a built-in validator that locks to the console. It ensures developers Fastlane as nothing is more frustrating than a speed regression you discovering month later on an end page.
The content is always King and the user experience is Queen no compromises. But if you now say wait, a sec sounds great for users, but how does this help publishers, consider this users love fast content and amp allows platforms like Google, Twitter, Pinterest or LinkedIn to know for a fact that this content is fast, which they can then promise To users in return, if I know it only takes me five seconds to read that article, I do it much more often with many more articles, I’m happy.
The platforms are happy because I’m happy and the publishers is happy because they get to show me more content and just like that everybody wins get started. Writing your first and page today by checking out two tutorials in the description or head directly to am project org to learn more
This diagram gives an overview on the client side. Your webpage interacts with service workers which in turn receive push events via the user agent, also known as the browser and on the backend.
You send messages from your application server to the push service, which then delivers them to the correct client. Let’s look at the notification API first, this allows developers to display notifications to the user. Before we can create a notification. We need to get permission from the user. This code will prompt the user permissions to show notifications. You can try this out from the browser console as you’ll see later, permission is requested automatically when subscribing to a push service.
So there’s no need to call this function when using just push notifications. Let’s take a look at some examples for configuring and displaying a notification from a service worker. We first check that permission has been granted. Then we call show notification on the service worker registration object and pass in the notification title. You can also try this out from the browser console. Try it on the new tab page now for push notifications.
You call show notification in the service worker in response to a push event. When a message arrives, we can specify an optional options: object to configure the notification. This is passed in as the second argument. In the show notification function, the body property is the body text displayed below the title icon? Is the image displayed at the top of notification? Vibrate is the vibration pattern for phones, in this case 100 milliseconds on 15 milliseconds off 130 seconds on so on, data is the arbitrary data we can retrieve in the service worker when the user interacts with the modification.
In this example, primarykey allows us to identify which notification was clicked when handling the interaction in the serviceworker. Let’s try that out. We can add action buttons to the notification that we can then handle each in a different way. Here’s what that looks like notification, interaction events are handled in the service worker tapping clicking or closing the notification. There are two notification interactions you can listen for in the service worker notification.
Close the notification close event only triggers when the notification is dismissed via a direct action on the notification. If the user dismisses all notifications, the event will not trigger, and this is done to save resources, notification, click. If the user clicks the notification or an action button in the notification, the notification click event is triggered. If the user clicked on an action, the action is attached to the event object of the notification click handler.
We can check which action was triggered and handle it separately. Now, let’s see how the two handlers work in a service worker. First notification close: we access the notification, object from the event object and we can get the data from the notification object. We might use the primary key property from the data to identify which notification was clicked in a notification click handler. We can determine what action button.
The user pressed by inspecting the action property on the event object. Note that each browser displays notification actions differently and some don’t display them at all to compensate. We put a default experience in this example in an else block after checking which action was clicked so that something will happen on a simple click of the notification. Now, let’s see how you send push messages from your server and handle incoming messages on your client web app.
Each browser manages push notifications through its own system called a push service when a user grants permission for push on your site, you subscribe them to the brow. Push service: this creates a subscription object that includes a public key to enable messages to be encrypted and an endpoint URL for the browser’s push service, which is unique for each user from your server. Send your push messages to this URL encrypted with the public key.
The push service sends the message to the right client. Now the service worker will be woken up to handle incoming push messages when a push event is fired, and this allows your app to react to push messages. For example, by displaying a notification using service worker registration show notification, your app doesn’t need to listen to or Pole for messages and the browser doesn’t even need to be open.
All the work is done under the hood as efficiently as possible by the browser and the operating system, and this is great for saving battery and CPU usage. Let’s go through that step by step in the apps main JavaScript call push manager subscribe on the serviceworker registration object, get the subscription object and convert it to jason, get the endpoint URL and public key and save this to your server, for example, by using a fetch Request send the message payload from your server to the endpoint URL encrypted with the public key.
The push message raises a push event in a serviceworker which we can handle in a push event handler in push event handler. We get the data from the message and display a notification. The push API allows users to subscribe to messages sent from your app server that are sent via the push service used by the browser and subscribing, of course, is done in the JavaScript. For the page, responding to push events, for example by displaying a notification, is done in the serviceworker, just to repeat subscribing to the push service and getting the subscription object happen in the JavaScript for the page.
First, we check if the user is already subscribed and update the page UI accordingly, if they are not subscribed, prompt them to subscribe, if they are already subscribed, update the server with the latest since that may have changed by the push service, since it was last used When the user grants permission for push on your site, you subscribe them to the browsers push service, as I said before, this creates a special subscription object that contains the endpoint URL for the push service, which is different for each browser, along with a public key.
We send the subscription object for this user to the server and save it now before you subscribe a user check if you already have a subscription object, if you don’t have the object again update the UI to prompt the user to enable push notifications, and if you Do have the subscription object, update your server database with the latest subscription object. The ready property of the service worker defines whether a service worker is ready to control the page or not.
It returns a promise which resolves to a serviceworker registration object. When the service worker becomes active, the get subscription function returns the subscription object or undefined. If it doesn’t exist, we need to perform this check every time. The user accesses our app because it is possible for subscription objects to change during their lifetime. This is the process of subscribing to the push service register, the service worker from the main page main jeaious.
This request goes to the user agent. The user agent returns the service worker registration, object, use the service worker at registration, object to access the push manager API and from that requests are subscribed to the push service. This request is passed on to the push service. The push service returns. The subscription object, which includes the endpoint URL and the public key, save the subscription object data to your server and send push messages from your server to the endpoint URL encrypted with the public key.
Like I said now before sending notifications, we must subscribe to a push service. We call push manager subscribe on the service worker registration object to subscribe and the resulting push subscription object includes all the information. The application needs to send a push me such an endpoint and encryption key needed for sending data each subscription is unique to a service worker. The end point for the subscription is a unique capability.
Url knowledge of the endpoint is all that is necessary to send a message to your application. The endpoint URL therefore needs to be kept secret or other applications might be able to send push messages to your application. Here’s an example of the subscription object. This is the object returned from the push service. When we call reg push manage, add subscribe. The subscription object has two parts.
The first part is an endpoint URL. The address on the push service to send messages to this includes an ID that enables the push service to send a message to the correct client and service worker. The second part of the subscription object is the keys property. The p25 6d H key is an elliptic curve, diffie-hellman ECD H public key for message. Encryption. The earth key is an authentication secret that your application server uses in authentication of its messages.
These keys are used by your application, server to encrypt and authenticate messages for the push subscription and, let’s see how the process of sending a message is done. The server generates a message encrypted with the public key and then sends it to the endpoint URL in the subscription object. The URL contains the address of the push service along with subscription ID, which allows the push service to identify the client to receive the message.
The message is received in the push service which routed to the right, client and the process of sending a push message from the server works. Like this. A back-end service on your server sends a push message to the push service using the endpoint URL from the subscription object. The message must be encrypted with the public key from the subscription object. The push service uses subscription IDs encoded in the endpoint URL, to send the message to the right user agent.
The push event is picked up by the service worker. The service worker gets the data from the message and displays a notification in this example. We’re using Google’s web push library for nodejs to send a push message from a node.Js server. The TTL value in the options specifies the time in seconds that the push service should keep trying to deliver the message now. This is important to set correctly some messages.
Have a short life some may be valid for several hours or more. We then pass in the subscription object. Payload and options object to send notification. You need a way to ensure secure communication between the user and your server and between your server and the push service and between the push service and the user. In other words, the user needs to be sure that messages are from the domain. They claim to be from and have not been tampered with by the push service you need to make sure the user is who they claim to be valid, was created to solve this problem.
This vapid identification information can be used by the push service to attribute requests that are made by the same application server to a single entity. This can be used to reduce the secrecy for push subscription URLs by being able to restrict subscriptions to a specific application server. An application server is further able to include additional information. The operator of a push service can use to contact the operator of the application server in order to use vapid, we need to generate a public/private key pair and subscribe to the push service using the public key.
The public key must be first converted from URL base64 to a you in 8 array. This is then passed into the application. Server key parameter in the subscribed method. The web push library, provides a method generate vapid keys, which generates the keys. This should be used once in the command line when push generate vapid, keys, Jason and the keys stored somewhere safe. We can use the web push library to send a message with the required vapid details.
We add a vapid details, object in the options parameter. That includes the parameter required for the request signing now. Let’s look at messages from the receiving end in the web. App on the client handling push, events happens in the surface worker, the service worker will be woken up to handle incoming push messages and a push event is fired. This allows your app to react to push messages, for example, by displaying a notification using service worker registration, show notification to display a push notification.
You listen for the push event in the service worker. You get the push message. Data from the push event object in this example, we simply convert the message: data to text The Wrap, show notification in a wait until to extend the lifetime of the push event. Until the show notification promise resolves, the push event will not be reported as successfully completed until the notification has displayed.
You can practice working with the notification and the push API by following the lab that accompanies this article, one small gotcha, don’t use private or incognito mode for this lab for security reasons, push notifications are not supported in private or incognito mode. You
But if you think registration forms are difficult, we should talk about. Checkout forms a lot more form fields, a lot more questions, but I think that you’re going to see a consistent theme emerging through, like our talks here today, which is this one of let the browser help you. There are certain advantages that we have as a browser, especially when it comes to reducing friction and making life easier for users, especially things around repetitive data steps, things that the users can store inside of the browser’s, but we’re trying to do our expose api’s and give You tools to reduce, friction and make things easier for your users.
We saw it in Koreans, while management and we’ll see a very similar theme with what we’re doing in payments, but first a little user activity just before we go off for lunch, which are some questions. Okay, great so first question just curious: how many people here actually enjoy the process of buying something on the web using their mobile device? Okay, good yeah and some people, but by large? No and whether we should come talk.
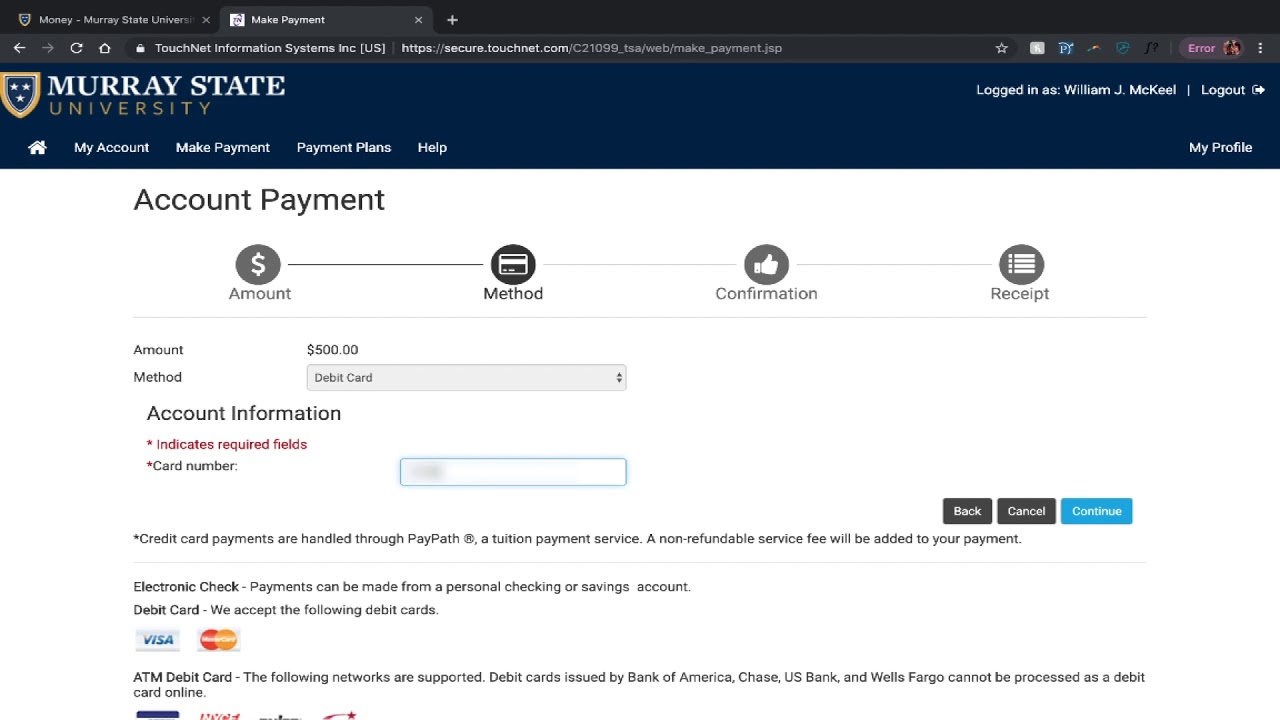
I’d love to hear like what is that you’d like about buying things on the mobile web and what it is that you don’t as much a second question, and I would be really impressed here how many people can remember all the details of their credit card. I’r talking full 60 digit number really CVC on expiration. Okay, it’s more than I expected. I got to be honest, like okay, we’re still like under 15 %, but okay cuz I’ve even payments out for like 18 months, and I think I have yet to remember a credit card number, that’s great and then okay final question: how many people enjoy the process Of handing over all their sensitive credit card information to a random third party server I’ll get one.
It’s almost like. I’r asking these questions to lead up to a particular point, and – and there was a points and the reality is that most users finds payment difficult. They find it insecure and scary and frightening and they find the process of doing it on the mobile web, particularly bad, and so we had this number. We talked about it at i/o as well, and it hasn’t really changed, which is that on average, we tend to see about 66 percent fewer conversions on mobile than on desktop and again we think there’s an answer to that, which is all around again high.
Friction the difficulty and issues around trustworthiness and security, and so we’ll talk about sort of how we’re addressing those today and how we’re trying to bring fast, simple and secure payments to the web platform. But this is a little I’m a p.M. It’s a little bit too PME for me actually, and so I have a much better mission for us inside of the chrome team, which is we’re trying to save the world from annoying check out forms.
So I’m trying to save the world from virtual keyboards and having to memorize and all of those terrible things. I actually started this joke of the better payments Bureau a couple of months ago, and now it’s become like a thing so anyway, but actually Chrome has been fighting the good fight against annoying check out forms for many years. Actually, we start with autofill back in the day, you guys are probably familiar with autofill.
This is my one slide on it. It’s not really the topic today, but consider this. My 10 second plea to say: if nothing else leave today and set autocomplete types on your check out forms. It helps us it helps. The users helps the browsers and it basically ensures a hundred percent accuracy on autofill. I’r not here to talk about that today. I’r really here to talk today about payment requests, which is this new API that we’re building for the web to really help solve a lot of the problems I’ve been talking about.
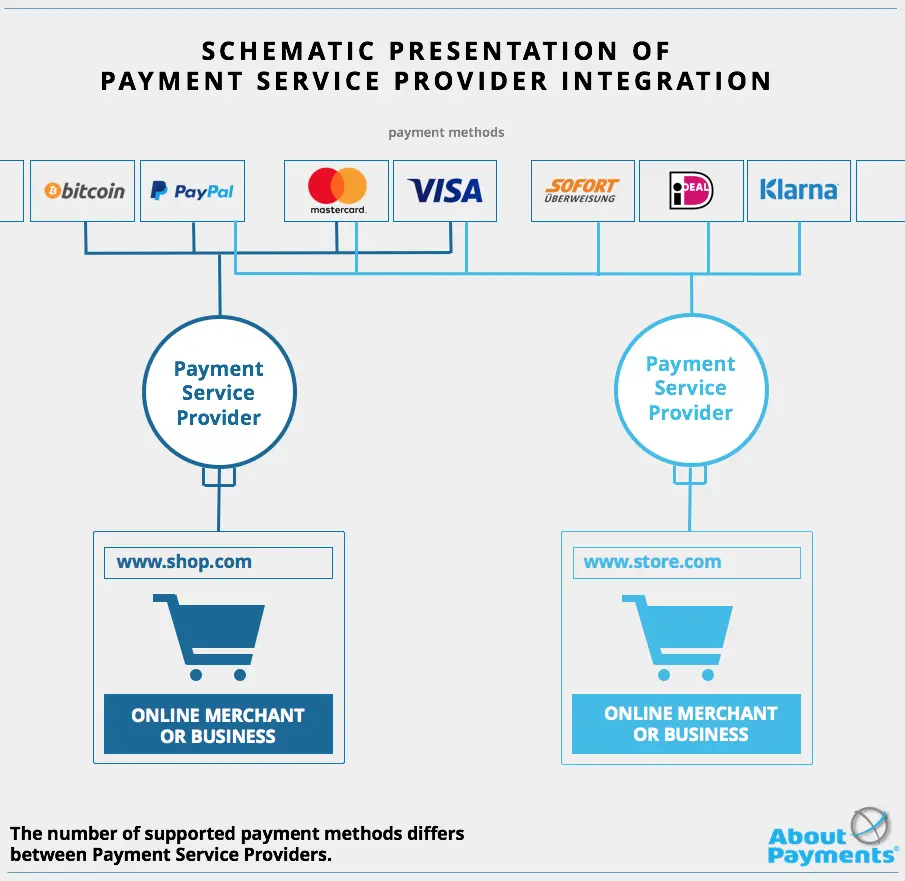
But before I talk about what payment requests is I want to talk about what payment request isn’t and that’s, because payment is complicated. There are a lot of players in this space and I just want to sort of set up fronts and sort of help alleviate any confusion. So the first thing payment request is not a new payment method, so we’re not trying to create Chrome pay or browser pay or yet another X pay button on your website.
That’s not fundamentally our goal. Our goal is to help users pay, that they went the way that they want to pay and do it quickly and efficiently. Secondly, we are not trying to become a gateway or a process or or some entity that literally moves money in the ecosystem. So it’s not we’re not trying to step on any toes here or like enter into this ecosystem. We think that the market has actually done an incredible job here.
Already players like stripe and Braintree and others have done a really stellar job over the last couple of years of taking the incredible complexity of accepting online payments and making it really simple. They’ve removed the burden of things like acquiring banks and all the couples of PCI, and they put it all into a easy-to-use API. And so our goal is to ensure that whatever we do plays really nicely with all these gateways and processors.
But that’s not fundamental goal to become one. The thing about all these great new services, though, is that they’ve really focused on developers, which is great they’ve made your lives easier and it made easier for you to accept payments, but the user experience has largely remained the same. You have to go from the state where you know nothing to a user to everything and formfields tend to be the way that we do this.
So payment request was fundamentally built for users. I mean we think it’s pretty good for developers too, and it’s pretty easy and we’ll sort of talk about code samples. But fundamentally, like my goal, I think about users and how I can help them and help them get through these burdensome flows on mobile, faster and more efficiently. So what exactly is payment request? Well, pay requests, like I said, is a new standards-based, API and standards-based.
I want to emphasize that we joined the web payments working group almost a couple years ago now and every major browser is a vendor. We have financial institutions from around the globe and we’re trying really hard to build something that everyone can integrate, that all forms of payment integrate with and all browsers can do so that users on a variety of devices and ecosystems can continue to leverage and have the Benefit of it, we’re just in the early stages of it and sort of will talk about where we’re at, but that’s sort of fundamentally our goal, and so when we started to think about what design this API looked like.
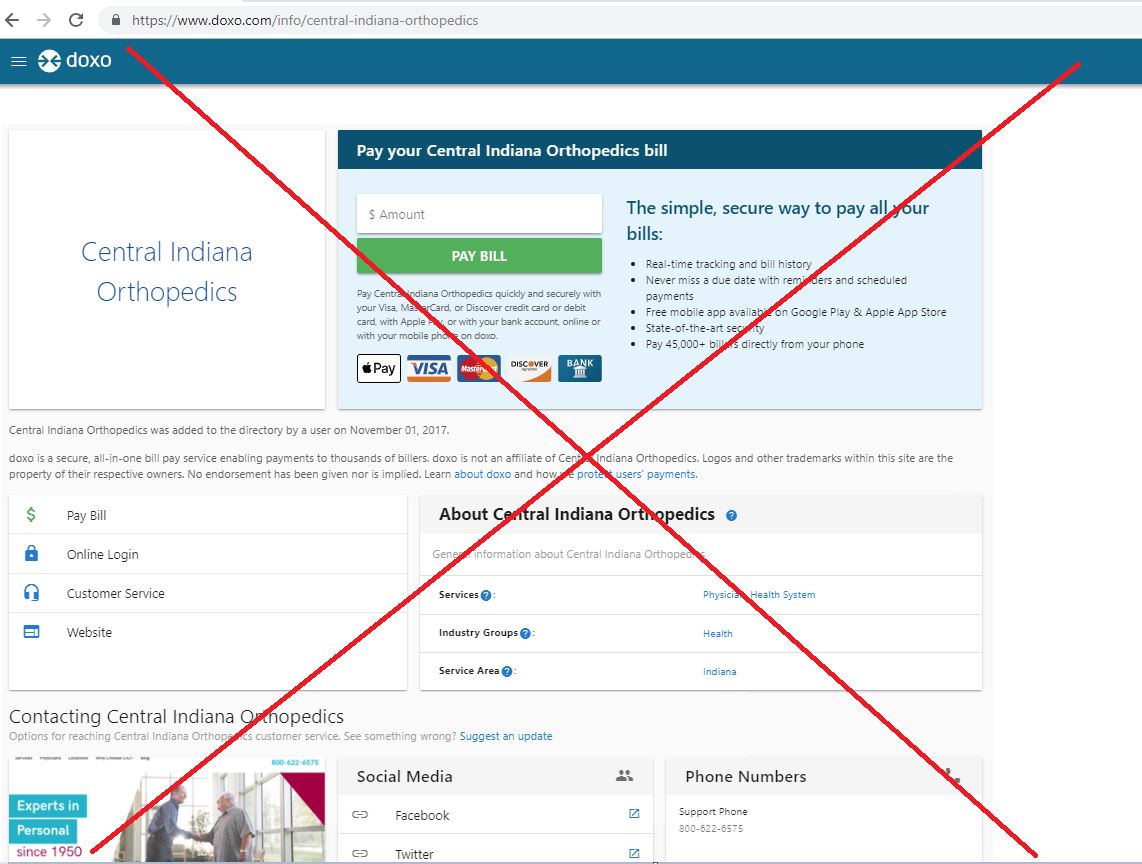
We had two high-level goals in mind and they sort of reference back to my original question set the first one is we to build a seamless, easy-to-use, checkout experience on mobile? In particular, we wanted to make sure that users like could minimize typing and minimize friction as much as possible, and the second thing is we really want to bring more secure payments into the web platform. In many ways like the web is one of the the last places where it’s very commonplace to exchange over all of your sensitive information to some unknown third party, and even though there’s an answer to this from the payments community.
With regards to tokenization, the web really didn’t have a great answer for that, which is why we’re really excited that we’ve brought Android pay into the web platform and again we’ll continue to expand that. But this brings tokenized forms of payment. So in the events of data breach or other problems, you as a users are protected, but also it also reduces the burden for for you, as developers and merchants, and so those are our two high-level goals that we had and again the idea here, just at a High level is that, if you think of your traditional checkout flow, it looks something like this.
It’s you know anywhere from like two to five pages, maybe one for single page things and you have somewhere between like 10 and 40 form fields where you’re asking a variety of questions. Things like what’s your name, what’s your shipping address, what’s remail, what’s your phone number? What’s yer credit card number, what’s your expiration and then you have users who are like you know trying to like do all this on their mobile device and at some point they’re, like man and I kind of give up, and maybe they go to desktop later or Most likely, they don’t – and you know and Aaron talked a lot about the growth of mobile right, and so we really think we need to fix this and make this easier and the way this happens with payment requests is you can imagine that the browser sort of Plays this role and and helps facilitate checkout across this, the the highest friction point.
So we take that common set of data, those common things that you request and sort of leverage our strengths to make it easier for users to to be successful. So before I could show you a demo, I want to talk about what types of data is actually supported by payment requests. So the first one is probably a little bit obvious, but it’s a form of payments. So, at the end of the day, you need a way to actually request money from the ecosystem, so it needs some sort of form of payments.
Right now in Chrome, we support we support credit cards and Android pay. I put etc on here, because the is to support more but we’ll talk about that a bit more later, and so you always have to request a form of payment. You can’t call payment requests and not want to form a payment that would just be weird and then would just be request: arbitrary user data API. So the other big thing that we allow you to request is shipping address and shipping options so for physical good purchases.
You can leverage the API to say, hey give me their shipping address and then there’s a dynamic mechanism for you to take that address and then populate shipping options that have updated pricing, etc. You can also request a phone number. You can request a an email address, of course, for like sending a receipt or even prompting sign up afterwards and coming soon, actually, but not quite there, but in a couple of months is payer name support, and these are all flexible.
You can request any of these or none of these, if you want the idea is to support a broad range of of use cases out there. So if you’re like a ride, pickup service, you probably don’t need you. If I don’t need everything, but you definitely need. Let’s say a location like an address and a name, let’s say or if you’re a physical good you may may or may not need their payor name because you’ll get that from the shipping address, so it’s flexible and you can sort of accommodate experiences as as fits Your the business, but the really important point here, is that all of these data points can be stored and returned by the by the browser, so users, by and large trust chrome to store this data.
They trust us to store their names, their emails and even their credit card data. And so the question is like: why put users through the burden of a form that they have to fill out manually and, like you saw like sabine slide about like fat, fingering and the difficulty of mobile keyboard typing and those problems were multiplied across all those form Fields, so if you can save them the burden of doing that, we think it’s worthwhile and sort of payment request is really designed to do that.
But let’s go ahead and just let’s just going to sort of see it in action switch over to a demo here see if we can see all right, excellent, I’m going to you open up, Chrome on stable and I’m actually going to use the exact same shop. Api, that’s, oh and you see it, it auto sign man, you have to love and a good demo goes right, and but otherwise it’s the exact same website, polymer shop demo, except I’m going to go a little bit further and actually just make a purchase.
So I hit the shop now button. You know, I definitely don’t have enough. Google hoodies so I’ll, just source wet shirt, so I’ll just buy it yet another one. So it standard shop. You see that there’s like size and quantity. I won’t affect those, but you see that there’s there’s two buttons at the bottom there’s a typical Add to Cart button, but there’s this also. This Buy Now button that Buy Now. Button is based on feature detection, so we’re checking to see if payment request exists and if it’s there great, let’s leverage it and if not it would.
You would just see an edit card, but I’m going to end use the rapid checkout approach, and so I tap on the Buy Now button and you see that this this payment sheet slides up from the bottom. This is a payment request in action, so you’re looking at sort of natively drawn UI, it’s controlled by us. We can through it, but it’s populated with data from the merchant. So you see that my total amount is there $ 22.
15. I defaults to my form of payment that I prefer, which is android pay. If it’s available only cuz, it’s faster and more secure. You see it they’re also requesting my email address for the purpose of sending a receipt, and the only thing I need to do here is select. The shipping address it’s very difficult to ship, a sweatshirt to someone. If you don’t know where it goes so I’ll tap on that you’ll see that the payment chief slides up to full screen – and it has my addresses, automatically populated for use.
These are our two Google offices here, so I’ll go ahead and shift to the one in San Francisco, where I work, you see that when I do that the shipping options are automatically populated there, and so we have a free shipping in California option or in Express Shipping, and if I change those it will dynamically change the price, so you can see here that express shipping changes, but of course, why would I pay more I’m going to go back to zero? That seems to make a whole lot more sense to me and now I’m ready to pay.
So we just have the pay button and then you’ll see the Android pay screen slide directly up we’re running the test app. So it says unrecognized ooh, you guys wouldn’t have that and because I’ve actually authenticated in the last couple of minutes. I don’t even have to do any extra authentication on Android pay I’ll literally just tap the continue button. A responses comes back and the transaction successful so pay with Android pay, no keyboard, no typing.
All I had to do was tap and select and confirm my shipping addresses so really great, really seamless, we’re really excited about it and just to show you that if you don’t have Android pay available no big deal, we can always change our form of payment and, If I didn’t have Android pay, I would just default back to my credit card, in this case, a Visa card that I have once again I’ll select my shipping address and options.
I hit the pay and the only thing the only keyboard we can’t get rid of is the CVC input everything else we have so I’m going to do one two three. I used to do like a live credit card on this and I discovered that what that didn’t work well for me, so I’ve switched to a demo card but either way the same. The same concept applies, we’ll talk about what’s happening behind the scenes, but this is all client-side basically, so it’s all happening super fast and pretty great they’re really excited about that.
And now maybe we can switch back to the slides and talk more about what it takes to make this actually happen. So how do you leverage payment requests? Well, it’s pretty simple. There are three parts to payment requests, two of which are that are required and one of which is completely optional, and so we’ll talk about them in order. The very first one are payment methods, so we need to know basically all the ways that you can get paid.
This could be a wide variety of things in the future, so it could be. I accept Visa and MasterCard and AMEX and Discover JCB UnionPay. It could be in the future, I accept Ally, pay or idea or PayPal, etc. As long as people are built into the ecosystem, like I said for now, Chrome we just launched so we’re, starting with credit card support, Android pay, and so it looks a little bit like this. So we basically pass in this thing called method.
Data and metadata is an array of objects and those objects. Each have a an array of supported payment methods. So you can see here that Mont. The first thing I support our credit cards. I support the standard for Visa Mastercard, Amex and discover. That’s it nothing else to do it, just as I accept this in the future coming out in a couple of months, we have added support for granularity for things like debit or credit or our prepaid, but for right now, essentially, when you say visa, we sort of Assume you can accept all visa and don’t make a strong differentiation there, but the second one is a little bit more interesting, and this is Android pay, there’s sort of an abbreviated version of this, but to support Android pay.
You see that there’s an additional key inside of that object, which is the data data, is sort of a generic object and it’s a payment method. Specific. The reality is that different payment methods out there have different dependencies different things that you’re going to pass in when you instantiate it by default, so for Android pay, for example, you always have to pass in like your merchant ID, you have to pass in what kind Of token you would like either network or gateway.
We don’t have a full example here, but and then what happens then is when a user chooses to pay with one of those forms of payment, we basically bundled it all up and pass it on to the payment. App so and then the payment app uses that data plus things like origin and assertions from chrome to basically verify that the payment app is the right one, and so the payment can can continue. So it’s pretty simple, but the idea here is that you throw everything you can at the browser for ways that you accept payment.
So if you can accept a like a hundred different ways of paying around the globe, tell us a hundred ifferent ways to pay, because what the browser does is we find that spot in the middle between the set of ways you can get paid and a way That a user can pay you and give a user an optimized experience about the ones that make the most sense for them. So you solve, for example, in the demo that Android pay and a Visa card were available, but let’s say that we had removed visa as an option, then visa just wouldn’t show up, because that doesn’t make any sense and so for, as you go across the globe There are wide variety of ways to pay, but we recommend giving us all to them and then we’ll find the best experience for the user to optimize around their preferences, their defaults and what? What is the best thing for them? The second bit of data is also quite important, so now that we know how I can pay you, we need to know how much money you wants to get paid, and this is what this looks like great.
So the first thing, the most important thing that’s required is this total attribute three parts basic. There are two parts really. The first ones are label, so we customize this. So if you tell us, total will display total, but you this could be like authorization donation. Whatever you want – and you have to, we have to know an amount and the amount is compose of a total amount of money and an underlying currency code.
So we know, for example, or the underlying payment app that we transferred to knows what currency to charge in we’re also to support display items. So, just like I showed you like when I tapped on the total those line items. I came down that basically told you how the total amount was reached this you can’t. We also support this. It’s a wholly optional. You can pass in. You can pass it if you want or ignore it.
We recommend it it’s nice to give a high-level overview to a user about the things that inform the total amount, things like the subtotal tax, shipping, cost, etc. Less of like a full itemized receipt and again in more of like a high-level overview, one important point payment request does not do math we’re not good at floating point math. So if you pass in, you know, you have two line items that sum to five and your total says four like we’re not going to throw anything so you’re totally in control of this thing.
So just keep that in mind and they’re by the way it might be some use cases where it makes sense for those not to a line, but by-and-large just want to point that out. The other point to note is that transaction details can also contain shipping options, and in this case, if you put them in there by default, we support default shipping options. We only recommend you use this if you’re highly confident that your shipping options will not change, then they’re not dynamic.
So if you support, for example, world wide free shipping and it never changes, no matter what the address is feel free to default populate this. But if your shipping is dependent upon a user address, then we recommend waiting until you’ve gotten a user, a user address event which we can talk about a little bit and then you can use that to dynamically query, against whatever service you use to calculate prices, and You can repopulate this and that’s the important point that basically the transaction details object can actually be updated and overwritten throughout the lifecycle of payment requests at certain events and points.
So if a user changes their shipping option, you saw like how, in my demo, when I changed my ship, the price change and the list items changed. That’s because when that event took place, we repopulated those set of transaction details, and so you have that flexibility in control on those events, and so that’s how we get sort of that dynamic pricing model that exists out there and so again don’t do default shipping options Unless you’re highly confident they aren’t going to change and the final piece is the extra information, the optional set of options, and that’s that things I talked about user address, shipping support, name, email and phone all entirely optional, but definitely useful.
I think there was like sort of this myth out there that the the only drop-off point in the funnel is the is the process of putting in your credit card, but really like the entire checkout. Funnel is well a funnel and so like wherever your users. Experience. Friction and there’s a step. Others are drop-off, so we highly recommend taking advantage of these these different pieces, and so there’s a few that we support, like I said, and it’s as simple as passing in just a bunch of boolean’s.
Basically, do I want shipping? Yes, do I want email, yes, etc, and you can again, these can be variable, so you can say I don’t want shipping, but I do want a name and phone number or you can say I just want an email address to send a receipt to. For example, it’s completely configurable and again. The idea here is to support a wide variety of use cases. Something funny that is minor that we have coming soon in the next couple of months is we’re adding support as well for a shipping type value.
It’s pretty simple, but the idea here is that let’s say you are buying a pizza, one does not ship a pizza right. That’s just weird like we deliver pizzas, and so it’s a very minor feature that allows you to actually specify shipping delivery or pickup. As like the address type, so we still call shipping address underlined in the system, but this way in the UI a user would see. Oh, I want my pizza delivered two three four five speed streets.
I don’t want it delivered or if you’re a ride-sharing service, for example, you can say pickup and it’s your pickup address where you’re currently at or located, and so that’s the value of that particular little thing again pretty minor but allows us to just have like a Better user experience underlining the whole system so now we just put it together basically, and we get that whole experience that we talked about, or I just showed you so.
The first thing we do is we instantiate payment requests and we pass in our method data way that we things that we support. We pass in the transaction details again how much money, what currency code, what line items do we once and then our optional options right? So in the case of our demo that I went through, that would be request, shipping, true and request email, true, but again that one’s completely optional um.
You see here. I’ve also added an event listener to my shipping address change and we support two events in the system: shipping address change and shipping option change. These are this: is that dynamic mechanism that allows you to receive the events parse out the new details? Let’s say so: if a user selects a shipping address that event fires, you can actually pull out that full shipping address.
We don’t do just the zip code because you can’t get fully accurate shipping information with just a zip code. So you get a full user address. You can use that at that time to call event update with this basically says: hey, you know browser, I’m thinking. I need to calculate this. You can call your back-end api’s and you can update resolve a promise with new transaction details. So again that updated transaction details object can now contain your updated set of shipping options, including the empty set of options and an error which says like opps.
Sorry, we don’t ship to you know wherever it is that you’re trying to ship to so that’s also supported and so and by instantiating payment request or not. There’s no UI. That shows it’s just instantiation when you want that actual payment sheet to slide up from the bottom. Oh, we called that show that show is actually our signal and we actually raised that payment sheet and put the user through the process.
That returns like a promise, and when that promise resolves you have a payment response and that payment response contains the entire set of data. It’s just a JSON object that contains the entire set of data that you requested so for a credit card. For example, you would know what the underlying network was so Visa, MasterCard, etc, and then you would see credit card number phone number, full, CBC, expiration, etc.
Think, like the same set of data, that a user would have typed out into your form, you’re now getting just from the browser as a JSON response, you can use that to basically send that response directly off to your gateway, your server or even let’s say in The case of like, like you know, scribe API is like directly to over to the API is for tokenization, it’s completely up to you, because it’s all plaintext these responses.
It’s important to note our our method specific. So if you selected Android pay as your form of payments, then when that response comes back, it’s going to look like an Android pay response. You’re going to be able to select this there’s a key and they’ll. Tell you that, oh there, the form of payment they chose was Android pay and then you’ll have to expect that the Android pay details object, looks different than a credit card, one which may look different than some other form of payment like an alley, pay, etc.
I mean in a good that’s because different payment methods have different requirements and are different systems and call things different things. The final step here is, we just need you to tell us to close the UI, because once you get this payment response back, we actually show us a little loading spinner and the little loading spinner is sort of waiting for you to come back and let us Know the the result of the transaction we highly encourage, but do not require that at the time that payment response comes back, you try to make the payment.
There are legitimate use cases where you can’t do this things like 3d 3ds flows, etc, but by and large, if you can submit, we recommend it, and so you call the complete you can call with success or failure, but you can also call it with nothing. This is basically an affordance for the browser to do like special UI considerations in the event of success. You know like a little animated check mark or something but yeah, it’s totally optional, but the important thing is that, when the UI closes will actually resolve that promise and that promise is your cue that the UI has been completely torn down.
So if you have animations or things that you’re trying to time with the close of that wait for that promise to resolve and then you’ll be guaranteed that any chrome UI has now been stripped from the page, and that’s it on with that. You basically have the hold experience, so in just a few lines of code, you basically get help user alleviate all that friction and difficulty I’ll type in all those annoying form fields, pretty simple, but also again, with Android pay and other future forms of tokenized payment.
You’re. Basically, getting easy tokenize forms a payment that reduced like the burden of CBC memorization, etc. So really excited about this, and this is all possible because the browser is sort of sitting as the middlemen. There proxying data back and forth between native apps on the device and and the underlying website and the developer. That’s requesting it. So my last few minutes here I want to talk about just a few UX considerations and forward-looking stuff.
So first one is my very bold. Hyperbolic statement to say, kill the cards, which is maybe a bit strong, but just sort of my way of saying if a user is coming to your site or you for a lot of users who come to your site on mobile, that only make a single purchase. Why put them through the burden of opening the page, adding it’s a card? Finding the cart page clicking the card page going to review page go to the checkout page, then.
Finally, starting the process there on mobile want to optimize their experiences. Payment requests allows you to do that quickly and immediately, so consider adding like Buy Now buttons directly to your product pages, especially on mobile, when it makes sense again. This moment won’t make sense for all businesses, but I would encourage you to go back and sort of check the numbers and see if, like this might be a powerful tool for you guys to leverage to help your users just a few other things really quickly that I’ve talked about – and you’ve heard mention here today – is thank progressive enhancement.
This is a new API. It won’t always be available, so you can’t necessarily completely depend on it, especially in a cross-browser way. Yet, although hopefully we’ll get there, so think what happens if it’s not available, you’ll still need a fallback flows etc. The second one, of course, is we encourage you to keep the set of list items high level, so don’t think of it like an itemized receipts. We don’t want the user to select this long scrolling list in the UI, if possible, try to keep it high level, subtotal tax things like that.
If it’s single item you can put it in there, but by and large we encourage high-level subtotals and things like that and then last one. Something to consider is that if you already have a user’s information – and you already have a credit card on file or some way to pay – I wouldn’t expect you to use. Don’t think you have to use payment requests like give the user the best experience they can and that means go ahead and just leveraging what you already have on file.
But if you don’t have anything and you don’t have the credit card or the credit cards expired, you need a new one, a consider payment request as a tool to help these users. You know we talked about. You know. We talked about sign up first right, but that might not always make sense for your business if you think about it, like maybe your your p0 or your most important thing is getting user through that checkout flow, then you can request an email address from payment requests And now all you need from them at the end of that funnel to sort of optimize.
The experience for next time is a password and so consider sort of leveraging this again. These are tools to help you be successful, so just a quick status update. So we are live in in Chrome as of m-53, so we’ve only been live for about, say, eight wait weeks now and it’s sort of a quiet launch. We had a great set of early launch partners that we worked very closely with and they integrated and tested and gave us a lot of great feedback again.
The API is still early. Chrome is the first browser to implements, and so we’re really thankful to all of these players for their great feedback and from it we’re actually making a lot of changes and improvements and enhancements to the underlining experience. And so I just want to talk a little bit about what you can expect to come soon, so the first one that we’re working really hard on is support for third-party payment apps.
As you go around the world. There are a lot of ways to pay in India. You know you have like paid TM and snapdeal, and all these other new emerging wallets and you go to Holland. You have ideal if you go into other countries, a whole new forms of payment that are not just credit cards and Android pay, and we want to be able to support all of this in a nice open way where we can support users from all over the Globe, no matter what, and so we’re really close to finalizing this and we hope to have support next year.
Secondly, we have a lot of spec and feature enhancements coming, so we have the shipping address types. I talked about you’ll, be able to call this within an iframe coming up soon, as well as much other small enhancements and improvements, and then we also have much of UX improvements, so we added a are scanning just recently, so you can now just like scan you. If you don’t have a credit card, you can just scan it directly into into the into the UI, so there’s things to make it faster, easier and fundamentally better onboarding flows and then just quick time lines here.
Just so you’re aware we’re sort of targeting in 56. That’s our January release as, like our next big major release. It’s going to have all these enhancements all these improvements and we’re really excited about it on you’ll, continue get updates along the way. This is all live in chrome, stable and we’d love to continue to work with you and get your feedback um everything I’ve talked about today is available online.
In a lot more detail, we have integration guides a bunch of examples in sample code where the phones come up, and then we also have a game start with Android pay. Android pay is really simple. With payment requests, it’s like less than ten lines. We do almost all the heavy lifting for you, so just a quick shout out there, but I’ll be around the rest the day I would love to chat with you learn about your challenges, things that you think you need from the browser ways that we can help.
You be successful, especially in checkouts, so thank you so much
This replaces the payment forms on a site with a much simpler experience on mobile devices. So let’s talk about paying for things on the web. This is a longer talk, so let me give you an idea of what’s coming up. First, we’ll talk about the user experience today and what could be better, we’ll look at the payment request, API twice.
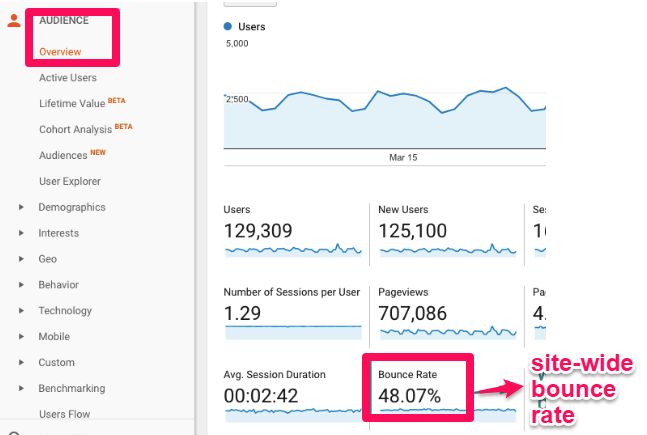
First, to give you the big picture, then we’ll dive into the code. Finally, you’ll get the usual resources in lab. It’s no surprise, given the rise of mobile computing, that a majority of commercial traffic is coming from mobile devices, what is surprising is that 66 % of that mobile commerce is still happening on the web, even when people have native apps installed. Unfortunately, we also see a lot lower conversion rate on mobile web relative to desktop websites.
Mobile conversions are about one third of the desktop conversions. If you wonder why this is the answer is pretty simple. Checking out collecting payment from the user is still rather messy. People often give up while filling the checkout form some checkout forms have improved since the beginning of web Commerce. What hasn’t changed is you still have to manually input the same information credit card billing address and shipping address? Our first step to solving this problem is autofill, because autofill works on existing forms.
You don’t have to modify your site. Autofill just works to help users check out faster autofill alone increases conversion rates by 25 %. Autofill does a good job of identifying form fields, but it’s not perfect. If you want an even better experience, you can have the autocomplete attribute to your forms. In this example, we’ve annotated the credit card portion of a form using values such as CC name and CC.
Number autofill will know exactly where to place its information. If you want to learn more about autocomplete attributes search the web, using what WG autofill to find the specification, autofill gets rid of the manual nature of data entry and makes it much simpler for the user. The current checkout experience presents you with a form to fill out every time for users, though the ideal experience would be that, when it’s time to buy they just buy site should be able to focus on creating an amazing and engaging shopping experience without worrying about optimizing.
A long checkout form this is where the payment request API comes in, we’re going to look at it first from a user perspective and then look at the code. What if we could do away with the form using web payments when it’s time to pay the user? Just pays payment request is a simple JavaScript API that helps the browser collect payment information. Then it’s a simple one: tap checkout for the user and an easy way for a site to receive a payment.
With the payment request API, you can make the whole process much faster and simpler and since the browser is actually taking care of collecting payment information from the user, we go from end taps to one tap. Let’s take a quick look at the code flow here. First, the site initiates a payment request in this request. The website passes to the browser the parameters of the payment, for example, how much is being charged and the available forms of payment? Don’t worry about the details now we’ll come back in a few minutes and look at this in detail.
The browser then determines the intersection of payment methods from the site and what the user has. It then presents a selection UI where the user chooses their method of payment. You get the UI by calling show this displays a native UI over the browser within this UI, the user can change how to pay the delivery method and the delivery address. The payment method can be credit cards or one of the apps that’s installed on their device, such as Android pay and, finally, the user taps on pay.
Then the browser requests a response from the selected payment method. This might be an app on your device or going directly to a payment provider. The payment processor verifies the request by examining its details and then returns the response directly to the server and the website now has all the information it needs to process the payment. Is this safe? The API is more secure than forum based payments.
The new payments are based on modern cryptography. You don’t need to enter payment data that could be logged or observed at the point of entry. Autofill is safe from website access and is typically stored. An encrypted storage on the hard drive to prevent disclosure, even when the OS is compromised payment request, is not just a chrome only API. The API is currently under development in the w3c web payments working group.
The goal is to create a universal cross browser standard for any website to accept any form of payment so to review payment requests, eliminates manual and tedious entry by storing the user’s information securely in the browser. The browser passes, addresses and credit card details immediately and securely to the site, and since the browser is collecting payment information from the user, we go from end taps to one tap: you’ve seen how payment request works for the user.
Now, let’s go over the code in more detail. First, a quick review. The site initiates a payment request in this request. The website passes to the browser the parameters of the payment, including the price and the payment methods accepted. The browser determines the intersection of payment methods for the site and the user and presents a selection. Ui payment can be anything from a simple credit card payment to a payment application installed on the user’s device.
The browser requests a response from the selected payment method and returns the response directly to the merchant. There are multiple code samples for this on: Google, Chrome, github, dot, io. Let’s start writing some code. Step 1 is to tell payment requests. All the ways you can get paid. Step 2 is to define the details about the actual transaction cost items, currency, shipping options and so on.
Here’s an example of how you would define shipping options notice. The selected bit you can include this: if you have multiple options, the browser will tell you which one the user selects step 3 is to define what information you want. The API to collect. Take the three data structures you just created and pass them to the payment request. Constructor. You often do this when the user indicates they’re ready to pay, take the request and call it show method.
This returns a promise and opens the user interface. The UI shows the details of the purchase and collects payment information when the user approves the prom resolves with a payment response object. Next, you should check that the payment is valid. Send the information to your payment processor for processing the UI will show a spinner while the request takes place when a request comes back, call complete to close the UI.
The complete method tells the user agent that the user interaction is over. The payment response object contains everything needed to submit a payment for credit card payments. The response is standardized for non credit card payments such as Android pay. The response will be documented by the provider. There’s one loose end to tie up what happens if the user changes their shipping address or options.
This may change the total cost and in some cases, may change the shipping options. Payment requests can omit shipping address, change and shipping option change events. You should add event. Listeners for these and update the payment details. Accordingly, the sample code will show you how and that’s it. You can find a full set of resource links on this final slide. You may have noticed. I didn’t mention a lab, we’re just finishing it up at the time of filming, so check your lab notebook for a complete ecommerce example.
Api is a w3c standard to eliminate payment forms for users and standardized payment collections for sites. It allows us to request payment and shipping information with a single API call.
This knows how to run Apple pay on iOS Safari and Google pay on Android. It’s not limited to those to any payment provider can write a plug-in. It’s not even restricted to one browser. It’s probably in the browser you’re using right now the browser simply acts as an intermediary collecting the information we need in a consistent way. Then returns a JSON object with the results that we can use to collect the payment.
If you have used a pay with Apple pay or pay with Google pay button in the browser, you already know what the experience will be, like developers previously used custom libraries to implement this, such as the Apple pay, API or the Google Wallet API, and if you Want to do that too great, but if you want to work with whatever payment system, the user has payment request. Is your friend, let’s take a quick look at the code flow and user experience? We want to buy this jacket, what happens when we tap buy now? This is an ordinary button with an ordinary event handler.
First, the site creates a payment request, object and populates it with some details. It typically has the price, a list of items being purchased and the available forms of payment. This is all invisible to the user. We need to trigger the payment user interface, you get the UI by calling payment request, dot, show this displays a native UI over the browser and returns a promise. The next few steps are all happening inside this promise.
The first screen is a summary of the information supplied by the app tapping on an item opens it the EPI stores, addresses and payment options securely. In this example, Larry can select his shipping address with one tap edit. The address or add another need to change. The shipping option no problem: it’s just kappa way note that changing this option may change the total price. The payment request api can handle this with a little help from your app notice, the multiple payment options, the api also handles country, specific payment methods and, finally, the user taps on pay.
At this point, the browser runs the selected payment service. This might be an app on your device or going across the network to a payment provider. The completed payment returns a special token that you can send to your server. The server has ways of verifying this token. Is this safe? The api is more secure than form based payments. The new payment instruments are based on modern cryptography. You don’t need to enter payment data that can be logged or observed at the point of entry, so to review payment requests, eliminates manual and tedious entry by storing the user’s information securely in the browser.
It works across browsers across OS platforms and can work with any payment service that wants to write just a little code now that you’ve seen how payment request works for the user, let me show you how to code it remember that the payment UI contains multiple sections. We need to populate these sections before making the request. The request needs at least three data structures, the payment options, the order, details and shipping options so we’ll create those then generate a payment request.
We will call show and get back a promise that resolves when it’s time to contact the payment processor, finally notice that we may want to or three event handlers. These are called while the UI is visible and can trigger updates when the user changes addresses or shipping options. Let’s walk through the steps in the UI and the corresponding code. First, the user taps by now. So we want to set up a payment request.
Remember that we need some data structures before we can create the request. The payment methods lists all the payment services that your site understands. It’s an array of payment method, objects and each method may have its own specific properties here. We’re listing the basic credit card method and Google pay note that I’m leaving out the details of the Google pay object as it’s pretty involved.
We want the user to know what they’re buying. This includes the core details of the transaction, how much money? What currency? And what list items you want displayed? Keep the line items fairly high level. It isn’t meant to be used as an itemized receipt. If you want more than one shipping option, you can define this structure notice, it’s a property on the transaction details. If you have multiple options include a selected bit, the browser will highlight the selected option and fire an event when it changes.
Now you can define what information you want from the API by default. Payment requests will only return the payment info if the user is logged. In you may have the rest of their information. If you need more these options, let you collect what you need. Take the data structures, you’ve just created and pass them to the payment request constructor. This should happen in response to a button tap or other user initiated action.
Now so far the screen hasn’t changed. We need to trigger the UI, take the payment request and call the show method. This returns a promise and opens the user interface notice. There’s a big block of code. After this, we still have a couple of steps until we’re done. The UI shows the details of the purchase and collects payment information when the user approves the promise resolves with a payment response object.
The payment response object contains everything needed to submit a payment for credit card payments. The response is standardized for non credit card payments such as Google pay. The response will be documented by the provider. Next, you should check that the payment is valid. Send the information to your payment processor for processing the UI will show a spinner while the request takes place. Okay.
So how do we remove the payment UI after we click payment? Even if it fails call payment response, not complete. You can include a message to the user. This tells the browser that the payment is complete and allows the app to notify the user of the result. Now, there’s one loose end to tie up what happens if the user changes their shipping address or options. This may change a total cost and, in some cases, may change a shipping options.
Payment requests can omit shipping, address, change, shipping, option, change and payment method change events. You should have event listeners for these and update details accordingly. Remember we’re making the update in the middle of a promise, just as we do installing the Service Worker, so we use a similar bit of code. We get the event and call update with on it. This takes a promise that resolves to a new transaction details record.
It’s not all that different from calling cache at all from the service workers install event that also returns its result via the event. The get new info method is something that you would write. It takes some data from the request and builds a new transaction details. Object. Here’s a reminder of what goes in the transaction details. Your code probably needs to copy from the old object to a new one.
We resolve the promise with the new details, update with then updates the payment request and the screen, and that’s it. You now have a seamless, easy to use checkout experience now that was a bit of a long example, but most of it is boilerplate check out the payment request. Samples at Google, Chrome, github, io, remember the process for easier payments starts with autofill. If you want more payment request, is there to help? You can also check out specific libraries for Apple pay, Google pay, Samsung pay and others they put up a pay with button on the screen.
They usually fall back to the payment request interface, but they may be an easier option for your users. The only way to know is to try them for yourself thanks for hanging in there through web payments. This is one of the most complex parts of building a PWA, yet it’s really satisfying and could be great for business. Take care and I’ll see you again soon.
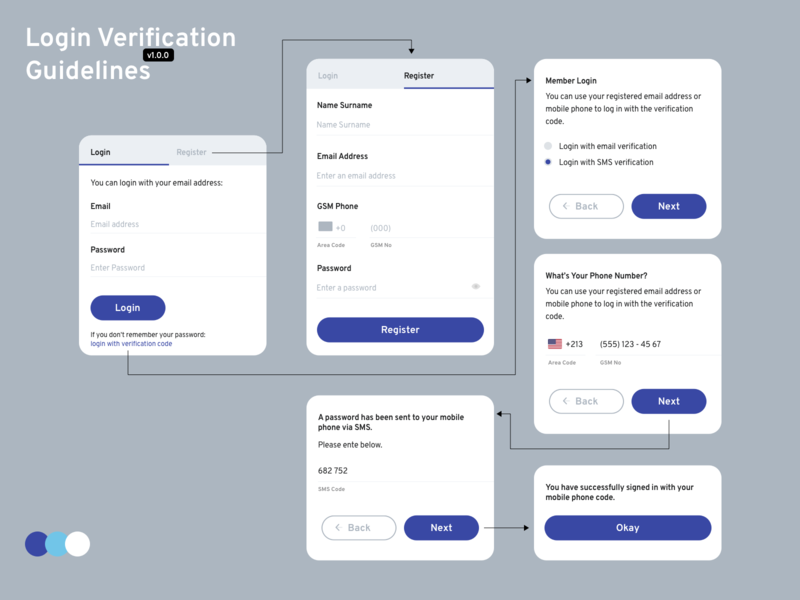
Let’s learn how to integrate with the backend. This will allow you to keep sessions and store user data in a database on the server. When I wasn’t caring with backends, you deal with something called ID token. It contains the issuer of this token, which app this is for an expression date and so on.
You can verify the user’s identity and its integrity by examining the ID tokens content. Let’s get started, you can obtain an ID token upon the successful authentication and then send it over to the server using a secure, HTTPS connection on the server side. The retrieved ID token will look pretty cryptic, but don’t worry you can decode verify and extract this information without a network call by using the Google provided.
Client libraries like this note that the client libraries verify most of the information, but you still have to check if AUD, which indicates audience matches your client ID and ISS, which indicates issuer matches either of following strings. Now you can retrieve the users profile information to be used in your app. This ID token includes the same profile information you can get using the JavaScript library on the client.
A quick tip to remember is that if the users email address is already verified by Google, you don’t have to verify it again in your app once the ID token is verified, use su B, which indicates subject as a user ID to store information. Remember don’t use the email address as a primary key for users as it might change in the future. Okay, now you are ready to integrate Google sign-in with back-end in the next article.
I will talk about how to authorize and access Google APs sucks for stopping by station.
If you manage to pick up on my accent in the last five words, I am indeed Australian and it’s honored to be followed up by Trey, my fellow Aussie, as well prior to joining this team. I’d worked on the beloved chrome dev tools, one of my smallest, but maybe my greatest contribution was adding the ability to rearrange tabs in dev tools, there’s probably the greatest five lines I’ve ever written.
I did work another five other features. So if you find me afterwards feel free to ask me about them, and I might share dev tools trickle to more recently, I’ve had the humbling experience of building web components at all and witnessing all the incredible components that all of you have built and published. For example, the one and only Pokemon selector and if you’re the person who says but there’s a Hanyu, only 151 pokemon in the original set well there’s even an option that lets you set that too, so all kudos to Sammy.
For this, it was, however, in the process of building web components at all, which brings us to what we’re here to talk about today. So, first I’m going to cover my story of how I came to encounter this SEO problem while building web components. Our dog will then look at how I used have less chrome to solve this before diving into all the details of how that actually works and how you can use it. So I’m going to take a step back for a moment and talk about what I learnt in the process of building web components.
A talk. The first thing I learned was how the platform supports encapsulation through the use of web components with this encapsulation comes with inherent code reuse, which leads to a specific architecture. I also learnt about progressive web apps and how they can provide us with fast engaging experiences. I learned how the platform provides api’s such as service workers, to help enable those experiences, as I learned how to compose web components, to build a progressive web.
App we’ve heard from Kevin yesterday about the purple pattern: push render precache lazy load as a method of optimizing delivery of this application to the user and one of the architectures which enables us to utilize. The purple panel is the app shell model. It provides us with instant, reliable performance by using an aggressively cached app shell. You can see that for all the requests which hit our server, we serve the entry point file which we serve regardless of the route.
The client then requests the app shell, which is similar, but because the same URL across the application, we can combine that with a serviceworker to achieve near-instant loading on repeated visits. The shell is then responsible for looking at the actual route that was requested and then request. The necessary resources to render that route. So this point I’d learned how to build a progressive web app using client-side technologies like web components in polymer and how to use patterns such as the purple pan to deliver this application quickly to the user.
Then there’s the elephant in the room SEO for some of these BOTS they’re, basically just running curl with that URL and stop right there, no rendering no JavaScript. So what are we left with with this PWA that we built using the app shell model? We’re left with just your entry point file, which has no information in it at all, and in fact it’s the same generic entry point file that you serve across your entire application.
So this is particularly problematic for web components, which require JavaScript to be executed for them to be useful. This issue applies to all search engine indexes that don’t render JavaScript, but it also applies to the plethora of link rendering BOTS out there. There’s a social BOTS like Facebook and to but don’t forget the enormous number of link renting BOTS such as slack hangouts Gmail, you name it.
So what is it about the app shell model that I’d really like to keep well? For me, this approach pushes our application complexity out to the client. You can see that the server has no understanding of routes. It just serves the entry point file and he has no real understanding of what the user is actually trying to achieve. This allows our server to be significantly decoupled from the front end application, since it now only needs to expose a simple API to read and manipulate data.
The client that we pushed out to the application that we pushed out to the client is then responsible for servicing. This data to the user and mediating user user interactions to manipulate this data, so I asked: can we keep this simple architecture that we know and we love and also solve this SEO use case with zero performance cost? So then we thought what, if we just use headless chrome to render on our behalf, so here’s a breakdown of how that would work.
We have our regular users who are making a request and they would like a cat picture because who wouldn’t and as part of this approach, we ask our robot and to answer this, we look at the user agent string and check if it’s an own bot that Doesn’t render in this case the user can render so we serve the page as we normally would. The server responds with the fetch cat picture function and then the client can go and execute that function to get the rendered result by the way.
This is one of my kittens, which I fostered recently, which is super adorable. Now, when we encounter a boss, we can look at a user agent string and determine that they don’t render, and instead of serving that fetch cat picture function, we fire for a quest to headless Chrome to render this page on our behalf, and then we send the Serialized rendered response back to the bar, so they can see the full contents of the page.
So I built a proof-of-concept of this approach for web components rock and it worked. I wrote a medium post about it, and people really interested in this approach and want to see more of it. So, based on this response, I eventually decided that instead of my hacky solution that I would build it properly but then came the most challenging part of any project and I know you’ve all experienced it as well naming.
So I asked on our team chat for some suggestions and I got a tongue, so these are some of our top ones. There’s some great ones in their power renders use the platform as a renderer. However, today I’m very pleased to introduce render Tron. Let me render that, for you. Brenda Tron is a doc arised, headless, chrome, rendering solution. So that’s a mouthful, so let’s break it down. First off what is docker and why did I use it? Well, no one knows what it means, but it’s provocative in all seriousness.
Docker containers allow you to create lightweight images and standalone executable packages which isolate software from its surrounding environment in render Tron. We have headless chrome packaged up in this container so that you can easily clone and deploy this to wherever you like. So what about headless chrome? It was introduced in chrome, 59 for Linux and Mac chrome 60 for Windows, and it allows chrome to be run in environments which don’t have a UI interface such as a server.
This means that you can now use Chrome as part of any any part of your tool chain. You can use it for automated testing. You can use it for measuring the performance of your application, generating PDFs amongst many other things. Headless chrome itself exposes a really basic JSON API for managing tabs with most of the power coming from the dev tools protocol. All of dev tools is built on top of this protocol.
So it’s a pretty powerful API, and one of the key reasons that headless chrome is great. Is that now we’re bringing the latest and greatest from chrome to ensure that all the latest web platform features are supported with render Truong? This means that net your SEO can now be a first-class environment which is no different, the rest of your users. So just a quick shout out. This all sounds really interesting to you and you would like to include headless chrome in some other way in your to a chain.
There’s a brand new library, node library that was published just last week, that exposes a high level API to control chrome, while also bundling all of chrome inside that node package. So you can check it out on github at google chrome, slash puppeteer, so we’ve looked at the high level of how headless chrome can fit into your application to fulfill your SEO needs now it’s time to dive to how it works.
But I’ve been talking a lot. So, who wants to see render tron in action alright. So this is the hacker news PWA created by some of my awesome colleagues and it’s built using polymer and web components. It loads really fast and all-round performs pretty well. We can see that there’s a separate network requests which loads the main content that we see and we can guess that it’s affected by this SEO problem, since it uses web components which require JavaScript and it pulls the in data asynchronously.
So one quick way to verify this is by disabling JavaScript and refreshing the page, and once we do that, we can see that we still get the app header, since that was in the initial request. But we lose the main content of the page which isn’t good. So we jump over to render Truong the headless chrome service that is meant to render and serialize this for you. So I wrote this UI as a quick way to put in a URL and test the output from render Tron so first off.
What are we hoping to see because these bots only perform one request? We want to see that whole page come back in that one network request. We also want to see that it doesn’t need any JavaScript to do this. So take a look, I’m going to put in the hacker news URL and tell render Tron to render and serialize this and that using web components, and it renders correctly I’m going to disable JavaScript and verify that it still works.
So you can see it’s still there and it all comes back in that single network requests render tron automatically detects. When your PWA has completed loading. It looks at the page load event and ensures that it has fired. But we know that’s a really poor indication of when the page is actually completed. Loading, so Rena Tron also ensures that any async work has been completed and it also looks at your network requests to make sure they’re finished as well.
In total, you have a ten-second rendering budget. This doesn’t mean that it waits 10 seconds, though it’ll finish as soon as your rendering is complete. If this is insufficient for you, you can also fire a custom event which signals to rent Ron that your PWA has completed. Loading serializing web components is tricky because of shadow Dom which it straps away part of the dom tree so to keep things simple.
Rennet ron uses shady Dom, which polyfills shadow Dom this allows render tron to effectively serialize the dom tree so that it can be preserved. In the output, so let’s take a look at the news PWA, which you’ve all seen – and it’s also built by some of my other colleagues and we’ll plug that in to render tron will then ask render tron to render this as well and that I’m also using Web components, and then we have it.
So what do you need to do to enable this behavior with polymer 1? This is super easy and render tron doesn’t actually need to do anything simply append D’Amico’s shady to the URLs that you pass to render Tron and polymer 1 will ensure that shady Dom is used with polymer 2 and with web web components. V1. It’s recommended you use web components, loader jeaious, which pulls in all the right polyfills on different browsers.
You then set a flag to render tron tell it that telling it that you’re using web components, and it will ensure that the necessary polyfills that it needs for serialization get enabled so another feature of render Tron is that it lets you set HTTP status codes, these Status codes are used by indexes as important signals, for example, if he comes across a 404, it’s not going to link to that page, because that will be a really poor search result.
Now server, though, it’s still returning that entry point bar with a status code of 200. Okay, so it looks like every URL exists. Rena-Chan lets you configure that status code from within your PW, a which understands when a page is invalid, simply add meta tags. Dynamically is fine to signal to render on what the status code should be render. Tron will then pick these up and return that status code to the bot, so this approach isn’t specific to polymer or even web components, let’s plug in Fahnestock google.
Com and sees what happens when we serialize it. So that looks pretty good. Who can guess what javascript library was used to build? Google fonts angular render Trond works with any and all client-side technologies that work in Chrome and whose Dom tree can be serialized. The render tron endpoint also features screenshot capabilities, so that you can check that headless, chrome and the load detecting function are performing as you expect.
Unfortunately, this service is not fast for each URL that we render we spin up headless Chrome to render that entire page, so performance is strictly tied to the performance of your PWA. Renat Ron does, however, implement a perfect cache. This means that if we have rendered the same page within a certain cache freshness threshold will serve the cached response instead of rear-ending it again. So how can you get your hands on this today and how do you use it? Well, first, you need to deploy the random tron service to an end.
You’ll need to clone the github repo at Google, Chrome, slash, magnetron, and it’s built primarily for Google cloud. So it’s easy to deploy there. But if you remember this is a darker container, so you can deploy this to anywhere, which supports a docker image. So to make things simple for you to test our. We have the demo service endpoint, which you can hit at render Tron appspot.Com and that’s the one with the UI that we saw earlier.
It is not intended to be used as a production endpoint. However, you are welcome to use it, but we make no guarantees on uptime. Having this as a ready to use service is something we might consider based on the interest receive. So, just in case you’re wondering my boss’s twitter handle is at met, Matt s McNulty, just in case. You want to tell him how awesome I am so once we have that endpoint up you’re going to need to install some middleware in your application to do the user agent splitting that I was talking about earlier.
So this middleware needs to look at the user agent figure out whether or not they can render and if not proxy, the requests through the render tron endpoint, if you’re using purple server, which is a node server designed to serve production applications using purple. You simply need to specify the bot proxy option and provide it with your rennet on endpoint, if you’re using Express, there’s a middleware that you can include directly by saying app, don’t use render on top make middleware with the proxy endpoint and whether or not you’re using Web components, if you’re not using either of these check the docs for a list of community maintained bit aware, there’s a firebase function there, as well as a list of existing middleware that render China is compatible with.
If it’s not listed, it’s also fairly simple to roll. Your own middleware by simply proxying based on the user agent string, and that’s it, that’s all the changes you need to make to use, render tron today and all these bots can now be happy. Brenda Tron is available to use today compatible with any client-side technologies, including both polymer 1 and polymer 2. Thank you.
Our current recommendation is To let users authenticate first and defer, asking Permissions until you need to access an API In order to use a Google APIs, you have to enable them from The [ BPI ] console Then looking at this page You can find the scope strings that correspond to the Apis, you have enabled Each one of these Represents an API so take note of the ones you need Now. You can make requests from The client or from the server, Let’s look at the client first, There are two steps.
You first need to get a Permission from the user Check if the user has already Granted access to the API using hasGrantedScopes, Otherwise request the Permission by calling grant Use the scope strings. You Obtained in the previous step, Once the permissions Is granted you can make API calls on Behalf of the user To send a request to the Google APIs, you can use gapi, For example, if you want To use a Google drive API at the client Module then drive module with the API version Using client drivers is simple In this case.
I’m grabbing The list of files and folders in the users root directory. Ok, let’s see how we do the Exact same thing: on the server side, Getting the user’s permission, Happens on the client side Use grantOfflineAccess To get a permission, Offline means that You can access Google APIs, even when the user Is not using the application Upon user’s consent, your Client will receive an object that contains authCode, And now you can send The authCode over to the server using a Secure HTTPS connection On the server side use a client Library to exchange authCode with a credential object: Which includes access_token, request_token and id_token, The access_token Is a primary key to access the user data? Through Google APIs, The refresh_token is a key To renew the access token, An id_token represents The authenticated user, as I mentioned in A previous article Remember that the Client libraries take care of refreshing, the Access token, if it has expired, For this reason, you should Store the credential object in your database.
After each request, This ensures you always have The latest credential object Once you’ve got the Credentials you can make API calls by using The [ INAUDIBLE, ] APIs, client library, OK, So we have gone Through the steps we recommend in order to use Google sign-in effectively, If you have any Questions ask them at stackoverflow with A tag Google sign-in and we will do our Best to answer them, Thanks for stopping by, I hope you will enjoy coding.
A smoother sign-in experience for your users with Google sign-in [ MUSIC PLAYING ]
So, for instance, I’ve got this input here, wrapped in a label and that’s going to produce a visual UI like the one that you’re seeing here this radio button.
But that’s also going to create a spoken UI based on the built in semantics of those native HTML tags. Now, if you’re not quite sure how all of that happened, or why those semantics matter be sure to check out our previous episode on semantic. So I’ll include a link down in the show notes and we can also maybe drop in an annotation up here for you to click on. I just I have some background on how semantics work and why those are important in the first place now.
This is all good and everything, but there are instances where a simple layout in native HTML just aren’t going to cut it and so to handle these situations. We have the web accessibility initiative accessible, rich internet applications, spec, which is a bit of a mouthful. So you oftentimes see this referred to as wai-aria or maybe just Aria, so audio works by allowing you to specify attributes on elements which then modify the way.
Those elements are translated into the accessibility tree. So let’s take a look at a really basic example. Just to show how this works, so, if you create a a plain checkbox a screen reader is going to announce it. As you know, a checkbox it’ll tell you what its label, if it has one like we do in this case, where it says, receive promotional offers and it’ll also tell you the the state of the checkbox right, whether it’s checked or not, but let’s say you’re in A situation where, for whatever reason, you need to implement your own check box using something like like a div right, maybe you need to style it in a really special way.
So, in this case, we’ve got a div checkbox we’ve created here, and the screen reader is going to give the user really like no indication that this element is meant to be a checkbox. It might announce the the text inside of the div there, but it’s not going to tell you the role of the element. I can say it’s a checkbox. It’s also not going to tell you the state so excited you sure is going to be able to see these visual cues and they’ll be able to figure out that this is a checkbox.
But nothing is going to be announced to our screen reader users and that’s a really big problem. So using Aria, we can actually tell the screen reader about this extra information here up at the top, I’ve got some custom checkboxes just created using gives down at the bottom. I’ve got some checkboxes using the native input element so using voiceover. Let’s see how these are announced differently: voiceover, I’m chrome, custom checkboxes in custom check intense group with three items there and then slices group with two items: heading ten times check, check box and then slices uncheck, checkbox voiceover off.
So you see there that the the div elements just are announced as groups. It doesn’t indicate to the user in any way that these are checkboxes where it’s the native element. It indicates it’s a checkbox and it tells you the state whether it’s checked or not. So, let’s see if we can add some Aria to improve upon this so over in my dev tools, I will select these the checkbox elements and I’m going to start off by just giving them a role of checkbox and I’m also going to give them a state Of Aria, checked of either true or false, depending on you know the actual state of the element there.
So if a role checkboxes to the one Aria checked equals false and let’s try it again using the screen reader voiceover, I’m dropping custom. Checkboxes 10 pens check the checkbox and then slices contract checkbox always go over all. So adding that role and Aria checked attribute causes the middle Union accessibility tree to actually have the desired role and state without changing. You know anything else about the nodes, appearance or its behavior, which is pretty awesome right, we’re just adding in additional semantics using Aria.
So in terms of the accessibility tree, what ru does is it really allows you to subdue like tree surgery? So you take the accessibility tree as generated by plain HTML. You add Aria to that, and now you get a different accessibility tree and it may be subtly different or it could be radically different, depending on what attributes you use, however, keep in mind that this is really the only thing that ru changes.
It doesn’t change anything about how the element behaves on the page. For instance, it’s not going to suddenly make your element focusable, it’s not going to add keyboard event, listeners for you or anything like that, or you does not change behavior in any way. It really only is for adding in additional semantics. So if you, you know, if you’re making a custom control, it’s really on you to make sure you go back, and you also add in that keyboard support so you’re kind of like maintaining that that consistent experience for your users.
So now that you understand more about what ru is and kind of some of the basics of how it works, I want to cover some of the things that Aria will. Let us do in our application, as we saw in that check box example. Aria can add semantics to an element where no native semantics already exists. So, for instance, you take a div element, it has no built-in semantics, but we can use Aria to be able to role.
We can use already to give it a check State, for instance, build a custom check, box or radio button, or something like that, or you can also be used to modify existing element semantics. So, for instance, let’s say I’ve got a button element that I want to. Actually turn into more like a toggle button, so I can on/off switch type of control. I can give it a roll of switch. I’m give it an already check state of true or false, and now I’ve sort of modified the semantics of this control, and now it’s more of a even more specific kind of thing.
It’s like a toggle button right to switch button. It’s important to note here, though, that the switch rule is part of the newer aria 1.1 spec. So, as I’m recording this, you know there’s probably a number of assistive technologies which do not support this role. Just yet, just like all web standards. Aria is you know, constantly evolving and advancing to try and keep pace with new UI patterns, so that’s something important to realise as well right, if you, if you come across an aria rule, you also want to check for the support of that role in assistive technology To make sure it’s widely supported, and then you can use it another thing or you can do is it can express semantics and UI patterns which really like don’t already exist in HTML, and I think this is where Aria kind of comes into its own Aria.
Basically, will let you create accessible widgets, which are not possible using plain HTML. To give you an example. Here is like a tree: widget component, okay, we can take an unordered list and add all your rules of we tree item and group and add an already expanded attribute to a few those children and now we’re expressing the more rich semantics of this tree element and Again, there’s no tree tag in native HTML, so it’s something that you know we wouldn’t be able to build otherwise without aria, which is really important.
Another thing we can do and as we saw this in our previous episode on labeling or you can add extra labeling and descriptive text to an element right to give that element an accessible name. So, for example, if you have like an image only button which doesn’t use an actual image element, so you don’t have access to an alt attribute or anything like that to put alternative text on it. You can still use Aria.
You can use Aria label to give that element its own accessible name, and that way you can have it be announced properly by a screen reader to those users, or you can also express semantic relationships between elements which go beyond just like standard, dom parent-child sibling relationships. So, for example, a more complex relationship is something like this element controls that element over there.
Even if they’re not like you know, direct parent-child or anything. So in this case right here, I’ve got a button which controls whether a particular part of the page is visible or hidden, and it does this in the form of kind of a disclosure widget. You can see here where it shows advanced settings. We’ve specified using Aria controls – that’s actually controlling this group of elements down here for these Advanced Settings checkboxes.
So even though they’re not parent-child, they’re, actually sort of like siblings. We can create this new relationship indicating this element over here controls that elements over there, which is really cool and finally, Aria, can make parts of the page live, so they can inform assistive technology right away when something changes – and we saw this in our previous episode On building alerts, so we add role equals alert to some element.
We drop some new content into it and then it’s going to announce that immediately through assistive technology to the user. So are you giving you a lot of tools to make sure the experiences you build? Are semantically rich and can be easily understood by assistive technology? Now we’re definitely going to be diving into the subject more in the future, but that about covers it for today. So if you have any questions, you can always leave them for me down below in comments, or you can hit me up on a social network of your choosing.
As always thanks. So much for reading I’ll see you next time, hey. If you enjoyed this episode of Ally cash, you can always catch more over in our playlist or click. The little subscribe button and you’ll get an email notification whenever we launch new stuff on the blog. As always, thanks for reading