Thank you so much for reading this quick article Matt at the lead. Jerk asked me to create this quick article for those of you out there. That might be a little worried about selling Final expense with this whole kovat 19 coronavirus crisis. In full force and the reason I’m putting this article together is to otherwise encourage you to not only continue to sell final expense but to ramp up your efforts, because I believe now versus all the time that I have been in the business selling final expense.
Is the single best time, at least since 9/11, to to get people interested in buying burial insurance, whether you sell them face to face or over the phone? So what I’m going to do in this quick little article is explain. Why that’s the case and to encourage you to go ahead and buy leads from that to get your business up and running and to continue selling, because people really are going to need it so right now, if you’re concerned about selling face to face, you should be.
I just got word from the Pennsylvania Department of Insurance that the ability to sell face to face for insurance agents has been restricted. That probably will follow suit for other states as well. So moving to a telesales platform is a logical solution. The good news is that again because of the circumstances surrounding the outbreak, more people now than ever or a at home, be there’s less telemarketing and B there’s more interest, because a lot of the people that have kicked the can down the road for buying insurance.
All these years now wish they would have done it. So, for those people who get in front of those clients are the weather over the phone or face to face are likely to see much higher conversion ratios, even if you’ve never sold over the phone before. So. What I want to kind of describe to you here is again not just encourage you that you’re going to see some results, good results in the final expense space.
I also want to give you some tips that I think would be useful to consider. As you place, your order with Matt, so the first one on the list here is, I believe, a local lies. Lead generation strategy is going to be your best bets. Explain what I mean. So a lot of you probably worried about making the transition. I’ve never done. Telesales so you’re not sure quite to what to expect is it’s the same.
Is it different? It’s different for sure, but you’ve got all these added advantages right now, with the our clients, literally being the ones at highest risk to to die from the stuff they’re going to be a much level higher level of concern to have it covered. So what I think is good to start your transition not to do this long term, but I think it’s good to start with is target your lead orders with Matt and somewhat of a extra local semi regional basis, maybe say a two-hour radius around where you live In that case, what you can do is as you’re calling your clients, your future clients or prospects.
You can say something like hey. This is David. Do Ford I’m calling because you had requested information on the phone about final expense coverage and I’m sure you’re, like a lot of clients that I’ve talked to that are concerned about coronavirus. They don’t want to get sick and die and leave their final expenses to a loved one. So I’m calling because normally I’d meet you face-to-face, but I want to serve you the right way and see if I can help you over the phone and before we get started.
What’s going on how how’s things going for you or you have you been impacted by this at all? Is there anything I can help with what this does? As far as the script goes, is it sets the stage to humanize the call? If you call in somewhat of a local area, you can tell them as much hey I live in Chattanooga. I see you look down in Dalton Georgia. People know about those two towns and both of the towns.
So there’s like that local feel, plus, if you’re sincere about the effort to offer to help them. You might help some people out in ways that you know they couldn’t get from an irregular telemarketer who’s. Just going to read down the script, not really take into account like the things that are top of mind for these prospects, so most people won’t take you up on it, but the big advantage is it’s going to build a level of trust and rapport.
That’s absolutely necessary in order to successfully sell over the phone. So that’s my recommendation as far as telesales go is buy leads format on the basis of a more local lized approached tryout statewide. If you like, there’s nothing wrong with that to kind of buying over a larger threshold or area, I just think it’s a bit easier, initially making the change to do that. A couple other ideas here: if you have to be in a situation again this this is day by day by the time you see this.
This could be an invalid sales technique, so understand, I’m not saying this is hard set in stone. This is all changing in the sensitive day to day on what we can do face to face if you are able to sell face to face. Obviously, when you talk to clients and they’re concerned, you could sell them over the phone up to the point where they need a signature on an app or to do a digital application. Then you can drive out to see em slide.
The paper under the door make sure you use hand sanitizer before and after and then send in the app that way. It sounds cheesy, but there’s agents who are doing that. That’s a valid method as well. We have been not mean necessarily, but others have been suggesting. You know bring a lawn chair with you park in their driveway. Do the sales presentation from the car might work? That’s probably going to be less and less of an option going forward, so the better bet is to just focus on telesales use.
Matt’s leads to focus on getting people to talk to, to have conversations over the phone to help, and I think, if you practice this now and start this transitionary process, you’re going to find that the business of selling insurance has not changed the method of how it’s Done has but the principle the fundamentals are the same. More people now than ever are wanting to buy burial insurance. More people now than ever sitting around the house got nothing to do and there’s less telemarketing calls being made, because a lot of these call centers across the nation are shuttered, because there are groups and trying to restrict the potential for an outbreak within that group.
So anyways, that is my advice to you. I think you should continue to go forward. I hope this gives you some perspective and encouragement on how to proceed. Thank you so much for reading and we shall see you next time. Bigger
No hay ningún vídeo que lo haga bien porque muchos te dicen cómo hacer anuncios en facebook, como elegir audiencias mal además porque muy, pocos, saben hacerlo así que hoy me voy, a plantear explicarte paso, a paso y de forma, clara cómo, plantear, el business manager, ya, sea, Para ti como para tus clientes, porque una cosa es el business manager que estaría en el top de la cima otra cosa sería en las cuentas publicitarias dentro de ese business manager, y otra sería las páginas dentro de ese business manager, por tanto eso es lo que Os voy a enseñar hoy mi nombre es jm, vadillo y este canal es para enseñaros, a crear vuestra agencia de marketing, digital ayudando, a negocios locales en marketing digital y, a olvidarse de gastar dinero absurdo en fuentes de tráfico que ya no funcionan como puede ser el Periódico como puede ser la televisión, como puede, ser la radio ahora en 2019.
Lo que funciona son las redes sociales en especial facebook, hay billones de clientes potenciales en esta plataforma y el que te diga que no funciona que lo ha probado y que no funciona es porque no sabe vale entonces vosotros vais, a ofrecer ese servicio vais, a ofrecer Tráfico pagado y vuestros clientes potenciales son negocios que ya están gastando dinero en publicidad porque esos negocios saben.
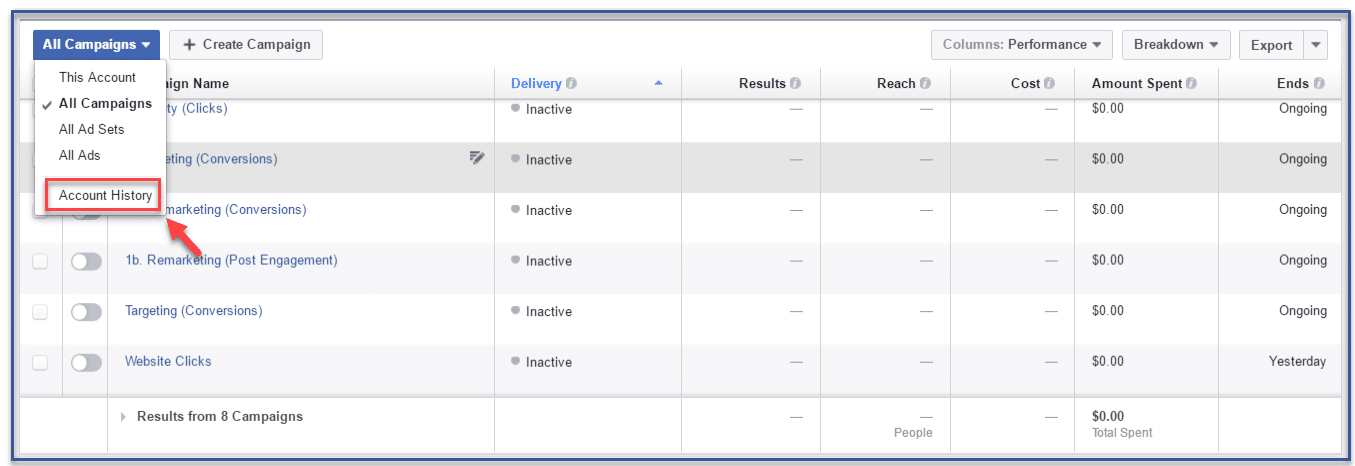
Lo que es gastar dinero en publicidad y no tener resultados y con vuestro sistema con vuestro embudo de ventas, lo van a conseguir porque es muy fácil de implantar y una vez que tengáis un embudo de ver de ventas, para un nicho en concreto vais, a dar Resultados seguros que os van a recomendar, a otro tipo de negocios y que vais a poder escalar de forma muy fácil vuestro negocio por tanto en el vídeo de hoy como os he dicho vamos, a plantear todo facebook, business manager y no vas a necesitar, más nos Vamos, a ir al ordenador para que lo tengáis de forma más, clara y vamos, a ello hasta ahora, muy, buenas ya, estamos aquí en el ordenador y como hemos hablado vamos, a explicar un poco cómo funciona el business manager, cómo llevar, las cuentas de anuncios de nuestros, Clientes cómo llevar las cuentas de anuncios nuestras propias como agencia por tanto vamos, a empezar, a explicando qué es el business manager que es las cuentas publicitarias y qué son las páginas de estas cuentas lo primero de todo, business manager, el viernes manager, es algo, que nos Interesa si vamos a llevar varias cuentas publicitarias, a nosotros como agencia de marketing nos interesa, a nuestro cliente, a nuestro restaurante; no le interesa por tanto solo, necesitamos, tener nosotros la cuenta de business manager, ellos lo único que van a necesitar tener es una cuenta de anuncios Una cuenta el az manager, digamos pero nosotros somos los que vamos a tener el business manager entonces lo primero que vamos a hacer es, crear ese business manager en un momentito vamos a ir a ello pero os voy, a aplicar os voy, a enseñar primero el esquema Dentro de ese business manager, propio nuestro como agencia vamos, a tener lo primero que vamos a tener es una cuenta publicitaria que es propia es de nuestra agencia con ella vamos, a hacer anuncios para nuestra agencia en el caso que los hagamos si no los hacemos en Al principio no creo que vayamos a invertir en ello porque vamos, a ir, a la calle, a buscar esos clientes y vamos, a aprovecharnos de conocidos de amigos, para conseguirlos, pero más adelante, para escalar, el sistema de embudos que hemos que hemos creado sí que vamos a Utilizar facebook, para conseguir otros otro tipo de clientes, que nos tenga que nos venga, un flujo constante de clientes y poder, escalar nuestra, agencia, con el tiempo, pero bueno, esta la vamos, a crear sin; más aunque, no la vamos, a utilizar en principio y luego vamos, a Y solicitar acceso a las cuentas publicitarias de nuestros clientes de nuestros restaurantes de nuestros dentistas del nicho que haya escogido y esas van, a ir directas, a nuestro business manager, entonces aquí tendríamos las cuentas de nuestros clientes, no son, propias, estas cuentas del cliente del restaurante, 1 Y del restaurante 2 ellos van a poner sus datos de tarjeta en nosotros no vamos a tener acceso, a sus datos de tarjeta ellos van a poner sus datos de tarjetas localidad todos, los datos y van, a poner lo que se quieren gastar un límite de 80 Euros: al mes, por, ejemplo y nosotros vamos, a utilizar esa cuenta de anuncios para llevar, a cabo esos anuncios y cuando lleguemos al límite que ellos nos han puesto se acabaría se acabaría durante, ese mes la campaña de facebook que estemos realizando por tanto, no nos tenéis Que preocupar por qué nos van, a tener que dar datos nos van, a tener que dar contraseñas sólo os van a tener que dar acceso, a esa cuenta publicitaria, esta cuenta publicitaria estaría unida, a la página de ese, local y ésta, estaría unida, a la página de Ese local está que es la nuestra, estaría unida, a la página nuestra como agencia bien una vez explicado, este esquema vamos, a ir, a crear el business manager, nuestro propio, para ello tendríamos que ir a esto business, facebook.
Com aquí le daríamos, a crear cuenta necesitamos una cuenta Propia un perfil nuestro en facebook, le daríamos a crear cuenta y, nada nos pide, no voy, a no voy, a meterlo pero ambos que nos pide, el inicio sin más de sesión y así, entraríamos al business manager que es lo que tengo aquí es un perfil nuevo Que creado a ver voy, a entrar un perfil nuevo que crea un demo sin más para que veáis desde el inicio, cómo hacerlo, todo, no hay nada, como, veis, es un demo que le llamó juan martínez volvemos le de alguna manera entonces una vez que ya hemos Creado el business manager, con ese, perfil nuestro de facebook nos vamos, a ir a configuración del negocio, lo primero que vamos a hacer de la configuración del negocio es ir a cuentas.
Publicitarias nos va, a pedir crear una página, porque aún, no la tenemos, porque es nuevo bien bueno vamos, a ir a solicitud de cuenta publicitaria aquí es donde nos va, a decir crear una página la creamos, nosotros nos vamos, a poner como por, ejemplo, artista, público y Nombre de la página, la voy, a llamar igual que nosotros juan martínez vamos, a decir que somos emprendedor por ejemplo emprendedor y crear página, esta sería la propia digamos la de la agencia, a ver si se va creando, vale ya, está, página principal personal vale, muy bien Listo vale vale una vez que ya tenemos esa página creada la propia, nuestra vamos, a darle, a cuentas publicitarias esto es para añadir cuentas publicitarias de un cliente le daríamos, a solicitar acceso, a una cuenta publicitaria tu negocio necesita usar, esta cuenta publicitaria, el nombre de otro.
Negocio está aquí muy bien entonces seguiríamos estos pasos, sigue, estos pasos, para solicitar, contexto contacto, con el propietario de la cuenta, publicitaria pídele que vaya a la pestaña de cuenta publicitaria del business manager y haga clic en asignar socio para darte, acceso tendrá que introducir el número Siguiente y elegir un rol bien se puede hacer de esta manera y lo que yo recomiendo es que vayamos y hablemos con el cliente y por ejemplo este es el perfil del cliente en realidad este es el que hemos creado un álbum pero imaginaros que este es El perfil del cliente del del restaurante, lo que vamos a hacerle es, crearle una cuenta de anuncios es decir, esta de aquí le vamos, a crear esta cuenta vamos, a vincular la página y nos vamos, a dar acceso, a nuestro business manager, como crear, esa cuenta de Anuncios muy sencillo vamos a ir a su perfil vamos, a darle, a crear vamos, a darle, a anuncios acepto muy bien y, esta sería su cuenta de anuncio que como veis; no es el business manager.
Es el administrador de anuncios, no tiene nada que ver entonces le vamos, a mandar dentro de esto le vamos, a mandar que vaya a configuración y aquí dentro de configuración le vamos, a decir que vaya a añadir personas aquí me está nuestro nombre y nos ponga, como Administrador de la cuenta publicitaria aquí pondría nuestro nombre y administrador de la cuota publicitaria lo mismo, en la página y la páginas darle al rol, asignar, un nuevo rol que eso está en roles de la página y lo mismo asignar, un nuevo rol y que nos ponga.
A nuestro nombre aquí como administrador bien una vez que él haga de eso, eso, dentro de su haz manager, dentro de su cuenta de esta nos va, a aparecer ya, a nosotros cuando vayamos, a nuestra configuración de negocio. Ya nos va, a aparecer aquí en las cuentas la suya y las páginas, la suya y ya, vamos, a poder utilizar esto, para hacer, anuncios orientados, con su cuenta para hacer; anuncios nos iríamos, estoy algo, lo explicaré, ya, más, adelante, porque, la mayoría del tiempo, vamos, a Estar creando anuncios, esta sería, el administrador de anuncios aquí en la cuenta nos iba, a salir la de nuestro, cliente porque la hemos unido a nuestro business manager y aquí nos saldría, la de todos, los clientes, le daríamos, a esa cuenta del cliente le daríamos, a crear Una campaña y ya, iríamos y, a iríamos creando todo como expliqué en otros vídeos anteriores y cómo voy, a centrarme más adelante, este vídeo sólo era; para explicaros, cómo, crear, nosotros, el business manager, y cómo, añadir las cuentas, publicitarias de nuestros clientes que es diciéndoles cómo.
Lo tienen que hacer o estar nosotros con ellos y decírselo que lo hagan y nos pongan, ese error. Así que espero que os haya ayudado esto y en los próximos vídeos, ya nos orientaremos, más en crear esas, campañas, o comentarme abajo de lo que queréis que hablen próximos vídeos iremos paso, a paso sin ningún tipo de problema además como os dije en algún otro vídeo. Para crear el sistema de embudos yo lo que utilizo es wilder, o los voy a dejar el link, abajo para una prueba de 7, días porque además con esa prueba de 7 días si le dais desde mi link os enviaré un correo damos un regalo de una Mentoría uno, a uno cuando os registres en bull terol y mensah, mentoría uno, a uno está valorada en más de 300 euros vais, a resolver todas las dudas que tengáis vais a aprender mucho os voy, a enseñar todos los sistemas os voy, a enseñar todo.
Lo que necesitáis para empezar ese mismo día, a crear vuestra agencia, a escalar y, a conseguir vuestros primeros clientes eso es todo nos vemos en próximos vídeos, adiós,
Looking for a company that will have your back? Check out the video below:
My name is cougar, and this is another episode from our bespoke post series. This time we didn’t get one of the monthly boxes. I went ahead and opted out of the boxes, some of them weren’t once I was real real interested in, and I did see something that I did want to get as you can see. It is a long box and if you can read that right there it does say bare-bones and if you have readed some of the other episodes you may know who bare bones is we’ve got part of, as you can see here, the woodsman collection.
Now this is what I would consider and what a lot of a lot of youtubers, especially guys that I read and follow and and whatnot, would consider this to be a bushcraft knife. Now, as you can see here, we have the the knife. It comes with the sheath here and it has all of the kind of classic known features that are part of the bare-bones kind of series of knives and edged implements and and various other types of things.
What they have is an oil canvas sheath right here. It does have a liner on the inside of plastic liners, it does have their nice leather accent piece which is on basically any of the sheets that they have. You do have a leather, basically a leather snap, keeper here and the snap which is a, I believe. That’s either like a copper or a brass and then on the back there you do have a simple belt clip there.
I now let’s go ahead and take this out and, as you can see, it is a pretty decent sized knife. This is a six-inch blade, as you can see there, and then we also have a walnut handle, which is standard for all of bare bones kind of knives and everything they do. Have this little copper insert here to put a lanyard. Of course they have their little information thing here and now it does have two rivets here and a little seal stamp there.
The rivets here are actually screw in type. They use an allen key so or an Allen, wrench and you can take and tighten and loosen those up. I’m sure if you for some reason need to replace the scales, let’s go ahead and check out and see what our little note card says here. Alright, so looking at the little booklet here, it’s not real big just gives us some basic things. They do say that this was basically why this was designed.
They give you kind of an understanding of the premise of the design and how the why and how they designed it. The way they did the little quotes in here as well, and there is a cleaning and maintenance section here. They do say that, for the blade you should apply a thin layer of protective oil after each use, because this is a high carbon blade now something else that I will mention about this. You can see right here.
They fairly thick blade, but the interesting thing, I guess, is it’s a little different than what I’m used to seeing for something that would be considered. Maybe a bushcraft knife. Usually, I see them and they have something kind of like that, maybe like an apple seed kind of grind, which is, I mean, that’s kind of the shape of it or you have something called a Scandinavian or a Scandi grind. It’s basically flat until you get down fairly low on the blade, then it starts to chamfer in a little bit, and then you finally get to that point.
Where you’re going to put the edge on this one is actually a flat grind. Now flat grind is where you actually have it ground from top to bottom totally flat, and then you put the edge just on the very the very very edge of it. You put that additional that additional angle in to get the edge, so it does make it overall thinner it. It worries me in the effect or in the sense that you don’t have that extra material to support the edge like you do for like a Scandinavian or an apple seed type grind.
One thing I do want to see, though, is this – does seem to have very nice edge on it. So let’s take a quick look and see how this does on the old arm, hair here and yep. There’s the back, there’s the front right out to the curve. It’s just as taking the hair right off and yep, so nice and sharp straight out of the box, shaving sharp as they say and yeah yeah that cleaned that cleaned it off really easy.
So now, let’s go ahead and take this outside, we’ll see how it performs all right so we’ll try this ash right here see how she works. It’s pretty long. It wasn’t cut very good on the ends, so we’re just going to have to try and hold it here the best we can all right, not bad. You can just see some some of the marks from where it rubbed on the side bit. So surprisingly, this uh this dealt pretty well or this handled that pretty well.
So I think this is going to be a pretty good, pretty good, bushcraft knife for me. If you follow the link down there in the description below and you guys do join, I get a little kickback from that. So I got a little money back from that, but so do you so we both actually make out on it. You guys get some money off of your first order and I get a little money off of one of my next orders and also while you’re down there go ahead and check out our social media.
We got links down there for that as well. On your way, down are on your way back up, don’t forget to hit that thumbs up button as well as that subscribe button. If you haven’t done so already, either the red one down below the article or there’s going to be one floating around in the corner or something like that and you can click on either. One of those make sure you hit the bell there is that little bell icon.
It is going to notify you of when we have new articles coming out here on world of me. Alright, everybody! Well my name’s cougar. This has been another episode from our bespoke post series. I’d like to wish you all a good day, and I will see you later bye,
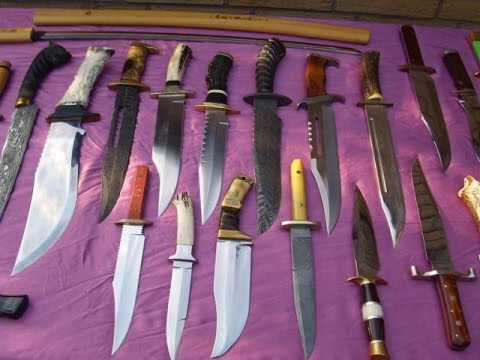
Knives and daggers are awesome! Plain and simple, right? Let me say, I enjoy my dagger collection with a little music playing in the background.
000 visninger af trafik til dit websted på autopilot Jeg skal vise, dig nøjagtigt hvordan jeg gjorde det lige efter introduktionen [ Musik ] [ Musik ] [ Bifald ], hej, fyre, har, været, Arkell, passiv, automatisering, rolig, Jeg, vil, vise, dig nøjagtigt, hvordan, Jeg oprettede syv tusind brug trafik der er fuldstændigt på vores, hjemmeside, på, autopilot men, først hvis.
I har lyst for at lære mere om affiliate marketing, om passiv indkomst hvordan man opretter en online forretning min YouTube-kanal har tonsvis af ressourcer er du velkommen til at gennemse, min articleer se noget mere jeg har talt, om tonsvis, af ting der er masser af gratis ressourcer. Her så hvis du vil abonner på min kanal, og tryk, derefter på klokkemeddelelse der skal meddeles med, kommende, articleer Jeg, vil vise, dig alt bag, kulisserne hvordan man kommer en online virksomhed, igang med, tilknyttet, markedsføring og, passiv indkomst.
I ville meget gerne have dig til at være en del af dette community men, jeg vil hoppe lige ind og snak, om Pinterest, jeg vil vise du prøver, virkelig bestemt bestemt at holde denne, article virkelig, kort, og, retfærdig giver, dig, nogle, utrolige nuggets jeg har en tendens; Til undertiden at gå sammen gør, jeg, ikke, vil, gerne, gøre, det men, dette, er, min statistik for en af mine websteder det, sidste år, okay de sidste, tre 365 dage så Pinterest.
I har 71.000 mennesker der er kommet til min nu vil jeg gerne have at du viser, dig all-time stats; fordi min Pinterest trafikken accelererer og fortiden jeg fik ikke så meget så hele tiden jeg har havde denne, hjemmeside, ligesom, fem, år, er, kun, hundrede, tusind så. I det sidste år kan du fortælle at tingene virkelig er hentet og jeg vil gerne vise, dig hvad Jeg laver dybest set jeg bruger noget kaldet medvind Taylan er dybest set en planlægning af Pinterest Jeg, kan oprette pins, og, jeg, kan planlæg dem til at blive, bogført Til forskellige grupper til forskellige stammer, på indtil en og så kan du se, her på min hjemmeside data, dette er for fortiden et par år, kan du se, jeg havde intet, så, dette, er social trafik for Pinterest lige, her okay du kan se at der ikke er Noget til den første brønd I 2017 beklager min computer frøs op og så besluttede jeg at lære, mere om det.
I gik til nogle konferencer folk kan tale om Pinterest, Pinterest Pinterest og så jeg begyndte at bogføre og så, er dette, bare trafikken, på, sociale medier men. Du ved en dag 926 visninger og det er slags tilspidset fordi på dette specifikke websted, Jeg, har, ikke, oprettet, nye, pins, Jeg, vil, gerne, vise, dig hvad der sker hvis jeg får en e-mail, hver, uge fra, haleenden, og, dette er, bare du ved, 2.
September det siger Mig, hey 96 pins, blev sendt, dig havde tusind repin så jeg mener hvor, mange pins fik du I sidste uge fik jeg en tusind og jeg gjorde virkelig ikke, noget, fordi, alt, allerede, var, konfigureret, og, derefter, igen, 1015, dette var bare sidst, uge, fik jeg en e-mail. Så jeg vil virkelig snak hurtigt med, dig om medvind hvordan jeg gør det så dette er jeg logget ind rigtigt, nu-jeg har to forskellige konti en gang a det siger gratis prøveversion jeg betalte for opkaldet at dele en om passiv automatisering, som er min online forretningskonto tilknyttet Markedsføring Jeg er lige begyndt at få ben går, og så, havde, jeg, ikke meget data for at vise, dig men, hvad, jeg, laver, halen, og, nu, er, det hvis du ser, på planlagte stifter du rejser dybest set til Canada, hvis du ikke, er det, kendt, Pinterest, Jeg, Laver en anden article på det men, grundlæggende undskyld mig, kan du gå, til canva ro du kan, oprette, gratis ben klikker du bare på dette, Pinterest-grafik, er meget enkel de vil, bare indlæse lidt langsomt så der er alle disse forskellige skabeloner og du klikker dybest set på Et og derefter du kan, bytte det ud for alt hvad du vil have ret men kan lide at ændre, URL passiv, automatisering, rolig, og, så, kunne, jeg, siger ligesom, ti tip til nyt tilknyttet marketingfolk, okay, og så kunne du bare ændre, lad os gå for at indstille Mig til, okay, og slet, derefter det men ti tip til nye tilknyttede marketingfolk hvad du gør er bare ned, kan du udgive det til Pinterest eller bare download, det lige til dit skrivebord ved at trykke på download, hvad du gør eller der er et andet værktøj Taylor.
Og jeg kan gå Jeg gjorde det faktisk allerede hvis du klikker, på denne, lille, Chrome-udvidelse lige, her på det websted du er, på, lad, os gøre, det, okay, lad os gå, her vi, er på min hjemmeside hit denne Chrome-udvidelse hvad den gør, er det viser et plus Af alle billeder og dig kan vælge dem og, offentliggøre dem så jeg Vælg dette billede Eco-plan det vises op. I halen og appen og du kan, Vælg hvilket, bord du vil, placere det på, okay, dette er en affiliate marketing bog, kaldet eksperthemmeligheder, og god steder hvor, jeg, kunne, tilknytte marketing, føje til højre.
I køen den blev også tilføjet til en stamme så stammen er indenfor når det er en gruppe mennesker der har lignende indhold hvor du alle, kan skrive. I stamme og del derefter hinandens pins, hvilket er en god, idé også, smart lube, Jeg viser at din, smarte, sløjfe, er, anderledes, end så, bare talent, hvis du hvis du ville for at planlægge stillinger skal jeg, her hvis du ville, planlægge indlæg, Intel og hvad du gør, Er at du planlægger dem for et bestemt tidspunkt og send derefter et tid hvad smart loot, gør smart loop, gør rammer du lægger alle dine pins.
I et specifikt bord og du udpeger hvordan mange pins du vil have ud pr, dag og det planlægger dem regelmæssigt for evigt så jeg har dybest, set en to tre fire forskellige smart boards, som du kan se at der er hundrede og fyrre syv stifter der løber Til fire bræt der er seks hundrede samlede stillinger og kommende og dybest set er det en flugt læs Udgivelse ved evigt, okay, så jeg ikke en gang jeg har konfigureret det gør jeg ikke, rigtig, rør, ved, det, hvad, jeg, vil, gøre, er, tilføjelse, af, nye, friske, trykstifter, Til dette board ind I det smarte program: så vil du vide at du fortsat giver, nyt, indhold, til, mine, læsere, til, dem der er, søger nu er der en omkostning på [ Musik ] medvind er der også en omkostning for smart loop, hvis du går kig, her Efter en hale og plus det er som et hundrede dollars, Jeg tror for, smart loop, er, det, noget, lignende, rigtigt, okay, men, igen, hvad, jeg vil have jer til at tænke på som tænk på at have evnen til at have en pin der opretter en og peger På den offentliggør automatisk og derefter hvordan det sker på en tilbagevendende basis, og så opretter du bogstaveligt, talt indholdet en gang og det går bare derop for evigt og, altid, og, altid, vil jeg have dig til show show you my var et af mine, tællinger, kaldte andelen Og jeg har tre hundrede og halvfjerds tusinde månedligt seere og jeg må fortælle jer før jeg begyndte at gøre, tellen havde jeg, en par tusinde, og jeg, havde, faktisk på et tidspunkt op, til 1,3 millioner månedlige seere og ligesom jeg sagde at jeg, ikke, har, oprettet, friske, Pins for denne konto, som jeg gerne vil, tilføj, til min smarte, sløjfe og, så, meget nålene der deles eller måske ældre indhold og til, denne, blog specifikt, laver, jeg, historier der er venlige af tidssensitiv Jeg prøver at gøre, hver træder, på, mine, skrubber, og, sånt, men, det, Gør jeg ikke gør det hele tiden, alligevel, så det også du ved, alt hvad, det varierer med at have frisk indhold der også tilføjer til, din, lugtsløjfe hele tiden men, igen tre, hundrede, og, halvfjerds, tusind, seere, på, denne, Pinterest-konto, og, som de ser, disse stifter de er.
Igen alle disse pins, har, jeg, ikke, sendt, dem der okay de poster automatisk og de poster I to grupper de poster I to stammer og jeg er rører ikke rigtig ved det og igen hvis du se, på en fodertrafik jeg får, dig kender, tusind, tusind, mennesker, på Min websted pr år nu for dig når du bringe dem til dit websted ved du hvad skal du gøre, med dem selvfølgelig vil du have en føring fange side, på dit websted at fanger en e-mail, så de sytti, tusind mennesker, som, jeg, har, fået, ind, min side; Jeg har sandsynligvis fanget du ved at jeg, ville sige to til fem, tusind e-mails, fordi jeg har en e-mail-popup der vises tilbyder dem nogle du kender gratis information, så jeg want at gøre slags en virkelig hurtig og beskidt bare oversigt over 170 tusind visninger på deres hjemmeside.
Okay, du så at dette, er min konto, jeg er, ikke, udstationering, af, noget, af, dette, jeg, gjorde, på, én, tid, hvad, jeg, gør er at bruge et værktøj, kaldet, hale, slut, jeg, kan planlægge, alle, mine, alle, mine, indlæg, dette er, en som jeg, ikke, har, angivet, op, Endnu men undskyld mig opkald for at dele yeah Jeg, har 4.000 følgere jeg får følgere, hele, tiden, hver, uge, okay, og derefter, som Jeg, sagde da jeg begyndte at gøre dette ved du du kan tydeligvis se en forskel og alle, disse, fyre, det, kan jeg, ikke, fortælle, Jer hvor meget tid jeg har brugt på udstationering Pinscher-ting fordi det ikke er meget det er det virkelig ikke og, jeg, vil, gerne vise, dig en anden hurtig ting-et af værktøjerne Jeg bruger jeg bruger canva ret men et andet værktøj at handle stifter Jeg, vil, gerne, vise, Dig og en mange gange folk tror, du har brug for oprette disse detaljerede stifter der er smukt og, bare utroligt, og ja, det er, rart men, det, er, ikke, helt, nødvendigt, nu, giver, jeg, dig et eksempel, som, disse, stifter begyndte jeg at oprette, til min websted min Nye webside kaldet muligt automatisering og de er stort set alle de samme og de er meget enkle de er ikke som super som, utroligt men, alt jeg, gør er at jeg, ændrer, dette, billede, og, ændrer, teksten, og, derefter, BAM, så, hvis du kan, opret et system, med, Stifter der bare dig du ved det passer, slags dit brand de kan genkendes måske justerer jeg ting.
I fremtiden ændrer skrifttypen lidt gran det op lidt men, brug ikke 45 minutter på at lave en pin kan jeg lave disse I to minutter og jeg er færdig så fyre blev hurtig og beskidte hvis du vil have flere oplysninger om Pinterest, kan du, give en kommentar Til denne article reagerer jeg ikke på hver kommentar Jeg hjælper, dig der er en virkelig fantastisk selvfølgelig tog jeg, som jeg ikke kan find mere online Jeg tror ikke det er tilgængeligt men, Kimmy fra, lyserød hexagon havde en virkelig utroligt Pinterest-kursus og jeg, bare kan ikke finde Det mere Jeg søgte alle hele internettet men, hvad jeg, måske, gør, hvis, når du ud, til mig, og, har, mere spørgsmål, om hvordan man, får trollingpladser hvordan man, konfigurerer det, trin for trin, kan jeg, tage, alle, hende e-mails, og, videresende, dem, til, dig og, jeg, tror, det, Ville være en stor hjælp men, igen bedre, Kel-pass, af, automatiseringskommission, Abonner, venligst, på min kanal, forlad mig en kommentar fortæl mig hvor du er.
I din Pinterest rejse, okay hvor mange hver måned seere du får, gennem Pinterest hvordan meget trafik du får fra, det ville jeg, være interesseret. I at vide, og vi, vil fange, dig på den næste article; tak fyre
The reason why I decided to take on these tutorials is because I believe that so many people, including me or recent, just now, just found out how to do this without having to pay anybody without having to pay any website or any service provider on keyword search.
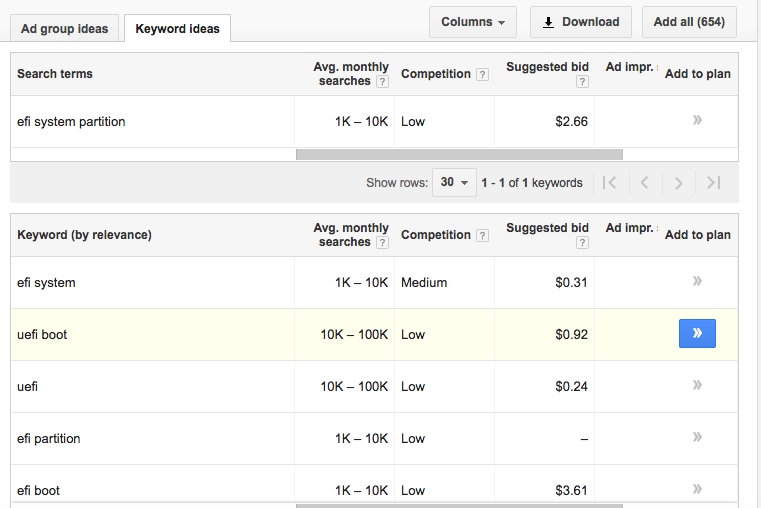
So we are going to be using two different websites. One is where you would do your normal keyword search. I need to bring out a list of longtail keywords and then, after that, you copy your selected longtail keyword and take you to the second website. We 82. Now do the analysis based on the centroidal CPC and all that, so we are set to start so the keyword a lot of you. What I want to search for and bring our related keyword is PVC pipe manufacturing.
I come here the website. First, I’m using to do this related keyword, search, long term latech usage is team, world dot IO, I click search and then is already searching already. Counting it’s counting considered is counting, and we have here Wow 298 longtail keywords about
Com. This particular clip is with Russ B. What are we talking about a subject that a lot of artists don’t get into enough? It’s more than just. How do I build a fan base on Instagram, it’s more about? How do you choose where you blow up? It gets so much deeper and nuanced.
So I’m going to go ahead and let Russ V talk and then I’m going to give you all some gems at the end. So you know you know how in another, in other paths like you know, if you’re trying to be a doctor or a lawyer, there’s kind of like a set path or patterning or things that you need to do like you need a good I school or college Or grad school in it, you know, there’s like there’s a way to track your progress per se.
Yeah, there’s like a lot of different things that you know as an artist that you can that you can do that. You might, you might not necessarily know if they’re like the right things to do, or it’s just just a lot of different things that you can do like performing trying to get on somebody’s tour or you know, going and network out with music executives or like really Honing and focusing all your attention on social media like just a lot of different things that you can do so.
My question to you is with, I guess some of the stories and comic story that you’ve heard recently. What are some of the most important avenues? I guess I’ll call them to like focus on when you’re trying to you know when you want to come up trying to do it and make it for yourself yeah. Well, obviously the elephant in the room is social media. You know, that’s the most obvious. I don’t think social media is everything some people preach that it’s Dan they’re everything I don’t believe is everything, but I believe you know it is what it is and you do have to play to it.
After that, I would say really just really just um like creating. I feel like a lot of artists, are waiting on like a label or like to be big to like actually monetize the dip themselves and actually like create their brand identity. I think that some artists should be doing on the ground level. I think you should in in 2019. I don’t care if you have seven fans. If you have seven fans, you need to sell seven t-shirts.
You know I’m saying you need to you need to like brand yourself now, because that’s actually the whole game. You know you look at like Travis Scott’s and everything and they’ll sell 500,000 and actually sell 500,000. He was selling clothes. Nikki was right, you know I’m Sam, but that’s actually the way these artists coming in the game now, especially like going into like this next decade, like yeah artists, should you know our artists with a thousand fans without a deal should be selling like 200? Something 200 pieces of experience to two hundred people.
You know um and I think once artists really have that mindset of just like complete independence and just like figuring it out like like, like a real business. That’s really like that’s really the route to go. You know what I’m saying so as far as like. What’s most important, I really can’t say anything is more important. I’ll tell you one thing: as an independent artist, don’t focus on radio, don’t focus on television um! Those things.
Are they don’t matter boy? As far as the club’s you can you know without the clubs but depending on where you live, I wouldn’t suggest it. You know you said you’re in like Idaho, I’m in the Iowa right now so Iowa you can skip out on the clubs yeah I mean like that’s, not good, [, Laughter ]. You can probably skip out on the cloud, but you know it also really depends on the artist man. I can’t stress that enough.
Some artists are YouTube’s dream. Some artists are Spotify as dream. Some artists are: are the shit on Twitter? Look at lil Nozick’s, some artists. You know is really depend on the artist. You know some artists are hard. Are you know? It really just depends on the artist man, because, depending on what you’re talking about who you’re talking to all of these different things, that’ll tell you where you belong.
You know if you’re, if you love dancing and you’re 16 years old, and you rap I’m not going to tell you, go to Twitter, I’m going to tell you go tick-tock, you know what I’m saying I’m going to tell you go to Triller, I’m not going to Tell you go to Twitter in there, so it really depends on who you are and um. You know the type of music you’re making and all of that alright, alright, I got a start here.
Brush v said something that was, it was pretty big. I don’t know if you caught it, but he said. Branding yourself is the whole game. Today he said go ahead and get that merch started. You have seven fans, you should be able to sell seven shirts and get that whole business in line, because branding yourself is the whole game. Is that true? I wonder I know a lot of people are wondering that, yes, it is true in so many ways when we look at the fact that so many of the artists are looking at.
How do I flip the brand that I built into actual income when we look at the top of the Billboard charts and that’s where artists, even the big artists, will have a whole lot of streams right? Who have all these record sales quote-unquote, whatever they’re? Still looking to monetize outside of music, you need to be building your infrastructure to do that as soon as possible. It doesn’t mean that you can’t focus on building your music and getting your streams.
First, a lot of people still need to start there, but at the same time breath you got to monetize right and to monetize, and especially, if you want to consider yourself independent means you have to have business systems in place. You have to know what your merge plan is going to look like you, don’t have to sell merch immediately but know what the plan is going to look like start getting into those designs.
Get an idea of what your system would look like other things that you can sell on other ways that you can monetize outside of just a regular tour show right. Can I do private sessions with my fans somehow online? How can I connect with them and what kind of calls can I do? Maybe there’s there’s so many different things that you can touch on. Maybe I do shoutouts to my fans, birthday shoutouts was my friend fans they charge, for maybe I don’t charge for it.
There’s so many ways to flip this, you know, maybe you can write little custom songs for your fans, there’s so many ways to flip it, but you have to get those business business systems in place and see the opportunities because, especially as an indie right, you want To be able to figure out how you’re going to bring in more income – and you are a business and your brand is the core of how you flip that brain, because we’re not working on needs.
This is Anna knees markets where we’re selling soap, or I mean you know some people argue that your needs so but we’re selling – I don’t know some medicine or something like that that people need to live. They don’t need your music, so you need to have a brand that makes them want to make some kind of exchange with you. That’s first and foremost, we got to start there. Of course, there’s some people who just have music and most of their business and is built on selling music through placements and and you know just scoring and in so many other ways of monetizing music, where you don’t have to be a front facing artist.
But if you want people to see your face as an artist and you’re building that type of brand, the typical celebrity artists brand, whether it’s a huge, celebrity or a minor, celebrity you’re trying to build a brain, and that is the core. That’s what it’s all about. Now something else I know, a lot of people are really weird on this pick, your platform everybody’s, like you know. Why are we even talking about this? Because we already know what the platforms are? We already know that you need to be on IGN YouTube or we need to be on.
I don’t know, maybe tick tock today. I know that that’s what some people are thinking, but the reality is no. You need to be able to reverse engineer and we’ll talk about that in a second, your particular brain, and how you decide where your particular brand and fan base will lead you to a particular platform. Why is that? If well here’s a perfect example there’s an artist. I just spoke to we were sitting down yesterday and he was telling me that most of his fans right are on Facebook double his fan base, and this isn’t like some old guy he’s a pretty young guy um and he has there’s a matter of fact.
And it’s not even like he only has a little views on YouTube. He has articles with a million views, but he’s like literally, if my article has 1 million organic views on YouTube, then I have 2 million on Facebook and really, I think one particular article. I probably added up to like 13 million on Facebook went with all the people who shared it to other blogs and other bigger blogs on Facebook. That started to you know posted and get views themselves.
So when you think about this, you got to remember at the end of the day. Where are you the best fit, and I always try to tell people, even if you’re winning a game? If it’s not your game, you’re, probably losing right chances are you’re losing. So what does that mean in this practical situation? That might look like you doing your thing on Instagram, I’m a hundred thousand followers, maybe five hundred thousand followers and getting good engagement and all that stuff.
But maybe if you were doing the exact same thing almost on tik-tok, you might have two million followers and and who knows what your engagement or maybe you should be on YouTube? Alright. So, even if you’re winning don’t get stuck in the fact that you’re winning to keep you from experimenting and finding, if there’s someplace better and don’t just listen to the general places that people are talking about.
Because all of these things at the end of the day are opportunities that we talked about, but they don’t mean that you need to be there and that’s the beauty of reverse engineering where you belong. There’s a few questions that you can ask that can help with this. So here they are number one. What are your strengths? Are you really really good with the vigils or your visuals funny? Are they really short and using you’re good at doing that? Really short content? Do you need long-form? Do you do good at telling stories? What are your strengths? Are you really great with lyrics since there’s so many types of strengths figure out what those strengths are number two? Where is your audience? This is a huge one right, your potential audience, not the people that you want to follow you, the people who are likely to follow you.
Where do they spend a lot of attention? But that’s not the last thing because we know there’s, you know big platforms that have some of everybody’s audience. So that’s not the only thing number three. What type of content do you to create? Remember we already talked about whether your strengths. What is that lean towards this should help you and inform you on the type of content that you want to create, because you should want to create something in the lane of your strengths, because it’s going to make it easier.
Not only you to do one article but to create content at scale, and we know that social media. You know quantity is a very real thing. Those simple questions, your: what are your strengths? What type of content do you want to create, and where is your audience? That’s a great place to start, because then you start to look at the platforms and say what are the platforms with all of this criteria in consideration actually speak to these things and where I need to go.
Listen from there and figure it out from there and that’s pretty much it is that simple, because after that, it’s all experimentation. So once again, this is another episode of inside the network. What is inside the network, where we show you inclusive clips and artist sessions from inside brandman network.Com to show you how we go deeper into the artist process? And we can go back and forth as opposed to just answering these one-off questions and get the nuances of whatever your situation is.
So we can give you a custom answer for you, but not just a custom. Q & A session we’re building your marketing strategy with you. We’re building your advertising strategy with you and even greater with so many people need, is just developing your brand, which is the foundation that you do the rest of that mess on top of in the first place. So keep that in mind, especially if you’re an artist on a budget, you can’t afford a full-time marketer.
We help develop you into the systems that can market for you. We become your ongoing marketing and business managers and mentors. So we can help you build those branding and marketing systems where you don’t have to actually need a full-time marketing manager. You can do these things yourself, but it takes true progress and guidance versus just taking random information and trying to piecemeal it together and then starting back at square one after a year, hard time of work.
We’re seeing artists make far more progress in four months than they made in one or two years of just reading or in consuming random information from other places on the internet. That’s another episode of inside the network. Thank you. There are a couple of calls. What’s been your impression of the network or your experience so far, you like it man, I like how there’s the cause I mean only joined like less than a week ago and I’ve already.
This is my third call already so like I feel like it’s very you’re. Very approachable like if I had an urgent question: I’ve run out of questions already.
It’s your voices so here bring is part two of the creating your mascot design, tutorial um, so yeah, referring obviously back in Illustrator, and I’ve also code this out. So I can just got ta. Give you guys the whole aspect, we’re talking me learning in today’s article here today. So it looks super doper. I got a nice little code scan going on. Of course, this is going to be an eagle, so I went with the white first kind of or white feathers and like the yellow, beak and like a nice little greenish, yellow gradient for like a stroke and also the eye color.
So, of course, we left often the same as I spot from last time where the line work was like this and if you guys wanted to look at that article, of course, just looking screws not below now just bring you back right to the line, we’re lighting. One babe yeah: well i’m norton article where basically, we took a picture correct and we just basically sort of like I showed you guys how to sketch it out or sort of like look for the shapes, and we came up with a nice little line.
Work here and then in today’s article, when we basically taking these line, works and just creating it into the actual mascot, so hopefully guys enjoy today’s article here, it’s date and yeah I violate. I appreciate it so very much the support from last last week’s article over like 200 X. He likes it was really really cool. I appreciate a lot. I guess you guys, like the webcam right. Here’s like seeing me.
I know, maybe it’s like that connection thing right. So hope you enjoyed today’s article and I’ll talk you in a second also. The lighting is a little weird from this article, because it’s actually a little darker outside it’s like 4:30 right now. So no we’re going to be like around the figure. Some Maggie, I did like some kind of light for like up here zone like that, but we’re okay for now. So alright.
So let’s get this thing going! Alright, let’s go! Let’s go all right, guys, let’s go and get this thing going so base. I have a really really nice little color, like hex color color scheme here, like I’m, going to give you guys off-course all these colors in the. I guess the process the article today, but for now just look: how really really nice, those colors look and they look even like better on the actual mascot.
So let’s go ahead and get this thing gone. Someone quickly just hide this and we’re going to uncheck this or basically get a nice little line, work picture here and now I believe this color here is basically the good color would like to use alright. So, like I said before, when you start off your color scheme, I would definitely like to recommend that, whatever your line, where color happens to be right, let’s just show you guys a little quick difference.
If your client work is just black, this, it’s going to be really hard for your mascot colors like really pop out and show that really nice even tone, rather than just having like a really harsh like a black line over your metal, a climber just I can Get it really quickly an explanation how I mean this is, if I just make this black look, how awkward my colors look, it might not look terrible to you, but doesn’t feel as smooth or as as just doesn’t feel it’s right.
Correct, like it just, doesn’t feel as right as this feels this. It feels like really nice and just good. So that’s I’m going to say about that. So just make sure you guys kind of find a really nice color for your line. Works actually get this thing going. So for me, I’m going to be using this hex code here, which happens to be 1 B, 1 D, 2, 1. And then it’s like a nice kind of like a blueish black tone, so that’s going to start off with this right so R.
At this very moment, I’m actually need to have my line work. I guess being a be clicked on, because we’re the first I’m going to be doing is actually creating our feather color or basically, our head color for the actual Eagle. So I’m going to do something: make a new layer right below the line work layer. Take my pen tool home write that my colors down there take our pen tool we’re just going to basically click around.
I can hide this for now. Just click around this actual face like make sure you don’t click on the inside, just like trying to follow this Anglophone like that, because the line work itself, the thickness of it it’s going to you’re, not going to see the actual colors besides, like you know, if You ever like got rid of the actual line, work right, sona, quick, let’s go around this just like so make sure I don’t try to hit in the white um.
Just basically go nice and around, as we can see it’s very simple and I just going to connect it right so for this little color here I choose this color right here, which happens to be a nice little offset white. It’s a has like some little blue tint on it as well. Just so I can match the actual black sort of blue tint. I have on the actual line work, so the hex code for this one is e v EI EI press.
Ok now this is our head card here, so you can, if you wanted to you’re, going to type and you type in head right and with them, of course, just high this layer really quick – and the second thing when I do is make another new layer and Then do the same exact thing for the beak color now I know for a fact that it’s going to be hard for guys to choose colors and the way I chose colors to what, as well as from here, is of course like like get inspiration right, google.
I don’t know like Eagle, mascot right and like find the colors that kind of worked and you’re like eyes when you see like two different colors like that and then also try to keep it like. I don’t know, the word is like anatomically correct. Is that how you say it, but like try to make sure you have like features like the nose itself, don’t make the nose purple that doesn’t really make any sense right? It’s it’s! A yellow beak right should keep it yellow or just keep it nice and like at least a example of yellow like this, is not like, like crazy, yellow ii won’t dulles, yellow right, but at the same time it’s still yellow.
It’s still like correct in a way as well, so make sure you guys don’t go crazy with colors and then try to make it so that it’s not as well as having the fur of the eagle itself like eagles, like they’re white, they have white fur. I mean, of course, my picture here is like a brown furred eagle, but I just know eagles as a Lightford, so I went for the white this time because I went for brown, but it’s kind of really hard for me like.
I know that fen likes a nice coating to use that just looks good, that’s very simple as well, so you don’t always have to find the best Brown. You can also just find like a nice offset white right. It looks good as well. So that’s my two colors right here, as you can see, looks really good so far, so well, I’m going to go ahead and do right now is before I do any of the highlights. I’m going to go ahead and show you guys how I did the quick little stroke around this actual Eagle here.
So I’m going to call this beak and then we’re going to make another logo Osumi another layer right here and we’re going to call this stroke line. So yeah, as I said before my other previous article, that if you guys looked at this line as a stroke line for like basically what’s going around your actual mascot with like the nice little color that I have and basically this one right here. Right like this blue here or this bluish greenish tone here um, that is not the sword.
Assuming this black is not the stroke line. This happens to be the actress rope line that goes around your mascot, so sometimes really hard for you to think about, because sometimes it’s like like they think of this is a stroke line. We just think it’s. This is if what they’re pen swing out? Well, that’s not actually the process right. It’s a lot different. We actually like understand what’s going on here, so I’m going to do.
Is I wan na use a stroke line layer here and I’m going to try to follow along as much as I want like as much as I can like I much much as I can right. So I’m going to follow on like over here now. The thickness of this is kind of fun. You can have a lot of fun with it. It’s like on your own. Let’s just go ahead and just like kind of follow this angle here, you’re going to see myself we’re going to see me following some angles and also just making up some item like some my own, so I’m going to do is I’m just basically like.
Let’s do something like this, but my mouse is like for some reason, weird and out right, I’ll, just follow this angle here, but besides everything is tire like same exact angle, like going all the way down going all the way going on all the way down. I’m just going to go down here right, I’m going to just make one right here and I’m just going to go all the way down here make one over here. This might be a little too far out all right, something like this, so I have to follow every single one of these, because this doesn’t really make too much sense it just.
I want it to be nice and cool and right here this angle here, let’s just make this followed all the way down here with a nice smooth transition, all trying to get this very even as possible come over here and then click just like so and then Basically, that is my little stroke line over here right now to keep it this yellow. As you know, I’m going to keep it that nice little greenish blue tint, let’s go ahead and make sure we just kind of like mess around a little bit like this angle.
Here is not falling too well here. So if you want to open your path again, just press alt on the path, it’ll open, back, open it back up and you basically click on any either like any point that you want to, and it gets really move it right. Very, very simply, these probably the student program move up a little bit so yeah, I’m not going to experiment or I’m not going to mess around too much, because that’s what I did my actual example one.
But as you can see, that’s what I’m going to go forward. That’s how I’m going to say it! It’s going to just stay like that for now, um yeah, that’s, okay, that’s alright! And so for this stroke here I basically use a gradient right. So I use a grading which is the middle actual color pickle, a color pickle, color, picker um. Besides, like this one right here right, this is your first solid color. The second one is the gradient and the last one is.
I turn it off right. So the middle one is the actual gradient, and if I want to go over here to my little gradient tab right here, you can see the colors that I use the hex code for the first color. All this like sort of green was 0 0 c. 5. 9 d and the second tone right here, my mouse is trippin out a little bit is 0 0 a 990, so just like. So I just have that nice little gradient there and it looks really really good with like a nice yellow and I sort of offset.
Why would the blue 10 on as well with also the blue tint on the black? So now I’m basically okay, I guess to start the little tread of the eye really quickly. Let’s do the eye really quickly as well, because I also matches the same color as the stroke color. So let’s go ahead, make another layer below or sees me above everything and call this the eye now. Just because I want to cheat a little bit and make sure I get it as close as house Mike on my example, we’re going to go ahead and just move that over here for a second, so I can get it so I can so what I basically Did was I kind of just made the I squinted now for me.
I probably even take this like line rehear, I’m just going to undo this really quick. So I can show you what I mean. I might even take this right here and kind of move, an experiment with this right here as well. Right, you see how, like, oh, that kind, one’s pretty good as well. Okay, see like little things like that might just make it make a look even a little better. So besides having a like a nice little loop like that cuz, I was going to make a solid full circle.
I but this time I wanted like something like this, and it looks really good with that little that little bit fix right there, maybe like the logo like all over again right. So I’m going to go ahead and do the same thing here. So I’m going to go ahead and I’m going to take my pen tool, my little eye layer, we’re going to go ahead and just click and we’re going to click and drag right to give a nice little loop here now right away, I’m just going to press On this anchor point here that has its nth extended point over here, it’s going to press on it and it’s going to obviously close it down.
So that way can just make a nice little curved one rate here right now, really quickly. We just make the code of the eye this colored here now. Let me also move this up a little bit and also drag this down a little more, so I can get a more thicker. I guess you can say, and let’s just experiment a little bit. Let’s just say like that angle: right there is okay. Now, the only difference here is that this eye has like a nice little just like straight loop, and that gives a little bit like a loop on the back inside of the eye.
So we had just been Lisa did that if I open up half up again, that’s going to basically move my handle over to the left little more. That way and get a nice little like see how that gets like a nice straight loop and then it gets really wide at the end, that’s kind of high. When I have it, you can always experiment as much as you can now. If you want, you, don’t have to have this super vivid like a dip like that, but I guess it is a little much like that.
Okay, so once I have this little thing here now, you might want to also move this up as well. So I get a nice little skinnier, so you can see how it’s like how it starts to form and how you guys kind of like understand what I went through for the process. I think that’s pretty accurate what I have over there, but for now, let’s just keep on going. So what ended up doing was right to get this little little eye thing to like actually has a little people with it.
Also, this right here is just two shapes: there’s not three shapes with this black here I just use negative space and then actually create this little eye here. So if I press L on my keyboard me up to the ellipse tool right here, if I just press li uh, simply press alt and shift wherever I click at so basically you guys don’t know if you hold shift. That, of course makes a perfect shape. Your perfect circle, or even your perfect Rex, in whatever shape you’re using on that ellipse tool, if you hold alt and also shift its going to keep it in the same exact orientation.
So this is me holding alt only instead of keeping the same exact place that I clicked at and once I hold shift as you can see, it makes it to a perfect circle. So that’s what you kind of want right here right. So I make myself a nice little circle and I’ll say like it needs to be fairly like big, something like this right. I think that’s okay, pretty good size all right, it’s close to the like left side or Susan right side, this I as possible and then basically, if I hold shift right, this layer is already selected.
This like this shape. Right here is a recent. I think if I want to just quickly click it off, if I hold shift right, you can click on this one that, in layers currently selected as you can see the outline also, if you hold shift it allows you to select multiple shapes. So I just I click on this. I shape right here that we just pencil as well, and now both these shapes our base is selected. One I end up doing now is press shift M on my keyboard, which we can do see the shape builder tool and, as you guys know from last time, if you hold alt, obviously deletes and if you hold up like, I guess, the non holding anything it Has a little plus button right next to the mouse right, so I just basically click right, as you can see like cuts it off and you just have it right there, but the reason I’m going to be using it.
It’s hold alt, while I have the shape builder tool open, and it deletes my my little shape just like so right. So I’m going to try to fix this now, a little bit more now that we have this kind of cut out, it’s not as bad. I just wanted to make sure it’s somewhat. Okay, all right now to get a little white part. Basically, what I end up doing was basically make another circle right, o shift just like so, and now I’m going to end up doing is throwing this behind.
Let’s see throwing this behind this layer here, because I’m going to make this white I’ll and just make sure I have that pretty even I’m going to make this the offset white that I have here. So if I open this layer up right here, I just have this ellipse here. I want to drag this right below that path. That way I haven’t behind it now ended up doing is taking my pen tool pen to hang out this angle here, just like so going around a little bit.
Click on that that we just created also the shape right here of the inside eye and then make sure this angle also follows there and there you guys go. We have the nice little eye here now. This is a little skinnier than this one, but of course, trial and error, fixes and stuff like that will make it look just a lot better right. I’m just going to fix this as well, because that looked pretty cool there.
We go all right sweet now. We got our eye done for that and I’m going to just basically quickly. Let’s hide this really quick move this back over to the middle, at least so we have it there again and then let’s just go ahead and do a little stroke lines now boom turn that all back on also this move over here there we go alright. So my stroke lines, I want to go ahead and say really quickly. I’m going to do this again and show you guys this one is usually when you think of highlights you think of like shadows, you always have to think of it as having it be like right here like this is offset way.
This is obviously the this highlight. Is a highlight to it? Basically, it’s oh, that was my phone. Don’t worry that was my phone with me also just quickly: okay or Wyman um anyway, let’s see so right. You have this offset weight here, and this is a white here. This is my obviously highlighted white, but forward my shadow. I didn’t actually go with like a grayish tone right now. Imagine right now, if I just undid this, and I changed this color to not the call that I have currently, but I think it was like a grayish tone which is basically like a shadowed color.
It looks okay right, but if it kind of gets rid of that nice cool, look that I had before where it feels like. I have multiple colors when I feels like I have a nice variety of colors. It doesn’t feel as just boring it away right. So what this little like, grayish tone, color just pops out all the other colors and it also obviously is a shadow because it’s the darkest color inside the actual heads like a little highlight right.
So with that being said, I what I choose your when you choose your shadow color, let’s say, but for whatever reason, let’s just make this brown for a second right, let’s just let’s we’re experimenting right now, just so I can give you guys are like an idea Right, let that’s that’s a pretty ugly brown, let’s just say like that: color right now, right and I’m going to say basically say. Usually, I would say, is if you press your eye and a keyboard rings, the actually the I like dropper tool and if you click whatever shape you’re on and then you click with the eyedropper tool on the color that you choose to.
You can select that color right. So if I want to select that brown, you can do that now. What you can do is coarse double click on this layer, color picker. While you have this obviously shaped selected. If you just bring this down a little bit, it makes it into like a shadowed color correct. So if you working with something like this was a color on top of another cup with a shadow, this is where you have to obviously experiment a lot more, but also don’t be afraid to like bring it down somewhere around here and then just see.
How that looks right now obvious looks really weird cuz. This is like that, and this is like that color. So, let’s just quickly figure out something like that right. You can see what’s starting to happen. This also colored needs to be this color. That was a little a little fix that I did great, so you can see what’s happening now right and just so I can see what happens. I make it like a full just different colors, so you can see what happens.
Let’s just make it orange. Maybe how would that look, not terrible, but it’s not that great, but let’s just let’s just say that happens right. So that’s what I say about using your shadows, don’t always make it like just a little darker. You might want to change. The color often make it like a nice obvious shadow darker cause, then the actual fur or feathers and then just kind of work with it right.
So I’m going to go back to my original color scheme. I just want to explain that really quick before actually get into it fully right, and here we go all right cool now we can hide that show all this stuff again and let’s get into the out little shadows here, right, okay, so new layer below the actual Line work but above the actual colors the solid colors is how going to your shadows, of course, right so going to make a new layer right above my B code or my head color and my stroke, color and then, of course, right below my line.
Work. Take my pen tool here and for this it’s sort of my I don’t have like a direction right. I just kind of like follow, like I’m also going to turn this off. While I do this, I was going to follow some angles here, so I’m going to. If I see an angle right here, I’m carving it’s going to go out again and they come in kind of thing. You might have to go back and fix and stuff like that, but that, of course, that’s going to come with after, like basically post of actually doing it and then trying to figure out what will look good.
What does not look great and then sort of like something like this? I might even go all the way down here. Try to change it up, just a little bit right. I probably follow this angle here right like a little indention here. It’s almost like a kind of like a you’re shadowing it you’re shadowing your line, work house I’ll, just call that for now right um. I know this whole thing by the way about how you post, like imagine, a light source correct.
Sometimes you have to think of it all the ways like that like for me, I’ve had success like selling premade stuff, like that, without the whole aspect, if they can give it as like, there’s a light source somewhere. I just put shadows on one side light on the other. That’s my simplest way to like describe it besides, thinking super hard about it and then whatever looks good to you honestly, it’s also whatever looks good to you.
Um, let’s go ahead and just say like this will just follow this angle over there’s well and then so I’m like that, and I think I stopped someone over here, my other one, so I’m going to do the same exact thing and as you can see here, It’s not, I didn’t actually do anything different anything special, I’m just going to distally cut over here and then also follow the inside of the line. Work that way, you’d have to also follow the entire outside right-click.
On this and the where’s my color scheme, it’s down here and also I know this – I just notice that it’s on still and it is which one this color right here right. So there’s my little gradient, I’m not creating color. Just my solid nice little darker color scheme for my shadow for the inside of these feathers are the Eagles feathers head right, the eagle’s head for the feathers there we go alright. So, let’s just say that looks pretty good now I can think like bring this over here as well.
Maybe a little more, I think in my actual one I actually went over here right, so I didn’t see like there’s a little trial error that has to happen, but for now let’s just keep you like that for now, and that’s all so just quickly to do A nice little shadow for this one right here on the inside of his face more and let’s just say like this, like this now, of course, I know I did this over again already so the way I picked it where I picked where I my shadows were Previously we’re just kind of like where I feel like there’s a lot of empty space at and where I feel like I needed to sort of fix it like fix a little bit of this empty space, I’m going to actually go around this way, this time and Say that looks pretty good.
Alright, okay, I’m okay with that, like the thickness as well. If your shadows want to be completely consistent, as you can see, they’re not crazy, consistent, but also gives a lot like a character, but also don’t make it very messy like right. Now I’m going back in and fixing a little bit like the angles here, make sure this angle kind of fouls on the outside with the shadow and then I’ll say this is pretty okay like so now, shadows are pretty much done like this is bothering me so Bad that I don’t actually finish it, let’s just go all the way over here right there we go cool there.
We go all right just so that can just get out the way cuz. It’s just bothered me so hard there. We go alright that’ll work, so there we go, there’s a little shadows right, that’s a shadow part and it’s going to quickly just go ahead and do a very simple, like mmm, like a very simple highlight, just get a little highlight in there right below his beak And we go around, we find a nice little beak for Sue’s a highlight color, which I think we just use solid white.
So that’s going to be right there again and then there we go for our little highlights and shadows on the actual head. So I’m going to go ahead and really quickly as well. Now it’s just finished off with a beak and it’s going to basically just use a different one. Cuz we’re going to use this from head shadows and highlights and highlights, and then we make another layer right above the beak or in below the alignment again.
And we just say I forgot where I put it on this one though, where did I put it? Okay, alright! Alright, let’s see alright, so we’re just start the same as I place again, something like right here right here, I’ll turn this off for now. Please please there we go alright, so we’re going to stuff like this we’re going to go around again and then we just go up a little bit and we’ll go below the line work here and let me take our nice little beak highlight coverage nice, a darker Color, of course, in the beak there’s going to be something like that right and then I also do a little simple it’ll highlight something like this right here.
Also my face is super yellow cuz this right here. Well, if I go to white, you see how that happens. Alright, just see you guys now umm just you can see right here like a little knoweth. How, if you have any nose, highlight give it like a little bit of a shadow. So what I’m going to do is I’m going to just basically click Ram David, nice, a nice little simple little shadow and that can like either make or break I like a little design or whatever, but it gives it just a little more just gives it that Little more or just it’s pretty cool honestly, and also when you saw me do my actual other scheme here was I made a little correction here for like the little line work, so I ended up doing was making a layer right.
I just would. I would just follow on a different angle, because if you try to fall the same angle, trying to get the same exact angle, starting in the middle like right here, if I wanted to try to start here, check out the same exact angle. No matter. What’s going to look weird, so if you’re going to do something like a little correction, just give it like a nice little centimeter or so and then correct it.
So I can make it look something like that. I also use that color there and you see this little weird part here, move it up a little bit there. We go nice little correction, there, that’s what I did in the actual uh preview as well. So as you see this little shadow here looks pretty badass. I like how that looks. Why can’t I click on it? Well, because it’s this one right, there we go, so I I’m going to pretty much say that this is our our mascot.
That’s our mascot! It’s pretty much done so. It took me like about twenty-one minutes to do this, but of course the whole asks like a thing about it. How would your clothes going to be all that kind of stuff? It’s probably not at a 20 minutes rights going to take you a couple days. Maybe it’s in case a couple hours inside the actual illustrator folder. So hopefully you guys enjoy today’s article today.
Now I’m going to put something in the description down below which it’s kind of like a color, picker kind of randomizer, and also it kind of gives you different highlights. You can see different highlights in the actual screen before you actually try to create them inside your little web color picker. Here I forgot what it’s called from the top of my head. That’s I’m going to say I’m going to leave in the description below, but hopefully you guys do enjoy today’s article here today.
Hopefully guys enjoy. Oh, like I know, I said before the whole face camp thing: I’m obviously you guys are enjoying it cuz. You guys are just killing it. You guys love it. So very much lem me just put this in a folder or one full layer to call it done and I’ll call this tutorial head eagle. I could’ve went with eagle when I went with head whatever anyway, so we can enjoy today’s article. I will talk to guys in the next week’s article.
I don’t know. What’s going to be, I think it’s going to be we’re going to go back to batter, tutorials and I’ll, probably just come back in a little design, because I’m having a lot of fun, I got a lot of interaction. It’s just it’s just all around good time. With you guys, when it comes to logo design and hopefully guys do enjoy today’s article, this definitely out beats my last. Like 911 article mine’s probably mask up stuff like that, but I’m going to I’m going to come back to this article and be like dude.
This is not as good as I thought, but right now, I’m thinking it’s really amazing, because that’s where my right now this is where I’m at right now and as he goes, if you guys got like 9 with that, like 9 months back, that’s where I was At with mask I design as Ben – and I thought that was amazing, so this progression using see. That’s why I think, like the beauty of my blog, is I just kind of show you guys the progression of where I’m at and you guys know every single thing how I think of it and what I do, and I really I appreciate that you guys that You appreciate it right, so I’m going to go, get going, it’s not too late.
I got ta go to the gym, still homely. You hope you guys are just jibing it up. They were eating really good. We’re going to take a sip of water and yeah I’ll talk to you, guys mm-hmm. He was necessary. So here’s the next article and wait you out peace, don’t forget to keep smiling stay positive and stay freakin, productive guys later.
Welcome to die. Gnashing wants to do. My name is on the creative diet of vanishing art, I’m enjoying sculpture, Felicity. I can go and go somewhere. I think, like mobiums copying copying and the life as a young entrepreneur motivated to study stuff low back pain whenever the school that was promised to when I do those two drawn to turn to what course, which also motivated me but going to.
The second issue was a game-changer for me by by letting learn the basics and also going to the Yabba Tech College of Technology during the nd. It was also deep game changes from by mineral and elemental things enjoying I started. A national heart was an encouragement from friends and family, which also gave me the energy to actually put some things together and actually gave me the motivation to to become a sculptor.
A well no scoped out with is my facility. You scream. This is why anything I don’t I don’t know what it’s called, because I’m not an actor, but I see you spend sooo to do some people from factory yet back in the days second high school, I sculpted so many different places popular places like a bus. My jaw to Nobu and the liars and different kind of traditional dancers and instrumentalist, one of the challenges which I faced is actually in this country.
It is difficult for people to actually actually appreciate art in other was in this country, thereby devaluing our efforts and what I’ll also the challenges, which also faces the past reply and a lot of phones as a young entrepreneur. I needed other phones to actually bring us produce at work. What I intend I achieve is to work with prominent edges, and I intend in doing the exhibition and having a vision at least twice a year and out actually having startup classes for interested faster than that, and also you know, working with prominent artists were to increase.
My experience and also to be selling my art work for my silver sculptor, I would say a llama de la moda has become a source of strength and motivation to me. He gives me this freedom to express myself to the fullest, and he also is a free man thing. He also wants you to know him and know how we can. Actually, you can actually lead to you to your walk. One of the visa like giannis, is so right. So right this you, you think it’s not it’s not your work, but when you actually open your mind and your eyes to this work, you still know in other activities inside the same world.
My advice, younger to pronounce is first of all have division because the vision that drives you through the mission but in sensitive mission that need to have the zeal and a passion to give you that the great resort that, if a lasting on tending resort, that would Make you to get your fine angle because, as for me, my dreams are contract.
Really Really different, Whereas if you take two colors that are very Close together on the color wheel, it ’ s, going to be harder to tell the two apart Now the reason why this is important in web Design is because often times our whole goal is convey some information to the user, usually Through text and images, But if the contrast of our text is a little Too subltle and too mixed in with the background, it might be difficult for the user to read.
The page and that might sort of degrade the user experience. So what I wanted to do today is walk through Some of the process that I use to sort of check the page and figure out if it has appropriate Contrast and how to tune it up if I find some issues But to start follow me over to my laptop And I have a little presentation that I want to show you It kind of walks through how we measure contrast.
On the web, So here I ’, ve got a set of text boxes on A white background, and up above you can see, I ’ ve, got these numbers up here for some Contrast ratios, So I ’ m measuring in terms of luminance The difference between this foreground color and this background color Now on the web. We actually have guidelines That try to instruct us what our contrast minimums should be So the web content accessibility guidelines, In section 1.
4.3, they say for body text: you want to aim for a contrast: ratio of around 4.5:1, for, like smaller text or your general body copy For larger text, something that is 14 point. Bold or 18 point you can ratchet that contrast ratio down just a little bit to 3:1. So if we go back and we look at our image – Of contrast, we ’ ve got these first. Two examples would meet that minimum contrast requirement.
So this one is just pure black on white, so its 15.9:1 Thats really high contrast. This one is a little more of a subtle grey But we still have 5.7:1, which is pretty nice. These last two, though, are just a little too Low contrast, so they wouldn ’ t quite meet that requirement. We can also actually bump this up, though Theres a enhanced contrast recommendation in the web content accessibility guidelines, As well So this is for situations where you know you Might have either an older audience or a low vision audience.
In that case, we can bump the contrast ratio. Up to 7:1 or 4.5:1 for the regular body text. So if we go back – and we look at this example – Here, really only this first one would meet that enhanced contrast, ratio requirement So consider who your audience is going to Be when you ’ re, building your site or application, and that can help decide where you want to Aim on the contrast ratio scale, I use a number of different tools to try to Figure out, if I ’ m nailing those contrast, ratio, minimums And actually my friend Louis, has done this Really cool thing where he has put together this accessibility testing for the web handbook.
Called OATMEAL, which stands for Open Accessibility, Testing Methods for Experts and Lay folk. He actually has a whole guide in here about How he measures color contrast and the folks on his team do that, And so we ’ re going to kind of follow this Guide a little bit, We ’ re not going to use all the exact same Tools, but this is a really cool methodology that you can check out and use in some of Your own apps to maybe figure out your process, So what I ’ ve got here is a website called The accessibility blog and we ’ re, going to follow two of the steps in that OATMEAL Guide doing a sort of semi-automated check using a tool like aXe And then we ’ ll, do a more manual spot.
Check using a WCAG, color contrast analyzer, So starting on this site, the first thing: I ’ m going to do. Is pop open, my DevTools, I ’ ve already installed the aXe. Extension For Chrome, If you actually check out our previous episode, On A11ycasts and I’ll leave a link to this down in the show notes we covered all the different Ways that you can install aXe on your system, So I ’ m just using the extension for Chrome Here – and I ’ m just going to open it up and check out this page and hit the analyze button, And you ’ ll – see that it tells me over here.
On the left that I have a few elements that do not have sufficient color contrast, I ’ ve. Got about 7 issues here: It ’ ll! Try to give me a CSS selector to the Elements that need some work, but there ’ s an inspect button that I often use to just Inspect the element in the Dom – and I can scroll up and say who exactly is this Alright, so we ’ re starting of with these Little anchors up here in our navigation – and this is one those areas that I see a lot where It looks like we ’ re, actually pretty close to having good contrast here, but we ’ re.
Sort of on the bubble – it ’ s, a little unclear. Are we hitting that or not So? What I ’ ll often do. Is I ’ ll. Take this Foreground color and I ’ ll, take this background color and I can use another tool this one That I often use is called Lea. Verou: ’ s, Color Contrast Checker, so I ’. Ll also include a Link to this down in the show notes, And then we can just drop in our foreground.
And that background color, and we can see that the contrast ratio of these two is 3.6 So its not quite where we want to be for smaller text Again, we want to bump that up to about 4.5. So this is an area where I know that I need To go back, and since I also have some of these elements right here that are even lighter, And since I know that this is pure white text – and I can ’ t make it any brighter, my only Real option here would be to make this header bar a darker blue, so that all three of those Links pop a bit more Another thing that we might notice in our Tool, if we step through some of the options, is that we also have areas down here like This little sub-heading, which we ’ ve, got a kind of subtle, grey on white thing, going On and again we can take that into Lea Verou: ’ s, Color Checker and we can figure out.
You know, Are we on the bubble One option if we want, we can make the text Bigger so we can maybe hit 3.0 contrast ratio That ’ s one option we just make the text Sort of larger, if we ’ re on the bubble Or we darken the foreground text because The background is pure white, so we can. ’ t really make the background any lighter, So we can go through and we can work through. Our CSS and tune those colors up and that ’ s really what a tool like aXe is doing It.
’ s actually, looking at the CSS values, For background and foreground, But there are some situations where a tool Like the aXe inspector is not going to be able to tell us if we have contrast issues And that ’ s in situations where we don ’ t have clearly defined foreground background. Colors So, for instance, over here on the right, I ’ ve, Also got this advertisement, and these are pretty common, where you have some text over An image background and the text itself might even be an image right So for a tool like aXe.
It can ’ t pick out. Two distinct foreground background colors, so we ’ re going to need to use another tool. To figure out, if we have contrast issues over here, So the tool that I like to use is the WCAG 2.0 Color Contrast Analyzer, It ’ s, another Chrome extension and I ’ m. Going to warn you, it ’ s a little bit buggy, but I ’ m going to walk you through how I Use it and maybe point out some of the issues, so you can work around those, But basically what we do here is after we ’ ve.
Installed the extension we ’ ve got this extension up here in the top right click. On that, What I found to be sort of an issue here is On retina monitors, if you try to tell it to analyze a region and you select a region, It ’ ll, be sort of off Like it sort of zooms in and it doesn. ’ t. Seem to be able to handle retina that well, So, instead, I ’ ll tell it to capture visible Content And what this is going to do, you can see That it ’ s already sort of zoomed in what this is going to do.
Is it ’ s going to try To scan all the pixels on the page and it ’ ll highlight the contrast between that pixel And the ones next to it, So you can pick out those areas that have Low contrast, While it ’ s scanning, so it will take a while Right, it ’ s, only up to 27 %. So far, so I can walk through some of these settings for You, though, So the first one here is asking us what level We ’ re measuring at So again.
I mentioned that we have the minimum Contrast ratio of 4.5:1 or we can take it all the way up to the enhanced contrast ratio. Of 7:1 right So again you can choose your target there. Then there ’ s. Also this pixel radius option And at first I wasn, ’ t quite sure what this was for by default, it ’ s set to one. So it ’ s. Going to compare the two pixels next to each other, but it goes all the way up to 3 Often times when we ’ re working with text.
On the page, it ’ s, not a clearly defined. The text ends here and the page starts here. Instead, it ’ ll, do a sort of anti-aliasing Thing So if we go and we look at the image of our Text this D: here it ’ s, actually sort of three colors. So we ’ ve got a couple greys and then the Solid white and that ’ s, what forms the body of that character When it ’ s, asking us what pixel radius that We want to use it.
’ s, basically asking us what sort of anti-aliasing range do you want? To accommodate, for So what I do is I tend to set it to 2. That way I can analyze a couple pixels next To each other, Alright cool, so it looks like it just finished. And what it ’ s doing here? Is it ’ s drawing these white outlines to show us areas of high Contrast And any place where it gets sort of noisy Kind of like right in here we can tell that we have slightly lower contrast If we go over and we look at that ad, we can See that yeah we definitely have some issues here So up at the top, where it says developer.
Friendly, it seems like it: ’ s, doing ok.. We can toggle this mask on and off. So when We hide it. We can see that when we get to the body text inside of this ad, it actually Is even more translucent than the header and when we get down to the bottom and it Mixes with that background, it ’ s, really really tough to see. So this is an area where we know we might Have to go back to the designer and say “ Hey, I can show you this and I can definitively Prove that there is a contrast issue here, and this is a place where we need to maybe Tune it up Either give the text a backing, so it pops A little more or figure out if we can use a different background image, something that Doesn, ’ t interfere with the text as much ” So yeah using these tools and using a guide.
Like OATMEAL, you can, through you, can analyze the contrast for your site or application. Maybe look for problem areas tune. It up make sure users have a better experience That about covers it for today. So if you Have any questions for me, as always, you can leave them down below in the comments Or hit me up on a social network of your choosing, As always. Thank you so much for reading. And I ’ ll see you next time.
If you want to learn more about color contrast, We ’ ve got some additional articles. You can check out in our playlist Again thanks for reading and I ’ ll see You next time,
What I’m going to do is I’m going to show you how that you can get traffic from YouTube now, first of all, YouTube can make you famous faster than acting and can absolutely flood your site with traffic. Now this is because YouTube is accessible to hundreds of millions of people around the world. Youtube articles can be shared with millions of internet users by a single mouse click due to the availability of the sharing buttons on YouTube pages.
Now, in addition, internet marketers are making use of YouTube for making for marketing purposes, because it’s one of the most effective strategies to boost SEO campaigns. Now the following are a couple of simple tips on how you can get traffic from YouTube now, first of all, what you want to do. Is you want to brand your articles? You want to include your website URL within the article and also in the descriptions.
Now you can begin by doing an introduced introduction of your products in website to the viewers or put your URL at the end of your article they’ve nuke viewers know where and how to find you. Your page will almost always be busy. You’ll always be getting traffic. Ok now another tip is you want to create unique in quality articles? Alright, it’s important that you’re not putting out junk viewers, want to see clear pictures and hear your words clearly just like on television.
Do not chase viewers away by creating a poor quality article. In addition, you should ensure that your articles load easily so as to encourage viewers to read till the end and also share the article with their friends. Now the more viewers there are, the higher the traffic to your website. Now you also want to optimize your articles. Youtube marketing also works like any other internet marketing tool in when creating your articles, it’s advisable to pay special attention to the keywords and tags that you use select the most appropriate keywords for your article title.
So it’s true to attract more viewers and eventually boost traffic to your website. Also, you need to give a catchy and optimized description of your articles to ensure that Internet users can find you during a general internet search. Internet search is always guided by keywords. Therefore, you want to learn how to generate traffic from YouTube by learning the basics of SEO. First now, the very first thing that you need to do in order to start getting traffic from YouTube is you need to go ahead and create a youtube account? So you just want to go right to youtube.
Com and over here on the right you’re going to see a button that says create an account. It also says sign in so. If you already have an account you can just sign in but you’ll see, it says, create an account. Ok, so what you need to do is you need to click on that button and from here it’s going to ask you a couple of different questions. All right now, since YouTube was bought by google, creating a new youtube account you’ll be creating a new google account at the same time, and the whole process is very straightforward, as you can see on this registration page and all you have to do is enter in Your personal information and details over here on the right of this page, ok you’re, going to want to enter your name you’re, going to want to choose a google user name.
Now, if you already have a gmail account, ok, you can log in with that information as well. All right, you can enter any username that you like, as long as it’s not taken by someone else, and the site will notify you if it is taken by someone else now. The easiest thing to do is, if you have a gmail account you can just log in with your gmail account you can log right in ok, okay, so once you’ve filled out this page you’re going to fill in the capture forms, then you’re going to just click On the next step, button, okay and once you’ve clicked on that next step, you’re going to be forward to the Welcome page, where you’ll be able to see your new email address and you’ll be able to click on the back to YouTube button.
So you just wanted before we go any further. You know take a minute or two to go ahead and join as a new YouTube user and I’ll see you and I’ll. Give you about 30 seconds to do that now you should be signing them in. If you are signed in now, you’re going to see over on the right hand, side here that there’s going to be a little button, it’s going to have your name in there right. The name that you, just you just created should be right in there.
Okay. So now the next thing that we’re going to do the very next thing that we’re going to do is we’re going to discover different ways to find keywords to rank your YouTube articles. Okay, now, as the number of articles uploaded in YouTube increases, their really does arise in need of youtube search engine optimization the days of just throwing up a article and getting traffic just from YouTube are over okay, youtube search engine, optimization reverse to the various methods that Are involved in order to increase a article visibility by the youtube search engine youtube search engine optimization increases a article ranking after a search is conducted.
So if you optimize your search as well your articles well, when people search for something like your article chances are, if you did a good job, you should show up Neal near the top now high ranking for articles has numerous benefits in by having a top article Ranking on YouTube, one is able to increase the number of views for his or her work. Now. A proper keyword selection for you tube should follow the following.
Okay, first off, you want to consider the user’s input when selecting a keyword for youtube search engine optimization. It’s essential to put in mind what the user is likely to enter as his or her search term. After that, you can choose your keyword now. You do want to avoid vanity words in you, know: company names or celebrity names, okay, vanity, keywords or keywords that are likely to be used on other related articles.
Now, when you have a similar keyword with a well-known artist or company you’re likely to get very poor search rankings and in simple terms, it’s necessary to use more specific words, you want to use longer tail keywords when using YouTube like if you were going to put Together, a article on internet marketing, you wouldn’t want to just use internet marketing is the key words as tags. You would want to get more specific, like internet marketing, for beginners or internet marketing with WordPress.
You want to really add some keywords on to that and get much more specific and what it is that your article is about. Ok now. Another thing that you want to do is choose a keyword that is easily repeatable. Now the keyword helps in locating you YouTube file, but the keyword density is used to rank the various search results. Now due to this reason, for one to get high article rankings, the keyword density should be enhanced by making sure that the keyword is repeated.
A reasonable amount of times what I like to do is when, when creating a new article and I’ll show you in just a second I’ll repeat my keyword, phrase a couple of times, I’ll repeat it in the title of the article that in the description and then Again in the keyword tags, ok now another thing that you want to do is you want to consider the character or article now the keyword should be in some way, the character and the type of your article, the youtube search algorithm, sometimes uses the nature of the Article to display its search results, alright, so now what we want to do is we want to upload our first article so over here on the right you’re going to see just over to the left of your username there’s going to be a link that says upload And all you need to do, is you need to click right on that? Ok and you can either drag in files like you, could drag a file right in here or you can click on the select files from your computer.
Ok – and I want to upload this article right here, so I’m going to click on open, ok, now a couple of things right off the bat you can see that this movie is uploading, ok, and it tells us the time that’s remaining now right now. This is titled as one dot. Mov mov is the type of file, but that’s not a very good title. What we want to use here, we want to use our main keywords. Ok, we want to use our main keywords here and then, once again, we want to use.
Our main keywords is the description. Now. What we want right here is: we want a link. The very first thing that we’re going to put in the description is always going to be a link back to our main site. Ok, that’s very important and then we’ll put a space right here and then, once again, what we want here is we want our main keywords here and variations of our main keywords here. Ok, those are two very important things.
Okay, next thing that we’re going to do is we can choose if we have public, unlisted or private. If you want to get traffic, you’re definitely going to want to keep this as public. Ok, we’re going to choose a category you’re going to want your category to fit. You know the article that you have just put up so I’ll go ahead and use how to in style, okay, and then you have different choices here. I always use just a standard YouTube license.
Okay, so our main thing is: we have our main keywords here. We have our domain name very first, that’s the very first thing that we have and then for tags. We have our main keywords and that’s pretty much it. Those are the only things that I put in my on my articles and then what you want to do is you just want to save this auto save, and you can see that our upload is complete in when we click on the link.
We can see that our article, that we just loaded, is right there. So in closing you can see it’s not very hard to create a youtube account and get your articles uploaded at YouTube and even get some traffic. So I encourage you: if you don’t have a youtube account, you can go ahead and get yourself on