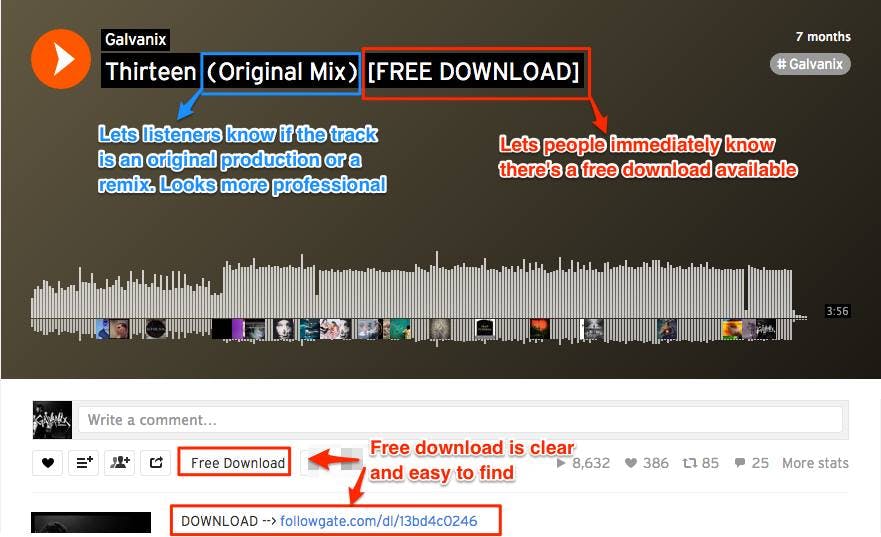
It’s really awesome and I’m going to show you a program that I like to use where you can go in and schedule. Obviously, there’s tons of them out there. You can go out and do your research, but the one I’m going to show you today is called lumely, and this is the one that I use.
This is my favorite one of my favorites anyway, and I’m going to show you what it looks like and give you an idea of what scheduling your posts can do in your life. Alright, let’s go ahead and get started, so is: is posting on social media eating up your time, you’re trying to post to Twitter to Instagram to Facebook? Of course, if you’re brand new, you probably shouldn’t be posting to so many places, but maybe you’ve already got these platforms established and then you decided to start your business and there’s lots of reasons.
People have to do what’s best for them, so you’re in a dilemma. I you know even posting to one platform and being a what, if I could tell you, you could post out everything in one month in one day and then not even have to mess with them. That’s what this does for you. So, even if you’re only home one platform, this could be your thing. So let’s go ahead and look at lumely and see what it does and let’s try to get rid of some of that frustration.
Lumely makes your posting look like this, so you can go in and I’m going to show you how I’m not going to go in real detail like step by step and give you a tutorial, because every every software tool that you buy will have that. And you can follow it as you’re using it, but I want to show you what it looks like and let you see how easy it is. But this is what attracted me to lumely. I love third layout.
Here’s a layout of a calendar, so I’m going to show you the steps and what you can do to put your post in and see how easy it is. But then I want you to see. This is what it looks like when you go to your schedule. To your calendar, you can say: do I have enough scheduled for January? Do I have enough scheduled for March, and you can see exactly what you have scheduled and say you know what I might want to pop some in over here on January, 4th, the 9th or 10th, or something like that.
So this gives you a visual, and I personally am very very visual. I need to see what it looks like when it’s all put together. So that’s what attracted me was the calendar um. So where do we go from there right here? You can create a calendar, and this is what it looks like it’s step by step and when you set the calendar up, this is a cool thing too. You can have more than one calendar. So if you happen to be running a business, an agency and posting social media for other people, guess what those people are using they’re using a tool just like this they’re going to go into their clients, accounts and set up all their social media.
For the next three or four months and then go work on the next one, so you could even start a job doing this as a social media, scheduler or an agency. So you go in and you schedule your new calendar and again it takes you step-by-step, and it gives you a an opt-in that it says current scheduling options. It gives you different options that you can go to, and it’s example right here. You can start a new calendar or you can pop into your other calendars, so maybe you’re on five or six different social media platforms.
So let’s say you’re on Facebook and Twitter and Pinterest and LinkedIn and Instagram. So you have five. You can look at individual calendars for them or you can look at the whole calendar of everybody together or you can make calendars for your clients for other people. Why would you want to do that? Well, maybe there are certain things you didn’t want to put on. Instagram, but you did want to put on Facebook and things like that, but I’m going to show you how simple it is.
If you have one post that you want to share every place, I used to think when I was brand new well. Why would I want to share the same post on all of my social media platforms? Then everybody’s going to see the same post, but once you start building an audience, everybody is not on all of your platforms. You have your Instagram people, you have your Facebook people, your YouTube people, there’s different people on different platforms.
Now somebody’s really stalking you and they absolutely love you well and they’re, just going to get a dose of five times the same thing that’s just with, and hopefully they’ll realize that and stop being on everything, that’s their choice, so you can do that now notice here On Instagram Instagram does not allow people to schedule their post, Instagram wants people to be live and active and engaged and present.
So what you can do is schedule your posts in lumely and then lumely will notify you and say: hey, don’t forget to hit this button and post your Instagram post. So you can plan them and schedule them, but you have to manually go onto your phone or whatever for Instagram and hit the button and post it, but it is still nice that you can have it all planned out. You don’t have to keep thinking about him.
That’s the nice thing about your business. You want to start learning how to focus on certain tasks and do as much as you can bulk and then go focus on something else. Alright set your workflow, so here you can set how your workflow will be set up. So you can have an original workflow, a light workflow and a zero at workflow. Zero means that you don’t have to have anything approved the other workflows it.
You can put some parameters in there like maybe, if you’re running a business you might want it to go. Have the Creator create it, then you might want to have your QA person check it and then your third person is going to go ahead and post it or something like that. So that’s your workflow. If you’re just doing it yourself – and you don’t need anybody to approve it, then you’re going to pick the one down here at the bottom, so you create a new calendar.
It’s very very easy! You can see the steps here again, I’m not going to sit here and do it obviously. But I want you to see but posting details now when you go to do a post, you’re going to give go ahead and follow the directions step by step and as you’re following them and you set a pose so right here. Here’s all your post details, you’re going to say I want it on Pinterest. I want it on LinkedIn and you pick which social media platforms that you want it on.
When you set up your account, you tell lumely which accounts you have and you have to integrate them again. Every post doesn’t have to go on every platform, but this is the neat thing. When it does, it will allow you to go in and week the content. So obviously, when you put something on Pinterest and you put something on Facebook, the size of the picture is different, and maybe what you want to say, you want to tweak it a little bit differently.
Facebook. You might have this lengthy thing that you’re going to say about that post and maybe you have a shorter version, you’re going to put on Pinterest or Instagram, so you go in and it’s going to say. This is what it looks like on each of these platforms. How do you want to tweak it, and then you tweak it? But the neat thing is your one piece of content. So, if you’re on YouTube, but a lot of youtubers do is like well Monday, you might make all your YouTube articles and then, throughout the week you’re going to make sure you post it on all your platforms and get it out there and one way to do It is to schedule it out ahead of time.
Alright, and here you can fine-tune your blogs or or your each of your tweaks, each of your posts. It’s raining here and I just had a big thunder thing and it just made me jump sorry about that. It kind of took me off, hopefully we’ll make it through this article, alright, and then you can set age restrictions. Probably I typically don’t anybody can read what I have, but if you have something that needs to be restricted, some people do you have that ability to do that? This is something I like to the dashboard look.
How easy and user-friendly this dashboard is everything you need is right there. It tells you exactly what it is and you can just click it and go into that area. I love again that it’s all very visual. It’s not some tabs off to the side that I have to figure out what those titles mean. I can look at and go yeah. You know that. I I understand that I see what that is. So again, it’s just a preference.
Here’s your calendar again! Wonderful user friendly visual for your calendar and again you can go out six months at a time. If you want to now. You might say: okay, I’m going to sit here and I’m going to schedule all of my stuff out for six months. But what if I scheduled everything from January to June – and here it is March – and maybe there was something I wanted to post well, you can still go in there live you can still.
If you found something, maybe that you want to share you’re an affiliate marketer – and you didn’t want to wait till June to start sharing this particular product or content about it, go share it. You can go in there at any time and change the schedule. It’s not set, but the work, the bulk of the work is done, and you don’t have to have that hanging over your head every week I got to get in there so many times a week.
You don’t have to worry about it anymore. Here’s another view that they have as well. It lets you see what your posts are where they’re at and it’s just a different type of view instead of a calendar view, but again it’s a very visual lets. You see what pictures thanks you’re using and where did you post it and what your copy is. The part you write, your words is called your copy and, and you can see the posts and not just the schedule, so that’s cool too and maybe you’ll go in.
There say you know what I don’t like that picture, I’m going to change it and change it up, or maybe you had a particular post that had a lot of engagement and you want to talk about the same subject, but maybe elaborate on something and change. The pictures out of that the neat thing about posting too, is once they’re posted. They go into an archive. You can go back and recycle your work, so I know a couple: people have been around for a long time.
They will schedule things six months at a time and then they have like four sets of posting that they do and they just keep recycling it. So when they go back to recycle, they may go in and tweak it update it. It’s ready to go again, so it can save you a lot of time and if it’s something you don’t like to do, it’s all you know something you can hire hire it out. Let somebody else do it now. This is neat for Facebook.
You can choose your target audience and promote them on Facebook, so it isn’t an ad you’re, not really paying for an ad, but it works like an ad. So if you have a particular post on Facebook and you want to target an audience, this is awesome. You can use this in lumely, so Facebook will post it to people that would be most interested in, and you know how it is you’re sitting in your house talking to your spouse or one of the kids about a pic particular dog food that you like, and All of a sudden there’s commercials on TV, it’s all over your Facebook, because somebody out there heard you that you liked a particular dog food that happened.
It’s nice all the time, but that’s what marketing is and we’re in a technology world and so you’ll be part of it. You can find those people that, like what you’re, promoting and Facebook will put it right in front of their face, and again this is just a little over all of you for you. You know to see I wanted to let you know too, that you’re probably thinking yes, but how am I going to come up with all these ideas? You don’t have to worry about it.
Lumely has a whole library of quotes. They have pictures in their media library that you can use. You can change your text and all that again, I’m not even going into the mechanics of how to make a post I’m showing you what it does, but if you’ve ever used canva and you’ve made a post there. A lot of that is available to you right here in lumely as well, and you can still go get your own pictures, but it’s there.
If you can’t think – and you need stuff available right away – it’s all there right for you and other things that lumely does. It brings up ideas for you. It brings up, quotes the media library just like I was talking, and it also has analytics. So if you want to see which one which posts we’re getting more engagement, more views, you can get analytics attached to your post as well, which is any time you’re doing marketing.
You want your analytics, so I’m going to pull up the pricing, and I want you to see here some of the different pricing there. There is a 15-day free trial, which I love any time you use any software use the free trial if you’re seriously. Looking for a scheduler find two or three that you want to check out, make sure they all have that free trial use the free trial and just make sure you go in and cancel your membership.
If you’re trying out two or three of them, you could try them all out at the same time and go in and out and then cancel two and pick the one you want, but the I always make sure that I, like the one I want the first Month, I’ll go ahead and pay the monthly fee. If I’m positive that that’s what I like, then I just go ahead and get the yearly, because you can save a lot of money that way, but this one here the base, the cheapest, the lowest level, can have two users.
So you can have somebody helping you with you helping you with this. If you hire somebody and then you have 10 accounts, that means 10 different social media accounts. So even if you have like 3 Facebook pages, all three of those could be on there. So that’s pretty cool, there is, and you can run ads if you want to the only thing with this one. Well, you just want to look at what each one has and I think that, obviously the higher you go.
You can get into custom branding and things like that. If you’re running a business you’re going to want a you know some of these more advanced than premium and enterprise, and things like that, those are for people running a business. But again, if that’s something you’re thinking about this is the way to go. It’s not if you’d love to be on social media and you’d love to post turn it into a business and do what you love to do more than anything gosh.
You know so easy make sure you subscribe to my blog. I would love to have you subscribe, and so you can see my articles that I put out every Tuesday every Friday to help you tips to help. You run a business online, specifically affiliate marketing using YouTube. That’s what most of my articles are about, and I will see you on the next article. Thank you so much for reading
How are you doing good all right, buddy? Take it away all right, hi everyone! My name is Daniel Roth, I’m a program manager on the asp.Net team and I’m thrilled to be able to talk to you about building amazing web apps with dotnet core and Visual Studio. 2019 Visual Studio 2019 comes with the latest version of.
Net core in the box.Net core 2.2 donna core 2.2 is loaded with a lot of great new features. We’ve done a lot of work on the templates to simplify them, clean them up, we’ve updated them to use bootstrap for we also updated the angular template to use angular 6 angular 7 will be coming in the next release. We did a lot of work on Web API improvements. In particular, we provide now API, analyzers and conventions that make it easy to generate complete swagger documents or open API specifications for your AP.
Is we added HTTP to support to kestrel our cross-platform web server and we also enabled in process hosting support for IAS? We added a new health checks framework and also a new routing framework that we call endpoint routing. Let me go ahead and show you what it looks like to do: web development with Visual Studio 2019 and dotnet core 2.2. Alright! So, let’s go over here to Visual Studio, I’m going to great create a new asp.
Net core web application. Web application 1 sounds great. I’r going to put it in my demo folder that looks good. Let’s create that. Okay, now you’ll notice at the top that asp.Net core 2 2 is already selected. I installed 2.2 of dotnet core when I installed the web work load and the dotnet core work load. As part of the Visual Studio 2019 installation, alright, let’s create a web application. That looks great, create that and this will go ahead and generate my project for me.
Alright, so we’re going to wait for the package restore just to complete and then we’ll go ahead and build and run this and see what the template looks like there. It goes all right there, so let’s build and run it while we’re waiting for it to build and run. If we look at this template, hopefully you can see that it’s a lot more lightweight, there’s a lot fewer files in this template. We’ve done some work to try and slim it down, get rid of the stuff that you end up having to just delete whenever you start a new project, so you can get going faster with your new applications.
Here’s the application up and running now waiting for it to render there it is, and you can see now the the new templates in HP asp.Net core 2.2 they’re a lot cleaner, a lot simpler, a lot fresher looking – and this is all based on bootstrap 4. We go looking at the layout, for this application should see bootstrap 4 in here and there it is bootstrap. 4 is wired up by default. This application is also using ice Xpress 2 to host the application.
Let’s do something real, quick, let’s go into the home page of the app and what I’m going to do inside a header here and let’s print out the name of the current process that the app is running in so Diagnostics, process get current process and then the Process name there we go so let’s just save that and then I’ll refresh the home page of the application. We should now see the the process that the app is running in and it’s running in the is Express process.
This is different than earlier versions: of.Net, core and asp.Net core. In earlier versions, your app would run in a dotnet eggsy process and then IAS would proxy requests to your application and they had a number of issues had a performance hit and also me. If anything went wrong with your dotnet XE process, then it was hard to diagnose what happened there in starting in dotnet core 2.2. You can now host your ASB done at core apps directly in the is process, much better performance, much easier to debug and diagnose issues.
So that’s great! Alright, let’s go back to the app instead of running this app in is Express and that’s let’s now flip it to just be a standalone application, basically, a console app hosting an asp.Net core application and let’s go ahead and run that and now we should see the The process should change because we’re no longer using is at all, so we would expect to be back to just running in a normal dotnet eggsy process, and we are great, let’s pop up the the the browser dev tools and look at the network trace, as we Refresh the application, there’s all the files that are being downloaded notice, that all these files by default are being downloaded over HTTP 1 1, but we in dotnet core 2.
2 we’ve added support for HTTP 2 to kestrel, it’s not on by default. You have to enable it, but it’s really easy to do: let’s go ahead and do that. I’ve got a little code, snippet here and notepad, I’m just going to copy out. Let’s grab that and then go back to the application, we’ll stop it and then update our where we’re building up the the web host. So let’s go ahead and add a little bit of code here to configure kestrel and I think we need a namespace.
Yes, we do great so here you can see we’re now, enabling both HTTP 1 and HB 2 protocols we’re setting up HSPs so that we can do negotiation 2 with the browser to set up HTTP 2 – all right. Let’s, let’s now rerun this application running on Castrol and see if we see any difference, ok, we’re back in the browser still running on net. Let’s look at the browser, dev tools and refresh the application and voila instead of HP 1.
1. You now see the protocol is h2, which is short for HTTP 2, and this is great because it means we can take advantage of features like connection reuse, compressed headers and all the optimizations that come with using the HB 2 protocol cool all right. What about web api development with dotnet core 2.2? Let’s go ahead and close the browser and close this app and let’s open up a different project.
I was working earlier on an API in my pets API when my favorites, a favorite API, is to work on. This is an API intended to manage a list of pets that you can add, pets get the full list of pets and so for simple crud operations. Let’s I already started a little bit here. I defined my model type, here’s my pet class. It has an ID and a name. Ok. Now I want to create an API controller based off of this model, so I’m going to use Visual Studio to help me do that, let’s add a new controller alright and I’m going to create an API controller with actions using entity framework.
So any frame Rick will be used to actually store the pet data. Let’s add that for the model class, let’s use pet, I already have a data context class that I’ll just reuse and for the controller class name. Pets controller sounds great, so we’ll go ahead and generate that now Studios going to take care of generating for me an entire API controller class with action methods that match all the standard.
Crud crud actions like get post put and delete and all the code for interacting with any data framework, or has already done for me. So that’s great. So I’ve got my API all set to go here now. I’ve also already gone into this project and enabled swagger generation or open API spec generation, which is sort of the newer name. To do that, I use a great open source community project called swashbuckle.
You can see here that I’ve got the swashbuckle package added to this application, already swashbuckle asp net core and then, if you go into startup, you can see that I’ve already wired it up added the swagger generation services and then down below in my configure method, add At the endpoints for generating the swagger document and exposing the swagger UI, so I should be able to now just run this application and see the default swagger UI, showing me the my new API resource.
Let’s see if that works, okay, great we’re at the swagger UI and there’s my pet’s API awesome and there’s the default values API that just comes with the template, and if we look through this, we see all the things we expect. We can get the list of Pat’s, we can post new pads, we can get individual pads, delete them and so forth. Alright, not, but something doesn’t look quite satisfactory, quite complete, like if we look at say the post action in the responses section.
It says that this thing basically always returns. 200. Okay, pretty sure. That’s not the case like there might be. You know, errors, validation, errors or I’m pretty sure that, but normally in response to a post you would say well: a resource has been recreated. You’ve posted a new resource 201 created here’s the URL to the new resource, but that’s not here, that’s not missing. Is it in the code? Let’s go look at our pets controller again and look for the post action.
Where is it so? There’s put yeah here’s post and yeah there’s a the returned value. Is it created at action action results which yeah it says it returns a 201. That’s not documented in the swagger document. Why is that? Well, there’s only so much that libraries like swashbuckle can do by just statically analyzing. Your AP is to figure out what the swaggered document should be. What the open API spec should say, some things you have to tell swashbuckle about using attributes and additional metadata.
This is one of those cases. Fortunately, in dotnet cor 2:2, we give you an analyzer, an API analyzer. We can see it in the analyzer section there. It is I’ve got it already added to this project. That will look at your API controller and tell you about all the places where you probably should add some additional metadata. In fact, you can see I’m already getting a green squiggle here for my post action with a potential fix up.
If I go ahead and do the fix-up, I get the attributes that I expect saying that this action by the way returns a 201 created. So if we rerun this application now, hopefully our post action in the swagger document should look a little bit more descriptive. Let’s see, if that’s the case post and yes all right so now it says that returns a 201, which is awesome also. It has like a default response which would be like in response to errors, and the nice thing here is in that in asp.
Net cor 2:2. We added support for problem details, which is a standardized RFC. I think it’s RFC 78, oh seven, there. It is for generating machine, readable error responses, so that’s already configured for you and setup for for your API controller. Awesome, alright. So that looks good, but it would be kind of tedious to go through and add all these attributes to all my actions. Is there a better way and of course the answer is yes.
Instead of adding the attributes to each and every one of your actions, you can instead apply an API Convention which looks at the patterns that your methods match and applies metadata accordingly, and we give you a set of API conventions. Out-Of-The-Box that match the API conventions that we generate in our scaffolded code. Until you apply those you just use, the API Convention type attribute there.
If there was there, it is, and then the default API conventions that we provide are this default. Api conventions type all right cool. Let me save that. Actually, let me copy comment that out and then down below. If we look in the errors list see the API analyzer is telling me about all the different action methods that are missing. You know metadata about the response types. If I now uncomment the convention and again look at the error list, oof they’ve all gone away.
Everything has been fixed up for me if I now run the application one more time. Hopefully our swagger swagger swagger document is much more descriptive. Let’s see so like the get that takes an ID that you would expect to return 200. Ok, if it’s exceeded yeah 404, if the ID is not found yup and then the default for errors and so forth. So great now we have a really complete open API specification, all right cool, so that’s know some of the new features that are in dotnet core 2.
2 used within Visual Studio 2019. There are also a bunch of really great razor tooling improvements in Visual Studio 2019. Razor is the format that we use to generate HTML dynamically, using a combination of HTML and C sharp. Some of the improvements that we’ve added for razor in Visual Studio 2019 is support for find all references, modern, completions and, of course, live share. So let’s go take a look at that all right back to Visual Studio 2019: let’s open up a different project.
This is just an asp.Net core web app, but I’ve done a little bit more to this application. Here I wanted to generate some pages for managing products. So I’ve defined a product model type, it has an ID a name and a price, and then I went and scaffolded a bunch of razor pages this time, some UI, no, no, not an API controller, but some some razor pages and the way I did that. I already I’ve already done it, but you can do it yourself to just add razor page and then razor pages using entity framework.
That’s the one. We want add that and then here I specified my product type for the model. I use my existing data contacts class and then accepted all the defaults and clicked add and after I did that and went ahead and generated all of these knives razor pages. For me, which is great, ok, so let’s go ahead and run this. Let’s see what it’s got so, let’s see we should see our normal default template that we saw before with a nice bootstrap for based clean UI and then hopefully some pages for looking at products and we’ve got so.
We got a product tab up here that I added and let’s see yeah, so we’ve got a list of products. So what do we got? We got a razor we’ve got a blazer blazer is of course free, because you know it doesn’t cost any code to write. C-Sharp and then asp net an asp net. I assume that’s some sort of net for catching poisonous snakes or something like that. I can almost hear the groans coming through the through the camera yeah.
So we’ve got a list of of products here we can edit things like if we wanted to go in here and actually put, you know, make this a snit core and make that free as well. That looks good, so we can you can edit, you can delete you can list the products awesome all right. Well, let’s go look at the the razor files and see what Visual Studio 2019 can do for us. Let’s see, let’s first look at. Let’s look at find all references, okay, so I’m looking at the product type and you can see through code lens that it’s telling me all the places where the product type is being used, and you know if I just look at the type it shows up in All these c-sharp files – these are all the code-behind files for the razor pages.
That’s the way final references has always supported that. That’s that’s that’s normal and it expected, but what’s really cool now, is that if I looked at what look at one of the members for my product type and let’s expand that a little bit, so we can see it better now we can see all the places Where that that member is being used in razor files, like here’s, the exact line where that that property is being used so find our references now works with with razor, which is great what else? Let’s go into the index page for this application? Let’s say we wanted to add a directive like, let’s add an inject directive for like injecting a service into this page.
I start typing at in, I course get completions over razor directives and all the c-sharp stuff, but a nice thing it because we’re in Visual Studio 2019. Oh sorry, let me let me start that again because we’re in Visual Studio 2019, we are using the new modern, completions infrastructure, so I can actually filter the completions by just the razor Actives. You see that says razer directives on that button, and so I get just Razer directives when I type that okay, let’s let’s go back to the add-in and filter the razer directives, and then we can complete it awesome.
And then you could type your type here and so forth. So that’s modern completions with razor. Lastly, what if you need some help with your your asp.Net core project and you’re working with you know Razer pages or views, and you want it to help from your buddy. Well, you can do that using live share now, so I’m going to go ahead and set up a live session for this visual studio instance. Okay, let’s go ahead and do that, and this should then copy a URL to the clipboard yep.
There did that. I can now share with my buddy who can help me out now to emulate my buddy, I’m just going to open up another Visual Studio 2019 instance and let’s join that live share session. Alright, so we’re just going to do. File join, live, stare, share session and paste that URL in there and join it. Okay, wow: it’s joining us going to put these two Visual Studio instances side-by-side alright, so we’ve got nothing yet well.
It says that that I joined the live share share session remotely from you know, whatever part of the world. Okay, I can see some of the solution now showing up and there’s the Razr file. In fact, it even shows where my cursor is that and now I can go ahead and start writing just normal Razer code, like let me help help you out there Dan. You wanted to display the current time here, no problem. The current date is at date, and I get C sharp completions in Razer running in live share, dot now, yep, more c-sharp completions works, awesome.
Okay now and if I look at what’s actually on disk in this guest visual studio instance in this that’s joined the live share session. Let’s open the containing folder you’ll see that you know I’ve got like nothing here like this. All I’ve got is this. You know pretty much empty project and the files that I have that’s that have been shared with me so far that I’ve been editing. So I can write Razer code get c-sharp completions for a remote ace, panic, asp.
Net core project, that’s using eraser, pretty cool. So that’s live share, let’s go ahead and leave the session and shut that down there. We go okay, there’s some of your new razor tooling features in Visual Studio 2019. All right. Let’s look to the future! Now when we can write client-side web applications using dotnet. Instead of JavaScript, we have been working to make it possible for you to write reusable web UI components using c-sharp and razor that can run directly in the browser.
And this is great because it enables you to share dotnet code both on the server and on the client. You can have shared common logic. If you still want to call in JavaScript, you can do that too. You can call in to existing JavaScript libraries browser API is using a JavaScript Interop and for the initially we will support two Hosting models for these kinds of applications. We will support hosting these apps on a server where all of the UI interactions with the browser get handled over a signaler connection, or we will also support of hosting these applications client-side in the browser on top of web assembly.
Now, what is web assembly well web assembly is a relatively new open web standard that defines a bytecode for the web, and what this means is that, as long if you have some code as long as you can compile it to web assembly, it can now run In any browser at near native speed, this is awesome because it means now when you want to write web client-side web logic, you can pretty much do it in whatever language or framework you want and, of course we want dotnet to run great on web assembly.
So we’ve been working on that for a while with this project that we call blazer. Now, what is blazer well blazer? You can either run a blazer app directly in the browser on web assembly, writing components getting rich, interactive, UI or, alternatively, you can write a blazer, app same components and host its server-side in asp.Net core and handle all of the UI interactions with the browser over a Signal our connection now, initially, we will support the service Hosting model for.
Net choreo later in the future. As soon as the webassembly dotnet runtime is ready, we will ship support for client-side blazer at some future point. Let me show you what it’s like to do: blazer development with Visual Studio 2019; okay, now these are actually you know, brand new bits, hot-off-the-press, I’m actually going to shift over to a developer, build of Visual Studio with some some some updates and I’m using dotnet core 3, Oh on this machine.
Now initially, what I’ve got here is a server-side blazer application. It has a number of components that are implemented using these dot RAZR files – let’s just run the app, so we can see what it looks like all right so compile and get this get it get it running. Actually, this app actually starts up pretty fast and it has some nice functionality. You can click a counter and the counter goes up. You have a fetch data page, that’s retrieving some some data and then rendering a table, and then we have sort of a blank.
Duze page now, normally to get this type of behavior. We have interactivity where I click a button in the UI just updates. Without a page refresh, normally you’d have to do that using JavaScript, but it didn’t write any JavaScript to write this application. It was all implemented in c-sharp and razor here’s the counter component. It has a page directive at the top to say that this is a routable component, then some normal HTML markup.
We use some razor syntax to write out the current count. Then we have a button with an onclick handler. Normally this would be JavaScript but we’re using razor syntax to say no. I want to run some she’s c-sharp code here. Here’s the method that we’re going to call every single time. That button is clicked. Let’s actually run this in the debugger, get the app up and running again and then we’ll go ahead and set a breakpoint on the increment count method all right counter.
We click the button and boom we’re hitting c-sharp code all right. So that’s super cool. Let’s go ahead and let this run through. How is this working? Well, if we look at the the browser developer tools, let’s refresh this, you can see this apps actually pretty lightweight. It’s only got a few hundred kilobytes of downloaded payload, but there is a WebSocket connection that gets set up with the server every time.
I click this button. We hit our breakpoint again, let’s go ahead and uncheck that and let it flow through. You can see that bytes are flying along that WebSocket connection, talking to the server running your components and then the UI updates get gets sent back. That is the server-side Blaser model. Now, in the future, we also want to support running those same components: client-side in the browser on web assembly.
Let me show you that so I’ve got a different project here. This is blazer on web assembly. Alright, let’s go ahead and get this guy up and running now the code looks exactly the same. We’ve got a counter component with the same code that you saw before same component model but hosted in a different way all right. So here the behavior looks the same. We have a counter have a fetch a day, Paige, let’s act this case, it’s actually fetching us some json data from the server deserializing it in the browser and rendering this table.
If we look at the network trace for for this application, it’s pulling down a little bit more stuff, but some really cool stuff. If we looked in here, where is it so mono? Yes, guy mono, dot wasum? That is a full dotnet runtime implemented in web assembly and then below you have normal dotnet DLL is being downloaded and executed directly in the browser to show it to really prove to you that this is actually dotnet code running in the browser.
Let’s do this I’m going to do some debugging. Let’s now, this debugging is going to happen actually directly in the browser with the browser dev tools. To do that, I need to enable remote debugging with the browser. So let me just copy this command, not that copy that good and then we’ll close all the browser tabs real, quick and it’ll restart the browser with remote debugging enabled and then we’ll fire up the debugger again and see if we can debug our c-sharp code.
That’s executing client-side, okay. There we go so here’s the browser, dev tools. Let me put this side-by-side with the browser all right now, you’ll notice. I can see that D allows in the sources for this application. I can expand to the client DLL and see my counter component. I can even set a breakpoint on the counter click the button and there we just hit a breakpoint in c-sharp code running on a web assembly based on at runtime executing directly in the browser.
This is something that we expect to ship in the future: alright, so that is Blaser in Visual Studio, 2019 cool. I hope you enjoyed learning about web development with the latest version of Visual Studio. Please download the bits and try it out fantastic. Are we ready for questions absolutely fantastic, all right, so, by the way, your questions are super important, so get them in use the hash, IDs 2019, we’ll get them on the board and we’ll make sure to ask them.
If your question gets asked during the show, you will win an answer to the question. Hopefully well, hopefully, oh yeah right, do I bat – hopefully, hopefully all right so here is. I need ket. I think I got the answer. I talked about new CS proj file. Is there a new ICS proj file, or is it the same as old? I mean well there-there’s a sort of a newer flavor of CS proj that we use in in.Net core applications.
That is much. You know much lighter weight like there’s not much going on in this in the CS: Braj files that are wearing the applications that I created, you don’t have to list every single file. That’s that’s! In the project you get to use package references directly in the CS. Proj yeah there’s a we’ve done a lot of work to try and make C a surprise. You know cleaner, lighter weight easier to use fantastic from Cal.
When do you recommend use razor pages versus MVC? I feel like that question. Maybe you can help they’re, both great they’re, both awesome technologies, so razor pages was introduced later and it’s actually built on top of MVC. It’s kind of a non question, because if you’re using razor pages you are using MVC, every razor page is actually running. On top of the MVC infrastructure, razor pages is kind of nice because it’s a page based model, if you just if you want to page you just create a page and then that the the route for that, that page is just the place of that page.
On the the directory on the the folder structure, NBC gives you a little bit more. I would say decoupling in terms of how your project is structured, where your views are over here and your controller is over over there. A lot of people really like that. That model, but both are great, both are testable both can scale to large applications. I think razor pages is probably an easier place to start.
If you haven’t done any development with MVC before or asp.Net core, I would probably start out with razor pages. It’s basically do whatever makes you happy, that’s true and whatever you would like, I think you’ll be happy with either yeah, whatever you’d like to be alright, so from Remy swagger looks great, but is there a way to automatically create model classes based on swagger end point: Just like the old good one add service reference does ask me because I’m pretty sure it’s possible in vs 2019.
So there is, there is some support for code generation in Visual Studio 2019 for doing client code generation based on an open API, spec or a swagger document, we’re actually working on a major turn of the crank on that infrastructure for the.Net core 3o wave, where we Will have really great support for doing emma spell build based code generation from your api, so it’ll be really easy to on every build will generate the code.
It will always be up to date we’re actually working with a bunch of really good community projects on that as well, and swag has some functionality that we’re leveraging for this feature, yeah, there’s stuff, that’s the stuff, that’s coming awesome! Next question is blazer now, officially and more than just the nice to have maybe in a pre-alpha mode by air, quoted that for you yeah and fully supported the new vs version.
So blazer started out as an experimental project. Right we were trying playing around with webassembly. Could could we get dotnet to work on web assembly? Is that even possible? We weren’t sure if people wanted it, we’ve been doing that experiment now for a little over a year, we’re pretty much at the tail end of that experiment, where we’re pretty sure that a yes, absolutely we can do this and be a lot of people tell us That they really would like it, it’s still technically experimental right now, but I can sort of see the the end in sight soon for that, for the experimental phase of blazer the model of taking the same components and running them.
Server-Side, where you manage all the UI interactions over a signal, our connection, we call that server side blazer, that is shipping in dotnet horse Rio, absolutely like when we dot Nick or 300 ships. You can use that in productions that will probably come first and then as soon as the web assembly based on that runtime is ready. We will then have production ready support for client-side blazer running in the browser on web assembly.
I was there at NDC, Oslo. When Sanderson was like hey. Do you want to see some code? I wrote just a demo his little demo. I did it over the weekend. He was peod broking into javascript files, because that’s what you would do with blazer right. I mean I was like that’s, oh, my goodness. Yes, that’s what it would be. You know all I know is it was a Fowler and Edwards. We were all just sitting there like this.
What did what is this? It’s pretty cool that it’s advanced all the way. Tor, I’m seeing a lot of people up taking this pretty exciting, I think yeah we’re we’re excited about it. Having speaker spoke speaking of that haven’t spoken of my English is terrible today, Allah. What is the expected arrival date for blazer on the client? Well, we don’t have officially publicly announced release date. I can tell you that the client blazer support won’t be available with donek or 3yo like we’ll ship down at core 3 o first and then Blaser client-side.
I expect will come sometime later. How soon later, is what we’re actually really actively working on right now, like it’s really depends on. How fast can we stabilize and mature the webassembly story for dotnet all up stay tuned for that, like, hopefully, we’ll have answers to that question that are more concrete in the near future? Fantastic just two more questions: will there be interrupts between web assembly and JavaScript to allow for continuous delivery replacement of application functionality? So you can there’s probably two questions in there.
You can of course, call into javascript from web assembly that that works. You can call from dotnet code into any JavaScript library any browser API. In fact, you can even take those libraries written in JavaScript and sort of shrink, wrap them in a dotnet API wrapper ship him as a nougat package, and now anyone can call that library as if it was written in c-sharp and net. There seemed to be some hint in that question that they also wanted to be able to sort of like dynamically update parts of the app.
That is like a more like a hot module reloading, I’m antic. That is something that we have been talking about and looking at potential solutions. Nothing really concrete to share on that. Yet, though awesome well we’re going to finish with that thanks so much Dan for spending some time with us.
You might be thinking that It’s good way to boost sales or gain subscribers notoriety or even add revenue to your website.
But the reality is that Without building relationships and authority on your site, None of this is possible, So the first step in a successful blog is finding your niche Write about the thing you do that nobody else does quite like you. Maybe you knit baby Yoda bean Bags and sell them on Etsy Write about your progress. Your Current ideas and projects – I see this all the time. With painters and artists, where they take a photo twice, A day to show their fans the progress of their Latest piece of artwork, I love that And be authentic, be yourself.
People really love that And your audience doesn’t wan na Hear you sell, sell, sell they wan na hear you tell tell tell all about yourself and your craft And pacing is key for your blog. You wan na write, often even if you think you Aren’t reaching anyone So commit to 15 minutes a day to update your status on projects, Add pictures or articles To enhance the experience for your future readers, This is going to take time.
But persistence is the key. You may not realize it, but all this work will give your blog and website authority which over time will increase your SEO and potentially help you Rank higher on Google search Yeah, we noticed that trend back in 2009. During the Great Recession, businesses were slow, so they turned to blogging about their business and connecting with Customers in a new way And the time they put into their website and writing about their Business paid off big time once the economy got going again and suddenly they were On top of Google searches and consumers were ready to spend money and those businesses reaped The financial benefits, But it’s a long game.
This doesn’t happen overnight Exactly this takes time. So once you have a good Cadence going with your blog and you have something That you wan na share with the world now’s a good time to start Connecting with others that might share your interests, So, if you’re making those Baby Yoda bean bags reach out to knitting Communities, forums and websites, or even Star Wars crafting and fan pages. It’s a great way to share your story and get people interested In what you’re doing Okay Darlene, let’s show Everyone how to get started on building out this blog page.
Now we’re going to go to demo the Website + Marketing, Version on the website builder And if you’re looking for a WordPress version of this demo, we covered that on The Journey and you can read it right over here: Cool, okay, let’s go Log into your GoDaddy account and go to your website. Dashboard. And click Edit Website, You can add your blog to a Section on your current page or you could create a Separate page for your blog For now we’re going to add it as a section to our current page To add a section we’ll Select Pages and Sections and then Add Section: Let’s choose Blog, Take a look at the layout options and select the one you like We’re going to add the top one.
The blog displays on your site Use the pane on the right. To change the layout, We’ll look at Manage Blog in a moment, but for now let’s look At the Background Image, As you can see, we can replace the image, but we’re going to keep this one. For now We can zoom in or zoom out, And we can adjust the overlay And the blue dot on the image allows us to adjust the focal point. This is the area that will be most visible to users on their mobile devices.
So the last option is to change the image from Color to Black and white. Once the image looks just How you want it click Done. Let’s check out the Manage Blog page, The blog page is where You can Create Post, manage comments, share Your posts on social or manage blog subscribers To return to your website click Website in the toolbar. If you wan na, keep your Blog on your homepage, then you’re good to go.
However, if you wan na See how to move your blog to its own page start by going back to Edit Site Click Pages and Sections and Manage Pages. Let’s Add a new page: Let’s call the new page, My Blog. We want the new page to be accessible from the Navigation as well as the Footer, So, let’s make sure both Of those are turned on When things look good, create the page Now you’re ready to move your blog from the homepage to your new page.
To do this, we don’t wan na add a section we wan na go to our homepage. And find our current blog Click Pages and Sections Now scroll down to find The My Blog section Click the kebab, which is The three vertical dots on the right and choose Move Section: Select your blog page and click, Move Click Publish to save the changes. That’s it. Your blog has been moved. To your new, My Blog page, Awesome Darlene, Thank you And look.
We realize that These are challenging times for businesses, but Godaddy is here to help If you need assistance, feel free to call the GoDaddy support line and Talk to one of our guides Until next time stay safe And stay healthy.
Com, and I want to show you guys how easy it is to create a website for your salon. I use a company for my salon website called Wix, I’m not really affiliated with Wix in any way. I just think it’s a very simple website builder for anybody. Anybody can do this, so I’m going to go ahead and I’m going to show you guys so, let’s switch over here alright.
So let’s get started in this way. So this is basically the Wix website builder. It looks exactly like a website, that’s what makes it very convenient a lot of you don’t know, but most of the time websites are built with something that they call code and code is basically a bunch of letters that somebody that went to school for a long Time learned to write – and you know most people cannot do that.
So this is so simple, and what I like about Wix is. Let me just show you. This is our front page of our website, so my salon is gratitude, salon, education. This is definitely not if you’re a website builder already. This is not the article for you. This is just me, showing you salon owners out there that it’s easy and you can create your own site very simple, so this is the basic menu. We have our social media stuff up here, so you could click that that’s easy to set up.
So the cool thing about Wix is it’s just as easy as clicking it? Let’s say I don’t like that there and I want to put it over here. I can do that and I just drop it, but let’s I want to keep it right there. So we have that up there and then I have my main menu here. All of this is connected to each page that I have developed for our website. So if I want to shrink that down a little bit, so we have our home menu, which is this, then we have our salon like about the salon and what? What the salons all about so the bio of the salon.
Then we have our menu for the salon. We have a portfolio with some pictures of hair that we’ve done and then a contact page and then the salon professional page is the free salon, education, komm page, which you can also click this image here. So, let’s just start with the basics over here is how you create pages. So if I click that it opens up, it shows you all of the different pages that are connected to our website.
So if you wanted to, let’s just start with the salon page so I’ll click – that this will show you what the salon page looks like it shows a picture of our salon very simple, and this is a slideshow. So it’s many different pictures put together. We have basically the description of our salon, what our salons all about, then there’s drop-down menus from that. So if actually let me open up, let’s open a new tab and let me go to salon gratitude comm, so this is our actual page and how it works.
So if you go to the salon, you can see this drop down menu here you can see that the slideshow is working here, showing some of the staff and everything so to create these drop-down menus. Let’s go back to our editor. I have my main salon page. Then you can see how these pages are offset. So now each of these pages, this one is the salon. Then we have owners so a picture of me and Christina and Hayden, and it just talks about us being owners and what that’s all about.
Then you go to our team and it has the BIOS of our whole team in here kind of breaks down everything. It’s really simple to do. So if I want to create the main salon page here and then have drop down menus from it right here, you can see these are a little offset. So if I want to actually show up in the menu I drag, let’s see I could take this page drag it over and now you can see team shows up here.
So if I want it to be in a drop down menu from the salon page here, then I just drag it over. So it’s really really simple. Anything I want to do if I want to change this picture. I’ll have to do is double click it once. I double click that picture see here. It’ll bring up this editor and you can upload there’s some of our friends in there. This is also connected to the free salon, education, comm page, but any picture I want to add in there let’s throw Josh XO a bone.
Let’s say I want to become Josh Excel, so let’s change the image and boom it puts it right there. You can change the size if you want, and then that becomes your bio. So let me go back to let’s change it back to me. I don’t have to be Josh, so, let’s see here and there we go. So it’s back to me. So it’s just that simple to change the pages and whatever you want it to be. Now we’ll go back to our pages here we have our menu.
That brings up the same thing. If you want to click an image, you can add images, you can change your pricing, you can write whatever you want. So let’s say I want to edit this text. I double click it I can highlight. I can write whatever I want, so I can come in here and type in and then you click out of it and you’re good to go. Let me just take that away here, so it’s just really simple: to create a website on Wix and the cool thing about Wix.
Is that it’s free for you to start so you just create the page and then the maximum amount that you’re probably going to pay, is $ 10 a month to be able to have a website. You can create your own domain and everything, and as soon as you have your page, the exact way that you want it, you save it up here so once you save it you’re good, then you hit publish and whatever is already done on your website.
Once you hit publish its going to go live so you can do all your editing and then, as soon as you have it the way you want it, then you publish it and it’s it’s ready to go so again up here. You can change your your logo and everything, and this is something that you want to get into it. Try it out and you’ll you’ll discover different things. This isn’t a full tutorial on it, but this is just showing you how easy it is to create a website.
Nowadays, now the other cool thing and let’s go back to our home page here, creating a slideshow is simple, so you can see all these images that I have added in here. So that’s going to rotate through. You can add your titles, whatever you can link them to other things, so that’s kind of a cool function as well. So if you have something, maybe you’re running a special in the salon – and you want to link it to that – I also we gift cards in the salon and we use millennium a gift, so they’re online gift certificates.
So what I did was I created an image and then this don’t do that. I linked it to our Millennium a gift. So now, if you go to our salon website and you’re like oh, I want to order a gift certificate. You click that it takes you to our page on millennium, for them to purchase a gift card which is really cool as well. We there we go so has our logo here they pick a design whatever they want. They buy the gift card to emails it to someone which is another cool thing that you can do, but you can click and add everything to whatever you want.
We have our reviews in here wedding page, so I think that’s pretty much it, but if you guys have any questions, please post them below on anything about building a website on Wix. I can answer them. I hope I’ve kind of clarified some things for you on this, but make sure that you subscribe to us on youtube and follow us and again post any questions below I’d love to answer them. Hopefully, this helps you guys and make sure you go to Wix comm create a website, have fun with it, and you know this will save you a lot of money and it allows you to have a little bit of creative control on what your salon looks like Online, so thank you guys, Matt Beck from free salon, education, calm and I’ll.
This is Bruce with the BSVP On-Site here at SES, Chicago with Greg Jarboe from Seo PR Greg there’s a great conference here: Today, but this particular YouTube his me some Changes versus last time we talk. What are some other basics there. Someone just starting off with the company Website or company Google+ page should be doing with their Youtube blog Well, first of all, they need to Understand that having a YouTube blog now requires You to become a programmer in the old days, it was all about.
I need A article and hopefully the article, is a hit and goes viral when we get to the gazillion views. Well, Not many people had a gazillion views, and these days it Turns out that having one here isn’t really a model for success either So let me give you the numbers ominous. This actually comes from CEO YouTube. If you’ve got really compelling article about it, said dog on a skateboard You can sell advertising next article about two dollars, a CPM to the two dollars about, but if you’ve got a skateboard blog or a blog about dogs, you can sell advertising on that.
For Twenty dollars a CPM so ten times more and the reason is Because advertisers want predictability, they don’t want to have to chase last One hit wonder they want to be able to say you have an audience its interest in Skateboards urs interest in dogs, water is, I have dog food or I have been all skateboards, the so whatever it is, that The product is in, I want to be able to advertise on Blog that has that audience week in week out month-on-month.
So all The sudden, if you’re interested in making a living On YouTube in there are thousands of people were making six-figure incomes a year. You can’t think like a Programmer reminder produce this week next week. Produce a week after in because all of that shift word google has done is given us the one blog. There was a lot of Gnashing of teeth when that happened, because all lot of people who’d invested in creating You know brand blogs that were customized lost, All the customization, but what the game in exchange was the Fact that new one blog is friendly on mobile Devices include smartphones and tablets in interestingly enough.
We just got this Fact, wide two weeks ago, forty-percent articles, you know you too Now viewed on mobile devices so or having a Site that is friendly on a smartphone or a tablet is nama thing you may you may want to live Your customization effort boy, you picked up big audience so, but if you’re running a Business, your business’s producing widgets Howard And Pau with monetizing your blog you’re trying so Your own product, as opposed to your, I guess, station yeah it so if you want To use your blog for marketing as opposed to selling ads next to your articles at the same Thing I don’t wan na reach forty percent of the people, we’re going to read articles on a mobile device, seldom widgets to so one way or another.
Despite the fact. That meant that people had to make changes. Are taking advantage of this new blog and some other new features? That they’ve offered is important, whether you’re using the Blog for marketing you wan na drive traffic to Your website or using YouTube to monetize those articles, you’re Trying to make your careers YouTube content creator source the best content it it turns up. Funny is Still number one I, the new david, has just come in from The Pew Charitable Trust, so it’s from a neutral third party and I’m sorry comedy – is still King number to go in.
This is new data. This is certain jumped off the chart. Last couple beers is how to articles an are it’s really hard to be funny, so not Everyone can actually pursue that as a genre. The content for whatever their trying to Do whether it’s marketing your make a living, but how to all of us can Do how to articles in its is really surprising how much People now turn to you too, when they have a how-to Question 1 answer: after you, russia’s article Google brass Balls very impressed ball.
This once-a-year, if You, Google giant brass balls you’ll discover that An article that I wrote for Search Engine Watch ranks number one in what the article was about. Was there Was an effort afford to try to get Stephen Colbert Tour ranked number one for German brass balls: And I wrote about it, and a part of this was to demonstrate That, although Google said Google bombing didn’t work anymore, we thought that it Still could in it did, but as soon as we present that Data a CS Toronto: Google did what they do and ironically I now Rank for the term that we were trying to get Stephen Colbert a ring for so arm.
Obviously, some the engineers a Google have a sincere, don’t think Stephen even ring sure that All now, but I do so – it’s interesting party have Tribune You can pick up and hurt so basically to get ranked Number one Creech, a good blog, create a good article. Dads is long-tailed in specific yeah, I N and and embarrass the hell out. Of Google for at least a week or two and then you know, guess what the they have ways of changing their Algorithm from time to time – and lord knows how I ended up number one, how can we find more about Greg Jarboe, Lord his a rash on the internet? So you can do a search.
You know your right. You can find me a at our website SEO hi from PR dot com. You can find that I write articles for Search Engine Watch an real SEO. You could read when my books, one of them Is YouTube in article marketing in our day that was published two years ago and so I recommend you, don’t read it because trust me you to his change. So much last Two years up, the eleven chapters in the book – 7 A.
M. Or out-of-date so don’t read about, but the new one that Is just out last month, so its only foreperson other day, I is strategic. Digital marketing, a written a chapter in that book along With a whole lot of the other faculty at Rutgers, who teaching the digital Marketing program, so you can find me there, you can find me to CS conferences. Thank you. This is Bruce him a blow with BSPP and site
What I want to do is take a look at what I would suggest some of our more advanced students would do and how to use this as a tool. So one of the cool things about soundcloud as you’ll see is that there’s a way that you can go in and you can annotate audio clips.
So what you’ll see is here is a clip by cindy tss, red, hot chili peppers and basically, let’s go into the the adventure club remix. So if you take a look at this all these little slashes here, those are areas where somebody that’s in this community went in and left the annotation okay. So you can see this person here up south been waiting on a new one for a minute. It was worth the wait that might not be exactly what you want your kids talking about in class, but you can see the power that’s involved in this, so you could.
You could have a piece here where you record an audio clip or your students could record an audio clip and then, if you or they go in, you can basically go in and grab the audio clip and then annotate it we’re going to take a look at Some classical music I’m going to go in and look at this track right here and there’s only a couple. But let’s see how this looks so as audio is playing, so you see ghosts, prints came in and said, lovely there’s a way for individual students to come in and leave their text leave their annotations and it’s pretty easy to do so.
I’r going to go in, you saw a piece that I had here. I could be listening to the clip that we just recorded and I’ll stop my reporting there. So you can see right there. I just added in two clips, so I can reply so you can have dialogue about a section of the tape. I could even come back in here and say this part of the recording tends to be a bit better than the rest, and I can post that up there.
What we can do here is, as the as the teacher you can come in and say: okay, I love your emphasis on the words that Pinsky uses here. This part is a very you. You know this is a dramatic part of your production that I appreciate you could add elements where you’re a little bit more critical of your students, but the nice thing is that all of this is here in soundcloud. Once you have an account, you can create the clips, you can annotate the clips.
It makes that whole process of recording and uploading as simple as possible. What’s also nice about soundcloud is it is an online community. You can annotate, you could create groups with your kids. There is a limit to the amount of minutes you can upload. I think it’s around two hours, then you can pay for more. I think, for your purposes, you could pretty much accomplished everything without paying for the number.
One thing that I would have a concern about and that you should be concerned about is the fact that it is an online social network. That’s based on music and it’s very healthy okay, so there are tons of artists that released tracks here, there’s tons of people that are involved, and some of it is questionable. Okay, you cannot ensure that your students will be safe here in these environments. So what I suggest you do is you don’t send them in and have them just hunt down and look for you? Okay, don’t send them in and just look for you and try to find you.
Okay, because I’m a fan of DJ shadow. Okay, I can go in, I can follow DJ, shadows, music. I can listen to a lot of his pieces here. You might not want your students just to go in and find you and basically follow your tracks and mark up your tracks. Okay, the way that you get around that is, you create private lists. You create private tracks, private playlist, you embed those in your website. Then your students never have to come back here to SoundCloud.
Okay. What they’ll do is they’ll, go to your website. They’ll see an embedded clip on your page. That basically looks just like this. It plays like this, it shows the annotation and they can annotate, but they don’t have to go back to sound file. So, in a nutshell, that’s how now that we’ve created a clip and made it private, that’s how we annotate a clip. If you want to come back at any point and figure out how to do this, I basically put together a tutorial will be sharing that the instructions on how to get there, but we have a tutorial.
That’s set up showing you how to do all of this. On the website, I’ve set up for some of these directions. I show some of the standards that are involved and down below. I show screen cat captures on how to do this on an iPad, so this is basically exactly what we’ll be looking for when we use soundcloud with our students and use it for annotation purposes.
Let’s jump in. I hear a lot from different businesses that Twitter is dead. It’s irrelevant! Why? Why should we be on Twitter? Give me what are some Pros to using Twitter, So I hear that all the time too, and it’s absolutely not the case – It’s on the rise popularity is growing and Twitter is really Unique in that, the real time that it embraces is What makes it so special So should all businesses Use Twitter or should some Are there certain use cases where you probably should avoid it? I’r a big fan, I’m a huge advocate of using all three Platforms, Facebook, Twitter and Instagram because they Work better together, Okay, But the thing about Twitter is and some view this as a Con is the algorithm So you’re not going to just see things in a chronological order.
Okay, So to keep your content Actually, coming up and being found, you wan na make sure that you have quality Content, not quantity, You don’t need to be Tweeting on steroids, Mass, producing content right. You wan na make sure that you’re giving something of value to your audience. What’s kind of the first Steps once I sign up What should I really look at So first steps. You definitely wan na start following like-minded users, Okay, And that can also help you to get in front of their followers, which will give you a really organic presence And then also go and engage.
With other users on Twitter, You know go and click retweet on something that makes sense to your business. That would also be of Value to your followers, So what about my profile? I know there’s some things that I should probably do just To make sure it’s consistent, What does that look like With your profile, you wan na Make sure that you have usually do you have a logo Yeah Yeah, so you wan na put Your logo out on your Twitter and definitely make sure Your handle is consistent, So that’s a at symbol and then the name of your business preferably Make sure that’s consistent across Twitter, Instagram and Facebook.
‘Cause. After all, you’re Branding yourself Right And then from there you Have a little bio description right beneath the photo and your handle Cool. So one of my just absolute favorite topics ever are hashtags Hashtag. I did it all. For the cookies right Tell us about kind of the Best practices using hashtags Like should we just go On a hashtag tangent, are there best practices What should we avoid? Give us a low down? Yes, so definitely real it in don’t need to go hashtag crazy, Okay, But I also love hashtags.
It’s a great way to get more exposure, They’re free to use, and it can help you to be found by someone who Doesn’t even know you exist Also, including an actual Caption that you’re writing it’s one of my favorite things to do when I’m traveling the country – And let’s say I did this Seminar right on social media – and I got a cool picture me – At the microphone feeling [ Justin ], I can see it now Feeling pretty cool at a trade show, and so I wan na, like get That out to my audience – and I caption it like “ Having a blast sharing # socialmediatips.
”. So then, it’s in my caption and then now, if anyone’s searching in the area or social media tips in general, [, Justin ] Right, I have a chance to be discovered, Seems more natural, Right than just having it at the very end make it Part of the conversation Exactly make it part of the caption, But do both by all means. Okay, You can get real localized with it. [ Justin, ], Really Yeah. So when I travel Like, for example, I was in Austin recently, I just wanted to know where’s a good place to Eat or get a craft beer, You know it’s a big thing in Austin, So I would just search # austineats and from there I found Out what tourists locals where they were going to get food and then that helped me make my buying decision So think about it as a Small business owner: how does this relate to you? Well, consumers are out There searching hashtags Right When they’re looking For a product, a service, a cup of Joe And then so, if you have these hashtags on your Posts you’re more likely to be found when someone’s Searching coffee, Perfect and what I would say, To you, when searching that joining in on the conversation With those hashtags that are relevant to what you’re searching and that’s what’s more Important about Twitter right Is talking to people and being social, social media for a reason, Yeah exactly it’s a two way street.
That’s the beauty of it Right, You’re, not just talking At your customers, anymore, you’re engaging with Them it’s a conversation and, at the end of the day, that’s what’s going to make your presence more powerful. If you have This two way conversation Right on. I dig it So next up, we have Really paid advertising.’Cause. I know I’ve seen Some paid promotions on Twitter every now and then Is there any relevance to that.
Should we test it out? What are your thoughts, I always say, start small and be sure you’re paying attention to the metrics, Otherwise you’re just blindly Spending money right At the end of the Month, you’re like wait: where did my money go? You’re like well Yeah, so just start small, So Emma so we’re Tweeting a lot we’re searching hashtags we’re using hashtags. How do we know if what we’re doing is Working and relevant Is there any place to go in And check what we’re doing There absolutely is a way to track Twitter.
Has this account dashboard that you can actually see even what time of day people are looking at your Tweets, which could really be informative? You know I used to work at a coffee shop and what we found is there Was certain times of the day that made sense to Tweet To get people to come in Right, Coffee, early risers, You can Tweet something at 5Am about what you have on what your drip coffee is or Your special foam on your lattes and that made sense you know And then so thinking About the time of day, looking at your Twitter Analytics to see what works best Yeah, But also the top Tweet Is really informative? What do yo mean by that? Like the Tweet, that Got the most impression, the most engagement, That’s going to help inform the Next Tweet and your strategy – Okay, Oh also the retweet.
If I’m getting a lot, Of retweets from users I know, oh they liked that you know They wan na tell their friends Yeah like I should include more photos of me skateboarding That got way more retweets and then that informs my next Tweet. So there’s two different Types of retweets, if you will There’s retweet and there’s a quote: Tweet Yeah. So while it’s fast and efficient to simply click retweet, You know back to the million Things you were doing Right.
We found it to be more beneficial. To quote, add your own caption.’Cause, then you’re, adding Your personal flair to it and you’re really explaining the relevance of that Tweet too. Why are you retweeting it Sometimes. I feel like I’m Spending all day on Twitter Is there a way for me. To not have to do that Like can. I just go and Do it just once a day’cause I have scheduled Things help me out here: I don’t wan na spend all Day on social media, I’ve got a business to run Absolutely so there Are ways to outsource [ Justin, ]? Okay, If you don’t wan na, do this Godaddy Social (, laughs, ): There are teams that can Take this off your plate, but if it’s something You wan na do on your own.
You wan na be beneficial with your time, So I strongly strongly Encourage a content calendar Okay! What’s that That what you get a Calendar a blank calendar, and you just plan out couple days of week that you wan na Tweet and Do it months in advance, so then you don’t miss piggy. Backing off of a holiday, Even unofficial, holidays, Like national hotdog day, There’s literally a random Holiday for every day, Yeah, and not all of them, are going to make sense to your business Right.
But if they do you Can really piggy back off of that with Twitter, but the Content calendar is going to be key to help you plan out in advance, So you’re not rushing And scrambling, like I haven’t, been on Twitter for a few days. I just need to go out there and Tweet. No One tool that I found. That is, pretty cool is Tweet Deck. Have you checked that out? No, I haven’t So Tweet Deck. Actually, let’s you it’s inside of Twitter Itself, but it let’s, you schedule out your own Tweets.
So that you don’t have to have to go in every day and post, You can literally take some Time or chunk out of your Monday and schedule out your content calendar, and it will just spin it for you, Yeah and I would just be Cautious with that, though, because while that’s Maybe a good way for you to manage your time. Rather, you wan na make sure that those times of day are Working for your consumers,.
‘Cause, that’s the key! You Want your Tweet to connect with your consumer at The most optimal time All right, thank you so much Emma. This has jut been a blast. I’r going to invest in Twitter now, Like it’s changed my life, so thank you. Hashtag life changing Hashtag life, changing (, laughs, ), Awesome! Well! Thank you. All so much for reading This has been The Journey. Make sure you, like Subscribe comment below, Let us know your thoughts and let us know what you wan na see next And thank you for reading.
Yes, honey. You guys filming with three little kids is hard work. Okay, first up was the library so that I could pick up some more books that I ordered to finish up the articles, my planning article for you guys, and then I also stopped by the discarded book section, and I picked up a few goodies.
They like to run through these trees every time we walk back from the libraries alright. So now I have to head back home such a task to get to and from the library that’s right down the street hi guys, I’m back okay. So what do I start? I’r going to try my best to walk you through how I organized my thoughts and planned out our year. I don’t know how comprehensive this will be, but this is just what I did so these are all my books and telling you how I how I did things yeah now I can kind of show you what I got from the discarded section in the library.
I love Steve Jenkins books, they’re, always in my Amazon card. This one was just 20 husbands, so this is just the Vita book. The Secret Life is money, a kid’s guide to cash for Cameron, like 20 factors, one a very hairy bear grande big mission, and then the last thing that I got was Jane. The Fox and me, the people that I readed on YouTube are probably nothing like what you think I would read. Oh I’m obsessed with reading artist articles, there’s a few blogs that I read regularly and this book came up in one of the books that they love.
So I recognized it when I was still library and I just wanted to take it out. I don’t actually know what it’s about. I just know that they thought it was really wonderful. So sorry, this is all over the place. The other one should be a little bit more straightforward, I’ll, say well, my Instagram story, so I was going to be filming today. The whole planning process, so this article is probably going to be split up into maybe like eight or nine articles, because I don’t want this article to be super duper long.
So this one we’re just going to chitchat about how I organize, like my thoughts and our goals and things like that, how it kind of like organized yourself when I go to plan a new year and then after this I think I will break down. All of my curriculum picks for homeschooling multiple children by subject, though so I’ll do that one article for each subject to lay out all of my picks and how I plan on using them and then, at the end of the three articles a day in the life Article for each of the kids, following each of them around that will kind of show you what each of them are doing for their grade level and how I kind of pull all of the curriculum together.
So, in the end it will probably end up being maybe spoil article me in 12 articles or so hope you don’t mind but, like I said, I can’t have this article be like an hour and 30 minutes. So it’ll just be better. If I can just split them up into separate articles, I’m trying to figure out how I’m going to communicate this to you guys. So the first thing that I do is I went ahead and did about a week or so of assessment time.
That gives me some time and space to like really spend individual time with them and see if there are some things that I had been missing along the way, some things that I thought they were doing extremely well in and maybe they needed a little bit of Help in or whatever so you guys know, I did that and then after I finished that up, then I just sit down with a piece of paper and try to organize my thoughts and how I’m going to tackle each section.
That’s going to need a little bit of attention figure out what I want to do differently this year, what I’m going to get rid of what I don’t need anymore and, for example, what I mean my dad. You guys know that I have been using time to learning and I had two accounts one for each boy, and I just decided that this year I mostly use it as a safety net and a guide to help me when I am. You know just not as confident when times when I’m not as confident or where I need a little bit of assistance and then also like for homework time to keep them busy and always learning with each year.
I become a little bit more confident and so this year I feel like I don’t need it the way that I have been using it in the past. I think I am going to keep it I’m going to keep it for sure, but instead of having to account, I’m just going to keep one account and I’m going to still use it for like random homework time. When I need to keep them busy and then I’m also using it to help me with my planning to help give me a structure or a little extra assistance when I’m having a hard time, so I’m just going to have one time to learn the account now.
So that is one change that I made. We are no longer using there with homra. I love mine with Homer and it worked extremely well with my boy, but I noticed it is not working as well with my daughter, who is the one that would be using it now. I recognize that I was going to need to do a little something. A little different with her, so I went ahead and cancelled, learn with Homer for us this year. Those were the basic changes that I made and then after that was cleared up.
I just kind of organize my thoughts on a piece of paper. I’ll show you my piece of paper: it’s not gorgeous, but if you can see that or not, but I just used the sheet of paper to scribble down some of my thoughts and to kind of organize myself on how I was going to tackle each thing. So the very first thing that I started with was my portfolio, which you guys already know we I do my portfolio in Evernote.
After I finish that, then I will work on my goals, Dropbox and notability, which is basically my like electronic worksheets and I’ll. Tell you more about that in a little bit for five, I’m going to be working on apps Pinterest and YouTube my YouTube playlist, I Pinterest boards and then whatever apps, that I’m swapping out or changing or upgrading or whatever. After that, I’m going to be working on books so just sorting through the books that we’re going to be using this year for curriculum and then the new thing that I am using.
I’r going to try it out for a month or so and see how it goes, but it’s a site called epic comm. I think it’s good epic calm anyway I’ll get into that in a little bit. Seven step for me is going to be working on my wishlist and shopping for supplies and then the last thing that I’ll be doing is just planning getting. My plan supplies together this year, I’m going to be using a bullet journal and I feel like this article is going to be pretty lonely guys.
Oh well, okay, so the very first thing that I’m going to be doing is working on my portfolio in Evernote. So I basically told you how I use Evernote mostly and that’s another thing I have been wanting to do home school record, keeping a certain way since the beginning. But when you have a certain thing in mind, you start off by giving it a try or starting something, and then over the years you kind of tweak it and simplify it to make sure that it fits and works for you.
So Evernote is something that I started using in the very beginning, but I did nothing with this the first year because I overcomplicated everything – and this is when I show you guys what I do. You may think this is complicated, but just think about four years ago and started how complicated I really made things so over the years. I have simplified things and they’re starting to work better and better for me, and I will show you how I’m using that.
But basically, at the end of the year I take whatever I did actually compiled in our portfolio from the previous year and I kind of archive it and then make new stacks of notebooks and Evernote to plan out this coming year. So I’m just basically going to show you how I set up my Evernote notebooks for this year of school. I start by taking all of the notebooks that I have for the previous year and I’m putting them all into one stack and archiving that then, after that I start with building up whatever notebooks I want for this year and how I’ve been doing it is.
I have one notebook for my homeschool curriculum resources. I have another notebook for my homeschool planner and then I have a separate notebook for each child representing their year of school, so for Cameron this year. This is his third grade quote-unquote third grade year school for Kendall. This is his quote: unquote, first grade year school and then for savanah. This is her quote: unquote, preschool year of school, so I have one notebook for each of them.
I have a home school curriculum resources, notebook and then I have a home school planner notebook. Now. Last year I didn’t have a home school curriculum resources, a notebook, but this year I want to give it a try. I may not use it extremely well, but in my mind is going to work, so I might as well give it a try and then for my homeschool planner, that’s also new. For me. I did not do that last year inside of Evernote um.
I just did it in with my planning pages, so all I’m doing is really I’m just taking my same planning pages and recreating those inside of ever knows so that it’s easier for me to access from anywhere. I noticed what I was doing with my my note book pages, which you may not do, but I was totally doing is I was planning everything out and then I was taking things out to reference them and then I was leaving them behind in different places and Then, when I couldn’t find it, that was a problem.
So this way, I thought that if I made sure that I had everything planned out and Evernote, I always have access to it and I never run the risk of losing it. That’s why I wanted to do it this way, this time around, also because of the way I’m using the electronic notebook in system deal so I’ll show you inside of the notebook, so each of the children’s notebooks is pretty simple. It’s just going to be a notebook, and inside of it will be a page and I’ll create a new page.
Each time we have a new week of school and basically I will take whatever we completed from the planner section and I will copy that into their notebook. That represents what they did for that week of school. So that’s going to be pretty straightforward and simple, and maybe I will show you more of how I do that in the future when we actually get into completing our weeks of school. But that’s how that’s going to go, then.
I have I’ll talk about the homeschool curriculum resources, because that will be fairly simple. That has five notes inside of that notebook, and each of them are books, learning kits living books, websites and worksheets, and basically I the idea was to have an electronic log of all of the resources that I have because, like I said in a previous article, Evernote Is searchable so if I get a new resource and I go in and just kind of highlight each of the topics that are covered then, when I am going to learn about a certain subject, I can go in or a certain topic.
I can go in and search that topic, and it should show me every resource that I have that I can pull from it. I felt like it was a brilliant idea. No, absolutely getting it to work will be the other thing, but I think this will be really helpful to me because a lot of times we get resources and we totally forget there were certain things in there that we could have used or pulled from. So I thought, if I just keep a log of what I have then I can go in and search and it’ll automatically show me everything that I actually have that I can use instead of feeling like I don’t have anything and then you’re kind of you know You go out and try to get new stuff, and then you realize later that you had something it’s good of you.
So I’m going to give this a try and see how it works. It may not work this year, but I’m going to keep trying until it works like I had in my head for it to work, so you nervous the real notebook that is going to be an interest to. You is going to be my home school planning notebook. So I kind of sort of set it up. Basically, like I do my planning pages, but the first section I have the first note I have in this notebook is being homeschool calendar, basically just that it’s just a calendar that lays out the month so that I can input all of my dates that I would Like to remember like Earth Day, I don’t know oil Day Presidents Day.
I forget those types of things. The next thing you know it’s right around the corner and I forgot to add a little something to our plans to kind of celebrate that, and I also just have a layout of my school days so my school day is we do school from Monday through Thursday. We still learn every single day, it’s just not as structured. We have structured school days Monday through Thursday, and then I lay out my school weeks, which is basically 38.
I think public school has 36 weeks of school, so we actually have 38 and then I lay out my vacation weeks, which is 14, so I have 14 weeks of vacation that I can move around as like the way we’ve been doing it so far since we Started year-round, homeschooling was, I just have a one week off every month and so basically that that equals one week a month, and then I have 10 floating days that I can pull from when I want to the reason why I laid it out like that, is Just because I know that I’m able to keep track in my head and I can eliminate that guilty feeling when you have other things to come up – and you know you may not be doing you know, you may need an extra day or two.
You know or three or four, but this way I know that I can pull from this time or we can like forge through and give up our week for this month, so that we can exchange it for another month when you are going to be going out Of town good, I’m trying so hard to film this article, for you guys – and I love having my kids in the background, but recently they have gotten. That’s why you don’t, even maybe they are anyway.
I rather my home school calendar just lays out the months. For me, so I can see a month at a glance year at a glance what we have coming up and then I can also just keep a tally of the school weeks and our vacation days I’ll skip down to our home school yearbook. It’s pretty self-explanatory, anytime. I want to add any photographs or any memories or any articles I just wanted them to be all in one place.
This may have been a good idea. It may have not, but I figured I might as well give it a try. So I have a section for a home school yearbook, whole school unit studies. So basically I have about 10 unit studies. I think maybe it’s 8 to 10 unit studies, where these studies are lasting between 3 to 4 weeks. This is an addition to our regular core work. So if we get to add these things on then great, if we don’t and it’s not a big deal, but I wanted to have it laid out ahead of time.
So I basically just took way too much time to add a few pretty photos to the beginning of each unit, because that’s just how I operate – and you probably shouldn’t do that because it was probably a waste of time. But then, underneath that I just lay out each of the activities, whatever field trip and then I add any links to any articles or you know any documentaries or anything like that – that we could use to help us for that unit.
Study – and I just have little check boxes next to each one of them so that when we complete them, I can just check them off, because you all know how much I love check boxes. As you can see. I have a color unit. Has an ocean unit? Human body light outer space and then my next note has weather and seasons. Then I have biomes the grow unit, neighborhood unit and dinosaurs. That’s the last one and how I got most of my information.
I gathered that together in my Pinterest boards over time, and that is where a lot of these photos come from and a lot of these links come from. I organize my thoughts and Pinterest. You know every time I just need a little bit of stress relief. I go and search a certain unit topic and just add it to my board so fun stuff. So now, let’s talk about home school goals. This is a major portion of laying out my plans for the year and it’s basically just like.
I had the home school goals on paper in my last curriculum. Article is the same thing except for I move that over into electronic form, and I just laid out by subject, I will go more into detail of what I have chosen for us and then the curriculum pieces that I have chosen to help me teach those things And as I break it up by subject in the articles that are going to come after these, but basically just me how all of my goals now I do get a little bit of help in certain areas like language arts.
That is where I use things like time for learning and I think it’s k12 reader comm. I use those places to help me figure out. What is the natural progression of what kids are learning? I mean it’s really kind of simple. If you think about it, I think that sometimes we just need a little help, knowing that we kind of know what to do. You know, because when you first have your child, you start teaching them the ABCs.
Like that’s the first thing you need to know, if you need to know the letters in the sounds in order to start building words in order to start different sentences, and that’s basically what language arts is, it just seems very over complicated because of how they lay It out in order to teach it in school, so I think that once it helps me, you know get my thoughts together when I can see things like on the curriculum is laid out on time for learning or in the k-12 reader.
I can see that okay, Language, Arts, the next thing they’re going to be doing, is learning about verbs and nouns, and it’s like oh okay, I get it. I get what you’re trying to do and then you can find a way to teach those things yourself. For me, I found that the kids do a much better job, just learning that thing first and then me going back and identifying what it is that they already know. I think I’m kind of taking that approach.
That makes any sense. But what really helps me is being able to look at some other, like common core laid out curriculum to see what it is. That is the next step for them to teach in that area. So I get a little help in language arts area and I will explain that more in the article where I talk about what I’m using when I’m doing for language arts. So I basically just layout each subject: Bible language, arts, reading, writing, spelling and I’ll all go into further detail about that in their separate articles.
That’s basically what’s inside of my Evernote portfolio and how I set that up. The next thing I do is a binders composition and art books, so I basically go through the ones from last year, pull out whatever I need to pull out, simplify the process a little bit. However, I’m going to simplify it and then set it up. So it’s nice and clean for this new year, and so the first thing I started with with our binder.
I was really extra with our binders in the very beginning, because I laid everything out by subject. I couldn’t really figure out like what I wanted to do with now. If I’m to the place where I know that it just holds our basic supplies mostly, so I have a little stack of their writing paper it’s inside of their binder and then I have two folders or housing any loose papers that they’re working on, and that goes Inside our binder and then I have a little rule, what they call a pencil holder under their pencil to color pencils, a little sharpener their little passport and eraser that type of thing, and then I have whatever resources that we’re using most frequently.
So in this case it’s just a little laminated map. There’s inside of that binder, then the next portion is my composition. Notebooks, you guys know. I adore my composition, notebooks and again when I first started using them, have a very extra about it and really didn’t know how it was going to fit in. So I had a lot of composition, notebooks that had maybe three or four pages filled out and then the rest them had coloring little doodles that the kids did randomly and sometimes they had the wrong things inside of the wrong composition book.
No, I feel, like those things just kind of happen, and you kind of learn to tweak it and figure it all out. You know, as you move along what I decided to do is continue on with that process and continue separating them by subject and I’ll just include any physical worksheets or things like I mentioned before that I want to keep inside of that specific subject. I’r still going to forge through as if I can do a better job at disciplining ourselves to keep the proper items inside of the proper notebook.
So I just went through, and since I did have a lot of composition, notebooks that weren’t, you know even halfway full. I would just rip out a few pages and log them loved those items wherever they need to go, and then I just am still going to use the rest of that composition, notebook and then, whichever compositional, because that I need to replace, then I go and purchase Those items I have it on my list of things to purchase on my shopping day and after that art books same deal clear out.
Our art book see if I can reuse it, if not go, get a new one. So that’s how we’re doing that. The next thing I’m going to is my electronic work sheet system. I’r really excited about this, because I am NOT a fan of work sheet, so this in the past I like being able to do the practice on the work sheet. I’r trying to be kinder to the tree. We already use a lot of paper in like our little makerspace, so I don’t use extra paper with a bunch of worksheets that just end up everywhere and I don’t know what to do with so.
It just makes more sense. It makes more sense for us to be able to complete work sheet on our devices, and I figured out a way to do that, so how we are doing that. I am using both Dropbox and the app called notability. I know the notability after you’re able to just basically completely fill out the worksheet as if you would on a real piece of paper or real worksheet, and I love that so I can even change the color of the mark to red.
If I want to correct a certain worksheet, so how I’m doing that is whatever worksheets that I download, I include them into my home, school Dropbox account and then Dropbox connects with notability, and I can upload them and include whatever worksheet I need to for them to Be able to fill out for the day if we’re going to be using worksheets, so I set up that whole system. This is where this is, where a lot of these come in, so that they can fill out their worksheet inside of their notability app from Dropbox.
The next thing I did was set up my apps, so I needed to clear off whatever apps they weren’t using anymore and then add any apps that we’re going to be additions to our curriculum choices by subject, so I needed to sort through my apps, my Pinterest Boards, which, basically I already talked about, I just went to my Pinterest boards and added some new things that I found during my therapy time. I just added them to my board and created any new boards that I wanted to create, which I didn’t really have anything new to create, because I already had everything under the Sun and then also YouTube just clearing out my YouTube playlist for the kids by subject.
So they could go in and read the articles that we selected and picked and have chose them for later to look at so I just needed to clear that stuff up and get all of that stuff together. So my apps Pinterest YouTube all of my electronic resources. I guess the next thing I did was my book search, my book search, so I did a physical book search and basically, I pull together all of my books and I was going to be using to help me teach everything that had laid out in my goal And I went and actually reserved all of those books, but I could sit down and do these articles for you.
So that is what I did a lot of reserving and collecting books from the library that I would return after I’m finished with these articles and then I, when the time comes, I will check out those books for us to actually use to help get through that Unit or subject or whatever it is that we’re going to be studying for that specific time after that, I’m wrapping this up. You guys, I know it’s getting long.
This is why it’s going to be like nine to twelve articles. The next one I did was my wishes, so basically anything that I know that we’re going to be doing in the past. I have planned out to do certain projects or certain things and never got around to doing them. So everything that I purchased for that specific project was kind of a waste because I really didn’t use it yet I mean maybe it’s not a waste, because I will use it eventually.
I’r trying to do be a better steward over our school monies. So, instead of going out and purchasing all of that being all of that stuff together, I just created a wish list. So when it comes time to do that specific project like a week before it’s time I’ll just go ahead and place the orders for those things and I’ll always have the monies available for those things. But I’m not wasting my money by collecting a bunch of stuff that I’m not using just yet, and I may not actually use so that’s where my wishlist comes into play.
I basically do my wish list by building a board on Pinterest and then also a wishlist on in my App Store and then a wish list. Oh my god does that I go and then I’m going to be also shopping for any supplies. So I am keeping a list of supplies that I need to make sure that I have stocked up on like pencils. I need more pencils and then one day this week, I’ll go out and I’ll. Take you guys with me to pick up those items and maybe look for a few extra fun things just because so then after that will be my last step.
The last step in my planning process is to just it’s kind of like a celebratory thing for me. I have all of my stuff planned out inside of my computer and available all my devices and everything and everything is good to go. But I don’t want it to actually have a physical planner that I can write in and doodle in and draw and in general all over and around, and instead of doing something like an Erin, Condren planner or a happy planner, or anything like that.
I wanted to try bullet journaling this time around, so it’s going to be kind of like a reward to me for finishing out my planning to go out and get a bullet journal and any supplies if needed, to try my hand at my first bullet journal for Home school so we’ll see how that goes. Okay, so I think that’s it you guys. We made it to the end of this particular article specific just article one. I don’t know how long this is going to be.
I’r sorry, but I’m trying to be as thorough as possible, because I get a lot of questions without this and I don’t know I just kind of wanted to share just in case it was helpful to you. Of course you don’t have to do my whole entire process, because I’m extra, but this is what works best for me and yeah. It’s it wasn’t that bad. I mean it seems like a lot, but once you get it all together, I start to finish was done with planning in a week, and so that’s really good for me because in the past it’s just taking me a lot of my brain space for a long Period of time and this time around, I just did it my way and I got it done and I had a lot of fun.
So I just wanted to share that with you. So yeah, that’s how I am organizing my planning for this year and so the next articles are just going to be what we’re using for curriculum, homeschooling, multiple children. So I will see you guys in tomorrow’s article and we will do Bible curriculum for homeschooling, multiple children. If you like this article, please give it a thumbs up and make sure you’re subscribed and leave me any comments or questions that you may have.
I know there was a lot in this article, so hopefully you stuck around to the end and I will see you in our next article
Today that my team has been working on to help you Be more productive building your apps locally and then extend that productivity. To the cloud as you deploy your apps and adopt Azure App Service in Cosmos DB, We’ll start with this app Here, which is an Express app built with React and uses A Mongo database on the backend I’ll start this app in debugging mode.
Just to give you An idea of what it looks like You can see it’s a sticker, app With no stickers, This will let customers come and browse and order stickers. And customize them, but again there’s no data. So let’s populate our Database with some data, So the first thing that I want to show you: is the Cosmos DB extension that I’ll, actually let you work With your database is locally as well as on Azure, In this case, I’m connected to a Mongo database.
That’s Running locally on my machine and this app is configured to use a stickers database on localhost. So let’s go ahead and Create the database that we need and the collection which Is just called stickers There we go now. We have a database And a collection with no data, So I have some initial Data that we can use I’ll copy this entire array, Of sticker objects and I’ll open up, what’s Called a scrapbook, So this is a fairly unique concept: To the Cosmos extension, What a scrap book because is is a way to write.
Your Mongo queries and get IntelliSense for the database that You’re actively connected to I’m already connected to The stickers database, but to do that what you would do, Is click on the “ Connect” button Choose my attached accounts my local database and the database. We just connected To or we just created Again you will get some intelliSense On here, so when I type Db, you’ll see the stickers collection, Is automatically recognized as available and we’re going To do an insert mini I’ll paste, the array Of sticker objects, I just took from my initial data And we’ll execute this command, As you can see, 15 stickers were added.
We can expand the Collection and actually see those collections or those Documents within the collection – and I can actually click on these documents and make changes. To them directly in the editor, Saving will upload The changes to database, But for now let’s just go back to our app and make sure That the data works Okay, Cool. So this is what It’s supposed to look like and it’s working on, our local machine and let’s go Ahead and deploy that to Azure To do that, I’m going to use The Azure App Service extension, which is our platform as a service offering That lets you deploy your applications and scale.
Them as the demand arises, This all starts with the blue up. Arrow, which is the deploy button I’ll, create a new app. Let’s give it a name and I’ll pick my node version, So what this is going to Do it’s going to call out to the Azure APIs to create an App Service plan which is basically a VM where The app instance will run You can have multiple app instances running on an App Service plan. It will also create a resource group which is a logical grouping of Azure resources that you can Use to manage various pieces and it will create the app instance itself, where The app will be deployed Now that the app is created, I’m prompted to choose The directory that I want to deploy it to The app instance We’ll skip this part for now.
But if you wanted to, you can actually let the App Service Extension, remember, which app was deployed to this Particular app instance so that in the future you aren’t prompted for which app you want to deploy to. So at this point it’s going To package up the app Since we’re in the default Configuration it’s just going to use a zip archive. It’s going to Take all of your code Put it in the zip archive Push it over to the Azure API, where Azure is going to take over Extract all of the code run NPM install in The root of the project and then start the application.
So now that our app has been deployed, we get notification, letting us know that we can connect to the log stream or we can just go Ahead and browse to the site, So let’s do that and get An idea of how it’s working Again, we have the same Problem with no data, but in this case I’ve Actually created a database out on Cosmos, That we can connect to To do that. Let’s go into The App Service extension here expand the node for The app and choose connections This will, let us connect to a MongoDB instance.
That’s Running on Cosmos or in Azure, Choose connect or pick From my subscription Again, I’ve already created A database for this and it’s going to automatically Create the environment variable that we need on Azure, To connect to the database I’ll use the default value of Mongo URL, because that’s what This app is looking for Now that it’s connected. We can Actually reveal this database in the Explorer which will take us Directly to the Cosmos extension, We can expand this and the same Functionality that we had on the local environment, We have again here in the production environment on Azure, So I can do something.
Like make a change here, When I click “, Save” prompt It to upload and refresh the page and take a second for our environment to be reset to use the correct Environment variable Now our stickers are loading. You saw that I made a quick edit To the markdown sticker, and that did show up right here in the Production version running on Azure, Okay, So now we have our app Running it’s connected to the database, but deploying from The editor’s a little strange So what we’re going to do? Is we’re going to set this up to automatically deploy from our GitHub repository and we’ll do That from the deployments node I’m prompted automatically to Connect to a GitHub repository I’ll click that choose my username pick my sticker app project and We’ll choose the master branch, So what this will do is set Up all the hooks out on GitHub to automatically pick up Pushes to the master branch, This also includes things like pull, requests that are Merged into master and then anytime that happens, the code will automatically Be synchronized over to Azure and it’ll be running just automatically as We develop our app.
This step takes a little bit. Of time, because it is actually setting up the hooks and that it’s Going to do a sync or deploy and get all of your all of your assets out on The worker and running Okay: now the application, is Connected to the GitHub repo, You can see the commits That have been deployed to this app before At any point in time I can Actually, right-click these and redeploy to revert changes if I find that they aren’t Quite working as expected, So we have our app now configured To deploy automatically but the App Service Extension will Let you do other things as well, such as manage The state of the app You can browse directly to The website stop-start restart.
You can actually set up your Continuous delivery here as well, Your next step would be to set Up continuous integration on your GitHub repository using Something like Azure pipelines and this will run Your lint and unit tests tasks as you validate PR’s And you do your code reviews Once you merge those items. Into Master they’ll automatically be Deployed to App Service For more information or to run Through these things on your own you’re welcome to visit us At any of these resources visit our docs page, there are specific Tutorials that walks, through the steps that I just showed you Also please reach out To us, if you have feedback about any of these features, I’d like to thank you for your time, Enjoy the rest of Connect.
As marketers, we talk about making decisions about an organization’s entry mode. However, before we start, let us list the learning goals for this article. Firstly, the goal is to understand what an entry mode decision is and how it’s connected to the rest of the internationalization process.
Secondly, why this decision is important and subsequently how we can go about making an informed choice by looking at some of the factors that influence our decision. We will also provide an overview of the different entry modes available for us to choose between. So let us begin so how is the entry mode decision connected to the rest of the internationalization process when an organization goes from marketing their products and services only on the home market to also target one or several foreign markets in different countries or regions? We talk about an organization’s internationalization process.
The internationalization process starts with a choice of which foreign markets to target. We call this the market selection process. Ultimately, we will define our marketing mix the four of the 7ps for the foreign market. The marketing mix we use on the foreign markets may vary to the one we use on the home market. We would address issues regarding standardization, and/or adaptation of the marketing mix.
However, before deciding on the marketing mix, we need to address how to organize our entry to the foreign market. We discuss, which entry mode to use and many factors will influence our decision. Choice of entry mode is what we will address in this article. So why is choice of entry mode important and how can we go about making the right choice? Let us use an example. This French business, located just outside of Paris, produces French cakes and desserts in these modern production facilities, well-educated confectioner’s, develop recipes and create delicious cakes and desserts ready to be sold and distributed to cake, loving customers.
The cakes and desserts are frozen immediately after production and are then distributed to a variety of catering companies, restaurants and cafes, around France. So what might impact French cakes choice of entry mode to a foreign market? French cakes internal situation will have an impact. Some external factors about the particular country, region and market of choice will influence that decision.
Some conditions related to possible outsourcing of activities are dressed in transaction, specific factors and, finally, French cake preferences for the different characteristics of the various entry modes will also affect their choice. As we will address these four sets of factors for French cakes, we will use this visual to indicate in which direction the different factors appointing us. Some factors might indicate and move towards internalization, in other words, that using a hierarchical mode is appropriate.
Other factors might indicate that a move towards externalization using an export mode is more suitable and some may indicate a more moderate approach and thereby point in the direction of an intermediate mode. So let us apply this visual to our example with French cakes. As we address the four sets of factors. French cakes have set their eyes on the UK and their initial idea is to enter the country by setting up a sales and production subsidiary in the UK.
The characteristics of hierarchical modes are high, set up costs, a production site and sales force carry a large investment high-risk, as there is no guarantee that the initial large investment will pay off and low level of flexibility, as the large investment will make it difficult to quickly Pull the plug on the UK adventure should business not prove to be as successful as hoped, a high level of control, as French cakes would hold on to complete ownership of all value chain activities being in the position to make all decisions about target groups, distribution, blogs And so forth, let us address the first set of factors: the internal factors.
Let us use this visual as we evaluate French cakes, internal factors, and let us see if this will indicate a move towards internalization, as French cakes are considering. French cakes is a small company, their resource availability is low and therefore a large investment would be risky. They have no international experience, making use of an external partners, expertise might prove advantageous. The cakes and desserts are not technically complex and, although their cakes and desserts are good, French cakes doesn’t carry a large product.
Differentiation advantage in terms of, for example, brand image. An evaluation of French cakes. Internal factors has revealed an indication towards externalization and not towards internalization. As French cakes initially suggested, French cakes also has another suggestion meet mr. Thompson. Mr. Thompson is a uk-based agent. He would be happy to represent French cakes and sell their products to appropriate intermediaries around the UK.
Using mr. Thompson would be using a direct export mode. The characteristics of export modes are low costs, as French cakes would not need to setup any facilities, start production or hire staff low risk, as the investment is low. French cakes will not be taken a great risk with this setup, a high level of flexibility. As the ties to the UK market will be limited, it would be fairly easy to pull the plug on the UK adventure.
Should business not prove to be as successful as hoped, but also a low level of control? French cakes will have little control of how mr. Thompson markets and sells their cakes and desserts. Will he choose appropriate sales blogs? Might he favour possible competitors due to a more advantageous Commission rate, and will he miss opportunities that French cakes would have been able to take advantage of if they had had their own sales staff in the UK? Let us address the second set of factors: the external factors.
These are factors that address the foreign market of interest, in our case the UK market for cakes and desserts. Let us use the same visual as before, as we evaluate the UK market for French cakes and see if they indicate a move towards French cakes. Second suggestion of using an agent, although the UK is geographically close to France, research will tell us that the socio-cultural distance is considerable.
This would indicate that having a partner with local knowledge could prove to bridge this gap. French cakes have researched the UK market and concluded that the market is of a decent size and that it is growing at a moderate pace. Currently there are no trade barriers standing in the way of exporting boots to the UK. French cakes have discovered that the competition is intense. This would add to the level of risk should they wish to use a hierarchical mode.
Therefore, this indicates a move towards externalization. Research has also shown that there are large number of relevant intermedia is available. Mr. Thompson is just one of many options in this field. Although the market has experienced growth, brexit is believed to call some general instability and uncertainty in the market, so an evaluation of the external factors has also revealed an indication towards externalization.
This supports French cakes. Second, suggestion of using an agent French cakes are still considering both options: 1a sales and production, subsidiary and and agent. The decision isn’t made until a thorough investigation of all four sets of factors have been carried out. Some factors might prove to be a showstopper, making other factors less important when making the final decision. So let us move on to the third set of factors.
The transaction specific factors these address to what extent outsourcing ie using an independent partner to carry out certain functions, is advantageous and safe. Let us use the same visual as before as we evaluate and see if they indicate and move towards French cakes, first or second suggestion. The know-how and product benefits connected with the cakes and desserts are not considered difficult to transfer and explain to an independent partner French cakes consider it unlikely that an independent partner will show opportunistic behavior marketing and selling their cakes and dessert will not reveal secret recipes.
So an evaluation of the transaction specific factors has also revealed an indication towards externalization. Let us move on to the fourth and final set of factors: the desired mode characteristics. We will evaluate French cakes wishes in terms of the main characteristics of the different types of entry modes – French, cakes of express that they can’t afford to be too risky. They have no desire to be in complete control of the operation.
They see the UK adventure more as a first and trial-and-error step in their internationalization process. Therefore, they are also very keen on a high level of so that they are able to pull the plug on their UK adventure. Should business not prove to be as successful as hoped? An evaluation of these and the other three sets of factors indicate a move towards externalization, which support French cakes second option of using a UK agent, a direct export mode.
Now we have evaluated four sets of factors that will influence French cakes decision of entry mode. We have addressed the internal factors, the external factors regarding the UK market, the factors evaluating outsourcing suitability and which mode characteristics, French, cakes desire, conducting a systematic evaluation of all four sets of factors has enabled us to recommend a suitable entry mode for French cakes.
We have now established what an int remote decision is and why we need to know about it. We have also gained knowledge of how to evaluate four sets of factors which will help us decide on a suitable entry mode and we have established the connection to the rest of the internationalisation process. So, let’s move on organizations might choose one or a combination of different intermode during their internationalization process to one or several foreign markets.
The different entry modes will not be discussed in detail in this article, but let us just provide an overview. Export modes include direct export, cooperative export and indirect export. Direct export is the mode we recommended for French cakes in the example used in this article. Intermediate entry modes include joint venture strategic alliance, franchising licensing, contract manufacturing and management contracting and finally, with the highest level of internalization, the hierarchical nodes, transnational organization, region, centers, sales and production, subsidiaries, resident sales representative or subsidiary, and domestic based sales, representative sales and production subsidiary is The mode initially considered by French cakes in our example.
In summary, we have now obtained an understanding of the what why and how event remote decision, and finally, we have provided an overview of the different types of entry modes. Do you want to learn more about entry mode decision-making, market entry strategies and each of the different entry modes, the internationalization process and global marketing? In general, I recommend that you read global marketing 7th edition by 7th Rawlinson.