This is my second live event ever and it was terrifying, but it was so amazing. So if you guys read my last article, you may have saw me break down a little bit roll the clip. I want it to be easy where I just know exactly what to say, and I’m like it’s easy for me to pick up this camera and like talk to you guys, and it hasn’t been greatly and there’s even been points where I’m just like done.
You want to take a break, and I don’t know what to say, and it’s just like my creativity has just been like suppressed number one. I just want to say thank you guys for all the love on that article. I still feel you guys and where you guys are at. I do want to say that, after this weekend that that confusion, it honestly just left my body after the whole entire event went down. My students flew in from all over the country from Alaska from New York from Oklahoma from all different places from Montreal, and it was absolutely incredible.
It was like 10 times better than the last one. The last one was amazing, but this one everyone said that was just so so much more. We went through with so much emotional stuff people cried people found their life purpose from one of the speakers. People realized what their next steps were. We workshop with each other and we just really got to know each other and the amount of love and clarity and peace and happiness and powerfulness and empowerment that we felt all weekend was the absolute best.
So let’s go ahead and get the article. So we started off the morning with a little bit of emotional work. We had a workshop piece going on where we were listening to each other and just like not responding to what people were saying. We were just opening up her hearts, opening up to how we felt at that moment, and everybody in the little groups were just listening and everyone got to rotate. It was super powerful.
We set our intentions for the day and then we got into speakers. Our first speaker was Brian Pataki. He is a life coach. His podcast is actually coming out super soon guys stay tuned. For that Brian is amazing. He has a huge personality, but he also knows how to like really bring you in and clarify what you’re trying to do in your life. So you guys can also utilize a sample session with Brian. He opened that up to the influencer Academy and if you guys are interested as well, his emails are down below you see someone at Starbucks.
You make a judgement about them. You decide this. How much money this bitch has it’s kind of cost reduction. This kind of kids like an array right normal, that’s a normal part of being human being because in the olden days like way olden days, you would assess somebody out check out they’re going to kill you because you were a cave person right. So it is normal that we have a quick way to make judgments about people.
There’s two parts of your brain that I want to talk about today. Your fast part of your brain and your slow part of your brain, the quiet, the slower part of your brain, is where you can get closer to hearing what the universe wants for you and you’re going to close your eyes, we’re due for short visualization. Okay is your future self? Your future self begins to speak to this large group of people.
Suddenly, you become aware of a shift that has happened to you and the entire audience aware of this impact on yourself and the others. You leave the room altered for the rest of your life. What was that impact your future self had on you and the others? Who was your future self being to have such an impact? You will have a chance to have any impact you want on this entire group. It will be only one chance, one impact, but all of these people will be changed in some way.
They will have a different life because of the impact you have had on them. Go back and look at your paper now just take a minute notice, if any words were repeated and if they were, would you just circle them? Knowing this kind of what I want to do is talk about the impact you can have some going towards a phrase where I’m heading is a phrase. It’s like your life purpose statement all right. This sounds a little hokey when I say it I think, but what it is is it’s a way to know.
Am I running my business in my life from the point of view of who I really want to be, let me offer one tune, we’re going to say. No, I hate better. Yes, I like it, let’s change it, so I am the fingernails, but I’m not that what great that’s the word, so people can feel compassion. If you love, does that compass, these words for you yeah great. So can you stand up and say that I am the person [ Laughter ], so our second speakers with Laurie and Chris harder, two of the most amazing humans that I know I admire them so so much just their stories are so incredible, but they both have Podcast II earn your happy podcast that I was on but Laurie, and I interviewed her for mine and a Chris Carter has the for the love of money podcast, which the motto of is.
When great people make great money, they can do a great thanks. We’re able to keep up on that ridiculous pace until all of a sudden. One day I took a $ 150,000 pay cut and we looked at each other said: what are we going to do and we thought that was bad. The next year I actually lost my job entirely and we had to start from scratch. So we had to sell the homes, the cars, the rental properties, we lost our rental properties like we didn’t start from the bottom.
We started from like below zero. Now here’s the cool part of the story, though it forced us to start getting into self-development. It forced us to start figuring out who we really wanted to be because while we were while I was successful in banking, I wasn’t happy with every promotion. I got further further away from what I really wanted to be doing. If you guys ever woke up one day and just said: how did I get here yeah? That was me.
I always had like these solvents. Do you know what I’m talking about when you know you’re just born for something, and you know you’re supposed to be doing something bigger than you’re doing, but I was just so damn comfortable that I wasn’t doing anything about it. So when we actually lost everything, I had this moment of you know, reading him kind of lose who he was because his identity was so attached to this business and making money.
It started training, people, sorry prior to the six years, realizing well. At least I want to help people’s transformation because Fitness had become such a huge part of my transformation, so I was really forced into starting to train women, because I had actually gotten certified twice before this and never used it, because I was too scared to do It I shared my dream with everyone. That was one thing that I will tell you once I started realizing what I wanted to do.
I started talking about it to everyone and, if you don’t do that things most likely will not happen in your life that you want to happen, because I really do believe it’s all about tribe. So, like just share your passion with every single person, you possibly can no matter what it looks like an Instagram or anywhere else. When you see other people’s businesses the only way they got there, if they’ve even really gotten there is they started in that really shitty place where everything was ugly.
Everything was broken and everything was just barely pieced together and they spent more time in that place. Then you probably think that they spent there and here’s why I share that with you, the majority of you said you are less than three years in to building your business you’re, probably still in that place where it looks like everybody else is growing faster than you, Where it looks like your stuff feels so half-ass and their stuff looks so polished.
Trust me, their stuff is not as polished when you look inside of it, as it looks on Instagram or anywhere else that you see them or it is as polished and they’ve spent. A lot more time in that rough zone, where you are right now and so you’re exactly right, we should be. The second thing is – and you left this part out your story, but it’s so important. Do you remember your first client who came down to this super crappy half-ass finished gym? Yes, so I remember she pulled up in this brand new Range Rover which, to me Range Rover, just meant success or something I don’t even know what it meant to me.
I was like, oh, my god, she’s going to come down to the base, and so I bring her down I’m like I’m remodeling great so for a year she was my client didn’t see any remodeling done over the question here. But that’s! The second point is your egos going to get in the way and a lot of people will stop right there or they’ll check out right there and you can’t, like it, doesn’t matter who’s going to judge you.
It doesn’t matter how you’re feeling inside about you know your own personal business. You’ve got to step through that ego anyways and we actually develop the saying, and that is your egos, your greatest overhead, think about it. Your egos, your greatest overhead, because your ego will stop you from speaking up when maybe you’re about to speak up to somebody who could change your life or change your business.
Your ego will stop you from inviting somebody into your business because, you’re afraid of judgment, your ego may cause you to buy too nice or too shiny of things. Well, you’re, not quite ready to have bought those things. And now you don’t have that revenue for your business, like your ego, truly is your greatest overhead and we had to learn that the hard way from when we had to sell everything that was shiny and start over from when we had to have people’s own clients Show up and Range Rovers in our horribly disgusting broken mirror gym.
Those are the parts that really shape who you are and last but not least, we got to go around the room at the end of the day and talk about everybody loved the most from the day saying that I can go to and talk and listen to You guys talk, your stories are so inspiring. It just motivates me to keep going, but just having that clarity of like where I’m at now and where I am going to be amazing everyone.
This group stretches me so much and I love all you guys for being here. I feel like after today, I’m like so in purpose, and you guys I just felt at the end of the day that it was just, I felt so clear, and I felt like what I was struggling with the other day. I felt like at the end of this day was what I was I felt like. I knew what I was meant to do in the world, even though like it might seem like, I know, and I put together and stuff.
Sometimes it can be confusing and you kind of know, but then the path gets a little blurry we’re all human, and we all had that happened to us. As I can tell by the comments section at the last article and then at the end of the day when everybody was going around the room saying exactly how they felt, I felt it’s so deeply in my heart that I was put on this earth to do This – and I remember specifically when I first moved to Los Angeles, I didn’t want to go, I was resistant.
I thought I had no money. I thought that I wasn’t going to make it. I thought I wasn’t going to get a job. I thought it was going to be too hard to have like a new city, new friends, all this stuff, and somebody had to convince me to go, and once I finally said yes, I like basically got dragged here. Obviously it was one of the most monumental times in my whole entire life. It changed everything for me, the trajectory of my life went in a completely different way, and that is possible for you.
It is possible for what you’re doing right now, where you feel cushy. You feel comfortable if you do feel like that. It is completely possible for you to change your own life, whether you’re, starting to read new in different books, whether you’re starting to listen to more self-help personal development stuff, whether you’re just like gaining new skills. For something that you want to do. Whether you’re just getting sign of your comfort zone and going to a karaoke bar alone and singing because it’s what you love, whether it’s moving to a different state.
Even if it’s just the next town over and you have to make new friends. And you have to go to a new job and like the outgoing and do something that feels kind of icky and weird to you at the time, not icky, just just like cringy. I guess it’s terrifying. It’s terrifying trust me, but you are the only person that can change the trajectory of your life. Nobody else can do it for you, people can guide you like I’ve guided them, but they all came here.
Did the work they’re still continuously doing the work throughout the rest of the time that they’re in the program and then they’re after forever after as well? Sometimes you just need a couple more tools to guide you, whether that’s podcast books, a program whatever it happens to be, but I just want to let you guys know that it is possible for you guess: Realtors! That’s around you! What the Shekhar opening jar have you ever, that’s great, but uh, let’s take a champ.
Have you ever read on that’s great at the end of the day? For me, I’m just so happy that each and every person felt like empowering at the end of the day they knew the structure and the blueprint of how exactly they were going to leave and pursue their dreams. And that’s what made me the most happy today. I just want to show you guys what’s possible for you. This makes me so happy and I hope you guys find that kind of happiness in your life as well.
Thank you guys so much for reading this article. I have a hot dinner date tonight with Celina I’ll catch. You guys in the next article
Meet the guys behind one of the top-rated pumpkin seed snacks on Amazon.com!
It’s an opportunity for me to shadow a second or first lieutenant to really get an idea of the day-to-day operations for an officer. I am able to really understand what it takes to run. A platoon have a successful PT program. Basically, what the operational army is all about. Lt gave me the reins today told me it’s my show and he’d help me out to find anything. I want them to do the best I possibly can and so we’re giving tips and tricks right. At the end, the day it’s coming up to them, we already got two guys shot expert. You
What are you eating? Check out the video below to find out about a healthy snack.
Are you tired of advertising on yellow pages, with little to no results? We help you get more business using the power of the internet. We put your business on the first page of Google, with a professionally optimized google places listing, don’t delay and get your Google Places package from us today.
So guys are this article may up Khaliq SE website Laker, album justly mother, say object. Nacho followers, less secure up an Instagram account per so well jogger up. Reality may happen, Instagram account for followers, but Ana chatter apne Instagram. I de Cobo teach other growth mallanna chat where this article for entered a cleaner myopically. Both is simple tariqas, as some John you alone is pour across Cisco Canada scheme.
Others are poppin, Instagram account / followers of Boris, Abu, so by child every doctor, but it’s available to cold like in a guy to like daruka, then I got it blog to blog, subscribe, Giroux, colonel kizhe be massively round to my past sub step, LSI up a Jog, which website made a website Kannamma IG follower, Dorner up core red wall, a greasy up, ok Nam, see the hider up his per click on. I simply up way: hopper up epic account good select karna, so you hopper map, nap Peck account goes like Carla Tom up, real account will be smelling: Colonel Kofi’s up the boat, each other Halloween’s budgeting, so edgy upper manic, pegacorn cupcake earlier is copycat me God.
After some magic, which is / cursor interface, subtly up the upper Rick hopes on the hider. I talk to Alan Cooper. Walla I can is simply a fish per click or neither safe whisper click over to Jana username was sled car. Then I do up. Guy username yeah /, Magna username, was led to cut that all worries. / 0 5 km z up with Instagram, follow chorus. Actor is quad up quicker than I or you hopper up to quantity, a big bitch followers, kyani Obispo, lower, less active, but hopper a be up core 99th Quinn’s mill, Rainey up 99 holy overlay sector 1.
1 click buy a Gurkha any up Co. One click make beats followers in Mill, English to a permanent, go he’ll cut their wet curtain, a be hampered through there up over karna Hotel we’re coming budgeted JC up of my Instagram account me to up K. Instagram account me up the followers gelatin or history or apne Instagram account for both each other follow buzzer, so gage. I hope they upgrade pori information, both the body wheezes, so much other yogi other.
We are building her keyword, seed list, we’ve got it all together. We’ve got it categorized documented and now we’re going to pull things full circle, we’re going to align them to business goals because Amy. It is not enough to just spend this time searching finding all these keywords: jotting them down, categorizing them if they’re not aligned to goes, you really want to achieve or website goals, and the other reason you want to do.
This is also because you want to identify any opportunities or gaps for keywords that you need to maybe include in some of your content right. That makes sense absolutely now. I did ask you to do a little bit of prep before you came so. Could you maybe give me an idea of some of your business goals sure so my monthly Instagram goal is to increase my followers by 100. Okay and I’m wanting to have four new coaching clients per month, okay for people signing on for packages and then increase my email list by 10.
New email addresses a month fantastic now, the first place I would go if I was looking to align with the goal of increasing Instagram followers is in your seed list, anything related to social media. Okay right, so let’s go back here. Competitor keywords: remember: when we search for hashtags right go to the hashtags, that you’ve got here right and even narrow it down to Instagram, specifically right.
If your goal is to increase your number of Instagram followers, then let’s focus on Instagram. You could search for ways to gain Instagram followers. I’ll bet, there’s a little bit of information out. There sure that’s a great idea cool, let’s move on to the next one: okay, okay! So for this bowl it’s clearly a business-related goal, so we definitely want to look at the business and industry keywords that are in your seedless right, we’re going to definitely find something there, but your target audience keyword list is really where we’re going to find the gold.
So go back to that one! Let’s go here, we’re going to look through all the keywords that we found around target audience, because it’s about gaining new clients right right, so we want to know what they were searching for. So I would look for words. Maybe that are associated with a sense of urgency, so finally Aimee we’re going to tackle the third goal that you’ve got here, which is increased email subscribers by 10 per month.
Yep awesome, it’s clearly a business goal. Let’s look at the business and industry keywords, kind of search through those what we have okay, let’s look at some target audience keywords: nothing’s, really standing out that matches up. You know this is a good one, because this means our strategy’s working because we’ve kind of identified a gap. I think right, I’m not really finding anything related to email subscriptions or how to do it or any of that in the seed list that we’ve built.
So far, okay, that’s alright! It just means this is an opportunity, a little bit of homework right um. Clearly this is a goal for you. I know I’m sure, that’s what you want to hear tiny bit, but it’s really just means. Go back maybe find some keywords that are related to people subscribing. You know growing subscribers increasing subscribers things like that. Just just see, if there’s anything and anything that we’ve done before just kind of rego through that process, see if any keywords related to this goal come up, because obviously you want to incorporate them right.
So, with everything ties together, you see in the big picture. Aimee. Absolutely that is so helpful. I’m so excited all right. Now we’re going to recap, because we’ve done a whole lot. Today, we’ve covered a bunch, so we went through some discovery and built you a keyword, seed list, awesome split it up into three categories: business and industry. Keywords: target audience, keywords, competitor keywords: we went and we documented a lot of things under each of those categories.
We’ve got this huge list going on and then we actually came back around looked at your business goals and aligned those keywords and phrases to your business goals. So you can actually, you know, improve some of that get found issue that so many small business owners have you’re out there. You’ve been working really hard. You’ve got a website. You want to grow your business. This is how you’re going to get there wonderful.
Thank you. So much for the help Emily Amy, it has been a pleasure working with you, I’m so happy that you just let your son, you open yourself up to this process. I’m sure it wasn’t easy and I know you were a little overwhelmed and it can come across that way, but that a lot okay we’re here to help. I want you to keep up the hard work and a good work. You’re doing awesome. Thank you. I want you guys to keep reading.
In my studio and I interview them live so then in that case I only use the ATM mini just to be able to switch between the cameras, but but otherwise all the idea of stuff was actually done on a completely separate device. So right now everything is actually being done here through the ATM mini, including the audio. So I have my rode ntg-2 and it’s being fed through my camera. In this case, is the Blackmagic Ursa mini Pro, and the idea basically goes through like camera, including you know, and then the audio, including the the the article, obviously goes here to my ATM mini, which in this case it’s on blog 3 you’ll notice.
Here I have the the you know, the blog three or number three years as a red, which means that I’m basically right now showing this this defeat now here also, you guys will notice. I have a sort of my other two devices that are music, so in this case I’m using the ninja Inferno from Atomos and that’s simply you know you could use any monitor if you wanted to – or you don’t even need a monitor. But in this case I’m using this monitor because it’s kind of nice for me when I’m talking to my main camera, I can just click the glance and make sure that you know I’m actually looking at the right camera, for example, because I can see whatever eighth And Minnie is outputting in and I can see it here, so I can see what angle I’m in like, for example, of our you know, switch someone well, some of these go stand again.
I can see that let’s see right now with some close-up of there of my eight and mini here, plus I’m actually using the an inferno to record onto this. Basically all my whole article output. So whatever I’m doing during my live streaming setup, I’m using this Ashley to record it and that’s kind of like that, I would say the biggest difference between the 18 million and the latest, one that came out, which is the ATM mini Pro 8 and mini Pro.
I mean there’s a few other differences, but the biggest one is that it allows you to record directly to like a USB Drive with the 80 mini. You can’t the rock directly record within it, but you have to HDMI out so you can plug it into an external recorder like you know whether it’s a black magic article system. This case I’m using the atomos inferno and you can record there now the laptop kind of comes in handy when you want to do sort of some of the other advanced features, or you know a lot of other little settings you wan na.
Just that you can’t really do directly on the ATM mini, simply because there’s just not enough space for all the buttons. So in here you have just a lot more control, and so, if let me kind of just show you quickly sort of the layout, so you comes with the software. Well, you go you’re going to install the software when you get to 8 and Minnie and Satyam’s software control. It also comes with the ATM setup and in this case you basically would you click in here.
You have your IP address things like that. You can change. You have your you’re, basically panel preferences, so you have switching mode, you can have it to program preview or cat pass and program. Preview. Basically, just means that when you press on the button one of the buttons, it doesn’t directly switch, it’s kind of just arms and I arm is basically one of the cameras on one of the article feeds and then only once you press, cut or ro water would Be for your transition, then it would cut to it in the i/o usually use the cut path, simply because I’m give the operating in myself.
So I don’t wan na have to press once and then fumble and look for something else. So I just kind of have my fingers here on these four buttons for the four different article inputs and I can just switch the. Could you switch between all of them by just you know, tapping it right. So I just I don’t have to basically do this and then do that now. If I wanted to, I can also do it with transitions, because I can just put my auto here button and now, when I click you’ll notice, it does the the transitions nicely.
So, in this case, it’s set up just to do a fade. Some of the other things you can do up here is like I said you have fade to black, meaning just cuts to black. You also have for the actual transitions. You can change the duration of it right now. It’s half a second. You can do one second, for example, or you can do, let’s see two seconds so you’re going to be very slow, dissolve from one angle, to the other, and and again you can do all that stuff and actually a lot more in the eighth and mini software.
Basically, so it gives you basically more control over all those things here we have some of the other effects that you can do again. I’ll show you more once we’re in the eighth and menu, because I just prefer to do these things there. You have a key because you can actually do a chroma key like if I had a green screen set up behind me. You can in real time basically key it out and you can put whatever article or still photo image as a background behind you.
You also have a picture basically picture-in-picture effect. What that does is, if I click on it, you’ll notice, right now. I have it set up to my camera, one which is a close-up of you, know this camera here over my shoulder and then here. If I switch here – and I again turn on the picture of the picture – and in this case again you can see – I have my other angle but overlaid now over the part where I’m talking so in case you have another angle, you can do that and and Again, this is all fully customizable, but to adjust for some for, like the size of it exact position or stuff.
You would have to do that in the ATM mini, because, if I were to switch now, if I were to press any of these buttons right now, like basically here on the on the actual keyboard, the only difference really is that, like, if you look at it, I have these four buttons and I can I can do picture-in-picture, but the second I press and DC will just default, it’s basically to its standard setting or its standard size and and the location of of the picture-in-picture.
So right now I usually like to have it a bit bigger like you guys, can see right now, but I mean maybe switch to another angle and now, let’s say I press here, let’s say to be on the bottom left corner you’ll notice. Now it gets much smaller, and so it just doesn’t look as good. I don’t think it’s as visible, but you know I can switch to the bottom right corner bottom, the top right and left – and that’s pretty much all you have up here.
So, that’s why I find that a lot of these things I prefer to do in the 8m mini software and some of the other things do you have up here. You have a still image that you can cut to so in this case I actually have a lower thirds graphic, so it doesn’t make sense for me to cut there so I’ll show you guys that in a bit you have a black. Basically, we just want to cut to black, for whatever reason you can do that, and then you have here buttons.
Basically, for you know, I said the four different article inputs and in this case I only have three cameras, and then you also have above it is basically the audio follows article buttons I meaning. If you want to use the audio from one of these cameras, you would click that and it would always basically, whenever you switch to that article source, it would use the audio from that camera. Whatever camera is, are you using you can have you know we set button for resetting all the settings and you have little arrows up and down so you can adjust the volume on each of these.
Basically thing article input, so these buttons here above each of these article inputs are basically just for the audio and then this here for our for the two mic inputs that you can do so. The 18 million has a three-and-a-half millimeter input, jacks that you can input. Let’s say a lav microphone or something like that, and then you can also adjust the volume of it and then turn it on and off pretty straightforward other than that.
You have four HDMI inputs here on the back of the ATM mini and then you have one HDMI output which in this case again like I said it goes to my atomos here and Ferno or ninja, and for now to record it. And then you have a USBC cable and that’s for sending the the live-streaming or basically the article signal out and so that’s plugged into my laptop so that I can now stream this. You know whether, basically I can connect to YouTube or Facebook, and I can just directly stream it there or usually the way I do it is.
I actually have it here, basically, switching here to my camera or actually my keys. I usually end up using the OBS software because I prefer it and I can do some other cool things with it. So when I’m streaming, I kind of use that and then through that software, I send out my article signal and then the the one more thing they have appears. You have a Ethernet connection here on the back, which is again kind of allows you to do a loop.
It’s pretty much the same thing as a USB see allows you to do and and that’s pretty much it there’s nothing else there so like. I said it’s a cool little device state and mini because it’s so small light easy to travel with, and you can use it to do some really cool stuffs but, like I said, you’re, probably always going to have it paired with at least a laptop. But if you want to have, I think that even better kind of you know capability, I would say, get an external monitor, slash recorder, so that you can actually record your whole output.
So, let’s see if you’re a live streaming and you’re, you know you lose your internet connection. For whatever reason and and something happens, you you’re at least always recording your whole session. That you’re doing is that worst case scenario you can later on upload it to YouTube or whatever it is so people can still see that how the whole life stream want anyways here now going back to software so and the Athan mini setup.
That’s like a little software that lets you kind of change, some of the settings for me when it comes to the like the basic things, which is to switch camera angles. I usually do that by switching there. You know basically pressing the buttons, because it’s easy for me to do whether I’m doing your podcast with somebody you’re doing a article like this. I can very easily except cut to my hands now have to here my main camera, and then you know cut to my little side angle that I have so it’s easy for me to do that.
Just by you know, the kind of I can just have my fingers on there and I can remember where everything is now. If you want to do some of the advanced things, then that’s when the a-10 mini software is really going to come in handy. So, for example, what can you do here? Well, we obviously you switched the different views, so you have again your for a different article input, so you’ll notice right now, I’m on one article input 3.
So it says here, camera 3. If I go to switch to camera 1 you’ll see what it does does their it’s, which is there now you’ll notice that this thing also moves. That’s because I have my transition now turned on so you’ll notice here, there’s a transition style, so I can do a mix and I can actually, if it’s on poor I can are me now like. I can go to preview and let’s say I want to go from camera one to camera.
Let’s say to or came out it’s a 3, which is my my view, kind of my or actually yeah. Let’s go to my side camera here now. What I can do is, since I have a mix bit, which is basically a like a dissolve. If I slide this slider you’ll notice what’s happening here, is it’s basically kind of like right now right in the middle of I leave it, then it’s kind of 50 % showing them. You know camera 1 and 50 % showing camera 2 or like in C up here, but I can just we manually literally pull this and do like a like a dissolve.
So that’s pretty kind of cool. I think that you have you, have that kind of control and then, like I said I can keep on going back and forth and I can even you know, play around with it. Then I’m not DJ with it. So that’s one one of the cool things that you can do with this, that you can’t do directly on the 8 and mini you can do dip. For example, you can change the transition style, so you have mix which is like I dissolve dip is, if I were to ear right now, do Auto button you’ll notice, it kind of dips to a color right.
So in this case it’s a white color and then, for example, I can go and change it to the tail wipe. So again, if I click on it, you’ll see. Does this wipe transition and then I can also do hero. Is this dve? I forgot exactly what that stands for, but basically, as you can see, kind of slides in the other article source. Now you can change these settings. Like example, for the dip you can change the color of the light right or or that salt color.
You can change the drink, the white, what kind of a wipe it does like? You can change all these things by going further and here and adjusting all these settings. If here I’m just kind of quickly going back, preview is like, I said, just your arming sort of your next blog there you’re going to be your article, just basically signal you’re going to be cutting to or dissolving to. You also have the black right that you can, you can switch to.
You, have a dump also at the color one and two, which are the basically solid colors that you can put in here into the ATM software, and then you have also your media player one. So you can have one media player and I’ll explain kind of how that works in a second then here you also have your kind of a it’s called know as the next transition, and you can have basically different things, so you can have example.
Like your background, you can do your key in chroma keying, all that stuff. You know this if I click on right now, the arrow and it says now it’s on air and there was a transition here. That said, it’s one, second! Well, basically, what I did is now, if I switch even to my angle here and by the way right now, I, instead of cutting, I did to add on the transition, but I’m I’m I basically put you know I put it in there to the dve transition.
So because of that did that cheesy slight but anyways right now, you’ll notice, I can switched my different angles and I have my lower third graphic in there and now again by clicking here the arrow. I can basically dissolve that out and everything it takes about. A second for it to do because it’s here’s the the set in the duration, so you can adjust this, make it faster or slower. If I wanted to, I can just simply cut and actually like just make it.
You know basically to make that lower third graphic up here like this and disappear, but just by turning it on and off and Ty just simply means that you can tie it to one of the angles. Basically, one of your camera program outputs. Now, how can you change, for example, these graphics, so let’s say I’ll switch right now and you’ll notice. Here again, I have my little lower third graphic. Well, you can actually change that by going into the media, so in the media you can actually change the different graphics.
So you can see right now my media player and you can only have one media player. That’s why, if isn’t, but you get some of the more professional eight and many switchers from Blackmagic, then you’ll be able to have more of these things and you can load them. But with this one you were limited to only one, so you can resentful lower than one, but you can have a whole bunch of other ones, sort of ready.
So, let’s see, if I don’t want to have this or let’s see if you have like a guest and – and you want to have like a graphic prepared for your guests right so their name and their whatever website, and things like that. You can have all of these prepared. You can load in up to 20 into the 8 and mini basically software control, and then I can just grab it here. Quickly, drag it and you’ll notice. Now my lower third graphic automatically updated time.
Our free support can be. You know, like a graphic that covers the whole screen like in this case this one you see, and so that’s how you can easily kind of drag and drop it and change it now. Usually you’re not going to be just kind of switching them life like that you’re going to go again, turn it off right. So, for example it in this case I have it to dissolve out and then you can go quickly. You know, or or let’s see, if you have somebody actually operating this wall – let’s see a live stream is going on.
You could have another person doing this and then they can basically switch quickly out the graphic go back here to the switcher and then click Auto, and then you basically now nicely fade into your other graphic that you want to fade in and out. So that’s basically how this works going back to the transition styles. Here is also how you can also change the like. I said I can right now arm, let’s say camera one when I go: click auto you’ll notice.
It changes to that right. Now it’s sent to the dve so I’ll change it to just dissolve second dissolve and then in here I can change the speed of it. So, like I said on the ATM mini, you have presets for half a second one, second two seconds and when I click that you’ll notice, it changes here too. So right you know one and a half seconds once they can have a second, but you can also manually go in here and you can put whatever number you want.
So you can, you know, kind of further again adjust it. You have more control than you. You you ever have like directly on the 8 and mini, and that’s basically how this whole page works right. Now, here’s some of these other kind of settings. I have palettes, so you have your color generator. So those are the things that basically like, like. I said you can cut here to your four different camera input or you can cut to fit some poor black.
Just a black screen. You can cut actually to color bars and then you can also cut to your media player, one, which is your graphic. So, let’s see, if I go to my media player one and then now quickly, let’s say I want to you know loading this little graphic I can go in here and I can press media player 1 and you’ll notice. That’s actually now outputting here on the basically on my main output or basically that that’s what I would be streaming right now and now I can again change those graphics by going to my media upper here, tab and just drag and dropping whatever.
You know graphic that I want, so that’s that’s one of the things that you can do and you can also switch by the way to the pictures right here. Basically, by if I go and I go to see if I cut here to this angle of the 8 – a mini and you’ll notice, here of example – I can go and I have a still – and I have the black buttons here. So still is basically the media player one that the grad of a graphic you you, you load him there, so they clicked that you’ll notice again it cuts cuts to that now.
I can also dissolve to that so, and I can do my transitions right. So this basically acts like another article source kind of GP. You can think of it in those terms and that’s basically what this is and the colors. I said you have color 1 and color 2. You can adjust those here, so you have color one color two and you can make it man whatever it is that you want to make it so you can adjust these and let’s say I make this kind of turquoise color, and so, if I wanted to, I Could cut to this now? Why would you want to do that? Well, sometimes I don’t know, maybe you’re going to have a lower third graphic displayed over this or or something else that’s up to you or maybe, let’s see if you’re doing a chroma key and then maybe you want to just have like a solid color to know Behind you, you can, you can use it for all kinds of things so that that’s up to you and then the same thing is, for example, if you go, if you want to do, for example, like some of the other transitions example, switching from mix to dip, Like I said you can dip into the different colors and you can actually change the color of those of the dip.
So, for example, if I go here to transitions so over here on my palettes and I go to dip you’ll notice that I can also adjust the rate at which is, this is happening that did and I can change the dip source. So I can basically say color one color two or I could even go and sheep a example dip to media player one. So now, if I go and do auto you’ll notice, it will switch to my my little graphic that I love and very quickly there.
So you that’s how you can kind of thing or let’s see if I wanted to dip to that turquoise colors and I would go a color too and then again I’ll go here and dip me see. That’s that’s the kind of stuff that you can do. If you go, for example, to wipe, see wipe, you also have the all the different settings for what kind of a wife you can do. As you can see, you can do all kinds of wipes so go, go, let’s say top and bottom that kind of stuff.
So now, if I say cut to camera one you’ll notice here, I can do that little wipe like that from top and bottom there you can see. I can reverse it. So now it’s going the other direction. I can also again change the duration of it. So that’s very easy, so I’ll change it to two seconds, so you can see Goods going slowly now. I can also go if I want to – and in this case I’m going to go – maybe you’re the softness.
So I can change the softness. Alright, you could see it’s kind of a soft the border, but I can make it too. We set it to zero, and now it’s going to be this kind of a hard line right as its switching from one angle to the other, the width you can have like a border with so and then again you can choose the color. So let’s say I wanted to have that turquoise color, so color too, and then now, if I go and do my transition you’ll notice, it just has this kind of a color line there and I cannot even softened up too.
If I wanted to so you can do all kinds of things again. You can really sit in here and tweak a lot of these settings, but that’s basically what that does and then you know you can easily switch to another would see going from one corner to another, or you know doing this kind of what I would say kind Of more cheesy transitions, but if you wanted to whatever, for whatever reason you have this and then your DVD settings you can, as you can see, you can have it again going from different directions.
So let’s say I wanted to go. Let’s say again from top to bottom, so I’m going to go from my main camera here to close-up of the ATM mini. So if I do the switch you can see. Basically, it just slides that out like that right and you can again adjust the rate of it. You can change the like the direction of it here and like this, so you can play around with all these things. Now, some of the other cool things you can do is you can enable here the effects and in effects you can, for example, go to Mia player1 again as your fill source or you can be any of the other things with the one or the other cameras Or colors or the solid colors that you have, let’s see right now, I’m going to drag and drop my big sort of talentless films here, graphic.
If I use that and that’s basically saying that the fill source is going to give me media player one, the key the key for it is also media player. One and now, if I do this, you’ll notice what’s happening. So it’s kind of like that graphic goes by right. For me, it’s kind of a corny thing, but you could have like. Let’s see, I don’t know some kind of a graphic that you do and then it kind of dissolves one one shot to the other.
So you have that capability, you can even do up here with a DVD. You can switch from not just doing a let’s say a push from the corner or things like that, but you can actually go and also do let’s say a squeeze, don’t say: squeeze it to the left side. So you can do all of these things. Basically, using the hardware right but, like I said, to access all these settings, you still need a laptop. So just just keep that in mind, but that’s kind of worry word.
This software basically kind of again opens up all these possibilities that, but the ATM mini. Has you know kind of lets you let you adjust all these settings going to fine-tune? There’s a fine tune, this all so anyways right now, I’m going to switch the transition back to just a dissolve, which is something that I use myself mostly now. What I’m going to do is I’m going to go also the downstream key, so the downstream key here I can for some poor neighbor again, let’s say the media player one and things like that and that’s for the basically dead here downstream key one like I showed You so that’s you know like right now.
I have that big graphic, so if I enable it you’ll notice it just kind of going to sit there and cover my face so most likely. I would want to go and probably load in my lower thirds kind of thing there, bumper and then in here those how you can change it. So you can have that you can have a caller, but you can use, for example, ugly. You can use, but my let’s say turquoise color, but you know I can use a different key right.
Like let’s say if I were to use this graphic and you see it would basically take the shape because it would use the Alpha or the key from daya graphic right. So that’s how you can kind of play around with these things. So again, I’m going to you know: go is back to media player one and I’m going to use that as my lower thirds you can mask its meaning. You can kind of like see, cut off the top and the bottom and things like that.
So, let’s see the right side see, I can like cut it off. Let’s say I don’t want it to be like that, so those are all kinds of things that you can do. You can also that add a pre multiply key in this case. This would look bad, but in case you had a graphic that was like a basically over black and this in and here I was actually loading a PNG files which are just have a transparency built in. So you don’t need a pre multiplied key in there, but those are kind of things you can invert the key.
Obviously, all kinds of things like that that you can do and then the last thing you have here is to fade to black, which again you can pretty much only adjust the rate or the speed at which is it’s. You know the fade to black is going to happen. So that’s basically what you have here in your palettes, the upstream key by the way is for your your chroma, like so, for example, you’re going to be doing chroma and you’re going to have let’s say like a like a blue or green green screen behind you.
That’s where you’re going to go in there and adjust these settings. I can’t show them to you right now, because I don’t have a green screen with me, but it’s pretty straightforward. So you pick your color, you some porn all that stuff and then you adjust it and it does a pretty good job for busy creating a real-time mask. So you can adjust together the the mask, the keys, all that kind of stuff. You can again further adjusted in there.
You can adjust you luma key. So let’s say if you wanted to, I don’t know key out like some of these really bright areas or the dark areas. Maybe in my shot you could do that too. So you can in that, do it and those kinds of things and then you have other also things you can do like patterns and stuff. So you know, there’s all kinds of here things that you can use, but I’m going to let that leave that, for you guys to play around cuz.
I guess there’s a lot of settings going back to media player, which is basically to just tap all these settings right that you had so in the media player, you can again change the different graphics right that you have so you can also in here quickly change Them now, the thing that you have to be aware of is that, with a ten minute, you cannot load in actual article. Let’s give files for your media player, it can only be still images, JPEGs PNG, those kind of files.
If you had some of the other eight many that have basically bigger you, know more professional features and they have more memory, then you could actually load in article files and then you could even basically trigger to trigger those. So, let’s see if you wanted to have a background, but there’s not a still background behind you, but I kept moving article. You can do that now. You can also do that with data mini.
If you actually got one of the Blackmagic hypertech’s. If you did that, then you will have the options here and you will actually see it, but right now, as you can see, it says it’s and there’s no Hypertech detected, but that’s where you have these these features and then that would act actually as your as Basically, another media player, so you would have more than one media player and then those could actually be again stole graphics or article that plays or loops over and over, and you can control that then using up here again I don’t have the hypertext, so I don’t Have that functionality and by the way, that’s also how you could enable to have for some poll like, let’s see an animated, lower thirds graphic right, because right now, I can only have these little bumpers in there, but they’re still images so by attaching a Hypertech and Then loading in, let’s see a little article, clip that’s looped with an alpha in it.
You could then put that over your article and it would be you know, actually moving in all that stuff. So anyways, that’s that’s one of the other things that you’ll be able to do. If you get the Hypertech and then when you have when you go to output here, you can do the thing you have the different options which are as you’ll notice. This one is, is basically not enabled, because you would have to example, install the Blackmagic Design desktop article.
Then you can actually record that or if you got the Blackmagic 18 Mini Pro the new one that has the recording capability than in here and the output. You would actually have a recording tab, you’re going to actually go in there. You could, you know, adjust your recording settings all that stuff and you could trigger the recording on and after and now another thing you’ll notice here is, for example, you have this thing called capture still.
What is this? Well, that’s actually, for you can capture, let’s see something that’s happening here, and we know that basically, that’s what you’re happening right there going as a article source 3 or a 10 mini. So, let’s see in this case, when I look at the camera, I’m going to give a big cheesy smile and I’m going to click their capture still now, when I go to my media you’ll notice in my ear capture, basically six or my you know my fourth.
Basically, your window, that’s what I have there. So if I put this now, I can be, for example, now talking, but I can always cut to a still, which is just going to be that still of me smiling as you cannotice. So so those are the kind of things that you can do so again. That’s that’s how we and one of the ways of loading kind of these extra images in there and that’s by by going to the output and capturing one of the stills and then time code generator.
That’s actually was something really cool that is enabled with the latest kind of the firmware, with a TM mini and also, if you upgrade your Blackmagic cameras now this camera I’m using as day or so many pearls, so that doesn’t work to with it bad. It’s simply because I you know this doesn’t accept USB and SD a connections. I actually have an adapter that changes the SDI out to HDMI, but if you have like in here, I have two of the Blackmagic pocket cameras.
I have a 6k and the 4k camera they’re connecting via the HDMI, so they’re, sending the HDMI signal to date and mini well, at the same time to eight in many sense, basic article signal back to the camera. So I can actually is a get the timecode gem both of these cameras, so they are servos. Let’s just shooting on these two Blackmagic pocket cameras. I could actually have identical timecode on both of them.
That’s perfectly synced and that’s really cool, because then I can be recording on both cameras and – and you know, let’s say doing my life switching here or just maybe just recording on them and then later on. I can then in my editing, software go in there and I can tweak it and I can basically, you know, do my edit all over again and I’ll. Actually, you know, let’s see, load in my RAW files, but I can also sync those two or three or four cameras, depending how many you have connected perfectly because again, they’re they’re all jammed to the same time code.
So that’s a really cool feature of the fact that it’s that time code generator is built in and now I said the next year page is the media page, which I kind of showed you guys you load in your graphics, and you can hear how do your Page, so this is where you’re going to be doing all of your kind of audio settings, so in here you’ll notice that I have again three cameras. So my a camera is there so many Pro and actually no.
This is a packet for key camera, and this is just a audio. That’s basically coming off of the camera, so it’s never a good idea, but if I wanted to, I could enable it so turn that on so I’m going to turn that audio and turn off here. My audio. Thank you for me. The good camera probably sound like a 6 K and again, probably or in this case, I’m going to enable the idea from my Ursa mini Pro, because it has that you know XLR microphone here connected.
But that’s how you can kind of do this and again I showed you before you can also do that here by switching their their. You know, turning on and off to different audio inputs now gifts would you can also adjust the volume. So let’s say right now: my camera 3 I’m going to be adjusting. Let’s say I want to adjust my the volume up here, so you can see right now. It’s set of 0 DB, but I can go up and I can do that by clicking here or I can go down by again by clicking it on the ATM mini.
And if you want to have really fine-tune kind of control, then you can do it by doing this slider here I can adjust the idea basically levels of up here. Oh yeah, you got, for example, you can do your panning and left and right, so you can go from one blog to the thing right now. You see that it’s, even though it’s one microphone. Obviously, it’s outputting to both left and right blogs, but just the left blog right now or the right blog, and this is basically how it sounds.
So I can do that all that painting all that kind of stuff. I can also go here. Actually, that’s actually some kind of something really cool you can you have like these things? There are also built in into the DaVinci Resolve article editing software, but you can enable up here, like I’d, see different bands and you can adjust. You know the EQ, you know and again it will do all these things and it will process your audio in real time.
You cannot be now load in here so right now actually, and we turn this off, you can load input dynamics. You can have a compressor, and things like that again, I’m not going to be playing around with this right now, because this is basically the same stuff that you would do in a day that makes you resolve so pretty much all the same settings, but the cool Thing is they can do it here in real time, while you’re streaming, you can adjust all of that and adjust all your different audios settings, and then obviously you have your main here here.
Basically, the volume and other stuff for the input, so those are kind of cool things, and I also like it because it’s like, I said it’s like an advanced kind of a thing you you can adjust a headphone level like all kinds of stuff like this, which In this case, you see it’s grayed out why? Because the 8m mini doesn’t have headphone output, so in my case, for example, I would be listening to my headphone out out of my monitor here, because that one does have the headphone out.
So if you wanted to monitor audio, you could do it that way and then the last tab here, which is really cool and again. This is something that now is enabled with because of the the latest update for the ATM mini, but also for the pocket. Cameras is that you can now control these cameras. So let’s say if I were to switch to, let’s see this camera. Is you notice right now it’s less. He focused on this, but if I wanted to and then you’ll notice that when I switch there, it actually shows me even like which camera do now, I’m in camera 2 going back to camera 1.
It shows me which camera that I’m on you know at that. Given moment – and it here gives me four different for the functionality so here on, the bottom is your focus control, so I could try some for even like. Let’s see if I wanted to focus on my hand, I can whatever is going to be in the center. If I click this, as you get out of focus, you know it’s going to do that really bad job of focusing. But if you let’s see if this camera was not life and somebody was operating, they could click that just to make sure that the camera is going to be in focus before you switch right.
But let’s see right now, it’s you know, focus here on my hand, but let’s say I want to focus back to the ATM mini here, so I can do that by actually rocking this thing. So I can pull the focus as you can see, and it’s very accurate. Actually, I can go as you can see here. Back to my hand, the focus and here back to the ATM, mini or Gow, maybe even here to the keyboards and then back to the ATM mini, and I’m doing this just by sliding here, the focusing you can also adjust here.
You can adjust your hair iris and see I’m stepping it down. You can also adjust your zoom if that sound University work. If you had a lens that has a power zoom. In this case I don’t have one, but if you had that, then you can zoom in and out. So it’s really cool because again, whoever is doing your live article. Switching and all that stuff can also control your cameras. At the same time, all for example, you can also have one person, let’s say doing a article switching while another person can operate all the different cameras just using the ATM software here.
So it’s really cool. Now, aside from doing obviously they’re like adjusting the exposure, you have here your DB, so that’s basically going to be your your your eyes. So basically, so you can adjust your eyes so so you can make it a lot brighter and all that stuff. So I can switch here, you’ll notice, that it’s going brighter darker here. If I go back down so I can adjust that I can adjust here my shutter speed or shutter yeah and this case started speed.
I don’t know why they didn’t do it shutter angle, because I prefer that one anyway shot her speech. I can adjust it all right. Now I’m going to go to one sixtieth and and then you can gently adjust your your temperature, you Calvin, but another thing you can do is you can actually adjust here if you pull this to just adjust your your iris and then your your here overall here Gamma, so I can kind of make it washed out a lot of stuff in this case I want to here I’m going to reset this we set out and then here you can adjust your overall color.
So, let’s see if I want to take that article source make it kind of bluish or at a green tint or whatever. I can do that just by moving this wheel and again I know I know what you’re thinking looks horrible, but again probably you wouldn’t be doing it’s. These crazy adjustments you’re going to go in there kind of tweak. Let’s see if you have different cameras and they also look slightly different, maybe or because of the lighting or something you can kind of match them just so easily using these tools, the cool thing is that you can also expand it.
So then, it kind of hides the other things and you all have here basically then more advanced controls, which is which these are basically controls that you would have again and DiMucci resolve. So I can adjust like if I wanted to do. I don’t know about teal and orange. Let’s see, look, I can quickly add a little bit of this kind of a teal kind of blue in the shadows, a little bit there in the gamma, which is the mid-tones.
Let’s say like that: an and the gain a de leave and a little bit of this yellow look and I’d say you know I like this kind of a look right I created and you can adjust the contrast, and you know things like that, the the hue, I can adjust it what else you know saturation, all that stuff, so I’d say want to make it very saturated. Oh maybe, let’s see like slightly less saturate, it see somewhere there.
So you can adjust all these things and now what you can do also is you can go in here. You can go copy and I can go now. Let’s say to one of my other camera. So let’s say I switch to this camera here to the side, which is the pocket 6k well you’ll notice, that if I go back to this angle you know the colors completely don’t match. But let’s say I like the color grid that I did there so now I can go and apply actually that same color grid from the other camera to here by again going here expanding this and I can go and paste and once I do that, you’ll notice That now my package 6k has the same.
Look as the packet 4k. So has that same kind of color treatment that I did with that one and then you know, if you wanted to, you, can still go in and tweak it further and all that stuff. So that’s the kind of cool thing and then again, even with the pocket six key. By the way I know some people were wondering online. Can you adjust the Canon lenses? It depends on the Canon lens right, obviously or the canon EF mount lens.
If you have a lens that that, let’s see doesn’t, have you know again, it doesn’t have power zoom but doesn’t have you know, let’s say out of focus capability, then you wouldn’t be able to adjust a lot of the things, but you can still adjust. For example, there the iris – I can open it up close it, you can resume the Calvin all that stuff and yes, you can also adjust the focus, so I can make you go in and out of focus so right now it’s a pretty wide angle so, and I think there should be good so I’ll, just kind of leave it there and yeah.
That’s some of the really cool stuff that I think again. I I thought it’s worthwhile, showing you guys yeah, basically what you get by just using the ATM mini, like you see up here over by actually using the ATM software control. You have all these other functionalities that you wouldn’t otherwise get with, with just eight and mini. So definitely sometimes it’s, I think it would convenient for you to hook up I’ll connect this to laptop, and I think most cases you probably are going to be doing this because you’re probably going to be using this for live streaming or maybe recording the life signal To your laptop and then you know and then like I said this way, you can do that, but you can also, while sending the article signal, you can also control the different things, including control, the different cameras that are connected at the two year, 18 minutes, which Is really really really cool now there are a few things that I found out after I did to update it with the cameras and the ATM, meaning that I’m not so happy about, and that’s basically the fact that now, because the cameras are recognized as kind of These life switching cameras, it basically takes the a two mini-dates control over them and it changes a lot of the settings in your cameras and you cannot change them basically, so you cannot record in some of the settings that you might want to record.
So, for example, the first thing is, you know, while you’re doing real life switching, you can be recording on your different cameras, but keep in mind that at that point all the cameras are only going to be able to record in RAW all the other functionalities. Basically, turn off, so that’s kind of one thing that sax next thing is that it switches to 60 frames per second, because that’s what I hate, em mini kind of operates, and so 16 frames or frames per second and the pocket.
4K is not so bad because you, you know the camera basically can still go and record in 60 frames per second in 4k, and I can record all these other formats and different resolutions on the packet 6k, though the second you switch to 4k or 60 frames Per second, basically you’re, you don’t have to keep ability to shoot in full or record the full 6k, because the camera is not able to record 6k at 60 frames per second.
So I don’t know why they did that, because I would still want to be able to, let’s say, record the the real six key signals of I want to do again. I want to maybe do some life switching but same time. Have the older original footage from the cameras, so I can do an alternate edit later on. It would be nice to have the full six key signal, not only that, but if it switches it to only twelve the other.
I think resolutions are just three action, including the anamorphic, but on otherwise only two other resolutions, which are 17 by 9 aspect ratio, and that’s why I know you guys saw, but when I was switching all the different angles or let’s save our to switch right now. You’ll notice that it’s the top and bottom has these little black bars and that’s because again it’s it’s said: 17 by 9, you know aspect ratio, that’s that really sucks, and I can’t change that.
Why? Because the camera, basically the only way you can shoot in and basically 1080 or raise a 16 by 9 aspect ratio is if I were to shoot in full 6k, basically resolution. I can’t switch to that and I can’t even switch to the 1080p like it. Just won’t, let me do it, so that’s the kind of things that I wish that that they had they are not limited, so they would still allow me to switch like let’s say if I wanted to you know, do I do a livestream or record to all These different cameras and even record to an external recorder, but do it on 24 frames per second.
It would be nice to have that option to be able to switch that and if, unless you guys, finally figured out a way of to do it, because I have not found these settings anywhere and I looked everywhere then, but if you have found it, maybe I’m Missing something that let me know, but I’m guessing, because it’s like a just a few know the latest update they released, I’m guessing hopefully and they’ll, be listening to people like me.
Complaining about this and they’ll they’ll enable those kind of basically more control over that, because it would be nice for me to have these cameras. You know all connected to my 8m mini so that I can switch and I can like even sometimes, if I’m just doing like, let’s say a multicam recording and I’m not necessarily streaming or anything like that. But I just it’s nice to have the 8 a mini. Then, to kind of be able to like quickly switch – and I can see on the monitor here – how I look on one camera – the second camera another camera, but unfortunately I won’t be able to use that now, because the second I connected, like I said to the 8 and mini it’s going to go switcher to run only 60 frames per second and what stuff, and that really then limits that the cameras.
So so that’s that’s one thing that I’m kind of disappointed now. Another thing is, with the many pro you have the functionality to hit recording like I said record, you know there but records to another like it like a USB Drive or something, but you can also trigger all the cameras they have connected so that they, you know, You can basically start and stop them using this. Well, you can’t do that with ATM mini, basically the regular one, and I don’t know why, because they could have just added that functionality.
I know that differently. Reg is graded out, but I wish they would add that because I would be like a small little thing that you know like here in the switcher. If I could just go to the output and in there you know and like they actually added a little record. Setting basically menu that you get when you connect the ATM mini Pro. If it is, they actually did that then they’ll be great, because then I could actually go in here and you know basically trigger all my cameras and record all of my cameras.
At the same time, so that would be a nice functionality which again does not exist. So those are the sounds that my two little complaints or or wishes help the somebody Blackmagic listens, but otherwise have a lot of cool things coming with these new updates. Now you know again and just overall cool tools that black magic has created where there’s these are some different cameras, including the article switcher, and things like that.
So if you guys are looking for something like that, as always follow the links in the description you’ll help me out by by using those so when you’re, making any purchases and at the same time, if you guys want any other information or you want to see Some of my other posts and things like that, as always you’ll, find all of that and a lot more on my website at um at those films like um, and it’s also where you can subscribe to my newsletter.
So you can stay up to date, anyways once again my name is tama tulsa and i’ll. See you guys in the next one bye
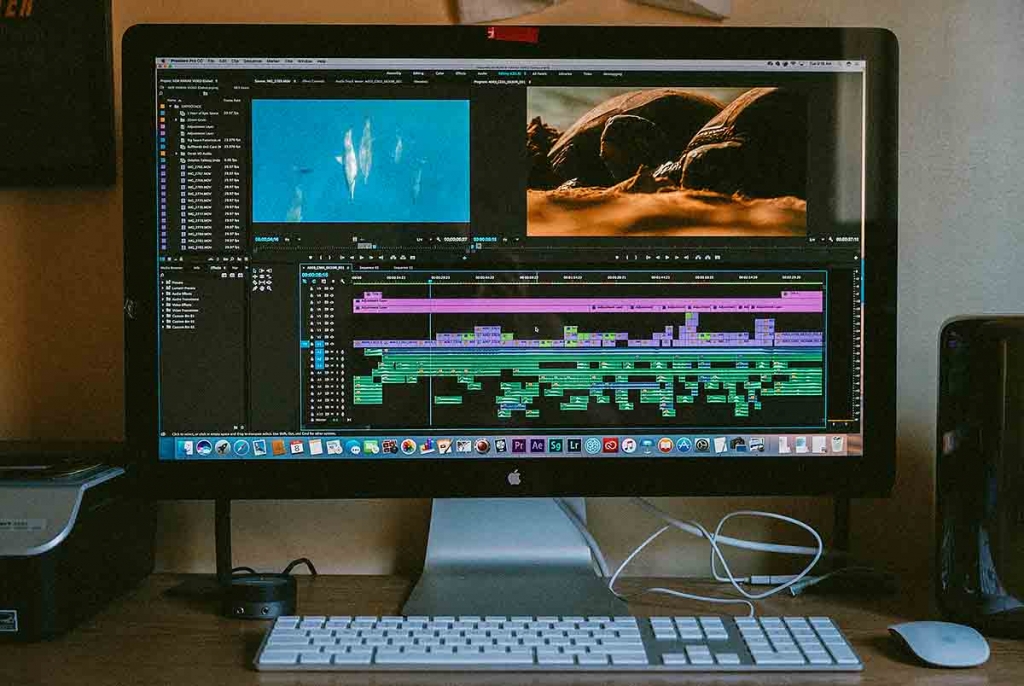
Videos are truly an awesome way to get the point across. Any type of content from your business is important!
. Now I’ve got your back in this article, I’m going to teach you how to create a facebook conversion set that will generate extremely cheap leads, which will lead to more sales and customers for your affiliate marketing business and before we get into the content.
If you want to know my number one recommendation to make money online, go ahead and click the first link in the description and if you like articles about entrepreneurship and online marketing, make sure you hit that subscribe button and hit that notifications bit alright. So in this article I want to go ahead and show you guys how to create a website. Conversions ad for your affiliate marketing business and basically, what we show here is a campaign that I recently created.
So it starts with three steps: right number: one: you need to create your campaign number two. You need to create an ad set, a number three need to create your apps, and what I’m going to do is I’m going to go in and show you a recent campaign, I’m going to show you the landing page as well as the Facebook ads and I’m Running to the landing page and the reason why I’m willing to do this to show you guys my heads is because I’m not done so, I’m going to optimize this ad um.
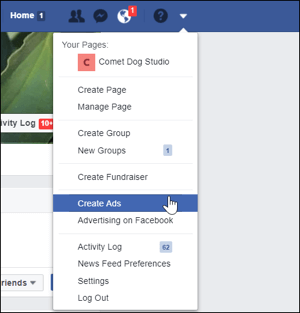
So this is the final product, but I’ll go ahead and let you guys kind of see into what I’m doing right. So, first and foremost, what we’re going to do is we’re going to go to create a campaign and when it comes to create a campaign, if you’re going to do a conversion to add what you want to do, is you want to name your campaign? So I like to put my landing page name so as tsf. I know what that means, and then I put website conversions and then I put the date 11.
24, 18 right and then what you’re going to do is you’re going to go to campaign objective and you’re going to go to conversions next. Is you want to go down safe to drive now, because I already have a campaign created, I’m just going to go ahead and use the existing campaign that I have so I’m going to go ahead and actually delete that one. And if we look here right, I’m actually testing. So one thing that people um.
I know this isn’t a part of the actual training, but one people, one thing that people don’t do. Is they don’t test right? So I was doing leave form ads. I was doing website conversions and I was doing website traffic and basically I was doing the same audiences on all three of these campaign objectives and out of these three right now website conversions is performing the best. So, that’s why I’m creating this article, showing you guys how to do website conversions so, basically, first informs you guys, need your pixels set up to be able to do website conversions, if you guys know how to set up your pixel.
What you want to do is you want to go to ads manager, go to all tools and go to, and then you go to pixels and once you go to pixels you’ll go to you’ll. Just add the custom pixel um there will be a link down below. If you guys know how to add your Facebook pixel so, but that being said, the next step is going to the actual ad set. So I’m going to go to website conversions and instead of just where actually I’ll, create a dummy ad set to show you guys how to do it.
So what you can do is you can go to create and then you’re going to go in and give an ad set name. So I always like to do ad set one at 2 X, sub, 3, X, sub 4 and then what I do is I go ahead and name my ads. The same thing like ad number, one Adam, Adam, 3, M 4, so ad set 4 and then the campaign objectives. The next thing that I put and then I put the the targeting options, will cover in a second.
So what is my niche guys? Um? It all depends on what your niche is. If your niche could be weight loss, your niche could be, it doesn’t matter right. So in this specific one, I’m going to website conversion event so guys. This is why it’s imperative to have your pixels set up. I still have all these pixels set up on my funnel and then what we’re going to do is we’re going to do lead now. I’ll show you guys the funnel that I’m currently using the reason why I’m only going to show you is because it’s not optimized.
Yet this is a brand new campaign that I’m starting to run so all you’re going to show you my steps. My steps are terrible right now, but because the ads are performing so well by the way I use click for them as guys you guys can there will probably be a link down below if you guys going to use, if you guys want to get access to It ok for some reason it’s taking forever for my stats, ok, so Facebook guys! Now, if you guys notice up, I use this.
I have different traffic methods right so, but for the Facebook ads right now, one is performing at 21 %. The variation once per sending at 9 % right and I’ll probably have an idea. Why so will actually show you the the landing page that I’m using Facebook Ads now? Basically, here’s one some split testing the same ad copy or the same sales funnel copy landing page copy and the difference is one – has an image.
One doesn’t have an image right on the left hand, side now, here’s the thing. One reason why this one might be converting better than this one is because this one has an image, so it might be taking longer to load. So it’s decreasing my conversions right, so here’s the landing page, all the copies are exactly the same and then on the next step on the next step is my pre-sale page, which basically is a step before the before my affiliate offer.
So here’s my pre-sale page. It’s basically picture picture again. I might take these pictures off because it’s probably decreasing my load, my book, my loading speed – I don’t even know – that’s probably English, but it’s taking longer for my stuff to load, but basically the difference is. I’m split testing the copy in this that the cellphone copy in this right. So I’m not going to show you exactly what the copy is, but if you guys want to like soo min feel free, I don’t care cuz, I’m going to be optimizing.
This sales funnel, but what that makes that I’m doing a two-step sales funnel so basically landing page pretty so page and then after they’d offer got it perfect. So next is what do you want to optimize for so you want to optimize for leads, hey guys, I’m going to optimize for these, because that’s what I want I want leads right. I don’t want landing page views. I don’t want people to click my website on what to believe.
That’s what I’m trying to get so with that being said, Facebook is going to optimize your ads to get. You leads now as far as the daily budget. Believe it or not. I started my ad sets really low right and I shut them off quickly and then, depending on ones that are doing extremely terrible and they then doing pretty pretty decent. Then I’ll start then I’ll increase them to like five dollars right.
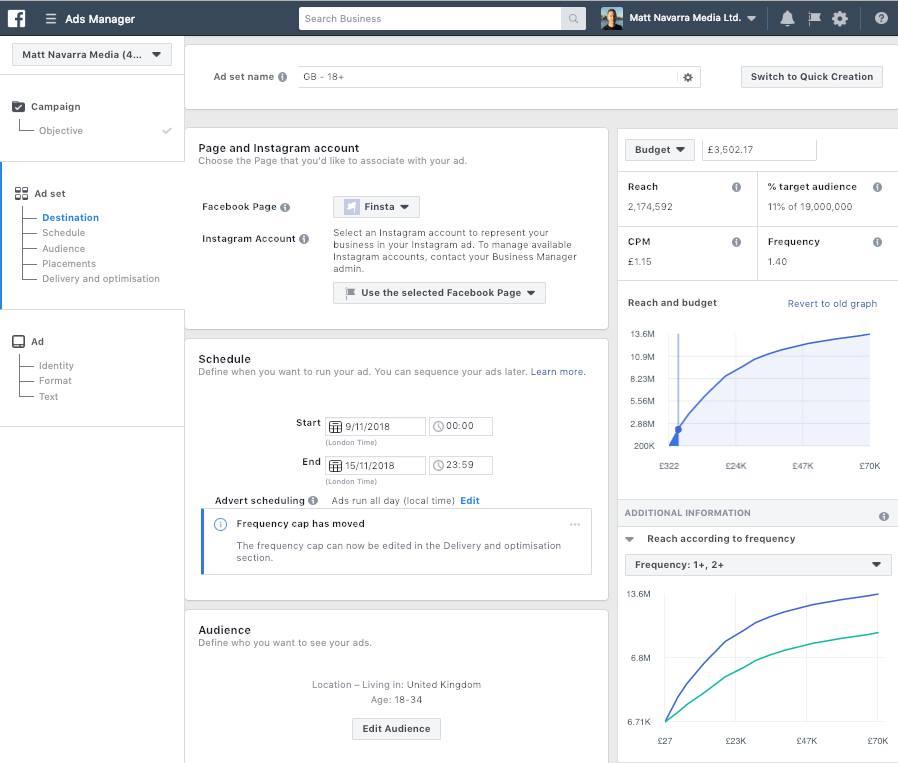
So you could do as low as $ 3, but I’ll just start this at five dollars to add, set and then custom audiences. We’re not even going to do that but ages and my specific niche when you 25-plus I’m going to do men because my ads convert better with men. The reason why is because I’m a 24 year old male bought to be 25, so does my target audience now? The reason why I do 25 instead of 18 is because 18 to 24 year olds are broke right, and it is what is there’s some people who want to put most Lamarck.
So what having said I’m doing 25 to 65 plus right, I’m looking for where their money’s at now detail targeting what are people interested in well before? I do that right, we’re going to like we’re going to I’m going to go back to the diesel targeting I’m going to edit placements, so I’m going to do news feeds because the type of ad I’m doing right now is a article ad. You guys can do image ads in this specific instance.
I’m going to do a article ad, but I’ll show you guys how you guys can do an image ad as well, for those who don’t know how to create articles. So what we’re going to do is we’re going to go to optimize for ad delivery, so conversions and we’re going to do conversions, we’re not doing landing page one landing, page reviews or anything of that nature. We want conversion, so you want meats. Now I do set a paid cap because I do not want to spend me personally.
I don’t want to spend more than two dollars per lead period. So with that being said, your your bidding right, if you leave just a random number out there, most likely Facebook will spin like I’ve, had Facebook spin $ 13 for lead and I’m like yeah. What is she doing so when you set a bid cat right, two dollars? That means most likely you’re going to be getting leads for less than two dollars, or it’s not that so just set a bit of cap right next is your detailed target.
So the reason why I want to do that, it’s cuz it narrowed it down. So what are people interested in right? So I’ll just show you guys an example online advertising people would be interested in online advertising so that narrowed it down to three million people. That guys understand. I’m going to give you guys two pieces of advice. Number one is: if you create a very broad audience, it’s going to be you’re going to be able to scale it right.
If you don’t have a lot of money to spend with your Facebook advertisement narrow down your audience as much as possible because going to be as targeted as possible. But if you have the cash flow right feel free, go ahead and have a big-ass audience. So all-night, advertising and then what I’m going to do is I’m going to go ahead and narrow down my audience, meaning they have to like online advertising and also and what I’ll do is something like affiliate marketing marketing.
So that’s 170,000 people, perfect, that’s perfect audience size. So guys, that’s just an example of an audience size or excuse me of an audience and then what I’m going to do is I’m just going to go ahead and copy and add actually so I’ll, just go to add, set three conversions but I’ll explain what it Is so I’m just going to go ahead and duplicate an existing ad, I’m currently doing, and then an existing ad set we’re just going to go and use the ad set that I just created duplicate bloom, so whether you duplicated an ad ad for whether you duplicate An ad or whatever, right, here’s my ad copy, so I use a lot of you emojis.
I use think pattern just for up things like breaking news. My thumbnail is a girl in a bathing suit, which is click article sale, especially if I’m doing 25 to 65 year old men. My headline is death to the 9 to 5, and then I kind of have like a cliffhanger college dropout creates weird dot. It’s like what so this is about building curiosity, so first, let me teach you guys how to do this stuff right.
So what you want to do is you either want to go ahead and upload an image or a article right? So if I was going to go out and upload an image, I could upload any of any of my images right like I could just 4/4 time stake out. Let me see I’ll do like this. One me hanging in a palm tree right so hard to do the same thing, especially if you guys aren’t, if you guys, aren’t doing um. If you don’t have YouTube or articles like I do right so I’ll show you guys the most practical one which is image ads right.
So breaking news. Kid treats weird niche laptop business that took him from dead, broke slaving away at a corporate desk job right. So I’m tapped I’m trying to keep it short sweet to the point, but I’m also trying to tap into that pain right people who hate their corporate job. People who are broke. People are slaving away right and then I basically sell them on their once in their desires right to quitting traveling traveling the world and only four hours per week.
Now. What think I would say is: let’s be honest here, guys I’ll just be very straightforward with you. I do not work for hours per week. I work more than four hours per week, not because I have to, but because I want to because I couldn’t imagine working four hours per week like I can, with the amount of money I make and the how passive some of my income is. I got the easy work four hours per week, but I don’t, but this is just me being a marketer selling people based off their once inner desires.
Oh my god, I’m working forty hours per week! Well, if I could work four hours per week, oh the dream! Right so guys at the end of the day, there’s curiosity, I’m not telling people what I do giving people a little bit talking about my weird niche, laptop business and um yeah. I mean that that’s pretty much it now. The headline depth to the nine-to-five people are working 9:00 to 5:00. I mean it speaks for itself now.
Here’s the thing guys. I highly highly highly highly recommend you’re, not stealing this this ad, and this is why, right because this ad isn’t optimized for is optimized right. I just created this campaign, so it’s not optimized yet now, if you guys do this isn’t proven to convert yet is what I’m trying to say and and what I would do after actually publish dish and I’m going to publish this. What I’ll do is this right? I’m going to go ahead and split test images right, the thumbnails! Well, first, I’m going to split test audiences.
That’s what I’m doing right now and I’ll show you guys in a second then. The next thing I’m going to split test is, after I find a winning audience. I’m going to split, says thumbnails. If it’s a article or images, if it’s images, as so I’m going to split test different images, then the next thing that I’m going to go ahead and split test is my headline rights, but that’s my headline. Then I’m going to go on the split test.
My ad copy and then once we do that we should have a winning ad we’re going to scale it up, but once I’m driving quality traffic guys it’s not just about the facebook ad. It’s also. Where are you sending right if you’re, a landing page and stuff? Isn’t converting right, you’re not going to make any money? So with that being said, once I’m driving quality traffic and want to start optimizing, the split testing this as I go along right so right now this one’s converting at 21 %.
So the objective is to get it to 40 to 60 %, eventually right. So what I’m going to do is I’m going to go and publish this? Is there anything else that I want to do not really so I’ll, just publish, publish this and then you have a Facebook ad, but I want to go ahead and show you guys a couple things to look at right. So I’m going to go ahead and only do the the convergence campaign so but guys so I’ve dipped three different campaigns leads website.
Conversions website traffic. If you guys want me to show you how to create different ads, going and comment down below and I’ll be feel free, right or I’ll be more than happy to is what I meant. So here’s ad set 1 here’s my ad sets there’s different ads and then there’s different targeting right. So it is what I want to tell you just because you think is a good at doesn’t mean it’s going to be a good ad.
You want to make data-driven decisions right, so over here right, look! All of them are $ 2.00 bid caps and aren’t any of my leads over $ 2, no they’re, not right so over. Here I have 26 impressions. 83 cents spent no leads right over. Here. Is the one I just created and actually have to edit the asset name to online ad and affiliate marketing right, publish? So next is so this one right here at the end, guys is a brand new campaign.
I just did it um. Last night, before I went to sleep, and I woke up – and this is what we’re looking at so far so um – I want to show you guys things that you should look at after your ad is up right, so leads to leads, and then over here we Have six leads so which one is performing better, obviously this one. So these are two two different ad sets so right now, I’m using the same ad. Besides the one I just created, cuz remember, I was doing article ads, I’m using the same ad across all to be these ad sets.
So the first thing that I’m going to be split testing is my audiences. Once I find a winning audience which looks like this one, then I’m going to create, but if I go to ad set what if I go to ads, I’m going to create multiple ads within this ad set right. But what are some things that we should look at right once the ad is up. This is what I look at right. Obviously, the cost per lease that’s most important right, but the question is: how do we get low cost per these right? So right now, twenty to twenty seven dollars believes that’s like unheard of I’m going to show you why so um, who knows where that’s going to be at later on, but basically cost per link.
Click is 11 cents and the reason why this is so crazy right now is because my click to rate on this ad is thirty point: seventy seven percent. Now what that means is out of a hundred people. Thirty thirty people, click on my ad, so my click. The rate is insane right now: um, I’m a very optimistic person, but realistically is my click-through rate, probably going to stay around this. No, but as long as my leads are below a dollar, I’m happy right.
So what you should be looking for is your cost per clicks and your click-through rate, so your click-through rate is simply out of a hundred people. How many people are going to click thirty percent? Thirty people click right. If twenty people click that’s 20 percent, if 10 percent or ten people click that’s ten percent, so the higher your click rate, the lower your cost per click, as well as the lower your cost per lead right.
So what I’m going to do is with this audience. I’m going to let me personally, I like to wait about 20, not 20 %. I like to wait about a thousand impressions right, so I’m going to see now, if there’s a clear, concise winner guys, then I’m just going to go and shut off the losers and then I’m going to go ahead and probably scale this ad right. Here I mean at 2727 cents per lead I’ll, definitely scale this, but I’m also going to go ahead and start split testing different ads within the specific ad set.
So I’ll keep this ad set I’ll shut all these off and I want to start the testing ass and then what I’m going to be split testing is my ad image or thumbnail my headline and my my headlines and then I’m going to be split testing. My my um, my ad copy right and what I like to do is a minimum of three variations right. So right now we have five total. When I first started my campaign, I had nine different variations.
Cuz I had three different ad sets or excuse me three different campaigns, three different ad sets for each campaigns and then the same ad. So what I’m doing is I’m split testing three different campaigns and then the same ad sets on three different campaigns. So a total of nine different variations at five dollars, a pop which you do to math. That’s like not a lot of money and out of that right, we had a couple of.
We had a couple of things right, so the website traffic is really not doing good per lead right. If you look at cost per leave, four dollars and seventy cents. If we look at my website – conversions, 39 cents right, so you make data-driven make data-driven decisions. Don’t just assume I would be biased if I said website, conversions would be better than traffic test, it try, it out, see what works best and then the ultimate goal is to kill the losers and scale the winners.
If you liked that article be sure to like comment and share, and also be sure, to smash the subscribers button and notifications about a join wolves nation. Lastly, if you’re, tired of working the nine-to-five, you want to be your own boss, you want to travel the world, create a life by design or even just the freedom to work whenever and wherever. You want make sure to check out my number one recommendation to make money online by clicking the first link in the description, and I want to thank you for spending your valuable time with me.
I know you could be spinning it somewhere else. So, thank you, and until next time your friend and mentor Eric Geller’s jr. Checking out
Looking for a company that will have your back? Check out the video below:
I am planning in my planner alert the cheers. We are actually working on something that I have been dreading doing, because it’s going to take a long time and I’m hoping it won’t be too long for you guys that I can edit this thing down a little bit, we’ll see how the editing goes. I’m not sure how exactly this is all going to work out, but, as many of you know, I went to an Alaskan cruise month or so we’ll go a little more than a month ago and I didn’t bring.
I brought my planner, but I didn’t bring my planner supplies because I wasn’t like 100 % sure what we were going to be doing and all that good stuff. So what I did is, I actually took my Erin Condren, like sticky notes, and so I have a bunch of little sticky notes denoting what we did and when we did it – and I was in Vancouver from June 19 and then we went back to Minneapolis on Really really late Sunday June 1st, but we didn’t actually get back until the 2nd.
So my goal today is to back plan this and the rest of this. So let’s get started here. I did get a bunch of these things which there’s a huge mess off camera for you guys so yay. I got a bunch of these things if you guys readed my Alaska haul, like all the things I got in Alaska, I’ll, throw it up in a card for you guys if you want to check it out, but I am going to be hopefully using a bunch Of these in the planner here, but I’m not sure how it’s all going to work out and then I did at one of the gift shops find this washi tape.
It won’t pull these out real quick and I don’t think I’m going to use the Northern Lights. One, but I might use these other ones. This is like the totem, poles that say Alaska on it, and this is just like some naturey looking ones. I don’t think I’m going to talk through this, because it’s going to be way too long. If I like ramble on about things, let’s just speed up this footage right now, all right, so I am finally done this took way too long, but I’m very happy to share with you guys all the fun things I did so.
The things I put in I’ll just talk about so when I got to Vancouver, I attempted to sleep for about an hour. I, like didn’t sleep overnight as a whole, long thing, if you guys want to read the vlogs if I haven’t linked it up in a card already, I will do so now and I will link the vlogs down below. We also decided to go shopping afterwards, actually hold on. We had some dinner before and I think we all had like burgers.
So, let’s put a little burger in there. Why not right, and then on Wednesday that was our cruise day, so we’ve gotten the cruise and then we unpacked also the Minnesota planner events planner buying out the Minnesota planner event summer event went on sale that day so Jodi over at life’s organized chaos bought my Ticket for me, so I paid her for that next day we were at sea, we played some bingo, there was also a lumberjack in the area and he did a little demonstration on the ship and let me put in a little, you know thing, you know what I mean we went to an art auction.
The only reason we went is because it was free champagne that, like by the way it wasn’t that good, but whatever it was free and then I’m late into that evening. My mom and I went and got a manicure. The next day we were at the Inside Passage in Alaska and Ketchikan, and then I used this washi tape. It’s a crafting tape. It’s like more, like a paper tape. So I’m not sure I don’t know if I’m going to put this up in my shop as samples cuz, it would get like very warped if that makes sense.
So I’m not sure about that and then we went to the totem Brite State Park. I used a little Alaska sticker, we also went to the lumberjack show and then we were at Ketchikan. After that we went on sea. Then we woke up in Juneau. We went to the rainforest garden, the Mendenhall Glacier, which I have a really pretty sticker from also we went to the State Museum and on the we went to a comedy, show the next day we were in Skagway Alaska.
We went on the White Pass Railroad and then we actually went into Canada for a little while and then after that we went into the red onion. We also went to Liars ville and had a salmon bake and gold panning later on. In that afternoon we went and got some ice cream, and then we were at sea and then the next week on Monday we were at sea. We did some laundry. Actually, my mom and aunt did laundry. I didn’t do any of the laundry I was attempting to sleep because of the snoring issue.
We were in Glacier Bay, so I got a lot of really great photos. Then I did some editing because we were at sea. I also participated in a fashion show and we got some like more formal photos taken that you would kind of see in the vlogs if you readed the vlogs, and then there was a musical on the on the ship and it was called encore. The next day. We were at sea, I did a little ship tour for my vlog.
I just put this little Alaska sticker green because I thought it was cute. We went to bingo and then we had a packing party and the next morning we woke up in Anchorage. We took a train ride over to Talca Tina and then we also spent some time there and then we ended up in a mount mckinley princess Wilderness Lodge the next day. We were still in the Mount McKinley princess wilderness lodge, we went on a hike and then we went to the Denali princess wilderness lodge after that I tried to upload there, but the internet was not strong enough, so I just wrote an upload failed.
The next morning we woke up in Denali Alaska. Again we went on an amazing national park tour that was probably one of my favorite things that we did on land. It was absolutely amazing, after that we had lunch, and then my favorite mama reads comments. My mom’s Q & A posted that day, so, if you guys, are interested in reading the favorite mama Q & A, I will link it up in a card for you guys and it was really sweet.
The comments that you guys had for her and she responded back to a lot of you guys there. We also went to a local place, called the bake that night and then the next day we traveled to Fairbanks, and we went on this riverboat tour and there was like a 40 degree below experience where you just went in a meat locker and like stood in There, for a minute it was kind of cool. It was actually that bad me being from Minnesota.
It was like, oh that’s kind of refreshing, and then we had an extensively loud dinner. It was pretty horrible, but whatever we got to put it in the planner, you know, and then we had a packing party. Then we traveled to of Fairbanks or sorry we were already in Fairbanks. Sorry, I’m getting my Awards mixed up. Today we did a little traveling downtown. We went to this visitor center and I actually put this Northern Lights washi in there, because we readed a like little show about the Northern Lights, which is really cool.
My mom and I went to a cemetery cuz. That’s like her favorite thing to do in the world. I put this cute little Alaska sticker in there and then we took an airport shuttle and we went back to Minneapolis. I did not do anything over here. Cuz, that’s just a whole long thing, but anyway that is going to be it for me today. I will link all the sources of all the stickers that I used the like stickers that I got on my vacation.
I won’t be able to source because I’m not sure where they’re from but any planner stickers that I used, I will link down below as well as the writing utensils that I used as well hope you guys enjoyed the article sorry if it was kind of long. I’m going to try to clip this up and make it not super long for you guys, but if you like this article make sure to give it a thumbs up feel free to subscribe, and I will see you all in the next one bye guys.
This one here is the OG 220, and this one here is the og 219. So G stands for off-grid, not original gangster. Just a sidebar anyway get sent a lot of knives to review. Many of them never make it to uh the coach, shelter, calm website. These two did and let me get into some detail on why these two knives did make the cut.
I’ve been reviewing off-grid knives for a couple years now, and they just seemed to get better and better quality’s, better more attention to detail. They recently upgraded their manufacturing plant and they came out with a bunch of new models, including these two. The reason why I am reviewing both of them at the same time is that they are pretty identical. Besides, of course, the color and the actual handle the blades on these rapid-fire models are made of us, eight Japanese steel, and they are cryogenically treated.
That type of treatment allows the blade to perform much better last longer and usually reserved for knives. What I have to your price tag usually found in our Special Forces community, so on and so forth. So the fact that you can get this type of treatment on a blade or this type of quality at a budget price definitely was something that I wanted to share with you, as I alluded to earlier. The main difference between these two rapid-fire models is the actual handle the og 219 has the g10 composite handle.
Resin and fiberglass mixture makes it very grippy the. On the other hand, we have the og 220 that has this scalar type handle once again all about personal preference. Both of them are relatively good to go whether you’re handling and operating in an environment where you have alcohol all over you sweating, which is usually an issue of mine, rain or even blood. The blade itself is pretty beefy. Incredibly, sharp, I mean definitely razor sharp and it has this nice serrated edge here.
Also that’ll do some serious damage. It’s made to be able to be deployed with just one hand, so you could you could index it with your index finger rapidly, deploy it. That way closes here with the body close it back down, or you can actually use the thumb to drive it float forward and deploy it. That way. So it’s nice to be able to have both of those options once again, usually reserved for knives with a heavier price tag.
Now the pocket clip itself is also very well made. Well, designed it’s really on are going to stay on there not really loosen up on. You does come with three screws, which is nice, which makes the integrity even that much more on the clip, especially for those of us that do carry it in our pocket, and you could also adjust the clip. So you can put it up here, so it allows you to carry a tip up or tip down depending on your preference and how you decide to Train speaking of training.
The teacher and me definitely wants to harp on the safety aspect. Make sure that you sure, if you do choose to carry this blade or any blade be sure to practice with it open it up, deploy it feel comfortable with it. If you’re going to carry it in your pocket or wherever you’re going to carry it, be sure to practice over and over, deploying it and feel comfortable with it make it a part of you. If not, it’s just going to end up being a liability, and I don’t want that for you at all.
I also wanted to bring up that these rapid-fire models come in an off-grid box, so if you are giving it as a present, it’s pretty cool. As far as the appearance, if I could figure out how to put this back, I guess it does go like this, so pretty form-fitting good presentation, if you are giving it as a gift. Another reason why I gravitated and like these rapid-fire models is because they remind me of my EDC, my everyday carry, which is this zero tolerance, zero, three zero one model.
Now, by no means am I saying that these rapid-fire models are in the same league as this zero tolerance. What I am saying is that many of the features of why I choose to carry this zero tolerance on a daily basis are found in these knives, but keep in mind that these knives are probably about one seventh of the cost of this zero tolerance model. So bottom line, if you’re in the market, for a folder that has a lot of the features that the big boys have, that pretty much a budget price definitely take a look at these rapid-fire models.
I think they’re going to impress you the same way that they’ve impressed me this is Helder. I hope that you found this review helpful.
Knives and daggers are awesome! Plain and simple, right? Let me say, I enjoy my dagger collection with a little music playing in the background.
So I you I was using software back in 2013. Called SEO presser this software was like one of the best software that I’ve ever seen in terms of SEO. It actually knows what to do and how to do it. Now, after, like a 5 years, I kind of like a lost track for using the software, because I changed my you know: works system and stuff, but I kept you know searching for like a more better softer throughout this time.
But I didn’t find anyone. But I have a good news for you, guys those who bought my a course, which is a Google play black hats off a book. You will get access to the SEO presser for free and I bought the SEO presser for my clients today. I’m going to show you how how this works so, let’s get into it, so so so for this test, I’m going to use one of my app. It’s called quick cash earned money online at first I started showing some Facebook ads and I got like a really good user downloads in first two days, but after that it kind of like a went down and it went up.
I did a little bit promotion here, but it’s not getting what it’s supposed to get. That means it’s not getting any organic downloads. The reason is because I didn’t do much of the SEO or listing here you see these are all like. You know. If I click on here, you will see what’s the problem is so I have installed a seopressor for my website and I’m going to use it to find a really good keywords. So I I I paste the whole description and I went to Google and I started searching for Google Keyword ideas where you know my app is: I earn money online scheme, so I earn money.
This one is good, so I’ll type in earn money. By the way. This part is the SEO pressor software just really powerful. You guys I’ll show you guys how it’s so powerful, how to make money online. I’m just scamming through which one has the best way so best ways to make money, which is we can all best way to make. No, it doesn’t make sense easy money. So I wrote my description now, I’m going to check what is your pressure give it to me.
Oh quick, like this. Okay, so, as you can see, the score is nine, it’s very, very bad, and so it will actually tell you what to do and what not to do like your score is too low. You can improve it by following out suggestions, increase the length of the content. You’re, what count is too low? 258. Add your keywords in the URL. We don’t have to do. That include keywords in your title: there’s no title! So we are what we’re doing is optimizing.
The description so number one is what count we have. A very low word count, so, let’s see so focus keyword. Ears earn money, so we can just write some take on money. Yep, it’s getting better. We still need 206 to call the land of content we need to. We need to create more so, as far as I remember add keywords in a Meta Description increase the length of our Meta Description. Longer description can describe your content.
Better use. Relevant images in your content include keywords in your h1 tag, so this is very important. So I’ll make this. This keyword as an italic form so include keywords in your encode link. Decorate your keywords to improve reading experience. So it’s like terraform include LSI keywords in your content area of semantic value. We don’t need schema and, let’s say keyword, suggestion. Oh yeah. They this after actually scripts the whole Google.
It tells you what’s the best keywords or what kind of keywords you need in your article. You know to rank it more better, so, on money online now, scam is pretty good. This app is online, no scam, isn’t it awesome, like literally it tells you what to do and what not to do this dislike the best software you’ve ever seen in real life, so it went to 31 percent and what count is trails, but we still need to Make it a hundred percent, or at least eighty percent, or something and your keywords in URL? We already did that increase the length of a tunnel – it’s too short, okay, so we can so we can make this an h1 tag, oops and let’s see 37 % – that he was.
You know matter prescription under. So, let’s put our LSI keywords and see what we get, who 41 % and Quirino Meta Description use. Relevant keywords include keywords in your image: no, we don’t. We don’t need those. So it’s going to be around 70 %. If we actually, you know, add more stuff increase the length of a Meta Description longer, just one can describe your content, better user, ok, keywords in your h2 and h3 tag, so we did put h2 tag, but we didn’t put on h3.
So I’m going to go right here how to make money money from home. Let’s see it stir tag so, okay, so this one will make it volt and an underline. Well, it doesn’t have any underline yep. It just went by so make. Let’s put some LSI keywords and money: now our money instantly on money instantly and fast, because there’s the fast fast fast fast, Oh see, 51 % earn money online without any investment. So you really don’t to invest just read ads and you can make money.
Let’s put this, it didn’t work, but also we can make this mm-hmm. It’s still working. What I’m missing aren’t money instantly earned money now won money instantly on money extremely fast. There you go so I got three LSI keywords and I’m going to instantly remain: Oh, earn money fast on money. Now online earn money now so online to see. Just by putting one word, you can actually have like a really good score.
So it’s going to be around 55 yep earn money online in third investment, so you can earn investment. Let’s see oops yeah it got get mine now for free. I need to make my now it’s because of this. The fifty five fifty five percent. It’s because of this lens or to increase your keyword, count is slow in 391, so ideal length of an article should be around 800 words, but let’s see where we can go 425 still, though, just a little.
So if someone asked what’s the best length of a description or an article, we’re going to to go and see like WordPress beginner and let’s, like post one of their article here, see the article is actually law. But just for the sake of like how long your article should be, I’m just testing wow, it’s very long. Okay, anyways! I think we’re done here. I don’t think anyone even read those well. Their word count is 2008 yep, it’s so it’s more than 1000.
You need at least 1,000 cue words, but I think we’re good we’re good at 55 %, more or less I’ll, add some more words later, but for now let’s see what we can do, so we go out description and we just update the yeah, oh by the Way, Google will not let you use any extra phone that we use. So what we have to do is we click on the text and we will pretty much just copy paste the whole thing so guys there you go, we just updated our app and it will take some time to come.
But when it comes, I’m going to show you guys and don’t forget to subscribe and, like my article, if you learn something new and the software, this is free. If your, if you bought my twenty dollar program, it’s free hope to see you guys soon take care.