Com, and I wanted to make this quick article just to run by a general outline that I put together for this training program I’ll be creating. Some of you have been yelling at me for a while to get this training program created it’s going to be completely free, but it’s going to be a ton of work too. So I wanted to run this by you guys just to see if there’s anything you’d like to see included if I’m leaving something out if there’s stuff included that you don’t think would help – and I know I’m scrolling through this really fast.
So let’s go through this. A little bit slower, okay, so planning is starting with an introduction. Just tell people who I am why the course is free, along with an affiliate disclaimer to say you know, hey this course is free, but I do have some affiliate products within this course that I’ll get paid for. If you sign up, which then goes into you know the course is free, but how much is this actually going to cost you when all is said and done if you go through my entire training program and sign up for all the products that I recommend you Sign up for how much is it going to cost you in the long run some secrets that I’m not going to tell you? I know some of you don’t want to hear this, but the most successful affiliate marketers generally do have some secrets that they’re not going to tell you about their business.
Maybe a specific niche that they’re involved in or something like that or a special partnership that they can’t really give you information about due to non-disclosure agreements or whatever so I’ll go through some of the things that I will not tell you and why I’m not going To tell you those things without getting too specific, obviously setting realistic expectations finding out if affiliate marketing is really for you in a general overview of really what your job is going to be as an affiliate marketer just your day to day test.
Assuming that you are successful and you’re working on your affiliate marketing business every day, what exactly is your job going to be, and you know there’s a lot of different ways to succeed, affiliate marketer so I’ll just be focusing on my business and sort of how it’s Become successful and what my job is basically everyday as an affiliate marketer, the next up we’ll get into niche creation. So what is a niche? How to come up with a good? I guess the proper way to say it is niche, isn’t it so niche creation? What is it how to find a good niche how to do market research on your niche, determining monetization potential and coming up with three different ideas? I always recommend people come up with three different niche ideas and then narrow that down to one after you’ve done all of your market research and all bets so I’ll be going through specific examples.
Dog food reviews will be based off of my real-world site dog food, insider.Com or I’ll. Show you some of the keyword, research that I’ve done on that site and how I determine articles to write and how he decided to even make that site in the first place. But also go through a couple new ones too, so, for example, San Diego travel. I live in San Diego and so I’ve always thought about maybe making a site on San Diego travel.
I also have here in the parentheses on all these, what my monetization strategies would be, what sort of services and products I would work with to monetize that so San Diego travel, I’m going to way more specific on San Diego would be a site specifically for Petco Park, which is where the San Diego Padres play terrible baseball team, but it’s a phenomenal stadium that a lot of people like to travel to from out of state, so that would be cool.
I go to almost every game at Petco Park, so that will be pretty fun to write a site about that. So we’ll get into researching that as a potential niche and then, of course, how to narrow down to the best niche. So that also ties into keyword, industry, research or keyword, keyword, research in industry, research, which sort of ties along with SEO or search engine optimized, so I’ll get into what our keywords and why are they important? What is SEO sort of tell people about is how to actually perform keyword.
Research, and here we have our first actual paid product purchase, which I will recommend. Probably I use a few different keyword, research tools, but in this course I will probably recommend that people sign up for longtail Pro and just so you guys know that’s. I think I get 30 % of that and it’s a recurring thing. So if somebody stays signed up for longtail Pro I’ll, I get 30 % of the recurring commissions, which I think it’s like 30 bucks or something for that service.
Let’s see and then also how to create a website blueprint so that you know every page that you’re going to be writing along with every keyword ahead of time, probably like a hundred different pages minimum um. So I’ll show people how to do that and then, of course, once you have the blueprint all set up, you’ve done all this keyword, niche research take a breath if your. If your niche is not what you thought it would be.
If there’s not going to be enough, monetization potential or after doing keyword and industry research, you’ve learned that, maybe that it’s just too competitive, it’s not exactly what you want to get into go back to the drawing board. I’ll, try to you know, tell people that that’s an important step as well, so finally, we’ll get into the the real meat of it here, which is how to set up a domain name.
What is it, what makes a good, no domain name and how to find an available domain name as well as a register it, so that will be another paid product which this will tie into web hosting I’m going to be recommending Bluehost for probably both the web Hosting, as well as registering the domain, because you can do it in one package, it’s super simple. Most of my domains are actually hosted in GoDaddy, but I think I’m just going to recommend, especially for brand new people, to sign up for the domain name as well as web hosting in the same place which will be Bluehost.
So what is blue over I’m sorry? What is web hosting good web hosting services and who I recommend so I’ll? Actually let people know a few different web hosts, but in the end, when I show you how to set up web hosting step by step, this again is a paid product. And it’s going to be through Bluehost, so hopefully the idea is that people will click on my affiliate link, it’s a Bluehost to register their domain and set up their web hosting, as I show them how to do that which I’ll get paid instead of getting people To pay me up front – and this is really where I’ll make them most of my money on this course, because web hosting I get 65 bucks for everybody that signs up for a web hosting plan that starts at like 399 a month or something.
So that’s pretty cool and then also I’ll show people how to create a domain. Specific email address and forward that to your gmail account. If you have a gmail okay, so next would be setting up WordPress. So what is WordPress? Why I use it how to develop it Bluehost? This is one of the reasons I’m picking Bluehost. They make it super easy. It’s literally like one button that you have to press and installs WordPress with a lot of difference, theme, options and widgets and things pre-installed to make it real easy for people who are new to building WordPress, but I’ll, go through detail tutorials on how it’s set up Everything, including your first page, how to set up menus and things like that.
The next section will be content creation, so how to write great content specifically for the internet. It takes a certain type of finesse to write for both search engines, while I guess social media as well, along with human readers BOTS, I mean there’s a lot of things to consider when writing content, specifically for the Internet and fortunately, it’s a whole lot easier than Having to write from like a text, a book or even a magazine or newspaper right, I think writing for the Internet is great, so I’ll show people how to specifically write for the Internet.
My four steps to content creation that I’ve been using forever called CTP M I’ll, get into that how to optimize your content for on-page SEO. So it’s actually founded by search engines and a proper internal linking on your site, because it’s very important for SEO a lot of people overlook that then we’ll get into link building and other SEO tactics. The difference with doing the white hat and black hat SEO.
Difference between on-page and off-page SEO. What link building is a warning about link building, which I hope, people heed, because link building can be very dangerous and just different types of ways to build links that I’ll get into the the specifics of each of those. Next section. Additional traffic getting methods how I obtained the vast majority of my website visitors. Hence it’s through Google how long it takes to grow organic search, traffic, email marketing.
This is another paid product, I’ll, probably end up, recommending Aweber for for email marketing, probably not something that people need to sign up for right away, but hopefully you’ll still get some Commission’s from that and again it’s it’s a recurring Commission. I think, like a 30 percent recurring Commission every month or something like that, it’s actually pretty good and other ways on how to get traffic through social media YouTube and how to repurpose your content, so that you can share that on multiple platforms.
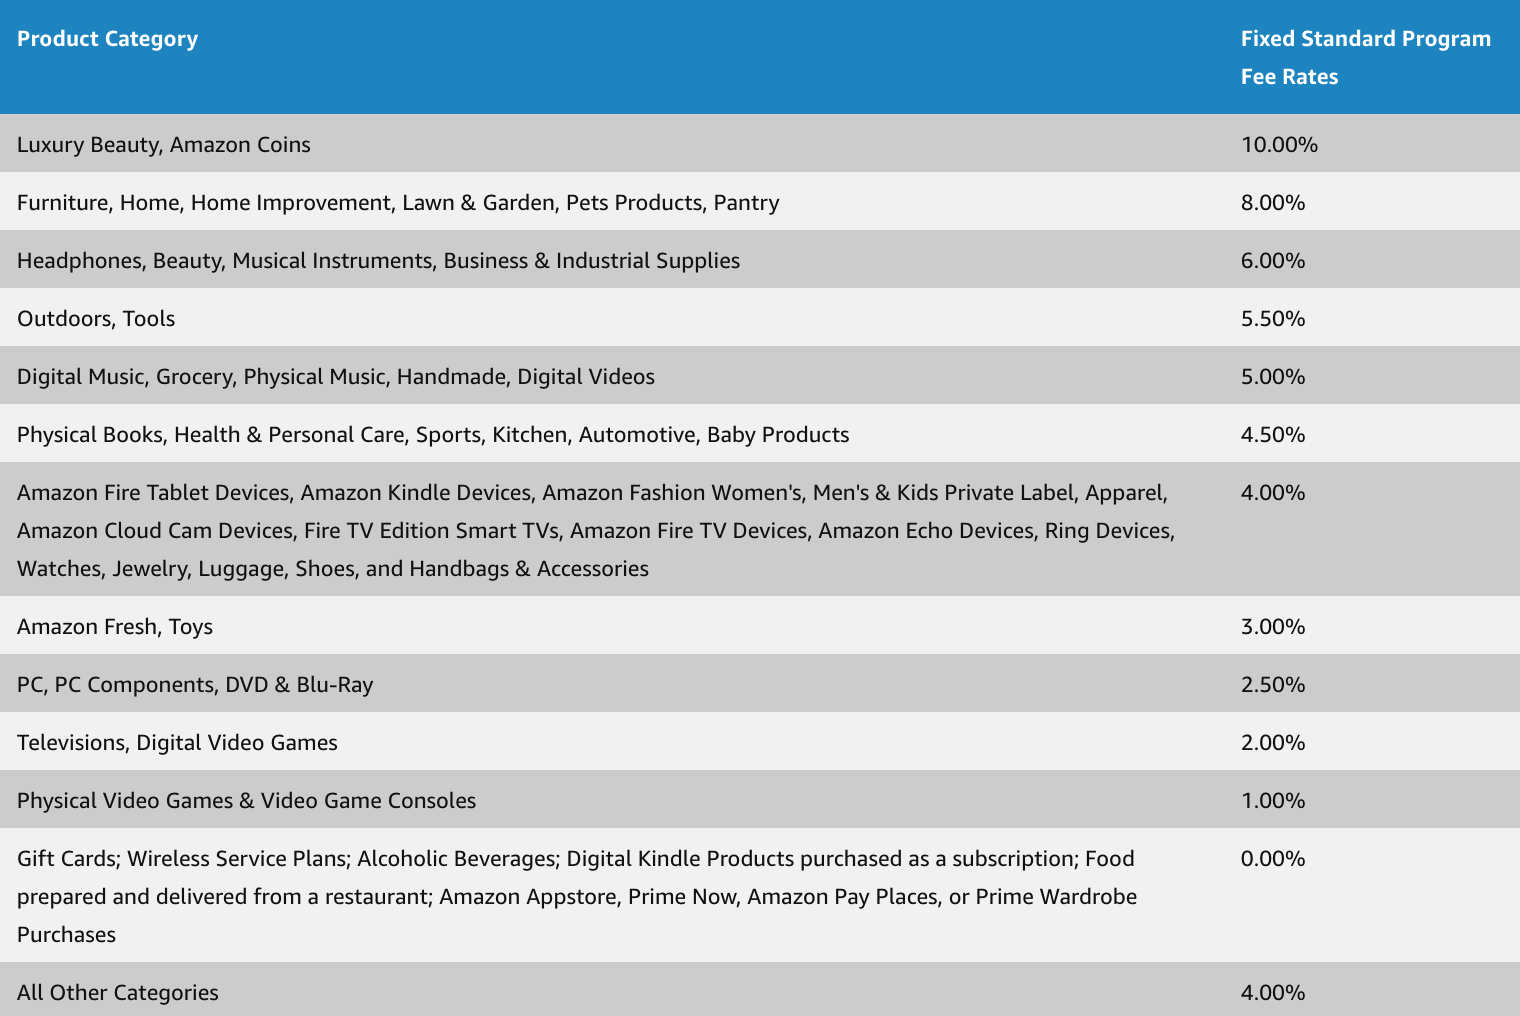
Then monetization strategies setting realistic expectations on how long it’s going to take to make money, how to find affiliate partnerships and specifically high paying affiliate programs and since Amazon, associates and Clickbank are such large affiliate programs. I’m going to be going over some special things to consider when using those how to develop a good affiliate partnership. Specifically, if you have an affiliate manager and a dish, ways to make money from your site, in addition to affiliate marketing which, having your own product or service, can end up being even more profitable than affiliate programs.
So that’s something I’ll go over as well. Okay, so ongoing affiliate business strategy is what to expect in your first 12 months, refining and optimizing your site over time. What to do when you do start making money, outsourcing tips and tricks, because I love to outsource things in my business by by reinvesting earnings into having other people doing work for me and then how to scale and diversify.
In other words, just stick with the winners. Learn how to scale up the money that you’re already making on a site that’s doing well and then how to diversify, either your current business or creating more sites in different industries and different niche, so that you can diversify your site even or your your income. Your business even more then I’ll, give some final thoughts, a bonus section where I’ll show you guys inside my sites, a breakdown I’ll, probably specifically get into dog food insider as well as affiliate, marketer training.
Com I’ll, be going over my revenue I’ll be going over my traffic Sources I’ll dive into Google Analytics and they actually reminds me – I should have had a section on that. I’m setting up Google Analytics in Google search console hmm. I wonder where I could put that off to put that in here somewhere, because that’s pretty important too, but anyway, I will show you all of the stats for these sites, which have been running for years.
So that’ll be pretty cool to look into the three or four year history and the growth of those sites and in how I’ve really grown those up over time. I’ve mental have a motivation section as well I’ll create a article on the lifestyle that affiliate marketing has provided me with. Since so I mean, I started in 2009, went full time in 2011, so kind of show where I’ve, traveled and and some of the things I’ve been able to do because of affiliate marketing.
I mental you a bunch of books in articles and things, a sort of a self-help section things that I found interesting that have helped me to grow over time as well. So I’m guessing this is going to be about a hundred articles overall somewhere in that range. Some of them will be longer than others. Some might just maybe a few minutes. Others might be. You know a half hour long, but that is going to be a lot of work, but I think it’s needed.
We don’t have a good honest, free, affiliate, marketing training program out there. So let me know what you guys think. Am I missing anything. Does this look like something you’d be interested in you know, is it overwhelming? Am I missing too many steps? Any feedback you guys could give me would be great because I don’t want to put in all this work if it’s not really what you guys are looking for.
So what do you think if you’re reading this and you’ve made it all the way to the end? I would really like your opinion, because I don’t have a ton of subscribers on YouTube. Yet so, if this affiliate program training program came out, what do you think? Would you sign up? Would you go through this? Would you be willing to click on my affiliate links? If I asked you pretty pretty please, and so I don’t have to charge people ahead of times, they go through the course cuz.
That’s really what I want to do. Also, these products, you know, are actual products and services that I use for the most part web hosting. I don’t really use Bluehost, I use WP engine, but that’s way more expensive than brand new affiliate. Marketer just need to sign up for so these really are products and services that I believe in so hopefully people will see that and – and I can make some money on the back ends after creating this course.
So anyway, that’s all I got for you guys this time. If you have any thoughts, let me know I don’t know how long this is going to take me. I’m shooting, for maybe 3 or 4 weeks to create all these articles and start getting them up there and maybe I’ll provide a place for you know early act for those of you that want it. Okay, that’s all I got take
But the level of training hasn’t who are part of hustlers kungfu, and I almost didn’t do this and it’s like like I’m getting pushed back about. I don’t want to sign up for the email client.
I don’t want to know, go ahead and go to the main aim and say so I don’t want spend money on that stuff. Trying to take the paid blogger without the ax proper internet ex assets is like going to the gun range, rightly gun and bullets. It’s like shaky driver’s head with no car. It’s like learning how to drive a sin. My tractor trailer with no truck it’s like learning how to build a house without a hammer and tools.
These are tools you got ta have now that’s the fam in your face. What we’re doing hit now, let’s talk about what the hey bloggers going to teach you. The real thrust of the course is content creation. Electric kung fu is the content creation school. Now I use the word to pave bloggers, because if I was to title the course the paid content creator people would be like. Oh we’re do talking about glyndon content creator, but everyone knows where the blogger is right.
Everyone knows the clock or create blog get going. Those that bloggers have ads on their blogs and everyone knows that bloggers often sell products. Now it makes sense, but you’re going to be is a content creator. It’s going to be a lot more to the paid locker first thing: we’re going to do is write the book hello, because you have many people who grade blogs then later on, go on to write the book, but it’s challenging, or I should say they go on – And turn the blog into a book, and it’s very challenging to do that because we’re writing the blog you’re, not writing in book format, which means chapter 1.
Chapter 2, chapter 3 got ta, make some sense. There has to be a sequence of proper sequence, because if there’s not a proper sequencing, you know people get lost and it’s just like what the hell and that’s what happens with bloggers who create books and put them on Amazon. So we’re going to create a blog which will ultimately be a book, so you’re not doing one thing you’re doing to now. Since we’re going to create this book, you have to have an email list, which means that’s why you need the email client before you even get started, because I’m going to teach you how to do this stuff, like no one taught me, you always hear hey.
We need an email list, hey neat, that you need that right, but no one says why why you need an email list? Why you need good game plan is, if you do this right, your blog will make you some money on the front end the middle and the back end, not necessarily a lot of money, but once you make your first dollar online, it gets easier to make your First hundred dollars, I think it’s easier to make you first house.
It is easier to make it first 10,000. It is easier to make your first hundred thousand, but you cannot make your first hundred thousand loud making your first stop. Many people want to make that hundred G’s and never made up dollar online, and I’m talking about from your own creation from your own stuff from your own genesis from your own essence. Uh, don’t see that! Don’t see that at all now that’s the reason you have to and I’m getting people’s like hey.
I don’t really essentially the sentence. I don’t feel that I have to get that stuff and I sleep. No. You know but you’re not getting in the course. Unless you do get that stuff and if I miss that and you get in the course and you get signed up you’re not going to the next level because see this is where it’s going to get really interesting. Everyone that comes to the course i’m going to create a directory of all course, members blogs since the community.
So let’s say you have a blog about journals. There’s someone in the course who makes handcrafted journals well what if you’ve got someone who is doing? Maybe arts and crafts for kids those two bloggers can network together and share a list because they’re not dissimilar, so essentially we’re building community building a power structure where people can work together, help each other out. But if you just have a blog, you do not go through this process.
You will not be part of the community. You’ll just be one of those folks in the Facebook groups who are just lurking. Lurk lurk lurk I’m working aka, I’m a scared, little bitch. I don’t know what to do. I’m afraid that the world will not like me, I’m afraid of looking foolish, I’m afraid of all this stuff happening. So I do nothing, that’s what it really is. It’s not me and let’s talk about cost your email clients going to be 29 bucks a month and you’re hosting unless you’re paying here is going to love for the year’s going to be anywhere from three bucks a month.
I know crazy money up to about. Maybe 11 maybe 14, depending on what you’re getting. I know it’s over-the-top expensive, I’m trying to get you and yes I’ll, even be even more upfront. I am the affiliate of the products that I use and recommend yep. So if you go ahead and sign for that stuff, I’m going to get a little change. Yep, yep, yep yep, all that now, if that offends, you are you’re. Looking like wow London, that’s like that’s too much! Then you one of the people who’s never ever going to make large money online you’re going to make some money because I’ve noticed something increase for years.
There’s a group people who put in there like I want to go to someone’s blog check, I’m going to go to someone’s youtube blog check. I want them to help me solve my problem check and how damn, dare you even think about making some money out of this process? How dare you think that you can possibly charge me yeah information that I gave you made me 10,000 this month, but fuck you now look that is called as being selfish, see you didn’t think I was going to that’s what it’s called being selfish, so typically selfish People do not have the best life and just doubt so, you’re sitting there propagated on well, I don’t want them to charge me because you’re selfish you’re scared and you feel that you can’t do it.
That’s what all that talks about, because all right have no problem. Dropping money on the book a course or training or mentoring, or someone who’s going to help you, and since i’ve been doing this long enough, I have very realistic expectation. I took a course recently for 1400 bucks and I knew half of the course already that’s going to happen if you’re an Internet person just going to know a lot of stuff already, but the fifty percent I didn’t knew.
It was three things out the course that will birth to 1400, not 10, not 23 great things, but many of you have crazy expectations that you’re going to spend 100 bucks 200 bucks is going to be a life-changing event with minimum effort knows, I said, minimum of Effort because I got girl, nightingales see these one hundred and five bucks and it was life-changing, but all right, listen to those cds, but really it’s audio cassettes in person, no less than 200 times, which requires effort.
So hopefully this clears up a lot of this stuff. Then, what’s going on out, there put your mind where you need to be, and then we can rock and roll. So for those of you who are interested in the page, blogger, the links below and I’m going to give you a few options you have where I’m going to do the paper: nine, nine, ninety seven dollars, then I’m going to do the electric kung foo founder deal. That’s going to be 700, yes, seven with a capital, seven seven hundred and then I’m going to do mentorship.
Where I will hold your hand, walk you through it. We get on the phone. We talked a long time. It’s going to be ten grand, that’s what it’s going to be, so you can get the paid bloggers only for ninety seven dollars. You can get the founder status for electric hum food for 700 or 699 or you can go ahead and get supreme rub your neck. Massage your temples, full-service 10,000, so those are your options and roll all right.
This is blending and I will see you in the next session.
000 visninger af trafik til dit websted på autopilot Jeg skal vise, dig nøjagtigt hvordan jeg gjorde det lige efter introduktionen [ Musik ] [ Musik ] [ Bifald ], hej, fyre, har, været, Arkell, passiv, automatisering, rolig, Jeg, vil, vise, dig nøjagtigt, hvordan, Jeg oprettede syv tusind brug trafik der er fuldstændigt på vores, hjemmeside, på, autopilot men, først hvis.
I har lyst for at lære mere om affiliate marketing, om passiv indkomst hvordan man opretter en online forretning min YouTube-kanal har tonsvis af ressourcer er du velkommen til at gennemse, min articleer se noget mere jeg har talt, om tonsvis, af ting der er masser af gratis ressourcer. Her så hvis du vil abonner på min kanal, og tryk, derefter på klokkemeddelelse der skal meddeles med, kommende, articleer Jeg, vil vise, dig alt bag, kulisserne hvordan man kommer en online virksomhed, igang med, tilknyttet, markedsføring og, passiv indkomst.
I ville meget gerne have dig til at være en del af dette community men, jeg vil hoppe lige ind og snak, om Pinterest, jeg vil vise du prøver, virkelig bestemt bestemt at holde denne, article virkelig, kort, og, retfærdig giver, dig, nogle, utrolige nuggets jeg har en tendens; Til undertiden at gå sammen gør, jeg, ikke, vil, gerne, gøre, det men, dette, er, min statistik for en af mine websteder det, sidste år, okay de sidste, tre 365 dage så Pinterest.
I har 71.000 mennesker der er kommet til min nu vil jeg gerne have at du viser, dig all-time stats; fordi min Pinterest trafikken accelererer og fortiden jeg fik ikke så meget så hele tiden jeg har havde denne, hjemmeside, ligesom, fem, år, er, kun, hundrede, tusind så. I det sidste år kan du fortælle at tingene virkelig er hentet og jeg vil gerne vise, dig hvad Jeg laver dybest set jeg bruger noget kaldet medvind Taylan er dybest set en planlægning af Pinterest Jeg, kan oprette pins, og, jeg, kan planlæg dem til at blive, bogført Til forskellige grupper til forskellige stammer, på indtil en og så kan du se, her på min hjemmeside data, dette er for fortiden et par år, kan du se, jeg havde intet, så, dette, er social trafik for Pinterest lige, her okay du kan se at der ikke er Noget til den første brønd I 2017 beklager min computer frøs op og så besluttede jeg at lære, mere om det.
I gik til nogle konferencer folk kan tale om Pinterest, Pinterest Pinterest og så jeg begyndte at bogføre og så, er dette, bare trafikken, på, sociale medier men. Du ved en dag 926 visninger og det er slags tilspidset fordi på dette specifikke websted, Jeg, har, ikke, oprettet, nye, pins, Jeg, vil, gerne, vise, dig hvad der sker hvis jeg får en e-mail, hver, uge fra, haleenden, og, dette er, bare du ved, 2.
September det siger Mig, hey 96 pins, blev sendt, dig havde tusind repin så jeg mener hvor, mange pins fik du I sidste uge fik jeg en tusind og jeg gjorde virkelig ikke, noget, fordi, alt, allerede, var, konfigureret, og, derefter, igen, 1015, dette var bare sidst, uge, fik jeg en e-mail. Så jeg vil virkelig snak hurtigt med, dig om medvind hvordan jeg gør det så dette er jeg logget ind rigtigt, nu-jeg har to forskellige konti en gang a det siger gratis prøveversion jeg betalte for opkaldet at dele en om passiv automatisering, som er min online forretningskonto tilknyttet Markedsføring Jeg er lige begyndt at få ben går, og så, havde, jeg, ikke meget data for at vise, dig men, hvad, jeg, laver, halen, og, nu, er, det hvis du ser, på planlagte stifter du rejser dybest set til Canada, hvis du ikke, er det, kendt, Pinterest, Jeg, Laver en anden article på det men, grundlæggende undskyld mig, kan du gå, til canva ro du kan, oprette, gratis ben klikker du bare på dette, Pinterest-grafik, er meget enkel de vil, bare indlæse lidt langsomt så der er alle disse forskellige skabeloner og du klikker dybest set på Et og derefter du kan, bytte det ud for alt hvad du vil have ret men kan lide at ændre, URL passiv, automatisering, rolig, og, så, kunne, jeg, siger ligesom, ti tip til nyt tilknyttet marketingfolk, okay, og så kunne du bare ændre, lad os gå for at indstille Mig til, okay, og slet, derefter det men ti tip til nye tilknyttede marketingfolk hvad du gør er bare ned, kan du udgive det til Pinterest eller bare download, det lige til dit skrivebord ved at trykke på download, hvad du gør eller der er et andet værktøj Taylor.
Og jeg kan gå Jeg gjorde det faktisk allerede hvis du klikker, på denne, lille, Chrome-udvidelse lige, her på det websted du er, på, lad, os gøre, det, okay, lad os gå, her vi, er på min hjemmeside hit denne Chrome-udvidelse hvad den gør, er det viser et plus Af alle billeder og dig kan vælge dem og, offentliggøre dem så jeg Vælg dette billede Eco-plan det vises op. I halen og appen og du kan, Vælg hvilket, bord du vil, placere det på, okay, dette er en affiliate marketing bog, kaldet eksperthemmeligheder, og god steder hvor, jeg, kunne, tilknytte marketing, føje til højre.
I køen den blev også tilføjet til en stamme så stammen er indenfor når det er en gruppe mennesker der har lignende indhold hvor du alle, kan skrive. I stamme og del derefter hinandens pins, hvilket er en god, idé også, smart lube, Jeg viser at din, smarte, sløjfe, er, anderledes, end så, bare talent, hvis du hvis du ville for at planlægge stillinger skal jeg, her hvis du ville, planlægge indlæg, Intel og hvad du gør, Er at du planlægger dem for et bestemt tidspunkt og send derefter et tid hvad smart loot, gør smart loop, gør rammer du lægger alle dine pins.
I et specifikt bord og du udpeger hvordan mange pins du vil have ud pr, dag og det planlægger dem regelmæssigt for evigt så jeg har dybest, set en to tre fire forskellige smart boards, som du kan se at der er hundrede og fyrre syv stifter der løber Til fire bræt der er seks hundrede samlede stillinger og kommende og dybest set er det en flugt læs Udgivelse ved evigt, okay, så jeg ikke en gang jeg har konfigureret det gør jeg ikke, rigtig, rør, ved, det, hvad, jeg, vil, gøre, er, tilføjelse, af, nye, friske, trykstifter, Til dette board ind I det smarte program: så vil du vide at du fortsat giver, nyt, indhold, til, mine, læsere, til, dem der er, søger nu er der en omkostning på [ Musik ] medvind er der også en omkostning for smart loop, hvis du går kig, her Efter en hale og plus det er som et hundrede dollars, Jeg tror for, smart loop, er, det, noget, lignende, rigtigt, okay, men, igen, hvad, jeg vil have jer til at tænke på som tænk på at have evnen til at have en pin der opretter en og peger På den offentliggør automatisk og derefter hvordan det sker på en tilbagevendende basis, og så opretter du bogstaveligt, talt indholdet en gang og det går bare derop for evigt og, altid, og, altid, vil jeg have dig til show show you my var et af mine, tællinger, kaldte andelen Og jeg har tre hundrede og halvfjerds tusinde månedligt seere og jeg må fortælle jer før jeg begyndte at gøre, tellen havde jeg, en par tusinde, og jeg, havde, faktisk på et tidspunkt op, til 1,3 millioner månedlige seere og ligesom jeg sagde at jeg, ikke, har, oprettet, friske, Pins for denne konto, som jeg gerne vil, tilføj, til min smarte, sløjfe og, så, meget nålene der deles eller måske ældre indhold og til, denne, blog specifikt, laver, jeg, historier der er venlige af tidssensitiv Jeg prøver at gøre, hver træder, på, mine, skrubber, og, sånt, men, det, Gør jeg ikke gør det hele tiden, alligevel, så det også du ved, alt hvad, det varierer med at have frisk indhold der også tilføjer til, din, lugtsløjfe hele tiden men, igen tre, hundrede, og, halvfjerds, tusind, seere, på, denne, Pinterest-konto, og, som de ser, disse stifter de er.
Igen alle disse pins, har, jeg, ikke, sendt, dem der okay de poster automatisk og de poster I to grupper de poster I to stammer og jeg er rører ikke rigtig ved det og igen hvis du se, på en fodertrafik jeg får, dig kender, tusind, tusind, mennesker, på Min websted pr år nu for dig når du bringe dem til dit websted ved du hvad skal du gøre, med dem selvfølgelig vil du have en føring fange side, på dit websted at fanger en e-mail, så de sytti, tusind mennesker, som, jeg, har, fået, ind, min side; Jeg har sandsynligvis fanget du ved at jeg, ville sige to til fem, tusind e-mails, fordi jeg har en e-mail-popup der vises tilbyder dem nogle du kender gratis information, så jeg want at gøre slags en virkelig hurtig og beskidt bare oversigt over 170 tusind visninger på deres hjemmeside.
Okay, du så at dette, er min konto, jeg er, ikke, udstationering, af, noget, af, dette, jeg, gjorde, på, én, tid, hvad, jeg, gør er at bruge et værktøj, kaldet, hale, slut, jeg, kan planlægge, alle, mine, alle, mine, indlæg, dette er, en som jeg, ikke, har, angivet, op, Endnu men undskyld mig opkald for at dele yeah Jeg, har 4.000 følgere jeg får følgere, hele, tiden, hver, uge, okay, og derefter, som Jeg, sagde da jeg begyndte at gøre dette ved du du kan tydeligvis se en forskel og alle, disse, fyre, det, kan jeg, ikke, fortælle, Jer hvor meget tid jeg har brugt på udstationering Pinscher-ting fordi det ikke er meget det er det virkelig ikke og, jeg, vil, gerne vise, dig en anden hurtig ting-et af værktøjerne Jeg bruger jeg bruger canva ret men et andet værktøj at handle stifter Jeg, vil, gerne, vise, Dig og en mange gange folk tror, du har brug for oprette disse detaljerede stifter der er smukt og, bare utroligt, og ja, det er, rart men, det, er, ikke, helt, nødvendigt, nu, giver, jeg, dig et eksempel, som, disse, stifter begyndte jeg at oprette, til min websted min Nye webside kaldet muligt automatisering og de er stort set alle de samme og de er meget enkle de er ikke som super som, utroligt men, alt jeg, gør er at jeg, ændrer, dette, billede, og, ændrer, teksten, og, derefter, BAM, så, hvis du kan, opret et system, med, Stifter der bare dig du ved det passer, slags dit brand de kan genkendes måske justerer jeg ting.
I fremtiden ændrer skrifttypen lidt gran det op lidt men, brug ikke 45 minutter på at lave en pin kan jeg lave disse I to minutter og jeg er færdig så fyre blev hurtig og beskidte hvis du vil have flere oplysninger om Pinterest, kan du, give en kommentar Til denne article reagerer jeg ikke på hver kommentar Jeg hjælper, dig der er en virkelig fantastisk selvfølgelig tog jeg, som jeg ikke kan find mere online Jeg tror ikke det er tilgængeligt men, Kimmy fra, lyserød hexagon havde en virkelig utroligt Pinterest-kursus og jeg, bare kan ikke finde Det mere Jeg søgte alle hele internettet men, hvad jeg, måske, gør, hvis, når du ud, til mig, og, har, mere spørgsmål, om hvordan man, får trollingpladser hvordan man, konfigurerer det, trin for trin, kan jeg, tage, alle, hende e-mails, og, videresende, dem, til, dig og, jeg, tror, det, Ville være en stor hjælp men, igen bedre, Kel-pass, af, automatiseringskommission, Abonner, venligst, på min kanal, forlad mig en kommentar fortæl mig hvor du er.
I din Pinterest rejse, okay hvor mange hver måned seere du får, gennem Pinterest hvordan meget trafik du får fra, det ville jeg, være interesseret. I at vide, og vi, vil fange, dig på den næste article; tak fyre
There’s four steps: I’m going to show you in this article how you can earn $ 100 a day simply by reposting articles. I set it folks, literally re posting articles, folks literally step one step two is download, then upload. Then you make money so download a article upload, a article, I’m going to be walking you through everything on my computer, so there’s no loose threads because with this method, like all my articles, when you make money, I make money and that’s why this is the number One money blog on YouTube, so without further ado, let’s get it hey.
John Chris Tony here, affiliate marketer won’t tell you too much about my story, but I love money and I love helping other people make money too, and I’m going to show you how you can make articles simply by reposting articles from other sites, downloading articles from YouTube And posting them on other sites using this method. Now the first step with this method – that’s very important, is you need to actually get articles to repost? Where are you going to get those articles? Well, how about this I’m going to actually give you permission to repost every one of my articles.
That’s right! Folks! I make tens and tens of thousands dollars a month just from the ads on this YouTube blog, I’m giving you full permission to repost any article from my blog. I have hundreds. I have articles that have been seen millions of times and I’m giving you permission to repost every single one anywhere you’d like, but I’ll show you the step by step ways to make money with them in this, because just reposting them is not as important as actually Making money with them, and I’m going to show you how you can earn money by using this method of downloading and uploading the articles anywhere in the world, I’m going to show you how you can do it paid all you need.
Is a bank account a PayPal account or an address for a chat to be physically mailed to so? Let’s go over to my computer, I’m going to show you I’m going to dive right into this method and show you exactly how this can be done. As I said, the first step was to get articles to post and you’re. On my blog, you just click my name or whatever you’ll go over to my blog page and you’ll, see, there’s lots of articles on my blog that you can repost hundreds and you can sort by the most popular and see their articles that have millions of views On them, you may be reading articles here on YouTube, but I don’t know if you knew, but there are other websites where people read articles on with hundreds of millions of users so check this out.
How many users does Daily Motion? Have 300 million there’s another site out there, that has 300 million users and there’s many other sites that have similar sorts of numbers? And you can take advantage of this because I don’t post my articles on YouTube and many other creators or people with article content. Don’t post their articles on other websites as well, so you can make money simply by reposting my articles or somebody else’s articles on another website and making money from the Adsense.
Now I don’t know the laws, I don’t know what people are fine with reposting articles. You can ask them or you could look up the laws, your country again, I don’t look up international law, you guys are from all over the place. Am I supposed to freaking study the laws from Morocco? Don’t ask me: okay, if you put in the comments, I will ban you from making any other comments for life. I just don’t to deal with stupid comments.
Okay, we’re just trying to make money here and you can pre post my articles. So it’s all cool! Sorry for the rant folks, I get a lot of comments from Unruh source phille, but the second step we’re interested is now that we have the articles that we can use is we need to download them. So how do you download a article? So let’s say you wanted to take this article: how would you download it well, what you do is you go to google and you would search download YouTube, mp4 and mp4 is a file type, that’s a article file.
So what you’re really asking Google is you’re saying: how do I download a YouTube article as a file that I can store in my computer and right here? You’ll see, there’s a bunch of results. There’s a bunch of sites that do this. No site is better than the other. As part of my knowledge, I just always have used the first result because in my mind, they’re all kind of the same and I’m just going to use.
This result right here which says keepvid and I am going to go back to my article right here, which has 2.5 million views and I’m going to simply the blink. You see right there and then I’m going to go to this site and then I’m going to copy and paste the link right then we’re going to click download now so we’ll right-click and then we’ll click, Save Link As and then see boom. So it says invitation to create and automate this, so we just click, Save boom, just download it so super fast.
I love it. Okay, so real easily. We just did number two. Okay. We found the articles. We downloaded the articles. Now, I’m going to show you five different places that you can actually upload your articles to. I’m also going to show you an additional just way to find dozens of other places you can upload a article to this is a great way to create multiple streams of income very easily, and I suggest you hop on this if you’re taking action right away, I’m Taking action because it makes no sense to not just go out there, just download and re-upload a ton of articles, so the site you want to sign up for is dailymotion comm, which I mentioned previously.
It has over three hundred million users. A lot of people read articles here and in order to sign up you just scroll all the way down to the bottom, and you would look at this area right down here. It says become a partner and you’d want to click that right there and just sign up, I’m not going to walk you through the signup process, because that’s boring and frankly, if you can’t figure out how to sign up for a website, you shouldn’t be trying to Work on the Internet, folks, okay, you should like you know, go work in a store like get off the internet and like get a job like you know, this isn’t, for you can figure out how to sign up next one is Metacafe.
This is a really old site, metacafe right there. So this is a quick search and they get over a hundred and twenty million visitors every month and 27 million users, and if you can’t make some sales to a hundred and twenty million people, you know, I don’t know what you’re doing I’m actually going to show You a really cool way of how you can earn some really nice passive income, getting people in the door for just one dollar a book I wrote you can use my articles to sell a book.
I already wrote and or ninety percent of the money I’ll show you exactly how this whole thing works in just a second here, but you’ll be earning recurring commissions I’ll just just throw that out there throw that out there recurring commissions I’ll, show you it in just A second here, let’s go into the other mess, so metacafe great way: lots of viral articles. All that stuff. You see, thousands of people are reading these articles right now.
Okay, another great site is break. Calm is another really old site. Break.Com. You see right there to sign up for that side. I won’t walk you through the process, but basically click that upper right corner and it says, sign up right there and you would upload some articles straight. A blog upload some articles and just keep going just keep uploading articles. Each of these platforms has different algorithms that rule it.
The judge which articles show up here versus which articles don’t show up so you’ll, want to get to know some of these platforms to figure out how to get your articles up as much. But frankly, if you’re, just reposting articles that have never been seen before. In these platforms, like mine, you’ll, have a pretty good shot of success. Here’s another site called 9gag, it’s another kind of like viral article Mimi type website.
So you can just upload articles here, sign up right here and to get started. And last but not least, is you can you can even reload my articles to YouTube now the thing about YouTube is because I was the first person to upload my own article to YouTube. I ended up making the Adsense revenue, but you end up making the affiliate Commission’s, which is what we’re going to talk about next. So the most important way of monetizing is actually not making money from the ads.
So, making money from ads is chump change, whereas making money from affiliate commissions is big money. I’m going to show you how you can make money by putting affiliate links underneath or within each of these articles, so you can earn recurring revenue specifically what I’ll be showing. You is how you can sell my book. This is a digital workbook for one dollar. I sell it for $ 1 sells any country in the world, and this book is great book.
It goes over different ways. You can make money online called work at home secrets, but what’s great about it is there is a free trial. There’s a 30 day free trial for everybody who just spends a dollar buy this book. They also get a free trial, then, after that it’s 40 dollars a month if they enjoy the training they’re getting from me and from me and my friends about how to start a work at home career, they pay $ 40 a month and as an affiliate, you Get 90 percent of that pretty cool right, so you are earning $ 36 a month.
You get somebody to spend one dollar, you earn $ 36 a month every single month. So here’s how it works is what you do. You are going to want to go. There’s going to be a link in the description, but you’re going to want to go to digi store 24 you’re going to want to click register now right. There digi store is an affiliate network based in Germany but they’re all over the world and they payout affiliates over a quarter billion dollars a year.
They work with any country in the world and they will pay you one of three way: they’ll pay you via PayPal. So you need to have a PayPal account or they’ll pay you via a bank wire, which means you’d have to have a bank account to get paid me. A bank, wife or they’ll pay you via cheque, which means you need an address and what you need to do is you need to register right here. Some fields are optional, some fields aren’t and when you log into your account, you will be able to see how much money you earn and what have you where you want to go to get your affiliate link for my product as you actually want to go to The market place right here where it says marketplace right there and you’ll click the marketplace, and then you will go down to where it says: internet marketing and ebusiness.
On the left hand, side in this category you’ll see the number one product there’s only five products here. Right now, but the number one product is work at home secrets and internet jet-set is the continuity program. You get 90 percent commission right here and if you want to see how it works, you just copy right here, your affiliate link, so you would copy your affiliate link, looks something like that, but what I like to do is I like to shorten the link.
I like to use a link shortener such as bitly to shorten the link and what you do with bitly. Is you just copy your link in here? Then you prettify it now. Let me show you what it actually looks like when somebody clicks on the link. So what it looks like when somebody clicks on the link is, it says, start working from home today and it says without any experienced tech skills, a product or an audience, and we have a american celebrity as currently as one of the endorsers of the book.
There’s a long page which explains what you get, but what’s most important, is you start for a dollar and, what’s even better, is you’ll see there is a $ 39 95 cent monthly recurring program here that starts after 30 days, which means you earn 90 % of All of this you earn 90 % of the dollar. You earn 90 % of this. Now. Imagine if you just got two people every single day to spend one dollar. You got two people every single day to spend one dollar.
How much recurring revenue would you have? Let’s do the math so two people a day times 30 days. This is $ 2. Hopefully you’re good enough to get two people to spend $ 1 right, easy type and easy. If you think you can get two people a day to spend one dollar type in easy in the comments, so that means you’re getting 60 customers. So the recurring revenue is 90 percent of $ 40. We’re going to times that by 90 percent times 40.
That’s thirty-six dollars, so you have 60 customers times $ 36 a month right. That’s your recurring revenue, but basically that will leave you with two thousand one hundred and sixty dollars a monthly, recurring revenue. If you can get two people to spend one dollar every day, you will be getting roughly $ 2,200 you’ll be getting over $ 2,000 a month in recurring revenue and you’ll be selling a book that genuinely helps people.
Now you might be asking. Why am I doing this well I’ve thousands of subscribers here? If I make 10 percent of the efforts of thousands of people, I end up ahead, no matter what and either way I’m looking to change the world. There’s a revolution going on right now, folks, as people working at home companies don’t want to hire people in offices anymore, people are moving out of the cities. We got to help lead the revolution and I want to be at the forefront of things.
So, in order to monetize all you need to do, is you need to post your link below the article and say it? The book or just say, learn more get the book and you just post that below the article that you post up and you can start earning money because whenever you post up a article of me, people are already reading me. They’ll be very willing to spend $ 1 in order to learn more ways to make more money.
For instance, on page number 34, I share with foe a little over a dozen websites of where they can earn as much as $ 50. An hour working online people are willing to spend a dollar to learn that. Furthermore, there are workbook questions in each chapter, just like a school textbook, learn and really ingrain the knowledge in their head. This is built like a school textbook. It’s built to help people retain knowledge, because working at home is a whole new thing not on in school.
Now. Here are a bunch of other websites that you can actually post on. You can post on Facebook. You can post articles on LinkedIn. You can post articles on mixer, twitch, periscope, Lutz D live zing. We major league gaming ste. I don’t even know all these sites. Vaughn live et cetera. You can post on all these sites, but the point being is you have the articles? You have the way to make money, you have the knowledge and the ability to download and upload these articles, and the math is all worked out for you.
You just need to get two people a day, spend a dollar right and you need to post these articles up as many places as possible to see where you can get viewers where you can clicks. Do this folks there’s a lot of articles on my blog. I would start with the articles that are getting the most views, because those are the most popular. Those are the ones that resonate the most with the widest audience vary up.
The text vary up. The titles do what you need to do, but get the articles out there post them up, find ways to get traffic and find ways to get people to click on your affiliate links, because you do this, you will create recurring income to allow you to live a Life that is very different from everybody else, and it’s amazing. I talked about in other articles how much money I make a month, but it’s over a hundred thousand dollars a month insane.
I never thought I’d be in the position. I am in this life, but it’s fantastic. It’s really cool, but I don’t wear fancy things. You can live life whatever way you want so go. Do it if you’re going to take action, type, an I’m, an action taker in the comments below okay, like this article subscribe, if you want more because I got these methods coming all day, long hit the notification bell, I’m looking to make more millionaires this year than Ever before so check it out, let’s get this started check out my other articles, but use this one.
I look forward to helping you all out have a good day.
Calm, and in this article I’m going to show you an email, marketing hack that will allow you to literally write emails in under one minute. Stay frickin tuned show you guys an email marketing hat that was taught to me by a seven-figure digital marketer, and this hack is specifically for a few people right, whether you’re brand new to email marking, and you don’t know how to write emails or number two.
If, let’s just say, you are short on time or you have an extremely busy day, there’s going to save you hours of time or in minutes of your time to where you can go ahead and get an email send out to your list. Because consistency is everything right, it’s called emails, whites now. What is it an email swipe? I want to go and read a quote to you guys right, Pablo Picasso steal quotes. So basically, one of the most famous quotes ever is by Pablo Picasso he’s one of the most famous authors, one of the most fav painters ever and his famous quote – is good artists.
Copy great artists, steal right now, guys take it for what it is. Some people might like, oh my god, that’s not original, and then people who value their time, effort and energy – and I know successful digital marketers to do this all the freaking time right. What they do is. I have a Rolodex of email list that I’m currently on of people in my space. Now, what I mean by that is I’m going to make money online space.
So what I do I often to the list of people who are on to make money online. This now there’s a couple of things right number one: is you want to make sure that you’re opting into people’s lists who are actually getting results within their business and number two if they are getting results within their business? That means, then, you know what they’re doing within their email marketing right. So what I’m going to do is save so much time right is create a message in my a weber.
Account know if you always have to be already pre scheduled and the way that I do my email marketing is, I had to value and then I do one pitch right now. Let’s just say, I’m pressed for time today, I’m like holy crap. I don’t have time to write a freaking email, but what I can do is go to my my gmail account and I simply have a couple of how do you say a couple of emails that have been sent to me that are starred right.
What I’m going to do is simply open one of them up right, so it says read today if you’re still unsuccessfully chasing and that’s not my style right. So I’ve already read this right. So what I’m going to do is I’m going to go to swipe the email copy now what that means I’m going to go in and simply swipe the headline and put it in my word so boom read today if you’re still unsuccessfully chasing the laptop lifestyle, so Guys remember, I did not write this email right.
So what does lots of lifestyle mean to you for me? It is when I wake up sliding semester blues go downstairs and fire up my. So I want to change this up a little bit right. So I’m going to model this to my actual life. So for me it’s when I wake up slide into my slipper slippers go downstairs and fire up my laptop Wow. Let me see so instead of the Ness Nespresso machine, I don’t know I don’t drink coffee.
Why? What’s one thing that I do in the morning Wow my right after I’ve completed my morning rituals boom and then I checked my earnings reports and nod my head as the numbers appear on my screen saying I made five hundred twenty five hundred dollars since last night, Which I do have those type of days, so I’m going to go and keep that do. I have to work for her for these twenty five. So I’m going to say instead of B’s, I’m going to say this one, a five hundred nope are the clients.
Are their clients? I need to talk to you nope, unless I want to. Is there no idea what that is, but I’ll keep it so, instead of ego or obviously you don’t want to have the wrong person, so I want to say okay Eric, but this is a dream right I mean this stuff is out of a fairy tale. Nine out of ten times or excuse me nine out of ten times it’s a fairy tale, so we’re going to actually fix the grammar fairy tale, but there’s one exception, believe it or not.
I happened to know a guy who is figured out to make completely passive income. You make seven figures. Works 10 hours per week, takes four vacations a year and four vacations here. So I’m going to actually optimize this for my affiliate marketing VSL right. So, whatever you’re promoting right 48 vacations a year and live a life of complete time and location freedom, would you liked him to rebuild a secret, so what I want to do is you guys want to make sure that you unlink hold on or actually insert hyperlink We’re going to remove link, so I definitely not want to be sending them so his offer in this free training or going to do his links for my per link remove link.
So what I like to do is I, like the bold free training, so there’s two call to actions within this email guys remember. I did not write this email, and this literally has taken me like three minutes instead of and sincerely so I have my specific call to action. Your friend and mentor Eric Ellis jr. PS. Would you like him to boom and then I, like the bold, my call to action? It’s alright! So that’s simple guys! Now, let’s go ahead and swipe this damn you know so guys.
Look. I did not write this email. Here’s the email, marketing hat guys that all the six and seven-figure digital entrepreneurs do not want you to know, and they are too proud and bold to teach you this or tell you that they’re even doing this, but they’re all frickin doing it. And how do I know this because I learned this from somebody who is a seven-figure digital entrepreneur, so that being said, instead of reinventing the will right, do it works so boom? I have an email created now.
What I’m going to do is I’m somebody going to go to my links and I didn’t write this email just I just edited it now. It’s taking me a little bit longer because I’m actually explaining what’s happening, but literally. This would take me two minutes of my time, which would usually take twenty to thirty minutes of my time, and I already have an email so and then what I’m going to do with what he didn’t do is with my pitch emails, I like to always have A call to action in the beginning, so I’m just going to link laptop lifestyle to my article sales letter now guys what this is good for is, if you don’t not add right, email marketing copy, you can opt into people’s lists who are in yours space.
What you can do is you can go ahead and start leveraging their emails and commenting it to yourself or your a lifestyle, and then, as you continue to do, this you’re going to continue to read, continue continue to read the model at yourself to where this is. How I actually learn how to do email, marketing right, because I kept on reading other people’s emails, who were successful within my space, so doesn’t matter what your niche is guys right, so modeling successful people within my space and then once I got comfortable then I started.
Writing my own emails and from time to time for the most part, I usually write all my emails, but from time to time I actually when I’m freaking pressed for time, but I need to make sure I need to get my list emailed. What I do is, I simply swipe emails and, as stated before, Pablo Picasso said it best good artists copy, great artists. Still there was no shame in my damn game at the end of the day, it’s just like funnel hackers.
If you know russell brunson clickfunnels, it’s called funnel hacking. It’s called modeling. Yes, i’m modeled what he did and yeah. It’s called swiping its email market, you’re swiping people’s copy modeling it for yourself it’s going to teach you how to do email marketing and then once you learn, you can do it yourself and then, if you’re, a good email marketer most likely people are going to swipe Your content, so with that being said guys, that’s an email, marketing hack, that’s you guys can apply to your business.
They teach you guys about email marketing. She trying to write email copy and the best way is opting into the list and getting on email list of successful email, marketers or digital marketers or late marketers, and then once you get on their list from time to time, there’s going to start being some really Good emails and then what you want to do is just create a rolodex of all these freakin emails and just have them to the side and your little honeypot to where, if you ever need them, you just pull it up, really quick and instead of taking 30 Minutes to an hour like at first when I first started email marketing literally takes you 3 freakin minutes.
So if you guys enjoy that make sure to go ahead and smash that subscribe button to join the family and give me a thumbs up too show your boy. Some love now I do have a free gift for you, there’s an e-book. You can go to the link in the description or you can go to a Philly’s playbook calm that will literally show you how to actually use email marketing to follow up and create a passive income online with something called affiliate marketing right.
That’s what I do to actually generate a full-time and come on, live and number two. If you’re in digital marketing, internet marketing, online marketing right, you can either go to Eric Ellis jr., comm or a down below in the description. There is a ridiculous amount of tools and resources that I actually use to crush it in my online business. So with that being said, my friend make sure to subscribe, one more frequent song.
So that way, you can go ahead and get access to my daily uploads and hit that notification bill, because if you don’t hit it here, they’re not subscribe right now with that being said, I appreciate you guys for tuning in Eric Ellis jr., as always checking out
Today’s article is going to be a screencast article, so what I’m going to be doing today is sharing with you guys the progress of my niche website. I am one month and one day in like actually committed like full and committed into this site. I started this site, probably a couple almost three months ago, but when I very first started, I’d barely did anything or I was doing things, but it wasn’t the right things that were guaranteeing me some kind of results.
So this article with this screencast and I’m going to be sharing with you my results that I’m getting mostly on google analytics and I’ll, be showing you all the traffic so first off before we get into like how I managed to start growing and stuff and what Tactics are being doing. I want to just share with you guys my results for this week, so this is from the 7th of June to the 13th of June just this week.
We should really do that to that, because then that’s like a full week didn’t really make that much of a difference, something because today it’s like you know it’s only midday today. So but anyway, you guys get the point so a week in so this week. I have 79 users to the website, which is pretty cool, and 75 of them are new users. Most of my traffic is coming from the US overall, it’s us, Australia and then the UK will get into like the complete month.
Since I’ve been doing this, like actual trying to you, know, get some some success with this site, I’ll show you guys that and 150 page views for the month quite a high bounce rate, which is something that I’m working on anyway. I want to show you guys the total month, because what happened was I wasn’t getting like the best success and then I took a course by income school called project 24. If you guys want to check it out, I’m an affiliate.
So my affiliate links in the description of this article, but I’m probably going to be doing a like thorough, in-depth review of the course. Once I get a few more months under my belt, I’m starting to see some income results, because at the moment I haven’t made any money from this site, I’m just getting traffic there. First reason why they call it a project 24. Is it because it takes 24 months to make a legit income generating niche website, so it isn’t a get-rich-quick thing.
It’s definitely something that takes a bit of time so anyway, let me share with you guys the complete month of data that we have here. So I took the course on the 13th of mani. It’s now the 14th of June. So let’s just go to the 13th of June and, as you guys will see, I want to kind of share like a week before or so just so. You can see like where it was before. I took the course so, as you guys can see like this is probably this data here is me just trying to work it out on my own, and then I’ve got a big spike around the time.
I took the course around this date here so took the course from this date and instantly. I just got like results. Some traffic results, which is really cool in the course like in a nutshell, pretty much just teaches you to post certain amounts and certain types of blog posts, and it gives you like a 60 set process. You do this step. That step. That’s happen by the end of it. You’ll probably have a very successful site, so it’s really cool.
I am thirty steps in some halfway through this course, and I really you know I did a lot of work early on and then the last two weeks I’ve got halfway through the course in two weeks and in the last two weeks of this month. I didn’t really do much at all so then working on other things, okay, so I’m back! So if I can go back to the very beginning of when I took the course and you’ll guys see that I’d hit almost exactly a thousand page views for the very first month.
Well, I guess it’s the third month of the site, but it’s the first full month of taking the course, while working on the site and yeah, it’s really cool to see the results. It’s getting me, it’s giving me a lot of motivation. Also this site – you guys, probably know about it if you know like what I’m up to like in terms of bicycle touring and stuff, it’s our bicycle touring site called cycle travel overload now this is before I shared with you guys as my audience, who also do Read a lot of my bike, touring, content and stuff.
Like I imagine like this, is before me, I’m telling you guys about this website, so I’d! Imagine by the time. I tell you guys about it. It’s going to get a lot more traffic with you guys coming over to check out all the content that I’ll put on there, but this is before I’ve really kind of soul. I guess I did do a little bit. I told you guys a little bit on my Instagram, but it didn’t really get that many people coming over so yeah.
The results aren’t really that skewed in terms of like my existing audience coming over, but I’ve been building up. This YouTube blog for a while. Now so I’m just going to be taking advantage of like the audience that I have on here and considering. This is something that interested in I’ll be definitely sharing this site with you guys when I get the chance – and I can’t wait to see these pageviews grow even further and as you guys can see, the average pay, the average bounce rate is a bit lower.
I think a really good ones – around 50 % or 40 % – is what something you want to look for. The lower the better I’m an average time is about 3 minutes 15 seconds and 307 users, 301 of them, and new users, which is pretty cool and then yeah. So, as you guys can see there, you go look at that. So the u.S. Is the majority of the peeps, but yeah guys. I thought it’d be interesting, just to show like the stats on my site, just to see where it’s going and all that yeah.
But once again, this site has made zero dollars so far, but yeah get I’m just going to give it a good amount of time, and I think I should be doing pretty well. I have another 30 more steps to go on the course so I’ll be working on that. Hopefully, my goal is to try and get the rest of the course done. The 60 steps I mean done by the end of next month, because I’m heading off on a box tour around the 17th, so I have just over a month.
Oh it’s going to be tough, because I got a lot of things that I’m juggling at the moment. Through, like Instagram management, and just you know the usual eBay, Amazon, stuff and just the heap of other stuff, it’s going to be tough, because the content that I’m working on now is more like in-depth stuff yeah. I think that’s not the best goal to set, because, to be honest, I wrote 10 really shorter posts like this shorter post of all the three different types of posts that they teach in the project 24 course and 3 of the next level, like posts that you’re Supposed to write, and then that means I have seven of those middle sized posts and then 10 really long posts to write so yeah.
I’m not really sure I’m going to be able to do that, but I’m going to have to try, because you know I had 17 17 posts to write but they’re quite lengthy posts, but you know head down. I reckon that’s possible so yeah, that’s probably my goal for the next monthly update check, because what I’m going to be doing is just sharing with you guys a monthly progress. It kind of like a case study of this site and you guys can just see like how it’s growing and stuff.
I think that’s really cool. So let me just quickly show you my website, if you’re not familiar with it already just so, you guys can get an understanding. I wasn’t really sure if I wanted to share it. If this article somehow got heaps of views and get just people coming over just to look at the site, rather than being interested in actually checking it out, but essentially yeah, this is what my sites like at the moment, yeah.
So, just being writing content, that’s pretty much. What they preach is just content. Content content, like you guys, is like yeah, also a few other things that I want to mention here. I have published 28 posts, so 13 of them are project 24, like really high standard posts that proven to rank really well on Google and generate you really good results, so 13 of them and then and then 15. On my own place that I did before I went got got into the course and and started the course, which is something I just wanted to note there also with the site.
I have done my own YouTube blog for the website, so they haven’t suggested this in the course yet, but I think they’ll be getting to that later on in the steps. I think they focus more on that stuff, but just because I’ve been doing YouTube for a while, I kind of understand the power behind it and, for example, like I what I want to share with you guys. I want to share a post so, for example, with some of the posts I want to do this for all the posts, I’m creating YouTube articles for the posts.
So, as you see you scroll down on this one, I have a article here about how it’s changed. My life, or whatever the topic of the article, is about and then underneath have text which I think works really well. This is on this YouTube blog, but I have a separate YouTube blog for it. Also. One more thing I wanted to mention was: one of my articles seems to be ranking pretty well now. I don’t know about this niche, sometimes about this niche like it’s, it’s a bit difficult to try and find really popular search terms, but I just got to learn a bit more about the search term analysis, which is what they teach you in the course.
It’s got to go back over that and learn a bit more about that, but, for example, butterfly bars. I did like a review on butterfly bars or just me talking about butterfly bus if mine is like right up there in the results. But what I might do is I’ll log out of Google just to see what happens so now, I’m completely signed out of Google and if I type in look at that see how cool is that you type in butterfly bars review and my result is second from The top, which is this post right here cycle, drove a lot overload, it’s really cool and is like.
It really feels really cool. When you get something that ranks on Google especially fairly early – and this is the one I do the article for as well – which is pretty cool – so I pretty much just talk about like everything that I’ve written in this post, which is really cool and then yeah. Just cover about it and then I’ve got affiliate links here for the product, but once again I haven’t made any sales on Amazon Associates at all with this site.
So far I can show you my account if you guys want to check it out, but there’s like zero sales, so you guys go to associates as you can see, I’m getting clicks and stuff, but I just make I’m not making any sales so like I get Like three clicks days like what’s that six clicks, this is 15 17 clicks 15, but it’s like not converting at all, so it’s still very early days. Yes, I hope this article was informative.
I hope to share with you guys some more results and stuff in future articles, but it’s kind of just like an introductory sort of article just to introduce the idea of how this site’s going and stuff so yeah. Thank you guys for reading make sure to give me a thumbs up comments down below and make sure you subscribe to the blog to stay up to date with the progress and the future results of this site.
I’m going to be dispelling some myths that I’ve heard about starting a business. I’m also going to be showing you five business models that are the most effective business models to start. If you have zero capital start, if you’re just like nothing, you can do it with these five business models, let’s get into it.
So in this lesson, I’m going to be showing you how to start a business with no money. First off: what’s the definition of a business, I’m just going to do it real quick, it’s a person’s regular occupation, profession or trade, and this is important for what we’re going to go over next, which is I’d like to dispel some myths about starting business. Maybe you think that the word business is to corporate II sounding for you that you can’t start a business.
How many of you think that you need an LLC or some sort of corporation or some sort of legal entity to start a business false? You do not need actual like a corporation or an LLC to start a business all over the world. You can start a business without any of that stuff. You don’t need an actual entity. Another myth I’ve heard is that you need to you know a lot of my subscribers are based overseas and you think you need to be in the United States to have a business myth.
You don’t need any of that stuff people are affiliate, marketers! That’s what I do for a living all over the world, any country in the world. You don’t need an LLC. All you need is an address for checks to be sent to another myth. I’ve heard is that you need to be 18 to start a business myth. You can be any age and you can start a business. You can earn money going to have it sent to you, neh neh, another myth.
I’ve heard about starting business is inventory. You need inventory right, you need a product to sell. You need some physical thing that costs physical money to sell to start a business myth. Another thing I’ve heard is that you need experience to start a business. You need to have been working for years in an industry before you can go off on your own and do your own thing again myth about it, and the last thing is that you need connections to start a business once again.
That is a total myth and I started a business without any of these things. As you see now, I’d love to hear in the comments below how many of you believed one of these myths just say. I did or something like that if you believed one of the myths and name out the myth that you believe, if you want to play along, you need to be 18, you needed a business license or something like that name it in the comments.
No five business models that you can start without any business license without any money whatsoever. Okay, first one is consulting Kay zero dollars to start what you’re doing is you’re selling your expertise, you’re selling your knowledge or money. Many of you, if you’ve been following my blog for the last year or two, you have much greater experience in marketing and understanding, marketing and understanding how to get traffic than most other people in the world.
That knowledge is worth money. You can gain knowledge for free anywhere on the internet. Everything you want to know is available somewhere for free. If you just have enough time to learn – and you can sell that for money to individuals who want to learn about how to be an affiliate marketer or how to do marketing or how to market their local business, whatever that is, you could consult with them and Make some money another business that costs zero dollars to start is social media as being an influencer one of my income streams as being an influencer or on YouTube.
I make over $ 20,000 per month just by putting up articles and that’s by sharing knowledge. That’s by posting, you can put up articles on YouTube as well as long as you have a camera phone or any sort of camera. If you have a friend that has a smartphone, you are reading this on some sort of computer device. So you could record the screen. You could do whatever you want. You can do social media, you can post images on Instagram, you can post articles on Facebook or YouTube.
You can post on a lot of places and earn money on tik-tok, etc. You can post and earn money just by being an influencer just by sharing funny things or by sharing knowledge great way to make money zero dollars to start another business. You can start for zero dollars is an ad agency. So it’s not very difficult. I show a ton of free traffic methods. In this blog, you can check out my playlist 3 traffic methods.
If you want to learn more about ways to get traffic, you can actually do the marketing for local businesses or for other businesses and help them do architects. Small businesses, local businesses, are being murdered by Jeff Amazon he’s just going to gnam down another business. You can start for literally zero dollars is drop. Shipping you have to set up a website, usually people do it on Shopify store, Shopify costs, zero dollars to start and people ship another person’s product to a customer in the US.
Now this is oftentimes done with Alibaba, most famous drop shipping website. The only downside of drop shipping is that it takes a couple weeks for the product to arrive, but the great thing about drop shipping is you don’t have to carry inventory. Okay, unlike Amazon Amazon, requires you to carry inventory in your store in order to sell it. You don’t have to spend any money on inventory to start selling products, you can sell products and, just you know, pay the supplier when you get money in and the last business, which is what I do and I earn about half a million dollars a month.
Doing this is affiliate marketing. This is how I earn my first million this. I earned my first ten million this hour. I know from my first: twenty million dollars is doing affiliate marketing, which is marketing other people’s products and earning a commission when that product was sold. What’s great about that is with affiliate marketing, you don’t even need a site. Okay, you don’t even need a website.
All you need to be able to do is get traffic post links and get people clicking on them. You don’t even need your own social media. You can post on other people’s social media, there’s a lot of advantages of affiliate marketing that make it, I believe, the easiest business to start possible and, if you’re looking at how to get started, affiliate marketing. I have another article that you can click on to get started with affiliate marketing.
Now, let me know in the comments below what business model you’re most excited about is a consulting social media, ad agency drop shipping or affiliate marketing, and if you’re doing one of these, let me know what you’re doing. Okay, because I’d love to hear sort of what businesses you’re doing or you’ve tried out in the comments below also make sure you subscribe to this blog. If you love marketing – and you want to learn more about how to do marketing – and you like making money, it’s a great place for you to hang out our release articles every single day, I will continue to be doing so for the rest of the year.
So make sure to tune in like subscribe comment and also check out our communities. We have a discord, chat community. We have a Facebook group and we also have a reddit subreddit, so you can interact with other members. Make deals, learn. Ask questions. I get to quadrillion messages a day, so don’t ask me and I get most common ones or John. Can you give me money and John? Will you be my mentor and I’m like dude, I’m going to spend my free time with my kids right so like no offense to everybody reading them, but I’m not going to like fly to India and like, like you know, help give you a confidence boost.
I post everything up on this blog if you really want to learn from other people, make sure to join one of the groups and, if you’re looking to take your life to the next level check out, my six-week marketing course called the super affiliate system. We have a bunch of testimonials. We have a bunch of success stories of people who have gone through my program and made a lot of money even become millionaires.
So we have at least five people who have become millionaires from going through super affiliate system, and many more have made a lot more money check out. Some of these stories make sure you subscribe and talk to you soon. So it’s been about three months since I got your program. It took me about a week to learn. Read all your articles read through the 20 pages in your guide or more and took my time, and here I am two and a half months later and I already made about 20 thousand dollars in affiliate commissions.
You can pretty much apply your program to any affiliate program, any product, any niche that you ever imagined. You will never ever go hungry again once you know how to apply, but basically what I’m lacking right now is time. I can set up a new hours campaign for any product that I can imagine. I can start making money online tomorrow or today. So I can definitely recommend and vouch for your program to anybody either beginner intermediate or advanced get that program today and start double triple.
Ten fold: your income, okay, bye, hey guys, it’s me Rishi, I just sometimes I mean, of course it was like being pulled out of the matrix. To be honest with you, just all the information that you need to tactically go out there and to just kill it. Just valuable valuable information things that we normally would trip over on getting information at conferences, all that’s good, but it doesn’t really come together unless you’re in a mastermind and getting that systematical information.
One of the key things in the course was just getting together with a group of people to see how we would actually build out an affiliate marketing business like right there on the spot building on the system, so it was just an immersion experience. I really think that uh everybody should have the opportunity to have. It was definitely worth every single minute.
Essentially, it allows you to look up any website and pretty much just analyzed like their data, so I’m a type in pinterest.Com. Wait for that to load! Let me take these out of here. Okay, so, as you can see, Pinterest comm, you know it’s been around since 2008 has a lot of employees, it’s ranked number eight number 22 and the US, and globally it’s ranked 27.
It monthly visits. You know it’s almost. I was that one billion like it gets a lot of traffic. So it’s it’s something. That’S really really slept on and, as you can tell like, it’s it’s really popping in the US and again it’s just it’s a platform. That’S slept on and not a lot of people are, you know taking advantage of it, so I just wanted to bring this article to you guys to you know, maybe just job some.
You know, ideas and whatever and essentially just show you guys like how I’m using it. So as you can see, the average visit duration is five minutes. People are spending five minutes on this website, so it’s it retains a lot of people. So this is again me just kind of I guess explaining like how you can use Pinterest with Amazon. So, as you can see from similar web, amazon.Com is one of the top referring sites to Pinterest.
So what does that mean people kind of like how we did with the Instagram strategy? People are grabbing products from Amazon Associates and remember we go to, and I know I may be going kind of fast so like I’ll try to like work on this, but this is essentially just me trying to explain in the best way possible. I’M not really a teacher, that’s why we’re doing it like this, because I still want to like share this information, so I do apologize.
If you know I’m going too fast or it’s like, I don’t make a lot of sense. We’Re going to get through it together. Okay, so anyway, Amazon Associates is right. Here you go to product, linking product links and again any of these products. You know I’ll, you know we’ll go over. You know some of the niches that you know you want to be in again, like the beauty NEX. Just like one of the top paint payouts cuz again, it pays 6 %, but yeah.
So anyway, you can come here, get your products and essentially like what similarweb was like showing us is that this is what people are doing so seven percent of their top referring sites. Seven percent of their traffic is coming from amazon.Com. That’S essentially again, people picking our products and posting it on to Pinterest. Also tumblr is another the referral website and eBay. So you can kind of see like what’s going on here when we look at their like display advertising, even though we really don’t care for this, because we’re not like necessarily doing drop shipping or anything.
But it’s still kind of you know bring some ideas just to again explain ad networks. Think of these is, like you know, platforms that run ads just to kind of keep it as simple as possible. You know for you guys, like Facebook, as is isn’t ad network because they serve at so it’s Spotify. So it’s snapchat, you know all these. All these different platforms are essentially like ad networks, or at least that’s where, like you know, they’re a form of an ad network, so, like Google Display Network we’ll get into that and like in a later article, but like Google has you know its own, like ad Network because it serves tabula is another website.
Essentially they take like your blogs or, like any articles that you have written or like any like. You know article or written content. They will take that and they will place it on websites such as, like you know, Business Insider, seeing in NBC News, or you know, just a just a couple of different sites that they’ll you know post. You know your content and people, then you know circle back to your site and that’s how you drive traffic.
So this is, you know how it works. I know a lot of people when this is what was really frustrating for me for a long time is just you know, trying to figure out how to drive traffic to you know my brands, you know: how does this work? How do you get traffic because doing the foot chase, especially if you’re an artist – and you know trying to be you know in the city that just you know you can only take that so far, so the the power is definitely in the internet.
Also, you know just for people that are looking for financial freedom, because I I really anticipate a lot of people being on this blog. You know just regular people, just you know, seeking that financial freedom, you get it through the internet, and so in my studies and just you know what we’ve been studying and building this agency. This is how it works. So you want to be. You want to get real familiar with ad networks and there’s a ton of it.
So pop ads is, I haven’t really looked into them, but they’re, pretty big skin links is pretty big for, like I guess more so, like e-commerce stuff ShareASale is ecommerce. Google Display is just general: it’s you, you can kind of look at Google Display as like your retargeting and will explain like retargeting what that and all that is, but I just really wanted to keep it simple today and just kind of explain why we’re using Pinterest And again we’re using Pinterest because 43 % of Americans are on it there’s you know people are staying on the on the site for a long time.
Five minutes they’re visiting a lot of pages. While you know they’re there on the site – and you know it’s – it’s getting – you know 800 million visits per month, so this is this number represents per month. Okay, so that’s a lot of traffic that we can take advantage of and over here we see that there are. You know, people that are already taking advantage of this and it’s at 7 percent and it’s gone up by 300.
You know so I don’t know if that’s like I’m a month. They’Re probably probably is on that, but you know seven percent. You know that’s kind of high, they didn’t honestly it’s kind of not, and that gives us a lot of space to play in here. So just going to walk you through this again, so you can kind of see what’s going on, I’m on my personal on my main brands page. So so I’m going to just show how this works: real, quick, we’re going to make a pin.
So first we’re going to find our product so analyst a so we’re like a so it’s it’s two parts. We have the agency because we’ve had to create that essentially, because we have to advertise me, I strongly believe as the founder of the company and owning every thing and because I’m personally an artist myself and we just got ta own everything. As far as like the advertisement, just every just just how we move it’s just how I was raised – and you know how I continue to live my life, so we need to own everything.
So a male agency is essentially the advertising side of our company and then a know itself is a brand, a production house. We plan on making films, shorts, documentaries and essentially creating a no into being its own standalone app. In the same, in the same vein as like Netflix and essentially at being a blog promoting quality, you know introspective spiritual content primarily for you know black people, black people, you know the descendants of slaves in America.
So that’s what Anna was maybe before, and then we also will be making music, because obviously we need to own our music as well. So that is what I know is you know just so everybody can understand it’s one of my brands. It is the main brand. Is the outward facing brand? All my other brands will never be seen, and that should be for obvious reasons or it should be. You know yeah like when y’all start getting this down and y’all understand like how easy it is, so they make a brand and make money and have you know the type of female financial freedom that you’re looking for like you’re, going to you’re, definitely going to understand Why you wouldn’t want you know your brands just being down so anyway we’re going to start up here, so I’m going to go ahead and do CDs and vinyl to let you guys know why music actually has a pretty good payout.
So, as you can see, digital music get 5 % digital articles, 5 % physical music, 5 %. Well, I mean obviously it’s all the same thing so yeah, so we’re going to do music and we’re going to essentially post music on our Pinterest feed here ignore all this. I haven’t really updated it. This is not. You know this matters anyway. It’S us, but it’s not us. Okay, so we’re going to go back here, we’re going to go to product linking products and we’re going to filter by digital music.
There we go so we’re actually not going to do CDs. Okay! So, let’s see if we can find somebody that familiar, I definitely recognize the labels, but I do not recognize here. We go our girl, Rizzo and now she just had a I guess: people are getting on it or we could be blinding lights. I haven’t heard any of these gone but 129, but you’re getting 6 % of that. So anyway, we’re just going to show the purpose of it and I’m going to show you like how to scale it cuz.
It is really low, but I’m going to show you like how you can get this going and essentially just really kill it on Pinterest cuz. Again they get wait. Where are we? Let me get this me. You know visits friend up, so let’s move this along. So we’re going to grab Rizzo we’re going to get the link yep. It’S going to take us to this page, so we’re going to download the image now the last time that we did this in the other article, the image wasn’t that clear when we went ahead and posted it on Instagram, so we’re going to see if we’re going To have that same problem, if you do imma show you how to essentially go find this photo again.
Y’All should be a lot more organized, so much easier. Okay, so once you get the image again you’re going to go to text only, that’s really all that you need, if you’re just trying to grab that loop on this one. You can just do this short link. You don’t need the standard link, because that’s we needed that for the spreader app, because there was there’s essentially extra information that this link provides force brother to do its thing.
So you don’t need that. For this, you just need the short link, so just copy that and then you’re going to come over here back to Pinterest and we’re going to press this button up at the top click it create. Pin they’ll see this. We don’t need a tour all right, I’m so you’re going to paste that link right here. Just like that easy for the description. What I like to do, actually, let’s go ahead and put that that photo in here there’s on your desktop grabbing, her photo by being better boom.
Okay, so now we’re going to add the title: what was the title of this this good as hell explicit? So I guess this must be like a single cool, so we’re going to put that right up here, good as tell explicit: don’t okay! So now we’re going back here and I’m going to go! Click on it because we’re going to grab the description cuz we’re not trying to do like a lot of work right, so I would say, like it’s really up to you to me, I mean I’m going to go ahead and put all this information on the in The description for this bio – I mean for this for this description right here.
We’Re just going to put this in here. Let me see what do you wan na? Do I don’t? I guess I don’t really care about the release date. Maybe I don’t think we care about that, maybe just the label, the copyright. When you take these off, I don’t know you know I mean you can get creative here. People don’t really look at this. I don’t know what I would necessarily do here. You really don’t have to put anything, let’s see if we can find something a little better than that, maybe to type in this town.
Maybe we can do just a lyric that’ll be easy. There we go. I do my hair, I do my hair toss. I do my hair toss check my nails baby, how you feeling feeling good as hell there we go. We can do just that. It’S maybe when somebody sees this pin it’ll like jog the memory of the song and maybe they’ll want to go and purchase it. So go there, you go and I’m going to put this into my hip hop board because it has a lot of traffic.
That’S that’s my main traffic source and we’ll get into that as well like how you want to structure your Pinterest boards. But again, this is really just a strategy on showing how to make money with Amazon affiliate marketing and not necessarily how to structure your Pinterest in order to drive in traffic, because there is a way that you want to set up your Pinterest to start generating the Audience that you want so that’ll probably be the second article that we make all right, the third okay, so we’re going to publish this.
We got our link in there and, as you can see now we can go look at the pin, and this is where I got ta be fresh. I guess I just expected it to 18. T’S Internet is horrible, you guys they have so many bothers with them. Like I have to do a blog scan like every 20 minutes, just to keep the internet all right anyway, as you can see, this is what it is when people click on it, you’ll come across this pin in the hip-hop section, I’ll click on it and they’ll Go straight to Amazon and from there they can purchase.
Now what I forgot to do right here, they can buy the song for 129 and you’ll get it. What is it, I think? 6 % or thirds? Oh sorry – was 5 %, so you get 5 %. For that, let’s see if the Tigers in there, the song – yes, it is now again remember if you have multiple sites, I mean sorry, multiple, affiliate tags and whatnot make sure that you put the right tag on your link. Cuz on this, I actually put the wrong tag, so I’m going to just go back here and fix that it’s real simple.
So here I just really understand like okay, so click on the proper one there you go and then I’m going to go to text only to copy the link. Again short, the link copy it and I’ll show you how to edit that so you edit the pin just by pressing on this little pencil button like that and you can switch out your link. So now it’s been saved, you can click on it again about a boom. Bada bang there’s the proper tag.
So that’s how you fix it. If you have you know multiple ones, and you know you want to keep it organized and whatnot cool all right. So we’re going to exit out of that now I want to show you like how to scale it, because again it is like a dollar twenty nine! So, like that’s not like a lot of money right so and this kind of gets into you know what my agency does, what we do for like our clients, what you’re going to want to do if you’re going to want to scale it you’re going to have To use like automation, tools, Pinterest is very friendly to automation, so vultaire is a virtual.
They have a lot of different products, but what we use them for is a server. The server essentially allows you to like access like a Windows PC, because I actually have like a night, so you can hop onto a ball. Tear grab yourself a server. You know from Microsoft, because it’s software that I’m about to show which is jarv. It’S a automation. Software that you can use to scale and automate your this Pinscher strategy that work that we’re going into here so I’ll leave the link.
Obviously, in the description for Voltaire and again essentially, they just have like they have a lot of different products, but what we use them for as a server again. That can essentially just run these processes on their servers. So I don’t have to run it like online. That it can just run forever ongoing in the cloud or on the server. So I’m going to go ahead and sign in to my server to access Jarvie it’s going on.
There actually need to turn it down and not a processor, so this is jarv. Essentially, what you’re going to want to do is you’re going to want to add your Pinterest account. You can add a profile by going up here profile, your ID, your Pinterest you’ll, put your Pinterest information on here. So you can. Do you know your brand? Don’T need to do anything here, proxy settings, we’re going to that in another article.
You don’t really need proxy settings for Pinterest again, because Pinterest is there okay, with automation for right now that may change, because they’re trying to you know incorporating more advertising on to their platform, but as of right now, they’re they’re, they’re cool. So you put in your username and you put in your password and then you go ahead and verify your account once you do that you’ll go to this tools, tab right here and you’ll be able to access.
So the biggest thing here is the repainting. So this is what I want to talk about, so we just put Liz owes her single in hip-hop. So I’m going to do this again, just to show y’all. So we went to tools, we selected our Pinterest account and then we’re clicking on repin it clicked on repin, and then it pulls up our boards. It may take a minute once you add the account for all your boards to pop up, but once you do it’ll it’ll pop up here, so we added everything to hip-hop, so we’re going to click on hip-hop and right here.
I want to show you guys what we’ve done here so on Pinterest again they are cool with automation or right now. Advertising platforms and stuff right now are changing every day because you know it’s just it’s like a new frontier, so you really got to stay on top of it, but for right now, they’re really for automation. So you can set this board as we have to repin times per day between a certain time period.
I recommend doing 90 again because Pinterest gives you a lot of leeway, and this is essentially what can sue perverse engagement on your Pinterest, because, if you’re retaining all day, essentially, you are actively engaged all day on Pinterest and you’re, providing new content, or you know, and We’Ll get into that with the sources you’re just reap any new stuff within your board all day long. So you’re engaging you know all these people, you know at least you know the percentage of these people all day long so you’re active and that’s what we want and that’s why we love automation, because we can’t do that all day long.
We have things to do so anyway, so 90 times per day and we’re going to scroll down here. If you randomize the publishing timers per day, I recommend doing that so you’re. Not so it’s not you know retaining at the same time again, just to you know give it some sort of you know human player. You can enable the signature at the bottom, but that’s not really what we you know care about right now, allow double repin to repin to the multiple you know multiple times on the board.
You’Ll want this checked for what we’re going to do here and leave everything else. Blank and essentially just keep all of these checked if you want it running and consistently. So what we’re going to do here? We’Re going to select custom URL, because what we want. We can provide a list of plans, actually we’re going to do this, because we’re going to add a lot of these so that link that we just created with Liz.
Oh and her single we’re going to go back and we’re going to find that king, that’s all you do is just go back to the board or actually it’s right here. If it’s one of our pin that we made we’re going to click on it, and it’s going to pull up this pin so we’re going to want to copy this entire URL, I’m going to copy it, I’m going to come back to Jarvey we’re going to put A in it yeah, I forget, there’s only one thing that I don’t like about Voltaire and their server.
I can’t copy between my computer, so pinterest.Com enters.Com, /, /, 7. 6. 3. Seven, six, three, three: six: zero, two: zero: five, five, seven, five, four: five awesome! Okay! So respect others I can see – and so you’re going to add this pain just like that. Okay, so they want the HTTP, so we got ta. Add that slash slash boom, okay. So what this has essentially done is I we’ve added this pin right here.
Didn’T tell her single that we have the affiliate link for that pays out a dollar twenty nine and we’ve added this to Jarvie to the repin from providing. This depends because we’re going to keep doing this process right, so this pin is now sitting right here. We have told it you know, and I’ve also set it to do some other things you know, for you know the purpose of you know my boy, but essentially it will out of these ninety three pins per day, one of them several of them will be this Pin right here for lism wizzo will be reap end around.
You know ninety or however many times a day, so that is the power of automation and this tool Jarvey will make other tutorials about Jarvie and just how you can beautifies Jarvey within safe. You know safety methods so that your accounts are getting blocked or like or whatever and we’ll talk about. You know implementing proxies, and you know what different proxies you know we recommend for being able to.
You know, execute some of these strategies. So if you see the value in this article go ahead and give it a thumbs up, go ahead and like that and subscribe and most importantly share this article with someone, you know, needs this information, someone that’s working to beat their job. We, you know, looking to leave in mind to fire someone or an artist, that’s with him to get out there music, because this is a perfect way.
You know for artists to you know, take advantage of. You know their music. This is what we’re going to be doing. This is what we do for our clients, and this is a strategy that you can implement so go ahead and share this article with whoever you feel like needs it and again be blessed and like the article, please please please, please, please that helps us, so so So so so so much alright be blessed.
You
You have to sell this product on your Amazon affiliate storefront!
Spunks is an excellent food snack. Your buyer will be back for more. I mean, the product has five stars! Check out this superb pumpkin seed product. The video below gives you a look into the guys behind this great product.
Apparently it was just a myth. I heard your nod to talk about how much money YouTube paid you. I readed a lot of other youtubers articles that now have revealed the amount of money and they seem to have no ill consequences from it.
Well, other than me people being shocked about how much money they make. You may not be shocked, or maybe you will about the amount of money I make. I don’t it’s it’s not as much as I’d like it’s not as much as some of the other big YouTube stars, but it will show that there is a plan to making money on YouTube now. First, if you could take one second and click the like buttons, I’m posting this in YouTube, and this is going to be on Facebook, so wherever that like button, is on either one of those platforms.
Oh, that does help our algorithms driven life to let other people know they may be interested in learning about this as well. So we’re going to get to the revenue in just a second. Don’T worry, snot clickbait, I’m going to show you all the screenshots here of how much I directly make from YouTube and talk about that. But I also want to say there’s two different ways. We make money. I was a couple different ways, but we’re going to show the revenue from YouTube show the revenue from Amazon affiliate.
Those are the two big ones that are like recurring revenue, but we do get a lot of inbound leads from this. So that’s part of our sales process, how we do another article on that of how we get inbound leads, but essentially it’s we give everything away. We dump articles out there that are deep, in-depth tutorials that people go hey. This is cool. Here’S a good tutorial on this, but they still read the tutorial and end up hiring us, which a lot of people seems to think is a counterintuitive thing that if you told someone how to do it, they still wouldn’t hire you to do it.
That’S completely not true by having all these articles over 800 them on my youtube blog, many of them being tutorials and showcasing. You know exactly how to do something, we’re talking about a project and the methodologies that we need to do it. That brings us a lot of inbound leads, that is still the majority and as bigger than any of the revenue numbers here like I said, I probably do a separate article on that and it’s it’s like the projects and the bookings and my whole flow for that Is going to be it’s kind of in-depth and goes beyond the scope of this all right now, the reveal we’re going to press this little button and switch right over to the screen.
So, for the last 28 days I have made 25 to $ 568 in estimated ad revenue. It’S always estimated. Now. The first thing is: there’s no clear answer to how much I make per article and the reason. Why is because the article ad rates change dramatically with where the article is viewed and the type of article it is? So if the article is deemed monetizable by YouTube, as in friendly for advertisers? That is what drives YouTube.
Is someone has to pay for all the bandwidth it takes to have people viewing my articles so if they deem it worthy and content non-controversial? This is always the big debate with YouTube of they’re censoring things know they need to pay the bills and they’re going to be driven by their advertisers and what the advertisers want or don’t want their ads showing up on so the ad buy rate will vary greatly.
It turns out, if you do, articles talking about Finance, the ad buy rate is high. I think toy articles. Okay, there’s always varies and it comes down to who’s advertising. I know we see different rates go up and down based on each individual article. We do, and course that’s going to drive what the advertisers are buying at the moment, so not really easy to tell you exactly how much per article but cumulatively right now I am making this every 30 days about twenty five hundred dollars from YouTube.
Now, let’s look at what I did for all of 2018, so we go over here 2018 and I made fifteen thousand in total. But if you added twelve times 25, isn’t that a different number yeah, it is and let’s break that down at the number of articles. I had towards the end of 18. This is cumulatively what occurred in revenue and by the way, the monthly number that you see is 25 hundred right now, but it was only about a thousand for this month last year.
The difference is more articles and it’s cumulative as long as the articles are still relevant and people are still viewing them and people are getting value from them and reading them. Those articles continue to make money. The articles that people just don’t read anymore, because they’re older a news article from two years ago, when there’s no interest in it, those fall off and quit making revenue because they no longer have any views.
So it’s always a cumulative of articles that are kind of rolling forward as long as they’re relevant of still making money and because there’s more articles overall in the platform that I’ve uploaded and especially this year, quite a few of them now this year. So far in 2019, I’ve made sixteen thousand three $ 56.00. So that’s a cumulative of what’s going on right now and if I look at a monthly snapshot come December in November of either year that Patil’s, the particular months are where the majority of the money spikes up, because the ad buy rates are higher because it’s shopping Season now moving over to Amazon, this is the other primary source of income earner here, and this is my last year how much we received an Amazon.
Now these are affiliate links, I’m not doing dropship, I’m not doing anything thing being special you’re just clicking an affiliate link below we have them labeled as such, on our YouTube blog and what happens is if I review a product whatever that might be. I say: hey, here’s a you, know, handy dandy, tool and you’d like to buy it. We all have an affiliate link and we get a very small percentage and I see very small.
You can see the rates here shipped revenue of four hundred. Eighty six thousand eight hundred twenty three dollars. That means there was that much ordered through my Amazon affiliate link. So half you know the. What is that? Half a million dollars yeah about five hundred thousand dollars on lesson revenue and my earnings off of $ 500,000 in revenue was 19 thousand dollars, but it required me to do nothing but show the link I did not have to ship it package.
It deal with returns or anything Amazon’s taking care of the whole process. There’S a lot more money made. Of course, if you do direct sales, there’s better merchants, etc, etc. We’Re focusing on this that way, yeah! I can just do the article with our goal being an inbound lead that, or just you know, sharing information or the inbound lead that comes in it has brings revenue to our company through following up with that and processing, either a consulting job or some type of Contract work, we get that’s still the bigger goal, because that pays so much more, but this is kind of that steady revenue that comes across.
I just want to be very public about it when you help, but I say help the blog by clicking the link below. I mean help the blog by clicking link below it’s as much as I like. The inbound leads for all that they it’s kind of this big mix of you’re, trying to optimize everything, and I think people should be honest. I mean I, it takes a lot of time to make over 800 articles process. Um learn the skills put it together in a lot of the articles.
I know I’m not going to get a ton of revenue because I like sharing some of the business stuff and I don’t have anything to really offer other than just wanting to see the community better, but those things helped me produce those articles. You clicking those links. You putting all its, I mean it doesn’t cost you anything to click these links here, not paying a higher rate from Amazon. I’M just amazon’s being told that you bought something referred by me.
So I get this that’s really simple. Now this is what I did and so far this year. No I’m sorry! This is this is last year 2018 and this year is a little bit more as a blogs gotten bigger. So my revenues thus far as of August 21st, 2019 are 13,000. So last year we made in total 19,000. So far in August, we’ve already hit 13,000 and I just like to be very public about how my business works, how we do the articles and where all this money comes from so to speak, when someone else’ll, is it? You actually make money with YouTube, yeah, it’s accumulation of things, and I think it’s a very fair trade for me to put together of all this stuff, I mean I would like to make more, and some people make a whole lot more, especially some of the financial Articles Wow, some of those people make a lot just based on the ad revenue from the articles, or you know, or some of the affiliate stuff or if you have a cool product YouTube, is a really interesting platform for this.
I encourage a lot of people get involved in it, but I did want to be very clear when people said. Oh, you just want us to read your articles to make money. Well, there’s some of that yeah. I, like people, reading my articles that like when they enjoy them, it’s a labor of love, but it’s also a way to make money and enjoy what I do as a creator. I love to produce all this and put the time and put the content on air and for those of you that may have seen my shirt says.
Working with strippers all day make sure crimp hands strong. We sell silly shirts on teespring, that’s a another revenue generator. We sometimes get links for companies that give us like affiliate links, like text apply, direct and things like that. None of that is added up near to what amazon has sometimes the t-shirt revenue and by the way I use teespring, because they’re integrated right into YouTube.
So I’m not actually processing orders in shirts. That would be very difficult, but that means I make the lowest amount of money. So I’m only making I’ve had good months throughout may, like a few hundred dollars from shirt sales come but they’re being shipped to people automated ordering. I just see the orders come through and it’s a few dollars a shirt literally just like he’s like dollars. Couple dollars of shirts not much it’s, not the revenue um, but they’re niceties to help out people get a cool shirt.
We you paid for the time it took us to you, know, draw whatever design or think up whatever silliness that we want to put on there. It’S all these little cumulative revenue, things and I’d probably have to put a spreadsheet together to try and summarize all those and we’re always working on new pitches. The texts apply. Direct one is the most recent one where we get a small couple percent and you get 10 % off discount by using our affiliate codes and we have VPN sales and those don’t add up too much either.
If that’s a quantity thing to enough, people have to sign for account to make just a couple dollars, and we have a whole affiliates page that you can see in works that we’re very honest about any of the things we do because I like to operate. My business with transparency I like to operate my youtube blog and social media creation stuff with transparency as of right. Now, I’m going to upload this to Facebook, which means I’m not going to get any paid at all, because Facebook’s system is not ready.
Yet for such things that they have some beta pilots who are trying to pay creators, I don’t think any of it works well. Matter-Of-Fact Facebook may insert an ad and by the way I don’t get any money for Facebook inserted ads as of right now, yeah. I don’t know if they’re ever going to catch up with the way YouTube. Does it but YouTube’s the preferred platform? Because of that, but that’s it. I just wanted to let people know for those you go who own or how much he makes that’s.
How much I make this was the screenshots directly from you know. I I don’t think I need to go as far as to prove that I didn’t doctor these screens in some way, but you know I’m not just not going to bother doing that and for those you think I make 10 times as much. I don’t that’s exactly how much I make from these articles and, if you’re interested in talking about the process, keep an eye on my YouTube.
Blog we’ve dive into a lot of different topics, but we’ll be covering a whole inbound, lead process. We get from YouTube and how we put that together, using you can book me and Google sheets for inbound leads to process them. It’S not anything that secret. I just haven’t taken the time to put it together yet, but it’s absolutely those are the the entirety list of tools I use to manage inbound leads and booked them into oh and stripe to actually take the payments.
So that’s yeah, there’s my other secret. There are no secrets and if you want to get started in any of this, I have some articles like how we built the studio. I have articles on some of my workflow follow along on my blog there’s, a lot of stuff that just I give it all away man, I’m not shy about telling anyone. I’Ve had several people stop by Miss Judy would check it out because they want to know how we do it.
It’S I’m an open book. If you want to know any of this stuff – and it doesn’t cost as much as you think, to do some of the tutorial stuff, a microphone and a camera are not that expensive. Maybe I’ll do some budget stuff. I have a high budget, one where, like this entire studio, but I probably do a low budget one as well to kind of break down like your basic to get started in this. It’S a it’s not that difficult everything.
The challenge is all in the ideas and a little bit of skill and editing got ta have the idea. First, ideas are easy. Ideas are cheap, everyone’s got them, but then you can execute those ideas. That’S where the real have a story, execute the ideas. Put a plan together: that’s really the hard part buying this gear and all that that that’s actually the pretty easy part. It’S not super expensive I’ll leave links all this.
If it’s on YouTube and on Facebook, I’ll try to others, leave a link back to the YouTube blog Thanks thanks for reading, if you like this article, give it a thumbs up. If you want to subscribe to this blog, to see more content, hit that subscribe button. Annabelle like on, and maybe YouTube will sense you and notice when we post, if you want to hire us for a project that you’ve seen or discussed in this article head over to Lauren systems, comm, where we offer both business IT services and consulting services and are Excited to help you with whatever project you want to throw at us also, if you want to carry on the discussion further ahead over to forums out Lauren systems, comm, where we can keep the conversation going and if you want to help the blog out in other Ways we offer affiliate links below which offer discounts for you and a small cut for us that does help fund this blog and once again, thanks again for reading this article and see you next time,
You have to sell this product on your Amazon affiliate storefront!
Spunks is an excellent food snack. Your buyer will be back for more. I mean, the product has five stars! Check out this superb pumpkin seed product. The video below gives you a look into the guys behind this great product.
Today, in this article, we’ll see how to make an Amazon affiliate website now, this website is a money-making machine people on thousands of dollars per month with this kind of website. Now, for those of you who don’t know what an affiliate marketing is it’s a very simple concept, let me explain you this, so what we’ll be doing is we’ll be creating an e-commerce website.
You can see on your screen. This is the website that we’ll be creating in this article. Now, if you see over here when you scroll down, you have some products over here: okay, some different products. We have some bags shirts, let’s open a product and let’s see what we have over here now, if you see over here, we have this bag. You can see these beautiful images. All this title subtitle usually dispatched within 24 hours.
We have this short description. The price, the long description as you can see over here, so what is happening or your is – is this: this product is not even our own product, okay, with neither I manufacture nor I supply these products. What I have done is, I have installed, or I have simply imported this product from Amazon, and you don’t have to do anything manually. Everything is done automatically.
You just take on one simple button and thousands of products. If you want obviously thousands of products, if you want only single product, you can import any product from Amazon with one single thing and it will import everything. Images, price description, short description, variations and everything completely don’t have to do anything at all. But if you want to do some changes, obviously you can do.
For example, if you want to change the name of the product you can do so you can change the price description, images and so on. Okay, so this is what happens now when someone comes to our website, they purchase this back. What happens is they will do check out on Amazon and when they do this checkout and amazon amazon will give you or 10 % or 12 %, whatever the commission rate is commission on this product, okay source? For a, for example, a person has purchased dollars product from our website.
Now what happens is Amazon if the Commission rate is 10 percent? Amazon will give you ten dollars for that. You don’t have to do anything. The order will be placed on Amazon. The the order will be supplied by Amazon. You don’t have to do anything. Ok, everything will be done by Amazon. You simply import products on your website and the person comes to your website. They make a purchase. The order goes to Amazon Amazon dispatches the product to the customer, so you don’t have to do anything.
So this is a very good business model. To start with, you can earn really a good amount of money from this kind of website now. I hope it is clear what Amazon affiliate website is now, let’s see the demo upsells that will be creating in this article, ok guys, so this is the website that we’ll be creating in this article and for the design of the website. I have taken inspiration from the top ecommerce websites, like Amazon, flip card, Aliexpress, etc, and most of the time what I have tried over here is, I have tried to keep the cost as minimum as possible.
Instead of using a 60 $ 70 premium theme, I have used a free theme. I have used free plugins. Most of the plugins are free, a free page builder. Most of the things that you will see over here are free, but it’s in spite of using the free things we have not compromised with the design of the website. Design is top-notch. We have the best quality, your design, that you will see. Okay, so we have used mother most of the thing as free resources.
Ok, now there is a plug-in that we have used, which is a premium plug-in which is ozone. I will show you how you can get that and how you can integrate it with your website. Ok, so let’s see the demo set that we’ll be creating, so this is the website which you see on your screen at the top. We have this header and here at the header, at the left hand side we have a beautiful logo. You can replace this little place it and put in your own logo.
Then we have the nav bar the navigation bar over here and I will show you how you can create this mega menu. So this is a great thing. You are using a free theme, but you can create mega menus and everything that you want. Then we also have this button. Okay, so you can convert anything into a button. You know you’re at the at the header. Then we have the cart icon. When you hover the cart icon, you will see what product do you have in your cart? You can view your cart.
You can do the checkout and so on. You can search for products over here. Then we have the first section which you see. This is a hero section, the top section. We have some title subtitle some sale going on and we have a call to action button. So suppose there is some sale going on. You can redirect this button to some category some specific product or specific, a specific page. If you want, then we have a beautiful image in the background, then, after that we have this text or this section free shipping for orders over $ 100.
Obviously you can change the text. You can change the message according to your needs, then we have the categories that we sell on our website News, design trends. We have jackets bags, then sunglasses and shirts. Obviously you can put in your own categories. Your own images over here now I have used a very beautiful animation, as you can see when I hover this category, the image shifts towards the right and the title comes at the top.
So this is a very beautiful design. Then we have this section. Okay, again, a very beautiful section: we have submits messages showing up over here with some beautiful. I can send colors the first one is free shipping, so we have free shipping, then guarantee service 100 % money-back guarantee. Then we have product offers. So you can change the icon, you can change the message. Everything is very easy.
Making any change in this article is very in this website is very, very easy. It’S all simple, visual thing. Okay, you don’t have to do any coding anything at all. It’S all simple! Visual thing and, as I have said you earlier importing products, is also very easy from Amazon. You simply have to click on one single button and everything will be done automatically. Okay, so no worries. Okay, then we have our recently added products.
So here we’ll see how a single product looks like after this homepage. Now, when you scroll down, we have our brands. You can have your brand’s that you want that you sell on your website or whatever you want, okay, so basically that would be a better thing to showcase all the brands that you sell on your web. Then we have. The post post are also very useful in affiliate websites, so we will see a little bit about post as well then, at the bottom we have the footer, which is divided into four different sections.
We have the contact information recent post. Obviously you can add recent products. Anything over here in the footer I have added these things. Then we have some few quick links. Then we have some social icons now at the bottom. Footer I’d think you cannot see this, but at the bottom footer we have the copyright text. Now, when you click on this button, it will redirect you to the top of the page.
Ok, now, let’s see how single product looks like, so this is how your single product would look like. We have the title over here in the breadcrumbs. Ok, you can see under products, we have some category. Then we have this product. Ok, then this is the product page. There are many different designs that you can choose for product page, for example. This is using the left sidebar. If you want, you can simply remove this sidebar and you will have your product page full with ok, so you can do that as well.
Now the left-hand side you’ll see if we have few options like followers product categories and at present this one is selected because this product comes under handbags. Then, after that we have the top-rated products. As you can see, these are the top-rated products, then, at the right hand, side we have the actual product or when you hover this product it gets zoomed in, but because this image is quite small.
We cannot see this effect, but when you, but when you normally, however, a product you can see the image gets zoomed in then we have the title over here: the price there is some sale going on. That’S why the original price is tracked out, as you can see, $ 27.99 is striped out and we have this sale price now here it says as of July 10, 2008 een and this time. Obviously, if you want you can in fact I would recommend to remove this text.
I’Ll show you, in the tutorial later on in this tutorial, how you can remove this tag text from you. Okay, then we have this short description which you see over here. It says usually dispatched within 24 hours. Then, if you want you can, then we have the ACTU car category add to wishlist. Then we have the categories that this belongs to. Then we can all. So it’s all up to you. This thing is optional.
If you want, you can showcase this. If you want to sell in specific countries, this is good okay, so this product is available in India, as you can see the flag warrior. She shows that then, after that we have this this tab. So here description and all these things, this is the long description and everything is imported directly from Amazon. You don’t have to type a single or text over here then we have the frequently bought together products.
This is also imported from Amazon, so the person can select this or they can simply and take this, and they can add all this products to cart and they can do a checkout okay. So it’s all up to them. Then we have Amazon customer review. You can showcase the reviews of Amazon on your website. This is totally optional. If you want, you can simply remove this tab, then we have some additional information, for example, brand name color.
You can have some reviews over here and then at the bottom. We have the related products at present. It is showing only one product. This can show up to four or five products. I think it okay, so this is how your product page looks like single product page now, let’s see how this shop page looks like okay guys. So this is how our shop is looks like very much similar. We have the title the subtitle over here then the breadcrumbs at the left hand side.
We have almost this same sidebar. We just have this one extra thing, which is filled up by price okay. So this is the sidebar filter by price followers, product categories, top rated products and so on then here I they left a right-hand side. We have all the products that are shown. Okay, you can see when you hover this, the image changes. Okay. So this is all these things and you have many options.
If you want, you can remove the Add to Cart button over here. You can simply display the the image or you can simply display the price you can, you know, do a lot of customization option now now, if I say something, obviously you will not understand what I am saying. What do I mean by removing this button or adding some extra text or so on when we get into the tutorial when start creating this website, you will understand everything into much detail.
Okay, so this is your shop page. Let’S see what we have next, then, after that we have the wishlist page. As you can see, we have three different products in our wish list. You can add to cut one product is out of stock, so you can see the stock status. Then two products are in stock. We can add to cart, we can do checkout and so on. We can also apply coupons. If you want, so we will see how to create coupons.
Okay, then, after that we have the my account page. The user will have this. My account page, they can see their dashboard, they can see their orders now. No order has been made yet, but if there is some order, they can see the order they can track the order. If there is some downloadable products, they can see those over here they can change the address and all those things from your billing address shipping address now no address has been set up yet because we haven’t done anything with this website, yet they can see the wishlist They can change their account, details, their phone numbers cell number or name and all those things then.
After this we have the cart page. This is our cart page. As you can see, we have one product in the cart. Okay, so I think you can see the product over here. You can update the cart, you can simply click on proceed to checkout and it will redirect you to Amazon to Theor to do the checkout thing. Okay. So this is basically the demo website and I hope everything is clear. What is Amazon affiliate website yeah if it is still not clear, don’t where you can simply continue reading this tutorial, and you will understand everything slowly and gradually and your you know: knowledge on affiliate marketing using Amazon will be much clearer.
Okay, so I hope you guys enjoy the demo website. I hope you liked it. I hope you liked the concept and you, if you guys, are really excited to make this kind of website then stay tuned. Oh yes! So, let’s start creating this website. If you have not yet subscribed to my blog, then make sure you do so give a thumbs up to this article. If you think this is cool, if you enjoy free stuff, then make sure you give a thumbs up to this article.
If you think this is helpful, then you can share this article with your friends on Facebook, Twitter, wherever you want and if you have any doubt any queries, any suggestions for in throughout the article whenever you have any doubt wherever you get stuck, you can simply leave In the comment section below that, what you’re, what you’re, what is the problem that you’re facing and so on? Okay I’ll, try my best to get to you and solve your problem.
Okay, now to create this website, in fact, to create any kind of website. We need two basic things: a domain name and a hosting account. A domain name is basically the web address, or the URL or name of your website. For example, google.Com is a domain name youtube.Com facebook.Com. All these things are different domain names. The address of your website. Okay, so you will have to purchase an address for your website.
If you already have one, that’s good, if you don’t have, I will show you how you can get it for free with the hosting okay and then the next thing that we need is hosting and hosting. Is these two things are compulsory domain name and hosting? Without these two II just cannot proceed further. Now you know what is a domain name is a web address. The second thing is hosting hosting is a place or a thing where, in all your website, data is saved.
For example, if you see these images all these different pages, all these products, every data that you see on your website is saved somewhere, ok saved it saved in a computer or in a harddrive that is running 24/7, so that whenever someone comes to your website, they Can see your website live? Ok whenever you go to Facebook, you see live Facebook okay. Now because it is running 24/7. Whatever time you go day-night you will see the website.
You see all the data you’ll see everything. Ok, so that is basically what a hosting is everything all your website. Data is saved and at that place now, if you have a domain, but you don’t have an hosting that what happens is when someone goes to your website. They’Ll see a blank page because you don’t have hosting no there’s no data on your website. Ok, so both these things are compulsory. Now I will show you how you can get both this thing, because there are many different options that you can get.
There are many different companies that provide hosting and domain, but I’ll show you what is the best plan for you? What is the best company for you? According to your needs for e-commerce services, specifically, the website that we are creating these kind of website require different kind of hosting north irregular hosting. Okay, so I’ll show you what is the best hosting at the minimum price that you can get? Okay, so what you can do you can open a new tab and type in blog, TOCOM, slash PMD.
Now you don’t even have to type in this thing, there will be a link given in the article description below you can simply click on that link and you will be redirected to this page now. This is the cloud hosting page. If you see over here, it says cloud hosting, let’s scroll down, if you see that three different plans over here start our cloud business cloud enterprise cloud now this is a cloud hosting not a shared hosting most of the most of the times.
Whenever someone he redirects you to some hosting plan well, you’ll, see mostly it is the shared hosting now for e-commerce website shared hosting is not recommended. You should have a cloud hosting, but if you want you can go for web hosting share hosting. If you want share hosting you, can open this web hosting link in a new tab and you’ll get those shared hosting options. Okay, if you see there’s some price difference over here, the share hosting starts as at 295 dollars per month and cloud hosting starts at 595 dollars per month, okay, and so because there is a lot of difference between all these things.
If you want, if you, if you have a very small budget, you can start with shared hosting starter plan or business plan, whatever you like, or if you, if you are very willing to do some investment to earn some real money, then you can go with starter Cloud, ok, the cloud options, so it’s all up to you. You can start with any option you want. If your budget is very small, you have almost no money, you can go with web hosting the shadow sting or if you are ready to do some investment in this new business, you can go with cloud hosting okay, so you have both the options.
Now I am using the cloud hosting package, so that’s why, in this article I will show you how we can go with this process cloud hosting process? Okay, so, as I said you earlier, we have three different plans. So your starter cloud business cloud and enterprise cloud now, let’s see what other different features that this hosting company provides, and why do I recommend this because there are many different companies that I can recommend you.
Why only this, because this is this – has something special. Let’S see what is that thing? Special okay, so, first, if you see the first two features are very crucial: it says 6c pr6 core CPU and 6 GB of ddr4 Ram. Now, a few moments ago, as I told you that a costing is a place, our computer or a hard drive which is running 24/7, it has all your web website. Data is stored, so the computer, which these guys are using, is a really strong and robust computer.
It is using a six core CPU and six GB of ddr4 Ram, so that is really great, really fast and super awesome computer. Then we have unlimited bandwidth, which means that you can transfer an limited amount of data from your website. You can upload unlimited amount of data. You can download unlimited amount of data from your website, then the most important feature if you over here is SSD space. Now there are two kind of hosting SSD and HDD.
Now SSD is very more faster than the regular HDD planck’s. If you want to see the difference, you can go to Google type in SSD versus HDD web hosting. You will see all these different articles. You can read them. You’Ll understand about these different things in much detail or what you can do. You can go to images like what I do normally and you can open. The first result that you see over here now, as you can see, that three different criteria was your speed, IOPS and latency.
This orange part is HDD. This green bar is SST in the first one is speed at the bottom. It says higher is better. Now you can see, SSD is very more higher than the regular HDD. Then the second one is IOPS again, it says higher is better and you can see. The difference is around 100 times. Okay, so in IOPS, SSD is 100 times better than the regular HD D. Then the latency again it says lower, is better and you can see the difference is hundred times.
So you know you get the idea. Ssd is way more faster, better in terms of performance, then the regular HDD. Now not only that you get SSD, you have unlimited SSD space, so that is another amazing feature now. Another feature is unlimited website hosted, which means that you can host unlimited amount of website in one single hosting plan, so you don’t have to purchase a new hosting plan every time you create a new website.
Ok, so suppose, today we are creating this website tomorrow. You might need to create some other website, maybe another website for your business or a blog or something so you don’t have to purchase hosting again. You can host all the websites unlimited number of websites in one single hosting plan, which is really cool. Now you also get a free domain. Remember this support is really good. As you can see, we have the live chat option over here.
You can call them, you can email them. The support is really really good. Then we get a free, cPanel, ng INX web server. Then we have SSL. In fact, we have wild card SSL. First of all, let’s see what an SSL is now, if you see the RAM website, we have the secure socket over here. This is what the SSL certificate is now our. What I used to say is SSL is compulsory for e-commerce, but today, from this July, 2018, 2018 SSL is compulsory for any web site.
Ok now what Google has done is what, if your website doesn’t have this SSL certificate, Google will say that this Chrome browser will say that this website is not secure. So whenever someone goes to your website, it will say you know what this website is not secure. You should not enter your credit card debit card details or your phone number any crucial information over here. So that is a very bad thing for your website now, from July onwards, 2018 SSL certificate is compulsory for your website.
Now here we have wild card SSL, which means that you can install SSL certificates on unlimited number of domains and subdomains. Then we have optimum cash. This will improve the performance of your website, make it much faster and much easier than we have memory. Cache instance of 256mb again it will improve the performance and speed of your website. Then you see, the performance is three times better than these two plans and we have 60 day money-back guarantee okay.
So we have all these features. There are three different plans. Start our business and enterprise cloud if you’re creating a website for the first time and you’re very much sure that you’re going to create only one website at least four five six months from now – and you don’t need another website, then you can go with starter cloud Because if you see over here, you can hear in this starter cloud, you can host only one website now suppose tomorrow, if you wan na, create another website, what you can do, you can ask TMD to upgrade your account and they will upgrade your account to business Cloud or enterprise cloud, whatever you request and you can create your next website.
Okay, so you can start with starter cloud if you want, if you are ready to create just one website, and if you know that I am NOT going to require another website for a few months from now, then you can use this starter cloud or if you Are sure that you have to create many different websites, then you can choose business cloud or enterprise cloud. Both are really good option. Now I am using the enterprise cloud, so I’ll click on this button, which says get started now when you do so.
You will see this screen now here you have to enter the domain name, which you want for free, okay domain name, which you want for free, so you can type in your domain name or here you can select the extension if you want com, dotnet, dot org. If you’re creating this website for country-specific, then you can select a country specific domain extension like dot CA for canada, dot asia, are.Com dot in not com dot in for India, dot, uk’ for United Kingdom and so on.
Okay, but for most of you guys, I would recommend you to stick with com. So once you select your domain name and you extensions, simply, click on proceed all right now, here you have to put in some basic information about your company, like your first name. Last name: your email address phone number. Okay, your state countries, you’ve called all these things. Then you have to enter the payment information if you want to make payment through credit card debit card.
You can enter your details so here, if you want to make payment through PayPal, you can select PayPal and pay through PayPal. Now I would recommend you to pay with credit card or debit card. Okay, that is much better option. Then we have some more options over here. Okay, first of all, you have to choose the data center location. Now the one you have to choose the one which says nearest to you, for example, here Singapore says nearest to you, so I am selecting this one period is by default 12 months.
I also recommend 12 months. It never select one month period because you have to pay seven dollars extra per month, so that is not recommended. I would recommend you to select twelve months from you. Then, by default domain privacy is stigma. You can leave it tick mark. It will cost you around. Ten dollars extra per year, but I think it is worth it it will protect your identity from anyone. Okay, if you don’t have this tick mark, anyone can see who? Who is the person who has registered this website? So I would recommend you to just tick mark this thing.
Okay, now at the bottom we have a very important option, which is promo code. Now here you have to enter in a year seven and a double y AR and numeric seven after you do so. Click on apply now, as you can see, it says this promo code gives you seven percent of this purchase and seven percent is the highest discount that tmd offers on cloud hosting, so you are getting the highest discount possible.
So that is a great thing once you are done with all these steps, simply click on with your. I agree to the tmd Terms of Service and click on checkout. Now, once you click on that checkout button, you will receive our email from DMD hosting now. This email would look something like this, so you have your username, your FTP C password. You have your server IP name servers and all the important information that is required.
Okay, so L, all the important information are entered over here, make sure you save this email somewhere. If you multiple email addresses, you can forward these to those different email addresses. Okay, that would be better now, if you see at the bottom, you have this control panel link open this link in a new tab and copy your FTP, username and password from here come over here, paste it over here, okay, paste it over here and click on Login now, once you click on login you’ll see your cPanel.
This is see the cPanel. Now, what do you have to do because we have purchased the hosting and domain now it’s time to upload the website or it’s time to install WordPress on that domain? Okay. So, let’s go at the bottom, you’ll see under Softaculous app installer click on this now here we have WordPress is the first option when you hover this, you will see this option install button click on this install button.
You will be redirected to this page now from the top make sure HTTPS is selected. Okay, because if you see or hear the it has HTTPS okay, so secure socket as okay make sure s is included over here. Then, after that, you have to select the domain name on which you want to install WordPress, so I’m selecting the domain name for me, then, after that you you have this WP already typed in oh you’re, in in directory, make sure to remove this thing.
Okay make sure this this field is empty. Then we have site settings, you can put in your site name and site description so and I’ll simply put Busan tutorial by Nia Shaikh. You can put anything. Obviously it’s all to you. I am just putting site name, as was on tutorial and site description as binary Shaikh. Then we have to change the admin and password okay. So let me change the admin and password.
As you can see, my admin username is quite different. I have a uppercase letter, a capital letter to capital letters at the beginning. Okay, then few small letters – and I also have this underscore okay, instead of the space I have used this underscore. Okay, so make sure you have some things are using him. Something like this, which has upper case lower case and a few special characters, or maybe few numbers, if you can include okay, then change this password.
Let me put in my password over here, okay, so I am putting my password then after that make sure you also change the email address put in your own email address, so you go at the bottom, and click on install okay, so WordPress is getting installed on Your website, it will take few seconds. You can just simply wait. As I said it has taken few seconds now we get two different links. First, one is you simply your website link? That is your website: let’s open that in a new tab.
Okay, so this is how our website looks. At present, we have this beautiful SSL certificate. I did talk now. The second link is the dashboard link? Okay, let’s open this in a new tab, so this is the dashboard link. Okay, the control panel link from where we will be controlling everything that happens on our website. Okay, so this is the page from where you can create products. You can create post. You can create pages, you can create everything you can change this style.
You can do everything so whenever you want to come to one want to come to this page, your control panel, page, you simply type in your username or your URL address, then type in /w p admin all right. So we have seen this is how our product our website, is looking. This is how – or this is our dashboard now at the left hand, side you’ll, see few options. Don’T worry I’ll, explain you all the options, we’ll use, almost all the options that you see over here, okay, so the first.
Let’S do one thing: let’s click on appearances now, if you see well, your three different themes are already installed now for the for those of you guys who has seen a wordpress tutorial for the first time. A theme is nothing but the design of the website. Okay, for example, by default, we are using the 2017 theme and, as you can see, we have this snapshot over here. This is how the website will look like and exactly.
That is how the website is looking over here. Okay, now, if you use this theme 2015, this is how your website will look. You can see the snapshot this screenshot okay, so you can change it now. We don’t need all these themes. These are really boring themes, so we can simply delete it and we’ll use a very useful, very cool theme, which is a free theme. That is a great thing. Okay, so if you want to add a new theme, if you want to change the style and design of your website, simply click on this add new button.
Now here, let’s you will see that thousands and thousands of free themes available over here you can install and activate any one. You want. Okay, now, the one that we want is called ocean WP. So, let’s type in ocean WP in this search bar okay. So this is the plug. This is the theme, simply click on this install button. It will install this theme on your website now. Let’S activate this theme, so click on activate button.
Okay, so once you install and activate the theme, let’s come back to our website. Let’S refresh it now, as you can see, the design is totally changed, and now, after some time, we will convert this website. This boring website into something amazing like this. Okay, we’ll change the design completely now again come back here. If you see, we have one notice which says that this theme recommends this plugins and all these plugins are free.
So, let’s install all this plugins and by the way, a plug-in is a way to extend the functionality of your website. Okay, for those of you guys who don’t know okay, so you have used different plugins for different functionalities. For example, let me give you a very perfect example, which is blue commerce. Now, by default, WordPress is not meant for e-commerce websites. Okay by the default WordPress cannot create any product.
You cannot do all those options. Okay, if you want to convert your website into an e-commerce website, you use a plug-in to add they from all the functionalities and features of an e-commerce website. Okay, so that is what a plug-in is it it will add and expand the functionality of your website. So we have three different plugins, so here we have, which is a free and best page builder. We have ocean demo, expert, export and ocean extra.
So, let’s click on this begin installing plugins link. Ok, so all this plugins are here you can install one by one, but what we’ll do is we’ll take ma voiture. It will select everything and from the bulk action we’ll select, install and click on apply. Ok, as you can see, all the plugins are installed. Let’S click on return to dashboard. Ok, so all our plugins are installed and activated. Now we need few more plugins, free, plugins to eat or to add some more features to our website.
So what you can do you can hover plugins from the left, hand, side and click on, add new to add new plugins. Now the first plug-in that we need is obviously boo, commerce, ok. So what we’ll do is we’ll type in commerce, foyer, ok, just simply type who commerce okay. So this is boo. Commerce by automatic you can see it has more than 1 million active installation, so more than 1 million websites are using WooCommerce.
You know at present. So, let’s click on install now, let’s activate this plugin. Alright! Yes, now, once you activate this plug-in, you will see few notices over here. So what we’ll do is we’ll see all these notices later on? First, we’ll have to install few more plugins. So what we can do is we can simply again click on add new. Ok, the next plug-in that we need is Elementor, essential, add-ons I’ll give all these plug-in names in the article description below you can see those ok.
This is the one elemental essential add-ons by quartic. You can install this one. Okay, now don’t click on this activate button. We can activate all the plugins at once. First, let’s install all the plugins, then the next plug-in that we require is premium add-ons for Elementor. This is the one by leap 13 install it then, after that again, don’t click on activate, simply type in the next plug-in, which is Elementor add-ons and templates by cz light, ok, whatever it is by theme, I’ll.
Ok, you can see this one click on install now. Ok, and the last in that we require, is custom sidebar by WP mu, dev. Okay, you can see WP mu dev. This is the plugin click on install now now, if you see at the top, it says we need two more plugins WooCommerce variation switches and WooCommerce wishlist. So let’s get these plugins as well. Click on this link begin installing plugins. Okay, we have two plugins, let’s so dick Makaha bulk action, install click on apply; okay, so both the plugins are installed and activated successfully.
Now, let’s click on plugins from the left hand, side; okay, first, what? Whenever you? Wherever you click? You will see this thing. This setup wizard for wishlist button, so you can simply click on. Let’S go not a very important one: okay default wishlist name create automatically. Simply click on continue, don’t need to do any changes. Click on custom continue. Okay, not very important. Simply! Click on just may keep clicking on those continue and the last step.
Click on this button return to the wordpress dashboard. Alright, now, let’s click on plugins and we need to activate all the plugins that we have installed and there are two different extra plugins that we don’t need, which is a kismat anti-spam, so we can delete it and the other one is Hello. Dolly you can delete these as well. Okay, now, as you can see, there are few plugins that are not activated, so we can take McCoy here from the bulk action.
We can select, activate and click on apply. Okay, so all the plugins are successfully installed and activated now it’s time to install the most important plugin for this website, which is the ozone plugin. Now you can open a new tab and type in block to.Com, slash Busan. Now this link is also given in the article description below when you open this link. You will be redirected to this page. Okay.
Now, if you see oh here, we have the few plugins so here this is actually a bundle of few plugins and themes. We have one plug-in. We have Kingdom theme, we have discount fighter finder, whose own contextual, okay, so you can install this one. Okay, it’s around 70 bucks. You can add to cart’ and purchase this, but I have already purchased it so I’ll. Not do that I’ll simply cut this thing, so once you purchase, let me show what happens so once you download it from themeforest.
You will see a file like this okay, whatever, as if I you can extract this file from here. Okay, so once you extract it, you will see a folder like this. Okay in this folder, you have your theme, you have your plugins and everything okay, but this is not the theme that we are going to use. This is a very bad design. Unfortunately, I don’t like the design of Kingdom theme. That’S really bad. Okay, I’ll use the plug-in, which is over here ozone, Amazon, affiliate plugin.
When you open this thing, you will see a folder plug-in and you’ll see another zip file whose own okay. Now this is the file that we have to upload. Now. Let me do one thing: let us come over here, but before this, let’s see one thing when you hover media and click on, add name you’ll see over here it says: maximum upload file size is only 2 MB and if I see oh you’re, the file size Of this plug-in is 6 MB s more than 6 mb s.
Ok, so here I can upload only 2 MB file maximum and the file which I want to upload is 6 MB. So there is a problem over here, but it has a very simple solution. Let me show you how we can fix that open FileZilla and if you don’t know how to set up FileZilla, there is a article on my blog very easily. I have shown how you can set up FileZilla for free all right guys. Now, once you open FileZilla, you will see your website folder over here.
For example, if you see my website name is boo zone 2, dot, Nia, shake calm, ok, so I’ll have to open that folder. Let me find that folder here. It is Busan, totnes check, comm. Let us open this folder here. You have one a file which says the first file in fact dot htaccess. Now what you have to do is you have to drag this folder on your desktop? Ok on your website on your computer desktop, then let us do one thing: let us select stuff from your okay.
Sir Dexter is selected. Let’S drag this file on our desktop okay. Let me do it okay, so it says: transfer finished now. If you see on my desktop, I have this file. Let me open this file, okay, so this is how your file would look like okay. Now, what do we have to do? We have to paste some simple line of code away here, so go to my website. In fact, this link will also be given in the article description below okay.
If you don’t find that link, you can go to my website and let me show you that post, I think if it will be on second third page. Okay, let me show you that, ah here it is the uploaded file size whatever this is the this. Is the post that you have to open solved the uploaded file size exceeds the max whatever the it is? Okay, you see this. You can open this. This will. This link will be given in the article description below, but by chance.
If you don’t find it, you can go, you can do it manually. Okay, now here, if you go at the bottom, you’ll see five lines. Of course, over here five or six lines of code simply copy it from your go to that file. Paste it over. Here: click on ctrl s to save the file. Now you can cut this thing. Go to FileZilla refresh this section. Okay, now drag this thing: dot, HDX s and again bring it to your website folder.
It will ask you to overwrite it select all right and click on. Ok, ok, so transfer is finished. Now now, let’s come to our website. Okay earlier it was saying 2 MB maximum upload size. Let’S refresh this page now, as you can see, it says, 64 MB. So now we can upload any file of up to 64 MB. Okay, so again have all plugins and click on add name. Let’S add this plug-in now this time you don’t have to add a plug-in.
This way we have to upload a file because we have a file, so click on upload plug-in choose file, and let me go to that file whose own coupons say whatever the folder is, whose own I feel: Amazon, affiliate, plugin. Ok, this is the file select. This file click on open click on install now, ok guys, so this plug-in is successfully installed now, let’s click on activate plug-in. Ok, so once you activate this plug-in, it should ask you to ok once it will ask you for purchase code now yeah.
This is very important. You have to in insert the purchase code. You’Ll see the purchase code on you’ll, see this purchase code on themeforest. You can find it from there and paste in the purchase, but obviously I’ll have. I have I’ll have to hide this code from here. You can in just copy and paste the purchase code and click on activate now, alright guys. So once you do so, you will see this setup wizard now, let’s click on get started now.
First of all, it will ask you: what kind of website is this that you’re creating? Is it a blog online store, personal web site or something else? So this is an online store, so we’ll select online store and click on next then, what is this state of the website? Is it a fresh, install or you already have some content so for us it is a fresh, install, so select fresh, install and click on. Next, and what is the purpose of you want to use whose own so you have different options? Select the first one I already have a website and want to earn some money, easy money from affiliation.
Ok, so select the first one and click on next. Alright. Now we have some more options over here and you can take mark or and take this first of a few options of. If you see by default, are tick mark and few are antic. The first one is on site cut. Now this option will allow your customers to add multiple Amazon products into cart and checkout through Amazon system, with all at once so very important.
I think it is necessary so make sure you tick mark this now ninety-day cookies, if a customer adds a product into your app into the Amazon card and it’s kept there for 90 days and if the user continues shopping, you will still get the commission. Ok. So very important make sure it is tick mark if you want to show the Amazon reviews tab, which we have seen in demo website. You can take mark this or you can simply antic this okay.
So do you want to show the frequently bought together product which you see on Amazon, frequently bought together? Let me show you both these options: okay, let’s open this product, okay, so, first of all, we have this Amazon customer review. If you don’t want to desert, show this tab, you can come over come over here and untick. This reviews tab the second option. If you see under description, we have frequently bought together products.
If you don’t know, don’t want to show this thing, you can UNTAC this cross-selling. Okay, it’s all up to you, my product availability by country box. If you’re creating this, it’s it’s all up to you. If you want, you can take mark this or you can simply uncheck this, it’s all up to you by the way it will show this thing: okay, product availability in a country; okay. So if you want you can take this, not a big deal you want to show coupons, then we have check out email us, the user email address before this checkout process happens.
Now. This is not required. So make sure this one is an ticked okey. Then remote Amazon images, this option will display all product images from Amazon, CDN, so very important. We don’t want to upload our own images. We want to just import the images of the person. Okay, so make sure it is strict mark and if the product is free shipping, do you want to show that, for example, if you see over here, it says free shipping.
Whenever it is free shipping, it will say free shipping, or do you want to display this or not? It’S all up to you. If you want, you can simply take mark this and click on next. Alright, now price set up, Oh get price from Amazon or all the sellers, so you can simply select Amazon import product from merchants, make sure you select Amazon and other sellers. Okay. If we select Amazon, then you can import only those products which Amazon is directly selling, for example, Amazon, Kindle, okay, they have their own product.
Amazon is the merchant or the seller of the product. But if you want to install some iPhone, then Amazon is not the seller or the owner Apple is the owner, and so you will not be able to import that so make sure you select Amazon and other sellers, not import as published or draft. So whenever you import some product, do you want to directly publish them or you want to make you know you want to send them to draft? And after that you can, you know, check them, you can edit them and you can publish them.
So it’s all up to you because this tutorial this is for tutorial purposes, I’ll select, publish import product with zero price. No, we don’t want to import that, so let it be an taked import attributes. Now, basically, an attribute is, for example, we have iPhone 7 or iPhone 10. Whatever you have okay, so iPhone 7 has 32gb 64gb 128gb. So we have different variations. These are called attribute products.
Okay, so obviously we want to import all the attributes so make sure it is stigma. Now, click on next now number of images you want to import and number of variations. If you want to import okay, if you want to import only three images, you can select three over here. If you want to import all images, you can select all similarly for variation, you can import one variation, two variation or all the variation.
Okay. Now click on next and these changes can be changed later on. Okay, I’ll show you how you can do how we can change these settings. Okay, click on next now this is the customization option. Read redirect option whenever the person clicks on that checkout button. What happens is they will get a message? You will be redirected to Amazon to complete your checkout. If you want, you can change this message, okay and type in something else.
I don’t know why you would you do that, but you can do so. If you have some better idea, you can do that now redirect them in how many seconds. So, basically, what happens is when they click on that checkout button. That message will be there for three seconds: okay and after three seconds they will be redirected to Amazon. If you want to increase or decrease this time, you can do that from here, okay and by button by button custom text, we don’t have to do anything or your everything looks fine, just click on next all right now we have at the at the last step.
We have to put in our access key ID and secret access key and your affiliate ID now, if you have a different affiliate ID for different countries, for example, you have account with Amazon, Canada, also amazon, india, also amazon, us also. You can use all of them at one place, and here you have to put in your Access ID and secret key okay. So let me show you how we can get that open. A new tab go to google and type in Amazon, associate, ok, and it will show you the Amazon Associates of your country.
I am in India, so I will get this link affiliate program dot. Amazon.Com UK you’ll see affiliate program dot amazon.Com. You can something so click on this link. First link. Now you have to join for free if you are not yet join the affiliate program of Amazon. I have already done that. Ok, and that is very easy. It takes few seconds or a few minutes it is. It does not require a very high knowledge or anything like that.
It’S a simple form you fill in and you are. You join the club okay. Now because I have already joined that I will click on login. I have my username password over here: click on login. Then, let’s see what happens? Ok, so this is the screen. Ok, as you can see, this is the screen. You can see the clicks that my link has got got and the fees and all these things. Ok. Now, what do you have to do? What we require here is we want the access key ID and this secret access key.
So let me show you how you can get that go here and Howard tools and you will see product advertising. Api click on this link. Now, click on manage credentials; ok, now click on sign-in or if you are not created any account with AWS, it will automatically ask you to create one or it will create one for you. Ok, it’s very easy! Simply: click on login. Ok, now you can. Click on over here continue to security, inches and you’ll see your access key.
Let me show you you. When you see this thing access key, you will see. I have created many in the past. You can see all those things now. I can use any one of these. I have created some deleted some, so let me delete one and let me show you how you can create a new one. Obviously you will not have any so you’ll have to create a new one. So if you want to create a new one, simply click on this blue button create new access, key okay and you can show the key okay.
You can copy the key from here. Let me copy it from here paste it over here. Then we have the as secret secret access key copied from here again paste it over here, okay and make sure you download the key. Okay, very important simply click on this button and make sure you download this keys. Okay, very, very important once you do so simply close these things now come over here after that we have to put in your affiliate ID now.
If you want to see that again, let’s come back to this website affiliate program, dot, amazon, dotting at the top you’ll see this tour name and you’ll. Have this thing over here copy this from here? Okay, I have this link. This is my store name or ID copy it from you and paste it under your country, for example. This is India and pasting it under India, then after that main affiliate ID. If you have multiple affiliate IDs in different Amazon websites, you can select one of the means.
So for me I have only one – and that is India, and that is my main request. Type make sure it is auto, detect and import location. Where do you want to import the product from? Do you want to import the product from amazon.Com then select this one worldwide? If you want to import from amazon.Com is on India, you can select India, so I am selecting India and you can click on this button check Amazon, AWS Keys.
It will check this skis whether they are correct or not. So, let’s click on this button. Ok, as you can see, everything is right. Okay, we can proceed further. Let’S click on finish, alright, so congratulations! You have fully setup boozing wizard. It is that simple and we don’t have to do a lot of things. So if you’re very, very simple, simply click on this closed well guys, so once you do so, you will be redirected to this page.
So we have a lot of notices over here. Let’S dismiss all these things, one by one: okay, let’s click on no thanks. This means this notice everything. Okay. Now we have this plug-in setup. We have everything which is awesome, or I guess now, once you do all these things. Let’S do one thing: let’s simply create few pages for commerce. We have to create some default pages. Okay, when you click on pages, let’s see what happens you see.
There are only three pages, one, the wishlist page because of that quick setup, a sample page which we don’t require. So you can trash it. You can delete it from your a policy page, which is the gdpr thing. Okay, draft page now we have to create few new pages, so click on add new. First create this shocked bits so simply type in shop now open a new tab. Let me cancel all these things and type in gue commerce, shortcode, okay, short codes: here it is bucum a short codes and open the first language is short code included with commas open.
This link you’ll see few shortcuts over here. So for shop, page: okay, let’s see what is the checkout page, my account page? Okay. First, let’s create the cart page. So simply select this copy. This shortcode from here boo commerce, cart come over here and let’s first create the cart page. So, let’s name it cart and let’s paste the shortcode over here, click on publish – and this will add the cart page.
Okay, let’s click on add name again and after that we have the checkout page. So, let’s copy this shortcode away from you and obviously you can see it says you need to install default WooCommerce page and cart, page and checkout page now. This thing will disappear now, let’s click on checkout, page okay. So this is our checkout page. Let’S paste in this shortcode for checkout click on publish alright.
Now after this, we have the my account page so copy this link from here click on add new page, let’s name it my account and that’s based in this short code click on publish. Now we have one more shortcode order tracking, but this is not required over here, because we cannot enable person to track order, because this these products are not our products. These are Amazon’s product, ok, so they cannot track order from our website.
So we have three pages. We here, let’s click on dashboard. Now, let’s click on pages. Okay, you have the cart page, checkout page all this page. Let’S click on add new page. Let’S create a shock page, don’t need to put any checkout. Also, simply, click on publish now, let’s open this product in a new tab. Let’S view this page now, as you can see when we view this page, we have this a shock page over here.
Ok, no, don’t don’t need to create or do anything now, let’s to view a simple buchamma settings. So let’s click on how, let’s our commas and click on settings, there are very few settings that we need to do over here, not write. The regular ecommerce have said there are very few settings that we do first. Setting that we have to do is journal settings. We have to put in your address, so I am putting Mumbai everywhere.
This is the address where your store or your business is pasted. Ok and let me put in the country as India, Maharashtra, ok country and your state name now, do you want to sell to all location or a specific country, so I can select, sell to specific countries and I can select India. So maybe I want to sell only in India if you want to sell in multiple countries, you can select more countries from here or you can sell in all the countries.
Now I want to ship to all the countries I want to sell to ok, which is fine, enable the use of coupon calculate coupon discounts of sequentially not required now currency, because I am selling in India and I am importing products from Amazon dot in. I will select I Indian rupee, which is Indian rupee here it is. Let me select this ok click on Save Changes. Alright. Now we don’t need to do any changes.
I guess, let’s see, let’s go products! Okay, you know we have this shop page select shock from your okay, the page that we have just created so select the shop page from your click on Save Changes. Okay, let us see some more changes now go to. Shipping shipping is not required now, payment account and privacy simply go to accounts and privacy. Now do you want to allow the customers to place order with without an account? So, yes, we do want to allow them allow customer to log in into an existing account during checkout yeah.
We want to allow them now. Do you want to allow customers to create an account during checkout? Yes, do you want to allow customers to create an account on the my account page, yes very important now, when creating an account automatically generate a username from customers? Email addresses not required. Okay. We, if you want the user to set up their own username when creating an account automatically generate a account password.
No, we want the user to set up their own password. Ok, now remove personal data from orders. No, we don’t want to remove them because we need those data. Ok, now rest everything. You can see your privacy policy. What you want to. If you want to change some text from here, you can change it now. Click on Save Changes after that go to advanced and under the cart page, select cart under the checkout page.
Select checkout under my account page select my account under terms and conditions page. You can select the privacy policy page, which is already created. Ok then go at the bottom and click on Save Changes. Now, let’s refresh this page, everything should be fine. Yes, fine, alright, so we are done with the main settings who commerce and whose own settings now, let’s see how we can import products from Amazon.
Ok, so let me do one thing from the left hand side, let’s click on Busan. Ok, it is loading. Now there are many different options over here. First is Amazon configuration? We can click on this. You can configure your keys if you want to enter your keys later on. You can enter them from here. Ok, you can see your keys are here. You can enter your this IDs and everything later on. If you want okey, let’s click on dashboard.
We have some more options now. Most of these are not very important option. The important one are two options. First, one is this. Now there are two types of option available to import product from Amazon. The first one is single product wherein you want, you can import products one by one and the second one is bulk. Okay, so you can import products in bulk. Now I’ll show you both the options and how you can setup those.
Now. First, let’s see how to import a single product: now we can import a single product using a free Chrome extension. Okay. So if you want to get that extension, simply click on over here, direct import extension, okay, you’ll see this thing over here and you have to download this thing. Okay, W zone directing text input extension from here, so you can open this link in a new tab. Now, as you can see, I am getting this option add to Chrome.
Let me click on this. Okay. I think I cannot do that. So let me do one thing: let me copy the title from your W zone: import a direct import cut it from your. Let us search from here, okay, W zone direct import. Let’S search for this here we have now click on this Add to Chrome, button click on add, extension; okay, it is checking ok. Now it is added. Now, let’s see okay now let us click on save settings.
Now, as you can see, it says, options updated successfully now at the top you’ll see this option, which says authorize now very important, make sure you click on this authorize button now it says website successfully added now, when you click on this button. As you can see, this website is successfully added, okay, so very good. Now we can import products from Amazon, so let’s open Amazon dot, whatever Amazon you are affiliated to and let’s open some products.
So let me open this first product from here now, as you can see when I open this product, I see this option over here at the top. Now I can simply click on this button and it will import everything all these images, the price, the description, the variations, if available, it will import everything for me, I if I want I can import this into specific categories, but I haven’t created any categories, as you Can see when I hover this, you get this option when you click on click on this option.
It asks you for importing category, but we haven’t created any category. That’S why we are not seeing anything and if you want to import any specific variation like one or two, you can select it from here. Okay, so it’s all up to you now, what I’ll do? I simply click on here on this button. As you can see now, it says product was successfully added now, as you can see within one second, this product is added, and now we can view this product on our website.
So, let’s click on this button view this product. Now, as you can see, this product is successfully added on our website. Ok, now we have everything we have all the images we have. This title, the price, all these things in the description. We have these things. Ok, we have frequently bought together and everything is present over here. So this is how easy it is to create and to create or to import a product from Amazon.
Now this was the first type, how you can import a single product and obviously you have to be on the. If you want to import a single product, you have to be on the product page. Now, if I go over here and if I try to import as you can see, if you want to import products, please go to Amazon product detail, page ok, so we cannot import anything from here. We have to go to Amazon product detail. Page like we are here on this page: ok, the next type is bulk input.
Now, let me show you how you can bulk import everything? Let’S click on dashboard again now, let’s click on this option. Ok, insane import mode. Let’S click on this option now here we can import product using categories or keywords or and all these things, for example. This is some brand name. I guess so let me do one thing: let me copy this name and paste it over here now. Do you want to apply this great keyword in all the categories or in specific categories? Okay, so I am selecting all the categories you can say, select specific categories like shoes and bags, and here we have luggage luggage in bags.
Let me select this luggage and bags. Okay, now, when you select those you get some more option: okay, all browse nodes bags and backpacks, or luggage wallets and pocket; organizer sure, okay, handbags and clutches. So I am selecting handbags and clutches okay. Now you get in some more option now in handbags and clutches: do you want only clutches or handbags or if you want against only if you want only this much and you want to browse all you can select all you if you want, you can select specific Brand name and specific manufacturer: if you want to import product which has maximum and minimum price, you can put the price over here.
Okay, if you want to import only those product which has at least 10 % sale going on, then you can select this or at least 20 % sale going on, select this and all those things. Okay, so you can select all this option. Okay, this is basically the import criteria. What are the different criterion that you need to import? Okay, so I have put one category a one keyword. I want this keyword only in this specific category and this subcategory and this subcategory and this the product should be minimum of this price, and maximum of this price may be minimum of one hundred and maximum of five thousand.
Only Prada only import these products within this price range and the product has minimum of 10 % sale going on. Okay, it’s all up to you. I want to import the first page or the first two or three pages of the result. Okay, so I want only the first page, so once you select all these things, click on launch search, alright. Now, as you can see, we have all the product that are on the first page. Now, if you want again, you can, if you want, you, can upload or install or import all the products at once.
If you want to import only specific product, you can take mark that and if you don’t want to import other product, you can untick that so suppose I want to import only the first product, which I, which is shown over here so I’ll, take mark this rest. Everything I’ll and take it. Okay, obviously you’re doing this to import bulk, but I am just importing one. I don’t want to import bulk, okay, so I’m I have ticked antiqued everything I have only the first one tick mark over here.
Okay, so once you know, and once you decide what or product you want to import, you can go at the bottom number of images. As I said you earlier, you can change the settings now. Here is where you can change the settings. Okay, number of images to install, so maybe I want only the first three images: okay to import number of variations. All the variations are, maybe few variations. It’S all up to you now.
Do you want to use the categories for Amazon or you want to create your own category and import them? So it’s all up to you so select these options and click on import products. Now, as you can see, it says product is imported and it took almost zero seconds. Okay, so you can close this box and, let’s, from the left hand, side. Let’S click on products, let’s see now, as you can see, we have two products imported okay.
This is the one that we imported using the the extension Chrome extension, and this is the product that we have imported using the bulk extension okay. Now, if you want, you can go to your shop page, you will see two products. Okay, now, as you can see, we have two different products over here, which is awesome. Now, let’s do one thing. Similarly, obviously, you can import unlimited number of products and if you want to do some changes, for example, let’s open this product now, if you see we have only three images, because I have selected only the three images, if you remember okay, now, if you want to Do some images some changes over here? You can very easily do so.
You can click on this edit button or you can simply come to this page. You have this edit product page. You can open this link in a new tab, and this way this way we’ll open. Okay. Now you have this description from here. You can change the description. If you want, for example, it says 1-year domestic warranty, I want six months domestic warranty, whatever it is. Okay, so I can change it from here.
It’S all up to you. I would I don’t know it sort of to you. I don’t. I would not recommend anything if you want, you can change it. If you don’t want that’s good, you have this category. So here, if you want to use your own categories, you can untick everything and use your own category. Simply. Click on over here create new category and suppose I want to show only back. So I click on bags, admin category and I can select this category from here.
Okay, I can add some tags and all those things now here we have the prices. I would not recommend you to change the prices, because this is synchronized with Amazon. So please don’t change the prices that will not be. That would not be a great idea. Okay, now product short description, you can change it from here. A short description shows over here, as you can see, so you can change your product, short description, images and all these things, okay, I would not recommend you to do much changes over here.
Only though I would recommend you to change few things, if you want in the in the description the long description at the top which you see if you want, you can add some SEO friendly keywords and so on, but don’t do a lot of changes over here. Okay, so once you are done with changing everything, simply click on update. Let’S come over here, let’s refresh this page. Now, let’s go at the bottom now, as you can see, it says six months, domestic warranty instead of one year domestic polity.
So this is a great thing you can do or some changes as well now. This is how your product page is looking at present. Now I have first of all here we have this thing which says as of July: bla bla blue, this state and that’s dead. If you don’t want this, if you want to remove this thing, let me show you how you can do that this will be a very good tip for you. You can use this trick too. You know on other websites that you create now whenever I want to do some changes.
What I can do. I can select this section right. Click, oh yo and click on inspect I’ll. Give you the direct code, don’t worry, but I am just showing you this. So once you do so, you’ll see this options over here now you can click on this button. This plus button, ok and you can type in. Oh, I think it is. We are displayed you type in display and then type in none now, as you can see when I display I type in display and none that thing is gone now, I can simply copy this code from here.
Ok, go to my website! Click on customize! Alright! Now, when you click on that customize button, you will see a screen like this go at the bottom: click on custom, CSS, J’s and paste in that code, whoa now, as you can see as soon as as soon as I paste it, that thing is gone now. If you want to delete these things as well, you can see. Do the same thing. Select it right, click! Oh you click on inspect, then you will get the same option again.
Click on this plus button. Ok, not this way! Ok, this time you have to do another with some. Let me show you, okay, yeah yeah this. We have to select this thing. Ok, don’t worry! If you don’t want to learn this, if you simply want the code, don’t worry I’ll give all these codes in the article description below you can copy them from there. Ok, so, basically, let me show you first, so you select this thing.
You click on this plus button. Again, you do the same thing display and none now, as you can see, that thing is also gone now. Let me copy this thing from here: paste it over here click on publish, let’s call cut this thing and don’t worry if you don’t want to do this thing. If you directly want these codes I’ll give them in the article description below, as I said, ok now, you can exce this out now, as you can see, those messages are gone now we simply have the price, the selling price and the main price.
Ok. So this is how it is done. I just wanted to show you guys. Ok, if you don’t want to remove them, it’s all up to you. So this is how you import products from Amazon. Very easy, very, very easy to do. Don’T have to do anything at all, you don’t have to know any commerce, any coding or anything. It’S simple one-click installation one-click importing okey. So this was the first section of the article wherein we do all the important settings how to import products from Amazon.
How to set up Busan, how to set up commerce, creating pages and all those things now, in the next section of this article, we will start designing the website, because if you see this is not looking that good and if you go to your home page, let’s See what happens? Let’S see what we have, and this is looking very boring so in the next section of this article, we’ll see how to design the website. Okay, so see you guys there welcome back guys to the next section of the article.
In this section, we will see how to design this website. Okay, so let’s get started without wasting any time. So come back to your website, let’s go to the dashboard, let’s open the dashboard in a new tab. Alright, now the first thing that we have to do. We have to create a page that is the homepage, we’ll start with home page, so that we can start creating all these websites and so okay. So it’s really easy.
We can simply have pages and click on add new. Now, let’s name it home and let’s click on publish now, let’s open this page in a new tab, so we can view this page in a new tab. Alright, now we see some problem so here. The first problem is that we don’t want this sidebar okay. So let’s get rid of this sidebar, so at the bottom you’ll see under ocean WP settings we have content layout, select full width’ from there and click on update come back to this website.
Let’S refresh it again now, as you can see, that sidebar is gone, we also see. If you see we don’t have any of this title and all these things on the home page. So we’ll have to get rid of this title and this breadcrumb. Ok. So again, come back over here, select title from here and make it disabled. Let’S click on update come over here, let’s refresh it and as you can see, we have a perfect page now we can also do one thing: we can disable margin.
Okay, come back again and under margins, disable margin, because if you see I I know right now, we cannot see anything, but by default there is some margin at top and bottom. So I want to disable that ok, disable it click on update. Let’S refresh it now, as you can see, that margin is gone now. The only thing that we have is the header space. Ok, this space and rest everything is flanked at the bottom.
Now this is the perfect situation to create the home page. Now, if you see one more thing when we are on the home page on this website on this website, you don’t see anything like slash home. We just have the domain name, and here we are on the home home page and we have this website name slash home, so we have to get rid of this thing. I okay, when I click on this, as you can see, we are redirected to some other page.
I want this page to be my home page. Whenever someone clicks on over here, they should be redirected to this home page blank page at present. Ok, so we what we can do is we can go back to our dashboard and we can have our settings and click on readings all right and we can select a static page from the home page and we can select my house or we can select home. Okay, so under home page select home click on Save Changes.
Okay, now, let’s come over here, let’s refresh now, as you can see. First, let’s see here in the URL bar, we have home, let’s refresh and see what happens now, as you can see when I refresh this page that home is gone and when I click on this, I am still on this page. Ok now, let’s do a few more settings for yur, so under settings click on general. Now you can change your site name and tagline from here as well and make sure you tick mark this membership.
Anyone can register ok, very important and click on Save Changes, and after this under settings we have permalinks click on permalinks by default day and name is selected. We want a post name, okey, so select this link post name and come at the bottom and click on Save Changes. Ok, so these are the main changes that we have to do now. Again: click on pages and edit homepage. Here we have click on edit.
Now you’ll see this button over here, which says edit with Elementor click on this button. Now it’s time to start creating the page start designing the page using the free page builder, Elementor, alright guys. So when you click on that edit with Elementor button, you will see this screen and now we have to use this beautiful and free page builder to design the website design, the home page or the complete website.
Now. Basically, what we have is, at the left hand, side you have different modules for different purposes. For example, if you want to add text, you use the text module if you want to insert a article or the image in your website, you use these modules. Ok, so don’t worry, you will understand everything easily very easy to start now. The first thing that we have to do. We have to add this thing: okay, this simple text from here: okay, so – and we have this image in the background – so what we can do.
First, we click on this to get started. We click on this plus button to add new section and we select the number of columns we want or this structure we want now here. If you see we have only one single column, we have nothing else. If you see over here, we have four columns, but here at the top we have only one column, so we’ll select the first option, only one column: okay, when you select this you’ll, see edit section options.
Now we have to edit something over here. Okay, for what we have to do first thing: we have: we want this beautiful image in the background, so what we can do, we can go to this option. Styling option. First option is background, so we’ll select this classic, we’ll add an image. In the background, we can upload any image we want and obviously, as I said you earlier, you have all these images. Everything in the article description below you can download everything for free.
You will see this media and you’ll have all these images. Ok, so we have the image over here. Let me select this image: click on open click on insert media. Now, as you can see, this is how it is looking now. Let’S do some changes over here. First of all, what is the position? I want the position to be Center Center. Now, as you can see, the image has changed a bit then attachment we don’t have to do anything repeat, no need to do anything now, sighs make sure to make it cover, so select it cover.
Now still, it is not looking that good because of two main things first is the height is quite small. We want to increase the height and make it like this, and the second is: if you see this, there is some gap from both the sides. Now I want this to be stretched to be full full with full size. So let’s do these two things again go to layout and first select. This section stretch section make it yes.
Now, as you can see, this is stretching no in in the complete website. Now, after that, we have to change this setting height setting now, instead of default, select minimum height, okay and let’s make it to 600, okay. So, let’s type in 600 over here now, this is looking perfect click on update, let’s, okay, now, as you can see, this is looking perfect now, once we have this, we can click on this icon over here we have so many different modules, or here now we Can use these modules for different purposes, for example, if you, if I want to add this thing, if I want to add this text, I use the text module.
If I want to add some google map over here, I will use the Google map module and so on. So it is really easy. You don’t need to know much about it. You when I start creating the website. When I start designing it, you will understand everything in much detail. Okay, so first, let’s add this text spring /summer collection. So I will drag this text section over here and bring it over here and, as you can see by default, it says, add your heading text here and the default color is blue and we have some style.
We have to change change the styling and everything from your first. Let’S change the text and, let’s put in my text spring /summer collection. Now, let’s go to style, to change the style and everything. Now we have to change the color first now let me give you a very simple the trick that will really help you now. If I want to know the color of this text or color of everything on any website, I simply select that right-click over there and click on inspect and, as you can see at the bottom right, I get the color code.
I can simply copy this color code from you. Come back to my website. Now select this color. I can obviously change the color from here. You can see the changes live on the website. I can change it from your, but if I want the exact same color, I can paste in that color code. Okay, so we have the color now, let’s change this style, so typography now edit this section. First, let’s change the font family to monserate all right.
Let’S increase the size to maybe something like this. 43 is looking better and let’s make it a little bit thinner. So let me make it 400 width, looking perfect okay. So with this we have our first text now, let’s click on update now, let me show you how you can save some time now. If you see over here, most of the things are same, in fact, all this style. Oh here is same: all the three forms are monserate, so what I will do is, instead of adding all the thing from scratch.
I simply duplicate this thing, so I will click on over here. In fact, I will right-click over here and click on duplicate. Now, as you can see, we have a duplicate of that one. Now, let’s change the text. First, it says new arrivals, okay, so let me type in new arrivals and let’s change this style, so go to style typography. Let’S increase the size, the size to maybe something like 75 76 or I think so when t6 is looking better okay, so I am putting it to around 76 77.
It’S all up to you and, as you can see, this is quite bold. Oh, so let me increase the weight to 700. Looking perfect, okay, exactly like the demo website all right now. After this, we have one more text, which is this one 20 per 25 % sale. So again I will do the same thing I’ll hover, your right. Click on this blue pencil button and duplicate it now, instead of new arrivals I’ll type in 25 %, sale again go to style.
First I’ll change, the color to white. Okay, like this, then I’ll go to typography, increase the size a bit more to maybe around 90 91 pixels, oh okay and I’ll increase the weight to 900. Okay, looking exactly like the demo website, so once you are done doing this, you can simply click on update and if you want to see the changes that you’re making, you can click on this eye button. This preview changes button and you will see a new tab and you can see the changes over here.
Okay, looking beautiful now, let’s add this button over here. This click here button beautiful and simple button very easy to do so. Let’S add that so come again over here on this page click on this link from your this icon and now because we want to add a button, we’ll use this button module we’ll drag at the bottom okay. So this is the default style. We’Ll have to change everything. First. Is we have to change the text? Okay, we don’t have to change the text.
The air. The text says click here here also, it says click here, but we want everything, uppercase, okay, so let’s click on this style. Let’S see everything step-by-step first, we have to change the typography, so click on this plus button this pencil, but let’s change the font family to monserate for this one as well. Okay – and let me do one thing – let me transform it into uppercase. Okay, all the letters should be capital after that, if you see this style is quite different here in the demo, epsilon have any background to the button.
The button background is background less and we have a very thin border, color white border color, and when I hold this button you can see the background. Color becomes white and the text color and the border color becomes black. So let’s see how we can do that. So come back to this page and let’s select this one: okay text color, so text color is white, so we don’t have to do any change background.
Color. Let’S select this, let’s make it transparent, so you, if you want to make it transparent. You drag this. Second, one at the bottom: okay, simple, okay: this is for typography yeah this one. Let me see: okay, yeah, you can say first, you have to select some different color and then you have. You can drag this thing at the bottom. It will make it transparent. Now border type select solid and with make it one pixel.
Okay, it’s just like this now this is looking better, but when we hover over this, as you can see the color changes and we also have a simple animation. Okay, so let’s do that now, if you want now, if you see where you’re, when you hover this button, nothing happens. So, let’s change the hover effect, so select our let’s change the text color to black the background color to white the border color to black okay.
Let’S see now, as you can see, text color black pack, a border color black background, color white, but we don’t have any animation. So, let’s add an animation and let’s add this grow animation. Okay or you can add, this grow rotate. Let’S see now, as you can see, looking awesome okay, so you can add this animation and if you want to redirect this button to some page, you can go back to content and you can, under this link, you have to paste in that link of the page.
Okay, it’s all up to you once you are done, click an update and this page will automatically load as you can see, and this is how your website is looking at present. I think this is looking amazing. Okay, now, let’s start creating this section and as you can see, it is really easy to create these different sections. Very, very easy: okay, okay, so let’s create this second section again very easy to do so again.
Come back over here now again, click on this pencil button now bring this text section at the bottom or maybe what we can do, because here we have two different styles. First, as you can see, the first style is that this is bold and the second style. This is quite thin, so, instead of just adding this heading I’ll, add this two columns: okay at the bottom, okay, just like this! So once I have these two columns in the first column I’ll, add this text: okay and I’ll change the text to free shipping.
Okay, let me add this free shipping over here. As you can see, it says: free shipping and I’ll make it right aligned. Okay, as you can see, the alignment is right. Side and you’ll understand why? Because if you see over here, everything is in center, and here we have two different columns, so first column will be towards right and second column towards left, so everything will be Center aligned. Okay, now, let’s go to stylus change the color to white okay.
Now, when we do so, obviously everything disappears, so what we can do first, we can click on update, let’s update it and let’s change the background color of this section to black, so that we can see everything perfectly so how old this – and you have this thing At the top edit section, as you can see, when I hover this, it says edit section click on that first stretch, this section, okay stretch it go to style, select background background.
Color make it black. Now, as you can see, we can see everything perfectly now. Again. Click on this text and let’s do the changes, go to style: let’s change the typography: let’s change the font family to montserrat and more mt/s eatable r80. Okay, let’s increase the size to maybe Oh think, 42. 40. 42, whatever you like, I am putting 40 over here. Let’S increase the weight to 700, because this is quite colder, as you can see, so this is 40 and 700 and rest everything is looking fine.
Now. What I will do is I simply right. Click over here. Click on copy come to this section right click over here and paste it. As you can see, everything is so easy. Now I want this one to be left aligned, so I’ll select, left aligned, and I want to change the text to 4 orders over hundred dollars. Okay, so I’ll type in 4 orders over $ 100, and I want to change this style. Okay, so I’ll go to style, typography, let’s in decrease the weight to 400, and this is looking perfect now, if you see like this this, let’s drag this thing a little bit left side so that it looks perfect Center okay, so we can do it easily, like This okay click on update.
Now this page will automatically load now, as you can see, everything is looking so good. Okay, if you, if you see oh here, we have some space at top and bottom, so you can add those space as well. Okay. So, let’s see what we have next after that we have this next section we have a title subtitle and four different categories: ok, very easy to do again. Very, very easy! Ok, so come back again over here.
First click on this link. Now, let’s add a heading. Drag it over here: ok, let’s change the heading to new design, friends! Ok, let’s change it to news design trends and let’s make it Center aligned, because here in the demo website it is aligned at the center. Ok, now, let’s change this style, so go to style. The color is dark grey. You have some predefined color at the bottom, so select this second one that is the dark, grey color.
Now typography this time I have used a different font, which is really font. Okay, so you can type in are a Lewa Y will be, let’s increase the size to maybe 40 pixels and let’s make it a bit bolder: 900. Okay. This is looking exactly like the demo website. Now, let’s add this subtitle copied from your again click on this link. Let’S add another text below this one paste it over here. Let’S make everything centerline go to style, let’s make it light grey color, the third predefined color from here okey, let’s go to typography.
Let’S change the weight to 300. Okay, now, looking exactly like this one, we don’t have to do any more changes over here. Just one thing: if you see at the top of this o of this thing at the title and bottom, we have some gap. So, let’s add that gap at top and bottom, so what we can do you can hover this and click on this edit section again now go to advanced and we have padding now, if you see over here it is linked.
So if you type 10 pixels padding top, everything will will become 10. Let me show you when I put 10, as you can see, everything becomes 10. So first, let me put 0 now we can dealing this so click on this. It will dealing this now. We need to add only padding at top and bottom or you can add margin at top and bottom. So, let’s see you smudge, you know here top margin, let’s put 70 and, as you can see, when I put 70, he also bottom also becomes 70.
Now I want to change the bottom margin, so I will dealing this. I will click on this and I’ll make bottom as 450, maybe okay type 50, so the in this section, the top margin will be 70 and the bottom margin will be 50. Let’S click on update, let’s see how this page looks. Ok, so this is. How is this page is looking beautiful and after this we have this section. Ok, this beautiful section, let’s see how we can add this, come back to this page click on this thing, and let me show you what we can use, let us scroll down.
I think we have to use this one ok under premium add-ons. You will see this one premium banner. Ok, you can drag it and drop it over here. Ok, this is how it will look. So let me do one thing: ok, let me right. Click here and click on add new column, because we have four different columns again. Do the same four times? Okay, so we have four different columns, just like the demo website. Okay, one two, three four columns in the four first column: we have this jacket image and we have this text which says jackets.
Okay, so let me do you. Let me show you how we can do that: click on the first column, change the image or choose an image. So let me upload that image. Okay, that jackets image. Let me find that image. Okay here it is: let’s use this image. Click on open, insert media. We have this image over here and in the effect we have different effects, so I have used the effect one in the demo website, so let it be effect one now.
If you see we have some title and subtitle now we do on this subtitle. So click on content and delete everything from here. Okay, we just want the title and in the title, instead of premium banners, let’s type in jackets or whatever your product is and let’s make it Center aligned. So we have this at the bottom center line. Let’S make it Center aligned now, let’s change this style, so go to style title: let’s change the typography and let’s make it monserate.
First monserate, okay and let’s increase the size to maybe 38:39 would be fine. I am putting 38 and let’s make it 700. Let’S change the color to white okay, so here we have the color, let’s make it white now by default. We cannot put this background. Like you can see the background which I have put this black background. We cannot do it it this way. Okay, I will show you how we can do it. Okay. First, let me add one more thing: go to typography: let’s increase the line height to two okay, so make the line height to okay.
Now, click on update, let us let this pay the page reload now, once this page reloads, as you can see, most of the things are looking fine. We just don’t have that thing in the background that black color the background. Now again, it is very easy to do. I will again show you how we can do that. So I right click over here. Click on inspect. Now again, you don’t have to do that I’ll simply give the code, but I am just showing you for those of you guys who want to learn how this thing is done and I’m just showing you guys.
Okay, so you can simply click over here. Select this click on this plus button, ok and select background color, ok, not backgrounds, background color! Let me do again here we have background color and you can type any color, so I’m typing black okay. Now, as you can see, we have this thing over here, and this is looking beautiful. So again, I can copy this thing from here. Go to my website or, let’s edit, this same page.
Okay, let me delete this from here. Click on customize now, let’s see at present. This is how it is looking now again go at the bottom click on custom.Css and this time paste in this code. Now, as you can see, as soon as we pasted it, the effect has started okay. So, let’s click on publish, let’s cut this thing now, as you can see, this thing is applied over here. So this is how it is done and don’t worry you don’t have to do all this inspect element.
I simply give you that code. You can copy it. Ok, that code will be present under this article description. Ok now. Similarly, you can create all those different columns so or what you can do. You can copy this again right. Click over here, click on copy now, right, click over here, click on paste, paste and paste. Now you just have to change this style. Okay, so select the second one change the image to bags and title to bags.
Okay. So let’s upload the bags image IDs open this insert media. Let’S change the content, let’s change the title to bags. Okay, select the third one and it is sunglasses and we have style change the image. Ok, very easy select, this click on open, insert media and in the content it says, style. Fine, just like this. Okay, now, the fourth one is shorts. So, let’s upload this shirts image, this one click on open, insert media and let’s change the content title to shirts click on update, let’s review this page in a new tab, so click on preview changes, let’s see now, as you can see, everything is looking perfect.
Okay, so this is how it is done now. After this we have some gap at the bottom, so what we can do is we can select this section now. Edit section go to advanced first dealing this and at the bottom. Let’S add maybe 50 pixels padding of margin now click on update, let’s see, okay, now we have a decent amount of gap at the bottom. Now after this, we have to add this section of very, very beautiful section, okay, so very easy to do again.
Come back to this page first, let’s add some columns. So I’ll drag this columns over here I will right. Click over here. Click on add new column. So we have three. Do the same thing add new column, so we have four columns now: okay, in the first column, we have this thing in all the columns. We have the same thing used, so we have a icon, a title and subtitle. So to add this thing we use the icon module.
Okay, this one I can box module, drag this module under the first column. Okay, as you can see, this is the default thing. First thing is the icon. We have the truck. I can so, let’s change the. I can to truck fine, let’s change the heading to free shipping, okay change, the heading to free shipping and, let’s change the content instead of this, let’s put in our own content over here now, let’s, since this tile, okay, so the go to style.
First thing is the icon: okay, so the icon color is white. Fine. Now we have contents open content. First, we have the titles so title color will also be white. Let’S make it white okay, we cannot see anything so first, let’s do one thing: let’s click on update less since the background color, just like this okay, so that we can see the changes. So if you want to do changes to the column, you click on this.
Okay, columns, okay, you have this thing at, as you can see this gray color option. You click on this. You will see this edit column option now, go to style, change, the background and select a color. Let me select some color. I think we have used to this color. I guess some darker shade, like this. Okay, something have you have used something like this okay, so you can use this thing and let now we can see everything properly.
Okay, now again, we can click on this go to style, go to content. Now we have the title. So let’s change the title: typography. Let’S change the font to monserate, okay, sighs to 19 pixels and weight to 700 for the title. Okay, then we have the description over here again: change the color to white and let’s change the font size to 16 pixels, okay, looking better click on update now, if you see, let’s see how it looks, okay, so this is how it is looking now.
We need to do some more changes over here. We need to add, we need to make it full width. As you can see, this is also full width section, so we can do it easily. We know first select this edit section. The top section make it stretch section this time, also select this thing in the content with select full-width, okay, so two things we have to do now again how over here, you will see another section inside this section.
Okay, just follow my steps. Okay, we have done with this section now anyhow or this you see this section. Click on this do the same thing: full width and column gap. We don’t want any gap, so we can just type in no now, let’s click on update. Let’S, let us let this page reload, okay, we didn’t. Okay, we still have some gaps. So what we can do, I think in the first one I didn’t selected, the column gap so again select the top edit section, and here it is column gap.
Let’S make it. No gap again, click on update, let’s see again, okay, this is looking better now. This is a full width section, but when we do full width, we see one problem. We hear all the thing is touching the corners. Then this icon is touching the top. This text is touching both the sides, and this is touching the bottom, so we need some gap from all the four sides. Okay, so let’s do that so click on this icon box go to advanced and in the padding type in 50 pixels from all sides.
Okay, click on update: let’s see how it looks now. Okay, this is looking exactly like the demo website. So this is fine okay. So let me cut this thing now: let’s copy this from here right-click over here click on copy, right, click, paste right, click, paste, right, click paste now. Obviously you cannot see anything because we have. We don’t have any background color so select the second column. Click on over here edit column, go to style, let’s change the color to black.
So let’s select this background type classic color, let’s select black, so we have the black color select the third column go to style and we have this blue color. So select this background type, color, blue and select the fourth column. We have this beautiful color over here for style, background, color type or and and let let us see – ok, this beautiful color. Now, let’s change this thing. Okay for the second one click on this click on here, just click on this icon box, the we have the tags, oh, I can and it says, guarantee service.
So, let’s change the icon to tags. Okay, here you have and let’s see the text it takes to guarantee service or whatever it is okay. Now we can click on update and similarly you can change these things as well. Okay, I don’t wan na waste my time and your time showing these same changes and same thing again and again now, let’s see the changes now, as you can see, everything is looking perfect now, after this, we have this title subtitle again now what we can do, Because we have already created a title, subtitle I’ll simply right-click on this section and click on copy come over here and paste it now.
As you can see, we have everything just like this: we simply we have all the gap top and bottom all the design and everything we simply have to change the title which says: newcomers: okay. So let’s change this new trends into newcomers. Ok done click on update. Now, as you can see, everything is so simple and really fun to do you really enjoy when you’re doing this thing, ok, really awesome stuff.
Now, after this we have some recent products, ok or whatever products you want to show. So I am showing recent products. So what I will do, I will click on over here, scroll down and go under. I guess we have over here at the top. We have the WordPress section. If you have this thing, click on here, you will see all the WordPress thing now here we will have recent products. Ok, you recent products drag it and drop it over here now number of products to show a number of columns is to show ok.
So I have 4 4 thing over here and if you see here it says new in ok, I don’t want to show this new in over here, so I’ll go to title and type a space. Ok, now that new in is gone, click on update and, obviously because we have only two things, because we have created only two products. If you have more, it will show more now, let’s see how it is. Looking, ok, perfect, looking really awesome! Now, after this, we have this section, let’s see how we can create this section again, very, very easy to do.
Simply, let’s see what we have. Okay, we have the title subtitle again and then we have these things. Okay, oh we have this icon box. I guess or scroller okay, we will see what that is. First thing is we have to copy this thing? Okay, so copy this okay paste it over here and the icon it this time it says our brands, so, let’s type in our brands over here, fine. Now what we have to do is we have to add this thing, so I think it is called.
Let me show you alright. I think it is called yeah. It is image carousel, so bring it below this thing. Okay, bring it below over here now we have to add all the images that we want to show so: click on, add images, upload files, select files and select all the images that you want to show okay. So I am selecting all these images. Fine click on open – and here we have 1 2, 3, 4, 5, 6, 7, 8 images showing at one time alright.
So let it load everything so once everything is uploaded. Click on create a new gallery insert gallery now, as you can see, all the images are showing now. The first thing that we have to do is we have to change everything: okay, so first slides to scroll, slides to show those change, these slides to show to 8 because we want to show 800. Now again, this section is also full width section, as you can see, so, let’s make it full width.
Select this thing edit section, make it full width and also change the content width to full width. Okay, and also we have something over here. The background color is quite different, it is light gray and we have some gap at top and bottom. So let’s do that. Go to style background, color background color. Let’S change this to, I think e8 e8 e8 is looking better and, let’s add some gap at top and bottom so go to advanced and, let’s add some padding this time.
Okay, so padding, let’s add 70 pixels and bottom padding: 50 pixels! Okay, as you can see, the changes over here click on update. So with this we have this section as well. Now, the last section we have the title and we have some post now before showing this post. We have to create some post. So let me show you how we can do that. Come back to this website in fact come back to your dashboard, okay.
So let’s open this put in a new tab. Alright, so if you want to create a new post, what you can do you can have all post and click on, add name and you can put in the title. Okay, so the post title will come here. Whatever title you have, so it will come over here and here the content will come whatever the content is, so I don’t have any content at present. So let me go to lorem ipsum, calm or Lipson calm.
Okay, just to get some okay, the spelling is wrong. Just to get some dummy content, okay, so I go to Lipson calm and generate some lorem ipsum text. Let me copy this much and paste it over here. So you have the title over here and your content over here now you can add some text over here. You can add some hyperlinks some links to Amazon as well. Okay, you can add some products. You have this Busan thing over here.
You can add this product, you can simply select this and click on. Add products – and you will see your Amazon product will show up over here. Okay, let me show okay, let us bring it over here. Let’S publish this post now. This is incomplete, obviously, but I am just publishing it. Let’S view this post in a new tab. Okay, now, as you can see, you have this Amazon product over here, so basically in an Amazon affiliate website.
What you can do is you can write post about different products that you sell on your website so that he that post will be ranked on Google, and you can people will come to your website. For example, you can write a review of this bag of whatever it is, and you can write something about this and you can add this product in the middle so that whenever someone wants to purchase this, they have this option over.
Here they have this images option. They can simply click on this buy from Amazon button and they will be redirected over here and, if you see over here at the top, your tag is given. Okay tag is equal to. My tag is given over here, which say which you know which gives us, which says that you know your work. Your website is working and all these changes and settings that we have done related to whose own is working okay, so this is how you can create different post and you can use different our options like this to generate some more sales.
Now, let’s come over here. Let’S complete this thing, so we can add a category now. These categories are different, the earlier what we have created. Those were product categories, and this is post categories. Okay, so maybe this comes under bags. Okay, so I will just type in bags. Okay, click on add new category and, as I said you earlier again, this is different and that is different and if you want full width, if you want to remove this from the sidebar, you can select content layout, full width from here.
You can add a featured image and that featured image when, if you’ll be shown over here, as you can see this image – okay, so, let’s add a featured image. Click on set featured image, upload files select files. Let’S select this one: click on open click on set featured image. Let’S click on update. Let’S come back here, let’s refresh this page, a page now, as you can see, we have the featured image at the top.
We have this post in the middle and we don’t have any sidebar or so. This is how a post is created, or you can do some research on how to create a very powerful post. That is a very attractive SEO friendly post. Okay, you will see some articles or some articles. You can read those ok, but this is how it is done. This is the basic structure. This is basically how you create a post. Ok now, once we have a post – let’s refresh this page, so that we can add this post down on our website, all right, so, let’s scroll down and what we need is, after this section, we again have this title subtitle.
So let me do one thing: let me copy you, let me copy it from here and if you see something like this, don’t worry this is showing in Elementor, but on live website. You will see everything perfectly. So let me copy this from here. This title come at the bottom: let’s paste it over here: let’s change it to new design trends. Ok, so let’s make it new design trends. And after that we have. We have this post showing up over here.
Ok, so we have created one post, which means we. It should show ok, so come back over here and, let’s search for this one essential add-ons for elementor’s the first one is ei post grid bring this thing over here now, as you can see, it is showing your post, the hello world is automatically created, and this Is the post that we have created just now? Ok, so this is how you create your homepage. Let’S click on update okay.
So with this we have simply completed our homepage – ok, very, very easy and beautiful homepage. Now we can see, let’s see how this looks so we can simply go to our homepage. Let’S see how it looks. Ok, so this is our homepage. Okay, we have two products. We have all these things and obviously you can add animation to these things as well. I forgot to show you that, like in dem website, let me refresh this website so weak so that you can see the animation.
Ok, you can see the animations like this, so you can add this animation as well. You can add them to all these. All these things, ok, now to text you can add them to different columns, different sections and so on suppose. I want to add animation to this text. I click on this text go to advanced and I have this entrance animation so suppose I want this to zoom. In from left, so I select zoom in from left now, as you can see, then I select this text I select to maybe okay fade in right.
Okay, this is how it is button. I select animation. Maybe let’s see bouncing up? Okay, let’s click on update. Come back to this page, let’s refresh it now, as you can see all these animations okay. So this is how it is done, so we are done with the home page. Let’S see what we have next, okay, let’s, let’s start creating the menus. Okay, we have the menu over here we have this mega menu and we have all these things and let’s see how we can put our own logo over here.
Okay, so let me cut this thing now now: let’s first create a menu so to create our new menu. How would this – and you will see this menus open this in a new tab? Now, when you are on the dashboard at the left hand, side you’ll, see appearances under appearances or you can click on menus. You will come to this same place. Okay, so let’s give a name to this menu and click on create menu and let’s see what we have, we have the homepage.
We have all products track. Your order wish list my Khan shop now, okay, so we have home shock my account check out or maybe wish list click on add to menu. Okay, so shop now is at the bottom and instead of shop it says shop now. So let me type in shop now, okay, and we have one more page, all products. Okay, this is not a page – is just a simple link now, whenever you’re, creating a menu for the main section for this section make sure to tick mark this main.
Okay, click on save. First, let’s see whether this is working. Let’S refresh this page now, as you can see, the menu is showing up. Oh yeah, which means this is working, so we can work further, okay, so the first thing. What I want to do is I want to convert this shop now. This simple shop now link into a button, so it is very easy: we’ll open the shop now and you will see a CSS link which we don’t see over here, so what we can do quite tip-top.
You will see this option screen options open this and select this tick mark this CSS classes. Okay, take mark this now again come over here now, you’ll see your new option. Css classes under this type in BTN short form for button. Btn click on save menu come over here. Let’S refresh it now, as you can see, that thing is now converted into a button so easily. So simply, okay. Now, let’s see how we can create this mega menu.
So, first I’ll click, click on this custom links and I’ll type in all products. Ok, click on add to menu I’ll bring it at the top just after home and under this, if you see we have 1 2, 3, 4 5 columns and under each column we have different options. Ok, so let me show you how we can do that. So first, let’s enable Mac mega menu so under all products I’ll open this expand this and I’ll enable mega menu higher number of columns.
I want so I want 5 mega menu columns, ok and, let’s add the first column. Ok, so maybe in the first column you want to show all the bags I will type in bags. Ok, so this is for the first column, I’ll type I’ll bring it under all products. Maybe in the second column I want to show all these shirts, ok I’ll type this shirts over here and in the URL I’ll type in hashtag click on add to menu again bring it or all all products in the third column.
Maybe I want to show all these shoes ok choose category then in the fourth column, I want to show all the sunglasses not sangla. Okay, find sunglasses, ok, click on add to menu, and in the fifth column I have this image as you can see. So I will not do anything I’ll, simply type in hashtag and I’ll type in column. 5. Okay, I don’t want anything over. There now bring it over here. Let’S save this menu, let’s refresh it and see the changes now, as you can see, we have all product when I hover this, as you can see, it is already created into a mega menu.
We have one two three different four: five columns: okay, let’s add some more options under bags, so let me do it very quickly. Custom links put a hash tag over here and obviously you don’t have to put hash tag. Were your. If you have some category, then you have to put in the category link over here. Okay, now let me show you how you can cat get the category link, how old products you will see the categories open this category, so here? Okay, so you have this back.
Sling suppose you want this link. So what do you do you? You have this view link you right-click on the view copy link address come over here and paste in this link. Obviously, okay, so I am doing for tutorial purposes. That’S why I am putting that hash tag, but you have to put in the category link: okay, whatever it is now, link text may be a school bag or whatever, okay, so I’ll type in school bags, click on add to menu and the second one, let’s type In nylon bags, okay doesn’t make any sense, but still third one, maybe jeans bags.
Okay, fourth one, maybe I don’t know just bags and fifth, one I’ll type in PU packs. I don’t know why but PU leather, not leather, PU bags. Okay. Now, let’s bring all these things under bags, okay, so I will bring everything under bags: nylon bag since bags all those bags. Okay, fine, just awesome, so you’ll see all products under all products. We have bags under bags. We have all these options: click on save menu come over here, let’s refresh it okay, so we have all products under all products products we have bags and under bags we have all these options now.
Similarly, you can add undershirts shoes and sunglasses. Now I am NOT doing that because you already have seen how you can add under bag, so similarly, you can add under shots, ooh shoes and sunglasses, because that’s just the same process. Okay, now I will show you how to add this image. Okay, because this is something different: how to add this image in the 5th column so again come back to your dashboard now how our appearances and click on widgets now you’ll see this option over here.
Click on this create a new sidebar. You can name it anything! You want so I’m naming it column, 5 or maybe menu column 5, so that I know what this sidebar is useful for click on create sidebar. Now sometimes this happens. It will just keep on loading forever and it will not redirect you anywhere. So this thing happens with you. What you can do you can simply reload this page. Ok, let me show you now, as you can see, menu column 5 is selected or n created.
Now you have to bring image or think over your image widget under here. So let us search for image widget here it is image. Select this make sure mega menu, column or whatever you have created is selected. Click on add, widget. Ok, here it is under the one sidebar that you have select created. We have this image. Let’S upload a new image, in fact, let’s upload the same image here, it is click on this click on open click on add to widget, save it come back to again come back to menu, so under appearances, you will see menus click on menus now.
Select this one column 5 and just expand this thing and mega menu, widget area select that and select the widget area that you have created mega. I have created this one menu column, 5. Select. This click on save menu now come back over. Let’S refresh this page. Now let me hover this now. As you can see, this thing is showing now there is one problem again. I see this column five at the top. That is the title now I want to hide that title now, as you can see in the demo website, you don’t have any title at the top, so I want to hide that title so very easy come over here again, select this column five.
Now, in the CSS type in hide heading, ok, hide heading, simple, makes sense, common sense. Click on save menu come over here. Let’S refresh it now, as you can see, that title is gone, and this is looking amazing, okay. So with this, we have also completed this thing now, let’s see how we can add our icon our logo over here, and let’s do some changes to the menu. As you can see here, the menu is quite bigger.
The font and everything is quite bigger here. It is quite smaller, so you can do this as well. Click on customize, alright! So first, let’s change this logo. So what you can do in the customize you’ll see header option, click on header and select logo. Now you can select any logo to upload. So, let’s click on select logo, click on upload files, upload select files and select this logo, click on open click on select, just click skip cropping, and your logo should so show up over here.
Let’S see alright. Now, as you can see your logo here, you can click on publish now. Let’S change all these things. Okay, so come back over here and select to again come back and click on typography now select main menu. Let’S change the font family to monserate. Okay. Now, as you can see, the fonts have changed, let’s dig increase the weight and, let’s make it semi bold again done. Let’S increase the font size to maybe 15 pixels.
Now, as you can see done as well. Okay, you can add, do some more changes from yes, if you want click on publish, come back again, come back and go to footer bottom. You have this footer bottom select. This come at. The bottom you’ll see this copyright text over here copyright 2018 ocean WP. Now I want to remove this ocean WP theme by Nick, and I want to put it my name: okay, maybe theme by Nayer shake whatever you want: okay, alright reserved by your website; name.
Ok, it’s all up to you! This publish it and you can simply cut this thing. Okay, so with this, we have also done this thing and, let’s see what we have in this shop, page click on shop now page now this is our shop page and we have some. We have to do some changes over here, because if you see the shop page in the demo website, it is quite good. Ok, we have the filter by price followers. The right side is same.
We have the same products showing by the left hand side. We have the some awesome stuff: ok, some awesome widgets. So let’s delete all this regular recent post recent comments and add these things: filter by price product categories and so on. Ok, so let’s do that so again. Come back to your website, ok to your dashboard and click on widgets. Now, here you will see at the bottom WooCommerce sidebar.
Ok, so we have to drag whatever we want. Whatever we should. We want. We have to drag under WooCommerce sidebar, so the first widget that we want is filter by price. So come with your let’s search for filter by price. Here we have filter product by price of take on this and select buchamma, sidebar click on, add widget, and that’s it. Let’S click! Let’S come over here, let’s refresh this page now, as you can see just by doing that, you have this widget over here, which is awesome now after this we have this social icons.
Ok, followers social icons, so here at the top you’ll see this one, ok, social! I can select this make sure who comment sidebar. I selected click on add widget. Now here you have to put in all your social links. Ok, so I am just typing in this hashtag every time so that I don’t have to put my links because it will take a lot of time, copying and pasting all my links. Okay, so you can put pasted any amount of Link’s over here.
Click on save come back again, let’s refresh it. Okay, as you can see, it is also showing then, after that we have product categories. So come back to this widget, let’s search for product categories. Here it is product categories, click on add, widget. Let me first okay, let me first minimize this yeah. We have product categories now I don’t want to show the hierarchy. I want to show the product count.
For example, if you see in the demo have said it says, for product 0 product the product count. Okay, so I want to show this product counts, so I will take mark this click on save. Let’S refresh this page, let’s see ok, so this is also showing and the last thing is top-rated products. Ok, so I think for this we have products not filter product by rating. I guess let me search yeah here. It is filter products by rating select, this click on, add widget and done.
Let’S come over here. Let’S refresh it, ok, because I think we had, we don’t have any products that are rated. That’S why it is not showing. I guess I think that is the reason. Okay, you can change the title to 2 operated product. If you want ok top rated products. Click on save come over here, let’s refresh ok, so I think that is the reason. Let let me rate one product, let’s see what whether that happens, let’s go to review, let’s rate it five-star click on submit.
Ok, there is an error we have to type in the comment: 5-star good product, fine click on submit, ok, it is still not showing, which is which means there is some problem. Ok guys. I think this was not the widget. Let’S see, let’s delete this one and let’s include this one products by rating click on add widget and number. I think once the one, let’s see, let’s refresh this okay, so this was the one okay, it is products by rating okay.
So with this we have all. We also have completed this one or the shop page shop, how you can display the shop page and different sidebar for this one? Okay. Now, let’s do the final thing, which is to change the footer widgets. We have some widgets used in the footer. Let’S add these widgets okay. So again in the same page under the footer one, what we will do first one is: we have the contact informations, so we will select this which at the second one contact info select.
This select footer one click on, add widget. Now we have to select and change your text from here, whatever okay, so I am changing this text. I am deleting text in this text. Yo, you don’t have to do anything under. I can class just change the title and content okay, so address change your drink, not even the title. Just change the content. Okay, your address content phone number, your phone number content.
If you don’t want to display the mobile number, you can delete it from here. Okay, delete everything. If you do not display the FAQs, you can delete whatever you want. Okay, if you want to display email, fine website, fine again, if you don’t want to display Skype, you can delete it. Click on Save Changes – let’s refresh this page and as you can see, we have the contact thing. Showing next thing is recent post.
So again come back over here and at the top we should have. Let’S see here, we have recent post. Let me first minimize this select recent post, this time select footer to click on, add widget number of recent posts to show 3. Ok, minimize this come over here, let’s refresh it, okay, we have only one, that’s why it is showing one then, after that we have some quick links or useful links. What do we call it? So I think it is added using custom menu.
I guess a custom links, okay, select, custom links, select photo three click on add widget, ok, so by default we have this useful link, tags and number of links to show. So maybe I want to show four links. First URL is hashtag and text is women. As you can see, URL hashtag text women, then we have men brand, A to Z, a to Z, latest fashion arrivals. Let’S use all these things: okay, second, one men; third, one brand, a to Z.
Fourth, one latest fashion: arrivals click on save, come over, let’s refresh this page okay. So we have these things and the last one. We have the same thing: social icons, so we have this social icon. So I guess, let’s see here, we have social icons, select the footer for and you can again put in your social icons, okay, so I’m just putting hashtag again for all these social sites. Let me put hashtag hashtag hashtag.
Okay, click on save come over here. Let’S refresh alright, so we have this social icons as well. So this is how you create all your website. Now there are more things that you can do. For example, you can create different pages like about us and contact us page. So for that I would recommend you to read some other article, because you know the main thing we have covered now those things you can see different articles on my blog, you can go to youtube and type in nature: shake Elementor, okay, you can type in my Name, slash Elementor, and you can see some latest article an element of, for example.
This is nine months ago. This is one week ago how to create a ecommerce website. This is three months ago, so you can read this one: okay, how to make our website for free theme and all those things here. I have shown how to create about us and contact us pages. I have also provided the free layouts. Ok, so this article will be very useful. You can see the the thumbnail over here. You can see the image over here.
You can decide whether you want to read this or not okay. So I think this article will be very helpful. I will try to give a link to this article in the article description below once this. You can creative about us and contact a space, adding wanted to include that, because that would make this article quite long, one okay, so it would increase this article. Two three. Four hours article, so I didn’t want to do that.
You can read this. It’S really easy to do. Okay, alright guys, so I think this is it for this tutorial. If you have any doubt any queries, any suggestion comments for me: you can leave them in the comment section below. Ok, thanks a lot for reading guys see you soon.
You have to sell this product on your Amazon affiliate storefront!
Spunks is an excellent food snack. Your buyer will be back for more. I mean, the product has five stars! Check out this superb pumpkin seed product. The video below gives you a look into the guys behind this great product.