Now, when you think of boards and when you think of creating about what is the first thing that comes to your mind code right, you need to write a program that will act as a bot. Now this Twitter bots application, helps you create BOTS visually. So you don’t have to worry about writing any code. You don’t have to be a programmer.
All you have to do is describe your bot in plain English and will do the rest. So here are some of the capabilities of the terawatts application. It can read you it and favorite tweets. It can follow users who do it on particular topics. It can send DMS or direct messages to your new followers. It can reply to do it with a public reply or even a DM, and finally, it can add users who do it on particular topics to one of your tutor list.
The other interesting feature of the tutor BOTS application is that you can specify the time period for which the board should run so, for instance, if you’re offline during evening or late night, you can instruct the bot to only run between 6:00 p.M. To 9:00 a.M. When You are usually offline. Ok, now that you know what the bots can do, it’s time to create a tutor bot, so the first thing you need to do is: go to App Store, tutor comm and create a new tutor application.
Now this is the easy part. All you have to do is fill in the tutor, BOTS name, a unique description, and your website address now remember to put the full website address, including the HTTP part, finally agree to the developer terms and conditions and create your application. The bot has been created successfully, but if you look at the access level, it is set as read and write. What that essentially means is that your bot can read tweets and it can write to it.
It cannot, however, send DMS so for that what we will do is we will modify the app permissions and set the access level as read/write and access DMS. Our tutor application is almost ready now. The last thing we need to do is generate the keys in access tokens and use that in our tutor, BOTS next go to lab nor dot or slash BOTS to access the Twitter bots application and here copy paste, the tutor keys that we have just generated music.
So we are all set. It is now time to create the bots. So writing a bot is simple. You specify the search term, you specify the action and the bot is ready. So for the first bot, let’s say we are trying to capture all tweets, that mention the hashtag green energy and that have been retweeted at least a 10 number of times. If we find any such tweets, the bot should automatically favorite that it for the second bot.
Let’S have some fun, so we will try to find to it that have misspellings of common word, and in case somebody has misspelled that word. We will try to send them a to be a public reply, saying that the correct spelling is this now. They are definitely not going to like this, but this is just to demonstrate the capabilities of the bot for the next bot. I am trying to find out interesting users who tweet about life facts, and I am trying to add them to a tutor list that I have already created so for that.
What I will do is I’ll specify the search term as hash lifehacks min faves 5. Now this is a search operator that will only return to its that have been favorited at least 5 times now. The important thing to note here is that when you are specifying a tutor list 1, this tutorial should already exist and, second, the way you should specify the tutor list is mention your screen name, followed by a slash and followed by the slug of the Twitter list.
Let’S now switch to the fourth, but it is not important that you create all the bots in one go, but for this demo, let’s do that. What I want the 4th bot to do is send a DM to someone who follows a particular user. So in this case, whenever somebody follows labne, all a DM will be sent, so you specify the user name in the search field and the message that should go out as the DM in the reply field.
So it’s time to create the final bot – and this is an interesting one, because, unlike other boards, that are always running, this will only run during certain hours. You you so what I am trying to do is set up an out-of-office reply, bot that will reply to tweets that come when I’m offline, so the bots have been described and it’s time to create and unleash those BOTS. So how do you do that? Simple? Just click the Create button, so when you click the Create button, what it does is it creates a background process that runs every 15 minutes, so your bots will auto run every 15 minutes.
They will find all the matching tweets and perform the associated actions against those tweets. There are two other important buttons on this page that you should know about. One is the show logs button, and this comes handy. If you are trying to know what the bot is doing in the background, and if the bot is not working, what could be the possible reason? Then you have the stop button and has obvious this helps you stop all the tutor bots in one go.
So, let’s see what the bot is doing in the background now here is a tweet that the bot has sent fixing asking somebody to fix the misspelling, obviously a fun bot – and this is the next week that the bot has favorited. So if you remember, we had a board that would favorite all green energy hashtag tweets with minimum number of favourites as 10, so it has done that so creating bots is very simple. The only thing you need to take care of his play by the tutor rules.
You should also check out tutor archiver. It helps you save to it’s in a Google sheet forever.
Today, in this article, we’ll see how to make an Amazon affiliate website now, this website is a money-making machine people on thousands of dollars per month with this kind of website. Now, for those of you who don’t know what an affiliate marketing is it’s a very simple concept, let me explain you this, so what we’ll be doing is we’ll be creating an e-commerce website.
You can see on your screen. This is the website that we’ll be creating in this article. Now, if you see over here when you scroll down, you have some products over here: okay, some different products. We have some bags shirts, let’s open a product and let’s see what we have over here now, if you see over here, we have this bag. You can see these beautiful images. All this title subtitle usually dispatched within 24 hours.
We have this short description. The price, the long description as you can see over here, so what is happening or your is – is this: this product is not even our own product, okay, with neither I manufacture nor I supply these products. What I have done is, I have installed, or I have simply imported this product from Amazon, and you don’t have to do anything manually. Everything is done automatically.
You just take on one simple button and thousands of products. If you want obviously thousands of products, if you want only single product, you can import any product from Amazon with one single thing and it will import everything. Images, price description, short description, variations and everything completely don’t have to do anything at all. But if you want to do some changes, obviously you can do.
For example, if you want to change the name of the product you can do so you can change the price description, images and so on. Okay, so this is what happens now when someone comes to our website, they purchase this back. What happens is they will do check out on Amazon and when they do this checkout and amazon amazon will give you or 10 % or 12 %, whatever the commission rate is commission on this product, okay source? For a, for example, a person has purchased dollars product from our website.
Now what happens is Amazon if the Commission rate is 10 percent? Amazon will give you ten dollars for that. You don’t have to do anything. The order will be placed on Amazon. The the order will be supplied by Amazon. You don’t have to do anything. Ok, everything will be done by Amazon. You simply import products on your website and the person comes to your website. They make a purchase. The order goes to Amazon Amazon dispatches the product to the customer, so you don’t have to do anything.
So this is a very good business model. To start with, you can earn really a good amount of money from this kind of website now. I hope it is clear what Amazon affiliate website is now, let’s see the demo upsells that will be creating in this article, ok guys, so this is the website that we’ll be creating in this article and for the design of the website. I have taken inspiration from the top ecommerce websites, like Amazon, flip card, Aliexpress, etc, and most of the time what I have tried over here is, I have tried to keep the cost as minimum as possible.
Instead of using a 60 $ 70 premium theme, I have used a free theme. I have used free plugins. Most of the plugins are free, a free page builder. Most of the things that you will see over here are free, but it’s in spite of using the free things we have not compromised with the design of the website. Design is top-notch. We have the best quality, your design, that you will see. Okay, so we have used mother most of the thing as free resources.
Ok, now there is a plug-in that we have used, which is a premium plug-in which is ozone. I will show you how you can get that and how you can integrate it with your website. Ok, so let’s see the demo set that we’ll be creating, so this is the website which you see on your screen at the top. We have this header and here at the header, at the left hand side we have a beautiful logo. You can replace this little place it and put in your own logo.
Then we have the nav bar the navigation bar over here and I will show you how you can create this mega menu. So this is a great thing. You are using a free theme, but you can create mega menus and everything that you want. Then we also have this button. Okay, so you can convert anything into a button. You know you’re at the at the header. Then we have the cart icon. When you hover the cart icon, you will see what product do you have in your cart? You can view your cart.
You can do the checkout and so on. You can search for products over here. Then we have the first section which you see. This is a hero section, the top section. We have some title subtitle some sale going on and we have a call to action button. So suppose there is some sale going on. You can redirect this button to some category some specific product or specific, a specific page. If you want, then we have a beautiful image in the background, then, after that we have this text or this section free shipping for orders over $ 100.
Obviously you can change the text. You can change the message according to your needs, then we have the categories that we sell on our website News, design trends. We have jackets bags, then sunglasses and shirts. Obviously you can put in your own categories. Your own images over here now I have used a very beautiful animation, as you can see when I hover this category, the image shifts towards the right and the title comes at the top.
So this is a very beautiful design. Then we have this section. Okay, again, a very beautiful section: we have submits messages showing up over here with some beautiful. I can send colors the first one is free shipping, so we have free shipping, then guarantee service 100 % money-back guarantee. Then we have product offers. So you can change the icon, you can change the message. Everything is very easy.
Making any change in this article is very in this website is very, very easy. It’S all simple, visual thing. Okay, you don’t have to do any coding anything at all. It’S all simple! Visual thing and, as I have said you earlier importing products, is also very easy from Amazon. You simply have to click on one single button and everything will be done automatically. Okay, so no worries. Okay, then we have our recently added products.
So here we’ll see how a single product looks like after this homepage. Now, when you scroll down, we have our brands. You can have your brand’s that you want that you sell on your website or whatever you want, okay, so basically that would be a better thing to showcase all the brands that you sell on your web. Then we have. The post post are also very useful in affiliate websites, so we will see a little bit about post as well then, at the bottom we have the footer, which is divided into four different sections.
We have the contact information recent post. Obviously you can add recent products. Anything over here in the footer I have added these things. Then we have some few quick links. Then we have some social icons now at the bottom. Footer I’d think you cannot see this, but at the bottom footer we have the copyright text. Now, when you click on this button, it will redirect you to the top of the page.
Ok, now, let’s see how single product looks like, so this is how your single product would look like. We have the title over here in the breadcrumbs. Ok, you can see under products, we have some category. Then we have this product. Ok, then this is the product page. There are many different designs that you can choose for product page, for example. This is using the left sidebar. If you want, you can simply remove this sidebar and you will have your product page full with ok, so you can do that as well.
Now the left-hand side you’ll see if we have few options like followers product categories and at present this one is selected because this product comes under handbags. Then, after that we have the top-rated products. As you can see, these are the top-rated products, then, at the right hand, side we have the actual product or when you hover this product it gets zoomed in, but because this image is quite small.
We cannot see this effect, but when you, but when you normally, however, a product you can see the image gets zoomed in then we have the title over here: the price there is some sale going on. That’S why the original price is tracked out, as you can see, $ 27.99 is striped out and we have this sale price now here it says as of July 10, 2008 een and this time. Obviously, if you want you can in fact I would recommend to remove this text.
I’Ll show you, in the tutorial later on in this tutorial, how you can remove this tag text from you. Okay, then we have this short description which you see over here. It says usually dispatched within 24 hours. Then, if you want you can, then we have the ACTU car category add to wishlist. Then we have the categories that this belongs to. Then we can all. So it’s all up to you. This thing is optional.
If you want, you can showcase this. If you want to sell in specific countries, this is good okay, so this product is available in India, as you can see the flag warrior. She shows that then, after that we have this this tab. So here description and all these things, this is the long description and everything is imported directly from Amazon. You don’t have to type a single or text over here then we have the frequently bought together products.
This is also imported from Amazon, so the person can select this or they can simply and take this, and they can add all this products to cart and they can do a checkout okay. So it’s all up to them. Then we have Amazon customer review. You can showcase the reviews of Amazon on your website. This is totally optional. If you want, you can simply remove this tab, then we have some additional information, for example, brand name color.
You can have some reviews over here and then at the bottom. We have the related products at present. It is showing only one product. This can show up to four or five products. I think it okay, so this is how your product page looks like single product page now, let’s see how this shop page looks like okay guys. So this is how our shop is looks like very much similar. We have the title the subtitle over here then the breadcrumbs at the left hand side.
We have almost this same sidebar. We just have this one extra thing, which is filled up by price okay. So this is the sidebar filter by price followers, product categories, top rated products and so on then here I they left a right-hand side. We have all the products that are shown. Okay, you can see when you hover this, the image changes. Okay. So this is all these things and you have many options.
If you want, you can remove the Add to Cart button over here. You can simply display the the image or you can simply display the price you can, you know, do a lot of customization option now now, if I say something, obviously you will not understand what I am saying. What do I mean by removing this button or adding some extra text or so on when we get into the tutorial when start creating this website, you will understand everything into much detail.
Okay, so this is your shop page. Let’S see what we have next, then, after that we have the wishlist page. As you can see, we have three different products in our wish list. You can add to cut one product is out of stock, so you can see the stock status. Then two products are in stock. We can add to cart, we can do checkout and so on. We can also apply coupons. If you want, so we will see how to create coupons.
Okay, then, after that we have the my account page. The user will have this. My account page, they can see their dashboard, they can see their orders now. No order has been made yet, but if there is some order, they can see the order they can track the order. If there is some downloadable products, they can see those over here they can change the address and all those things from your billing address shipping address now no address has been set up yet because we haven’t done anything with this website, yet they can see the wishlist They can change their account, details, their phone numbers cell number or name and all those things then.
After this we have the cart page. This is our cart page. As you can see, we have one product in the cart. Okay, so I think you can see the product over here. You can update the cart, you can simply click on proceed to checkout and it will redirect you to Amazon to Theor to do the checkout thing. Okay. So this is basically the demo website and I hope everything is clear. What is Amazon affiliate website yeah if it is still not clear, don’t where you can simply continue reading this tutorial, and you will understand everything slowly and gradually and your you know: knowledge on affiliate marketing using Amazon will be much clearer.
Okay, so I hope you guys enjoy the demo website. I hope you liked it. I hope you liked the concept and you, if you guys, are really excited to make this kind of website then stay tuned. Oh yes! So, let’s start creating this website. If you have not yet subscribed to my blog, then make sure you do so give a thumbs up to this article. If you think this is cool, if you enjoy free stuff, then make sure you give a thumbs up to this article.
If you think this is helpful, then you can share this article with your friends on Facebook, Twitter, wherever you want and if you have any doubt any queries, any suggestions for in throughout the article whenever you have any doubt wherever you get stuck, you can simply leave In the comment section below that, what you’re, what you’re, what is the problem that you’re facing and so on? Okay I’ll, try my best to get to you and solve your problem.
Okay, now to create this website, in fact, to create any kind of website. We need two basic things: a domain name and a hosting account. A domain name is basically the web address, or the URL or name of your website. For example, google.Com is a domain name youtube.Com facebook.Com. All these things are different domain names. The address of your website. Okay, so you will have to purchase an address for your website.
If you already have one, that’s good, if you don’t have, I will show you how you can get it for free with the hosting okay and then the next thing that we need is hosting and hosting. Is these two things are compulsory domain name and hosting? Without these two II just cannot proceed further. Now you know what is a domain name is a web address. The second thing is hosting hosting is a place or a thing where, in all your website, data is saved.
For example, if you see these images all these different pages, all these products, every data that you see on your website is saved somewhere, ok saved it saved in a computer or in a harddrive that is running 24/7, so that whenever someone comes to your website, they Can see your website live? Ok whenever you go to Facebook, you see live Facebook okay. Now because it is running 24/7. Whatever time you go day-night you will see the website.
You see all the data you’ll see everything. Ok, so that is basically what a hosting is everything all your website. Data is saved and at that place now, if you have a domain, but you don’t have an hosting that what happens is when someone goes to your website. They’Ll see a blank page because you don’t have hosting no there’s no data on your website. Ok, so both these things are compulsory. Now I will show you how you can get both this thing, because there are many different options that you can get.
There are many different companies that provide hosting and domain, but I’ll show you what is the best plan for you? What is the best company for you? According to your needs for e-commerce services, specifically, the website that we are creating these kind of website require different kind of hosting north irregular hosting. Okay, so I’ll show you what is the best hosting at the minimum price that you can get? Okay, so what you can do you can open a new tab and type in blog, TOCOM, slash PMD.
Now you don’t even have to type in this thing, there will be a link given in the article description below you can simply click on that link and you will be redirected to this page now. This is the cloud hosting page. If you see over here, it says cloud hosting, let’s scroll down, if you see that three different plans over here start our cloud business cloud enterprise cloud now this is a cloud hosting not a shared hosting most of the most of the times.
Whenever someone he redirects you to some hosting plan well, you’ll, see mostly it is the shared hosting now for e-commerce website shared hosting is not recommended. You should have a cloud hosting, but if you want you can go for web hosting share hosting. If you want share hosting you, can open this web hosting link in a new tab and you’ll get those shared hosting options. Okay, if you see there’s some price difference over here, the share hosting starts as at 295 dollars per month and cloud hosting starts at 595 dollars per month, okay, and so because there is a lot of difference between all these things.
If you want, if you, if you have a very small budget, you can start with shared hosting starter plan or business plan, whatever you like, or if you, if you are very willing to do some investment to earn some real money, then you can go with starter Cloud, ok, the cloud options, so it’s all up to you. You can start with any option you want. If your budget is very small, you have almost no money, you can go with web hosting the shadow sting or if you are ready to do some investment in this new business, you can go with cloud hosting okay, so you have both the options.
Now I am using the cloud hosting package, so that’s why, in this article I will show you how we can go with this process cloud hosting process? Okay, so, as I said you earlier, we have three different plans. So your starter cloud business cloud and enterprise cloud now, let’s see what other different features that this hosting company provides, and why do I recommend this because there are many different companies that I can recommend you.
Why only this, because this is this – has something special. Let’S see what is that thing? Special okay, so, first, if you see the first two features are very crucial: it says 6c pr6 core CPU and 6 GB of ddr4 Ram. Now, a few moments ago, as I told you that a costing is a place, our computer or a hard drive which is running 24/7, it has all your web website. Data is stored, so the computer, which these guys are using, is a really strong and robust computer.
It is using a six core CPU and six GB of ddr4 Ram, so that is really great, really fast and super awesome computer. Then we have unlimited bandwidth, which means that you can transfer an limited amount of data from your website. You can upload unlimited amount of data. You can download unlimited amount of data from your website, then the most important feature if you over here is SSD space. Now there are two kind of hosting SSD and HDD.
Now SSD is very more faster than the regular HDD planck’s. If you want to see the difference, you can go to Google type in SSD versus HDD web hosting. You will see all these different articles. You can read them. You’Ll understand about these different things in much detail or what you can do. You can go to images like what I do normally and you can open. The first result that you see over here now, as you can see, that three different criteria was your speed, IOPS and latency.
This orange part is HDD. This green bar is SST in the first one is speed at the bottom. It says higher is better. Now you can see, SSD is very more higher than the regular HDD. Then the second one is IOPS again, it says higher is better and you can see. The difference is around 100 times. Okay, so in IOPS, SSD is 100 times better than the regular HD D. Then the latency again it says lower, is better and you can see the difference is hundred times.
So you know you get the idea. Ssd is way more faster, better in terms of performance, then the regular HDD. Now not only that you get SSD, you have unlimited SSD space, so that is another amazing feature now. Another feature is unlimited website hosted, which means that you can host unlimited amount of website in one single hosting plan, so you don’t have to purchase a new hosting plan every time you create a new website.
Ok, so suppose, today we are creating this website tomorrow. You might need to create some other website, maybe another website for your business or a blog or something so you don’t have to purchase hosting again. You can host all the websites unlimited number of websites in one single hosting plan, which is really cool. Now you also get a free domain. Remember this support is really good. As you can see, we have the live chat option over here.
You can call them, you can email them. The support is really really good. Then we get a free, cPanel, ng INX web server. Then we have SSL. In fact, we have wild card SSL. First of all, let’s see what an SSL is now, if you see the RAM website, we have the secure socket over here. This is what the SSL certificate is now our. What I used to say is SSL is compulsory for e-commerce, but today, from this July, 2018, 2018 SSL is compulsory for any web site.
Ok now what Google has done is what, if your website doesn’t have this SSL certificate, Google will say that this Chrome browser will say that this website is not secure. So whenever someone goes to your website, it will say you know what this website is not secure. You should not enter your credit card debit card details or your phone number any crucial information over here. So that is a very bad thing for your website now, from July onwards, 2018 SSL certificate is compulsory for your website.
Now here we have wild card SSL, which means that you can install SSL certificates on unlimited number of domains and subdomains. Then we have optimum cash. This will improve the performance of your website, make it much faster and much easier than we have memory. Cache instance of 256mb again it will improve the performance and speed of your website. Then you see, the performance is three times better than these two plans and we have 60 day money-back guarantee okay.
So we have all these features. There are three different plans. Start our business and enterprise cloud if you’re creating a website for the first time and you’re very much sure that you’re going to create only one website at least four five six months from now – and you don’t need another website, then you can go with starter cloud Because if you see over here, you can hear in this starter cloud, you can host only one website now suppose tomorrow, if you wan na, create another website, what you can do, you can ask TMD to upgrade your account and they will upgrade your account to business Cloud or enterprise cloud, whatever you request and you can create your next website.
Okay, so you can start with starter cloud if you want, if you are ready to create just one website, and if you know that I am NOT going to require another website for a few months from now, then you can use this starter cloud or if you Are sure that you have to create many different websites, then you can choose business cloud or enterprise cloud. Both are really good option. Now I am using the enterprise cloud, so I’ll click on this button, which says get started now when you do so.
You will see this screen now here you have to enter the domain name, which you want for free, okay domain name, which you want for free, so you can type in your domain name or here you can select the extension if you want com, dotnet, dot org. If you’re creating this website for country-specific, then you can select a country specific domain extension like dot CA for canada, dot asia, are.Com dot in not com dot in for India, dot, uk’ for United Kingdom and so on.
Okay, but for most of you guys, I would recommend you to stick with com. So once you select your domain name and you extensions, simply, click on proceed all right now, here you have to put in some basic information about your company, like your first name. Last name: your email address phone number. Okay, your state countries, you’ve called all these things. Then you have to enter the payment information if you want to make payment through credit card debit card.
You can enter your details so here, if you want to make payment through PayPal, you can select PayPal and pay through PayPal. Now I would recommend you to pay with credit card or debit card. Okay, that is much better option. Then we have some more options over here. Okay, first of all, you have to choose the data center location. Now the one you have to choose the one which says nearest to you, for example, here Singapore says nearest to you, so I am selecting this one period is by default 12 months.
I also recommend 12 months. It never select one month period because you have to pay seven dollars extra per month, so that is not recommended. I would recommend you to select twelve months from you. Then, by default domain privacy is stigma. You can leave it tick mark. It will cost you around. Ten dollars extra per year, but I think it is worth it it will protect your identity from anyone. Okay, if you don’t have this tick mark, anyone can see who? Who is the person who has registered this website? So I would recommend you to just tick mark this thing.
Okay, now at the bottom we have a very important option, which is promo code. Now here you have to enter in a year seven and a double y AR and numeric seven after you do so. Click on apply now, as you can see, it says this promo code gives you seven percent of this purchase and seven percent is the highest discount that tmd offers on cloud hosting, so you are getting the highest discount possible.
So that is a great thing once you are done with all these steps, simply click on with your. I agree to the tmd Terms of Service and click on checkout. Now, once you click on that checkout button, you will receive our email from DMD hosting now. This email would look something like this, so you have your username, your FTP C password. You have your server IP name servers and all the important information that is required.
Okay, so L, all the important information are entered over here, make sure you save this email somewhere. If you multiple email addresses, you can forward these to those different email addresses. Okay, that would be better now, if you see at the bottom, you have this control panel link open this link in a new tab and copy your FTP, username and password from here come over here, paste it over here, okay, paste it over here and click on Login now, once you click on login you’ll see your cPanel.
This is see the cPanel. Now, what do you have to do because we have purchased the hosting and domain now it’s time to upload the website or it’s time to install WordPress on that domain? Okay. So, let’s go at the bottom, you’ll see under Softaculous app installer click on this now here we have WordPress is the first option when you hover this, you will see this option install button click on this install button.
You will be redirected to this page now from the top make sure HTTPS is selected. Okay, because if you see or hear the it has HTTPS okay, so secure socket as okay make sure s is included over here. Then, after that, you have to select the domain name on which you want to install WordPress, so I’m selecting the domain name for me, then, after that you you have this WP already typed in oh you’re, in in directory, make sure to remove this thing.
Okay make sure this this field is empty. Then we have site settings, you can put in your site name and site description so and I’ll simply put Busan tutorial by Nia Shaikh. You can put anything. Obviously it’s all to you. I am just putting site name, as was on tutorial and site description as binary Shaikh. Then we have to change the admin and password okay. So let me change the admin and password.
As you can see, my admin username is quite different. I have a uppercase letter, a capital letter to capital letters at the beginning. Okay, then few small letters – and I also have this underscore okay, instead of the space I have used this underscore. Okay, so make sure you have some things are using him. Something like this, which has upper case lower case and a few special characters, or maybe few numbers, if you can include okay, then change this password.
Let me put in my password over here, okay, so I am putting my password then after that make sure you also change the email address put in your own email address, so you go at the bottom, and click on install okay, so WordPress is getting installed on Your website, it will take few seconds. You can just simply wait. As I said it has taken few seconds now we get two different links. First, one is you simply your website link? That is your website: let’s open that in a new tab.
Okay, so this is how our website looks. At present, we have this beautiful SSL certificate. I did talk now. The second link is the dashboard link? Okay, let’s open this in a new tab, so this is the dashboard link. Okay, the control panel link from where we will be controlling everything that happens on our website. Okay, so this is the page from where you can create products. You can create post. You can create pages, you can create everything you can change this style.
You can do everything so whenever you want to come to one want to come to this page, your control panel, page, you simply type in your username or your URL address, then type in /w p admin all right. So we have seen this is how our product our website, is looking. This is how – or this is our dashboard now at the left hand, side you’ll, see few options. Don’T worry I’ll, explain you all the options, we’ll use, almost all the options that you see over here, okay, so the first.
Let’S do one thing: let’s click on appearances now, if you see well, your three different themes are already installed now for the for those of you guys who has seen a wordpress tutorial for the first time. A theme is nothing but the design of the website. Okay, for example, by default, we are using the 2017 theme and, as you can see, we have this snapshot over here. This is how the website will look like and exactly.
That is how the website is looking over here. Okay, now, if you use this theme 2015, this is how your website will look. You can see the snapshot this screenshot okay, so you can change it now. We don’t need all these themes. These are really boring themes, so we can simply delete it and we’ll use a very useful, very cool theme, which is a free theme. That is a great thing. Okay, so if you want to add a new theme, if you want to change the style and design of your website, simply click on this add new button.
Now here, let’s you will see that thousands and thousands of free themes available over here you can install and activate any one. You want. Okay, now, the one that we want is called ocean WP. So, let’s type in ocean WP in this search bar okay. So this is the plug. This is the theme, simply click on this install button. It will install this theme on your website now. Let’S activate this theme, so click on activate button.
Okay, so once you install and activate the theme, let’s come back to our website. Let’S refresh it now, as you can see, the design is totally changed, and now, after some time, we will convert this website. This boring website into something amazing like this. Okay, we’ll change the design completely now again come back here. If you see, we have one notice which says that this theme recommends this plugins and all these plugins are free.
So, let’s install all this plugins and by the way, a plug-in is a way to extend the functionality of your website. Okay, for those of you guys who don’t know okay, so you have used different plugins for different functionalities. For example, let me give you a very perfect example, which is blue commerce. Now, by default, WordPress is not meant for e-commerce websites. Okay by the default WordPress cannot create any product.
You cannot do all those options. Okay, if you want to convert your website into an e-commerce website, you use a plug-in to add they from all the functionalities and features of an e-commerce website. Okay, so that is what a plug-in is it it will add and expand the functionality of your website. So we have three different plugins, so here we have, which is a free and best page builder. We have ocean demo, expert, export and ocean extra.
So, let’s click on this begin installing plugins link. Ok, so all this plugins are here you can install one by one, but what we’ll do is we’ll take ma voiture. It will select everything and from the bulk action we’ll select, install and click on apply. Ok, as you can see, all the plugins are installed. Let’S click on return to dashboard. Ok, so all our plugins are installed and activated. Now we need few more plugins, free, plugins to eat or to add some more features to our website.
So what you can do you can hover plugins from the left, hand, side and click on, add new to add new plugins. Now the first plug-in that we need is obviously boo, commerce, ok. So what we’ll do is we’ll type in commerce, foyer, ok, just simply type who commerce okay. So this is boo. Commerce by automatic you can see it has more than 1 million active installation, so more than 1 million websites are using WooCommerce.
You know at present. So, let’s click on install now, let’s activate this plugin. Alright! Yes, now, once you activate this plug-in, you will see few notices over here. So what we’ll do is we’ll see all these notices later on? First, we’ll have to install few more plugins. So what we can do is we can simply again click on add new. Ok, the next plug-in that we need is Elementor, essential, add-ons I’ll give all these plug-in names in the article description below you can see those ok.
This is the one elemental essential add-ons by quartic. You can install this one. Okay, now don’t click on this activate button. We can activate all the plugins at once. First, let’s install all the plugins, then the next plug-in that we require is premium add-ons for Elementor. This is the one by leap 13 install it then, after that again, don’t click on activate, simply type in the next plug-in, which is Elementor add-ons and templates by cz light, ok, whatever it is by theme, I’ll.
Ok, you can see this one click on install now. Ok, and the last in that we require, is custom sidebar by WP mu, dev. Okay, you can see WP mu dev. This is the plugin click on install now now, if you see at the top, it says we need two more plugins WooCommerce variation switches and WooCommerce wishlist. So let’s get these plugins as well. Click on this link begin installing plugins. Okay, we have two plugins, let’s so dick Makaha bulk action, install click on apply; okay, so both the plugins are installed and activated successfully.
Now, let’s click on plugins from the left hand, side; okay, first, what? Whenever you? Wherever you click? You will see this thing. This setup wizard for wishlist button, so you can simply click on. Let’S go not a very important one: okay default wishlist name create automatically. Simply click on continue, don’t need to do any changes. Click on custom continue. Okay, not very important. Simply! Click on just may keep clicking on those continue and the last step.
Click on this button return to the wordpress dashboard. Alright, now, let’s click on plugins and we need to activate all the plugins that we have installed and there are two different extra plugins that we don’t need, which is a kismat anti-spam, so we can delete it and the other one is Hello. Dolly you can delete these as well. Okay, now, as you can see, there are few plugins that are not activated, so we can take McCoy here from the bulk action.
We can select, activate and click on apply. Okay, so all the plugins are successfully installed and activated now it’s time to install the most important plugin for this website, which is the ozone plugin. Now you can open a new tab and type in block to.Com, slash Busan. Now this link is also given in the article description below when you open this link. You will be redirected to this page. Okay.
Now, if you see oh here, we have the few plugins so here this is actually a bundle of few plugins and themes. We have one plug-in. We have Kingdom theme, we have discount fighter finder, whose own contextual, okay, so you can install this one. Okay, it’s around 70 bucks. You can add to cart’ and purchase this, but I have already purchased it so I’ll. Not do that I’ll simply cut this thing, so once you purchase, let me show what happens so once you download it from themeforest.
You will see a file like this okay, whatever, as if I you can extract this file from here. Okay, so once you extract it, you will see a folder like this. Okay in this folder, you have your theme, you have your plugins and everything okay, but this is not the theme that we are going to use. This is a very bad design. Unfortunately, I don’t like the design of Kingdom theme. That’S really bad. Okay, I’ll use the plug-in, which is over here ozone, Amazon, affiliate plugin.
When you open this thing, you will see a folder plug-in and you’ll see another zip file whose own okay. Now this is the file that we have to upload. Now. Let me do one thing: let us come over here, but before this, let’s see one thing when you hover media and click on, add name you’ll see over here it says: maximum upload file size is only 2 MB and if I see oh you’re, the file size Of this plug-in is 6 MB s more than 6 mb s.
Ok, so here I can upload only 2 MB file maximum and the file which I want to upload is 6 MB. So there is a problem over here, but it has a very simple solution. Let me show you how we can fix that open FileZilla and if you don’t know how to set up FileZilla, there is a article on my blog very easily. I have shown how you can set up FileZilla for free all right guys. Now, once you open FileZilla, you will see your website folder over here.
For example, if you see my website name is boo zone 2, dot, Nia, shake calm, ok, so I’ll have to open that folder. Let me find that folder here. It is Busan, totnes check, comm. Let us open this folder here. You have one a file which says the first file in fact dot htaccess. Now what you have to do is you have to drag this folder on your desktop? Ok on your website on your computer desktop, then let us do one thing: let us select stuff from your okay.
Sir Dexter is selected. Let’S drag this file on our desktop okay. Let me do it okay, so it says: transfer finished now. If you see on my desktop, I have this file. Let me open this file, okay, so this is how your file would look like okay. Now, what do we have to do? We have to paste some simple line of code away here, so go to my website. In fact, this link will also be given in the article description below okay.
If you don’t find that link, you can go to my website and let me show you that post, I think if it will be on second third page. Okay, let me show you that, ah here it is the uploaded file size whatever this is the this. Is the post that you have to open solved the uploaded file size exceeds the max whatever the it is? Okay, you see this. You can open this. This will. This link will be given in the article description below, but by chance.
If you don’t find it, you can go, you can do it manually. Okay, now here, if you go at the bottom, you’ll see five lines. Of course, over here five or six lines of code simply copy it from your go to that file. Paste it over. Here: click on ctrl s to save the file. Now you can cut this thing. Go to FileZilla refresh this section. Okay, now drag this thing: dot, HDX s and again bring it to your website folder.
It will ask you to overwrite it select all right and click on. Ok, ok, so transfer is finished. Now now, let’s come to our website. Okay earlier it was saying 2 MB maximum upload size. Let’S refresh this page now, as you can see, it says, 64 MB. So now we can upload any file of up to 64 MB. Okay, so again have all plugins and click on add name. Let’S add this plug-in now this time you don’t have to add a plug-in.
This way we have to upload a file because we have a file, so click on upload plug-in choose file, and let me go to that file whose own coupons say whatever the folder is, whose own I feel: Amazon, affiliate, plugin. Ok, this is the file select. This file click on open click on install now, ok guys, so this plug-in is successfully installed now, let’s click on activate plug-in. Ok, so once you activate this plug-in, it should ask you to ok once it will ask you for purchase code now yeah.
This is very important. You have to in insert the purchase code. You’Ll see the purchase code on you’ll, see this purchase code on themeforest. You can find it from there and paste in the purchase, but obviously I’ll have. I have I’ll have to hide this code from here. You can in just copy and paste the purchase code and click on activate now, alright guys. So once you do so, you will see this setup wizard now, let’s click on get started now.
First of all, it will ask you: what kind of website is this that you’re creating? Is it a blog online store, personal web site or something else? So this is an online store, so we’ll select online store and click on next then, what is this state of the website? Is it a fresh, install or you already have some content so for us it is a fresh, install, so select fresh, install and click on. Next, and what is the purpose of you want to use whose own so you have different options? Select the first one I already have a website and want to earn some money, easy money from affiliation.
Ok, so select the first one and click on next. Alright. Now we have some more options over here and you can take mark or and take this first of a few options of. If you see by default, are tick mark and few are antic. The first one is on site cut. Now this option will allow your customers to add multiple Amazon products into cart and checkout through Amazon system, with all at once so very important.
I think it is necessary so make sure you tick mark this now ninety-day cookies, if a customer adds a product into your app into the Amazon card and it’s kept there for 90 days and if the user continues shopping, you will still get the commission. Ok. So very important make sure it is tick mark if you want to show the Amazon reviews tab, which we have seen in demo website. You can take mark this or you can simply antic this okay.
So do you want to show the frequently bought together product which you see on Amazon, frequently bought together? Let me show you both these options: okay, let’s open this product, okay, so, first of all, we have this Amazon customer review. If you don’t want to desert, show this tab, you can come over come over here and untick. This reviews tab the second option. If you see under description, we have frequently bought together products.
If you don’t know, don’t want to show this thing, you can UNTAC this cross-selling. Okay, it’s all up to you, my product availability by country box. If you’re creating this, it’s it’s all up to you. If you want, you can take mark this or you can simply uncheck this, it’s all up to you by the way it will show this thing: okay, product availability in a country; okay. So if you want you can take this, not a big deal you want to show coupons, then we have check out email us, the user email address before this checkout process happens.
Now. This is not required. So make sure this one is an ticked okey. Then remote Amazon images, this option will display all product images from Amazon, CDN, so very important. We don’t want to upload our own images. We want to just import the images of the person. Okay, so make sure it is strict mark and if the product is free shipping, do you want to show that, for example, if you see over here, it says free shipping.
Whenever it is free shipping, it will say free shipping, or do you want to display this or not? It’S all up to you. If you want, you can simply take mark this and click on next. Alright, now price set up, Oh get price from Amazon or all the sellers, so you can simply select Amazon import product from merchants, make sure you select Amazon and other sellers. Okay. If we select Amazon, then you can import only those products which Amazon is directly selling, for example, Amazon, Kindle, okay, they have their own product.
Amazon is the merchant or the seller of the product. But if you want to install some iPhone, then Amazon is not the seller or the owner Apple is the owner, and so you will not be able to import that so make sure you select Amazon and other sellers, not import as published or draft. So whenever you import some product, do you want to directly publish them or you want to make you know you want to send them to draft? And after that you can, you know, check them, you can edit them and you can publish them.
So it’s all up to you because this tutorial this is for tutorial purposes, I’ll select, publish import product with zero price. No, we don’t want to import that, so let it be an taked import attributes. Now, basically, an attribute is, for example, we have iPhone 7 or iPhone 10. Whatever you have okay, so iPhone 7 has 32gb 64gb 128gb. So we have different variations. These are called attribute products.
Okay, so obviously we want to import all the attributes so make sure it is stigma. Now, click on next now number of images you want to import and number of variations. If you want to import okay, if you want to import only three images, you can select three over here. If you want to import all images, you can select all similarly for variation, you can import one variation, two variation or all the variation.
Okay. Now click on next and these changes can be changed later on. Okay, I’ll show you how you can do how we can change these settings. Okay, click on next now this is the customization option. Read redirect option whenever the person clicks on that checkout button. What happens is they will get a message? You will be redirected to Amazon to complete your checkout. If you want, you can change this message, okay and type in something else.
I don’t know why you would you do that, but you can do so. If you have some better idea, you can do that now redirect them in how many seconds. So, basically, what happens is when they click on that checkout button. That message will be there for three seconds: okay and after three seconds they will be redirected to Amazon. If you want to increase or decrease this time, you can do that from here, okay and by button by button custom text, we don’t have to do anything or your everything looks fine, just click on next all right now we have at the at the last step.
We have to put in our access key ID and secret access key and your affiliate ID now, if you have a different affiliate ID for different countries, for example, you have account with Amazon, Canada, also amazon, india, also amazon, us also. You can use all of them at one place, and here you have to put in your Access ID and secret key okay. So let me show you how we can get that open. A new tab go to google and type in Amazon, associate, ok, and it will show you the Amazon Associates of your country.
I am in India, so I will get this link affiliate program dot. Amazon.Com UK you’ll see affiliate program dot amazon.Com. You can something so click on this link. First link. Now you have to join for free if you are not yet join the affiliate program of Amazon. I have already done that. Ok, and that is very easy. It takes few seconds or a few minutes it is. It does not require a very high knowledge or anything like that.
It’S a simple form you fill in and you are. You join the club okay. Now because I have already joined that I will click on login. I have my username password over here: click on login. Then, let’s see what happens? Ok, so this is the screen. Ok, as you can see, this is the screen. You can see the clicks that my link has got got and the fees and all these things. Ok. Now, what do you have to do? What we require here is we want the access key ID and this secret access key.
So let me show you how you can get that go here and Howard tools and you will see product advertising. Api click on this link. Now, click on manage credentials; ok, now click on sign-in or if you are not created any account with AWS, it will automatically ask you to create one or it will create one for you. Ok, it’s very easy! Simply: click on login. Ok, now you can. Click on over here continue to security, inches and you’ll see your access key.
Let me show you you. When you see this thing access key, you will see. I have created many in the past. You can see all those things now. I can use any one of these. I have created some deleted some, so let me delete one and let me show you how you can create a new one. Obviously you will not have any so you’ll have to create a new one. So if you want to create a new one, simply click on this blue button create new access, key okay and you can show the key okay.
You can copy the key from here. Let me copy it from here paste it over here. Then we have the as secret secret access key copied from here again paste it over here, okay and make sure you download the key. Okay, very important simply click on this button and make sure you download this keys. Okay, very, very important once you do so simply close these things now come over here after that we have to put in your affiliate ID now.
If you want to see that again, let’s come back to this website affiliate program, dot, amazon, dotting at the top you’ll see this tour name and you’ll. Have this thing over here copy this from here? Okay, I have this link. This is my store name or ID copy it from you and paste it under your country, for example. This is India and pasting it under India, then after that main affiliate ID. If you have multiple affiliate IDs in different Amazon websites, you can select one of the means.
So for me I have only one – and that is India, and that is my main request. Type make sure it is auto, detect and import location. Where do you want to import the product from? Do you want to import the product from amazon.Com then select this one worldwide? If you want to import from amazon.Com is on India, you can select India, so I am selecting India and you can click on this button check Amazon, AWS Keys.
It will check this skis whether they are correct or not. So, let’s click on this button. Ok, as you can see, everything is right. Okay, we can proceed further. Let’S click on finish, alright, so congratulations! You have fully setup boozing wizard. It is that simple and we don’t have to do a lot of things. So if you’re very, very simple, simply click on this closed well guys, so once you do so, you will be redirected to this page.
So we have a lot of notices over here. Let’S dismiss all these things, one by one: okay, let’s click on no thanks. This means this notice everything. Okay. Now we have this plug-in setup. We have everything which is awesome, or I guess now, once you do all these things. Let’S do one thing: let’s simply create few pages for commerce. We have to create some default pages. Okay, when you click on pages, let’s see what happens you see.
There are only three pages, one, the wishlist page because of that quick setup, a sample page which we don’t require. So you can trash it. You can delete it from your a policy page, which is the gdpr thing. Okay, draft page now we have to create few new pages, so click on add new. First create this shocked bits so simply type in shop now open a new tab. Let me cancel all these things and type in gue commerce, shortcode, okay, short codes: here it is bucum a short codes and open the first language is short code included with commas open.
This link you’ll see few shortcuts over here. So for shop, page: okay, let’s see what is the checkout page, my account page? Okay. First, let’s create the cart page. So simply select this copy. This shortcode from here boo commerce, cart come over here and let’s first create the cart page. So, let’s name it cart and let’s paste the shortcode over here, click on publish – and this will add the cart page.
Okay, let’s click on add name again and after that we have the checkout page. So, let’s copy this shortcode away from you and obviously you can see it says you need to install default WooCommerce page and cart, page and checkout page now. This thing will disappear now, let’s click on checkout, page okay. So this is our checkout page. Let’S paste in this shortcode for checkout click on publish alright.
Now after this, we have the my account page so copy this link from here click on add new page, let’s name it my account and that’s based in this short code click on publish. Now we have one more shortcode order tracking, but this is not required over here, because we cannot enable person to track order, because this these products are not our products. These are Amazon’s product, ok, so they cannot track order from our website.
So we have three pages. We here, let’s click on dashboard. Now, let’s click on pages. Okay, you have the cart page, checkout page all this page. Let’S click on add new page. Let’S create a shock page, don’t need to put any checkout. Also, simply, click on publish now, let’s open this product in a new tab. Let’S view this page now, as you can see when we view this page, we have this a shock page over here.
Ok, no, don’t don’t need to create or do anything now, let’s to view a simple buchamma settings. So let’s click on how, let’s our commas and click on settings, there are very few settings that we need to do over here, not write. The regular ecommerce have said there are very few settings that we do first. Setting that we have to do is journal settings. We have to put in your address, so I am putting Mumbai everywhere.
This is the address where your store or your business is pasted. Ok and let me put in the country as India, Maharashtra, ok country and your state name now, do you want to sell to all location or a specific country, so I can select, sell to specific countries and I can select India. So maybe I want to sell only in India if you want to sell in multiple countries, you can select more countries from here or you can sell in all the countries.
Now I want to ship to all the countries I want to sell to ok, which is fine, enable the use of coupon calculate coupon discounts of sequentially not required now currency, because I am selling in India and I am importing products from Amazon dot in. I will select I Indian rupee, which is Indian rupee here it is. Let me select this ok click on Save Changes. Alright. Now we don’t need to do any changes.
I guess, let’s see, let’s go products! Okay, you know we have this shop page select shock from your okay, the page that we have just created so select the shop page from your click on Save Changes. Okay, let us see some more changes now go to. Shipping shipping is not required now, payment account and privacy simply go to accounts and privacy. Now do you want to allow the customers to place order with without an account? So, yes, we do want to allow them allow customer to log in into an existing account during checkout yeah.
We want to allow them now. Do you want to allow customers to create an account during checkout? Yes, do you want to allow customers to create an account on the my account page, yes very important now, when creating an account automatically generate a username from customers? Email addresses not required. Okay. We, if you want the user to set up their own username when creating an account automatically generate a account password.
No, we want the user to set up their own password. Ok, now remove personal data from orders. No, we don’t want to remove them because we need those data. Ok, now rest everything. You can see your privacy policy. What you want to. If you want to change some text from here, you can change it now. Click on Save Changes after that go to advanced and under the cart page, select cart under the checkout page.
Select checkout under my account page select my account under terms and conditions page. You can select the privacy policy page, which is already created. Ok then go at the bottom and click on Save Changes. Now, let’s refresh this page, everything should be fine. Yes, fine, alright, so we are done with the main settings who commerce and whose own settings now, let’s see how we can import products from Amazon.
Ok, so let me do one thing from the left hand side, let’s click on Busan. Ok, it is loading. Now there are many different options over here. First is Amazon configuration? We can click on this. You can configure your keys if you want to enter your keys later on. You can enter them from here. Ok, you can see your keys are here. You can enter your this IDs and everything later on. If you want okey, let’s click on dashboard.
We have some more options now. Most of these are not very important option. The important one are two options. First, one is this. Now there are two types of option available to import product from Amazon. The first one is single product wherein you want, you can import products one by one and the second one is bulk. Okay, so you can import products in bulk. Now I’ll show you both the options and how you can setup those.
Now. First, let’s see how to import a single product: now we can import a single product using a free Chrome extension. Okay. So if you want to get that extension, simply click on over here, direct import extension, okay, you’ll see this thing over here and you have to download this thing. Okay, W zone directing text input extension from here, so you can open this link in a new tab. Now, as you can see, I am getting this option add to Chrome.
Let me click on this. Okay. I think I cannot do that. So let me do one thing: let me copy the title from your W zone: import a direct import cut it from your. Let us search from here, okay, W zone direct import. Let’S search for this here we have now click on this Add to Chrome, button click on add, extension; okay, it is checking ok. Now it is added. Now, let’s see okay now let us click on save settings.
Now, as you can see, it says, options updated successfully now at the top you’ll see this option, which says authorize now very important, make sure you click on this authorize button now it says website successfully added now, when you click on this button. As you can see, this website is successfully added, okay, so very good. Now we can import products from Amazon, so let’s open Amazon dot, whatever Amazon you are affiliated to and let’s open some products.
So let me open this first product from here now, as you can see when I open this product, I see this option over here at the top. Now I can simply click on this button and it will import everything all these images, the price, the description, the variations, if available, it will import everything for me, I if I want I can import this into specific categories, but I haven’t created any categories, as you Can see when I hover this, you get this option when you click on click on this option.
It asks you for importing category, but we haven’t created any category. That’S why we are not seeing anything and if you want to import any specific variation like one or two, you can select it from here. Okay, so it’s all up to you now, what I’ll do? I simply click on here on this button. As you can see now, it says product was successfully added now, as you can see within one second, this product is added, and now we can view this product on our website.
So, let’s click on this button view this product. Now, as you can see, this product is successfully added on our website. Ok, now we have everything we have all the images we have. This title, the price, all these things in the description. We have these things. Ok, we have frequently bought together and everything is present over here. So this is how easy it is to create and to create or to import a product from Amazon.
Now this was the first type, how you can import a single product and obviously you have to be on the. If you want to import a single product, you have to be on the product page. Now, if I go over here and if I try to import as you can see, if you want to import products, please go to Amazon product detail, page ok, so we cannot import anything from here. We have to go to Amazon product detail. Page like we are here on this page: ok, the next type is bulk input.
Now, let me show you how you can bulk import everything? Let’S click on dashboard again now, let’s click on this option. Ok, insane import mode. Let’S click on this option now here we can import product using categories or keywords or and all these things, for example. This is some brand name. I guess so let me do one thing: let me copy this name and paste it over here now. Do you want to apply this great keyword in all the categories or in specific categories? Okay, so I am selecting all the categories you can say, select specific categories like shoes and bags, and here we have luggage luggage in bags.
Let me select this luggage and bags. Okay, now, when you select those you get some more option: okay, all browse nodes bags and backpacks, or luggage wallets and pocket; organizer sure, okay, handbags and clutches. So I am selecting handbags and clutches okay. Now you get in some more option now in handbags and clutches: do you want only clutches or handbags or if you want against only if you want only this much and you want to browse all you can select all you if you want, you can select specific Brand name and specific manufacturer: if you want to import product which has maximum and minimum price, you can put the price over here.
Okay, if you want to import only those product which has at least 10 % sale going on, then you can select this or at least 20 % sale going on, select this and all those things. Okay, so you can select all this option. Okay, this is basically the import criteria. What are the different criterion that you need to import? Okay, so I have put one category a one keyword. I want this keyword only in this specific category and this subcategory and this subcategory and this the product should be minimum of this price, and maximum of this price may be minimum of one hundred and maximum of five thousand.
Only Prada only import these products within this price range and the product has minimum of 10 % sale going on. Okay, it’s all up to you. I want to import the first page or the first two or three pages of the result. Okay, so I want only the first page, so once you select all these things, click on launch search, alright. Now, as you can see, we have all the product that are on the first page. Now, if you want again, you can, if you want, you, can upload or install or import all the products at once.
If you want to import only specific product, you can take mark that and if you don’t want to import other product, you can untick that so suppose I want to import only the first product, which I, which is shown over here so I’ll, take mark this rest. Everything I’ll and take it. Okay, obviously you’re doing this to import bulk, but I am just importing one. I don’t want to import bulk, okay, so I’m I have ticked antiqued everything I have only the first one tick mark over here.
Okay, so once you know, and once you decide what or product you want to import, you can go at the bottom number of images. As I said you earlier, you can change the settings now. Here is where you can change the settings. Okay, number of images to install, so maybe I want only the first three images: okay to import number of variations. All the variations are, maybe few variations. It’S all up to you now.
Do you want to use the categories for Amazon or you want to create your own category and import them? So it’s all up to you so select these options and click on import products. Now, as you can see, it says product is imported and it took almost zero seconds. Okay, so you can close this box and, let’s, from the left hand, side. Let’S click on products, let’s see now, as you can see, we have two products imported okay.
This is the one that we imported using the the extension Chrome extension, and this is the product that we have imported using the bulk extension okay. Now, if you want, you can go to your shop page, you will see two products. Okay, now, as you can see, we have two different products over here, which is awesome. Now, let’s do one thing. Similarly, obviously, you can import unlimited number of products and if you want to do some changes, for example, let’s open this product now, if you see we have only three images, because I have selected only the three images, if you remember okay, now, if you want to Do some images some changes over here? You can very easily do so.
You can click on this edit button or you can simply come to this page. You have this edit product page. You can open this link in a new tab, and this way this way we’ll open. Okay. Now you have this description from here. You can change the description. If you want, for example, it says 1-year domestic warranty, I want six months domestic warranty, whatever it is. Okay, so I can change it from here.
It’S all up to you. I would I don’t know it sort of to you. I don’t. I would not recommend anything if you want, you can change it. If you don’t want that’s good, you have this category. So here, if you want to use your own categories, you can untick everything and use your own category. Simply. Click on over here create new category and suppose I want to show only back. So I click on bags, admin category and I can select this category from here.
Okay, I can add some tags and all those things now here we have the prices. I would not recommend you to change the prices, because this is synchronized with Amazon. So please don’t change the prices that will not be. That would not be a great idea. Okay, now product short description, you can change it from here. A short description shows over here, as you can see, so you can change your product, short description, images and all these things, okay, I would not recommend you to do much changes over here.
Only though I would recommend you to change few things, if you want in the in the description the long description at the top which you see if you want, you can add some SEO friendly keywords and so on, but don’t do a lot of changes over here. Okay, so once you are done with changing everything, simply click on update. Let’S come over here, let’s refresh this page. Now, let’s go at the bottom now, as you can see, it says six months, domestic warranty instead of one year domestic polity.
So this is a great thing you can do or some changes as well now. This is how your product page is looking at present. Now I have first of all here we have this thing which says as of July: bla bla blue, this state and that’s dead. If you don’t want this, if you want to remove this thing, let me show you how you can do that this will be a very good tip for you. You can use this trick too. You know on other websites that you create now whenever I want to do some changes.
What I can do. I can select this section right. Click, oh yo and click on inspect I’ll. Give you the direct code, don’t worry, but I am just showing you this. So once you do so, you’ll see this options over here now you can click on this button. This plus button, ok and you can type in. Oh, I think it is. We are displayed you type in display and then type in none now, as you can see when I display I type in display and none that thing is gone now, I can simply copy this code from here.
Ok, go to my website! Click on customize! Alright! Now, when you click on that customize button, you will see a screen like this go at the bottom: click on custom, CSS, J’s and paste in that code, whoa now, as you can see as soon as as soon as I paste it, that thing is gone now. If you want to delete these things as well, you can see. Do the same thing. Select it right, click! Oh you click on inspect, then you will get the same option again.
Click on this plus button. Ok, not this way! Ok, this time you have to do another with some. Let me show you, okay, yeah yeah this. We have to select this thing. Ok, don’t worry! If you don’t want to learn this, if you simply want the code, don’t worry I’ll give all these codes in the article description below you can copy them from there. Ok, so, basically, let me show you first, so you select this thing.
You click on this plus button. Again, you do the same thing display and none now, as you can see, that thing is also gone now. Let me copy this thing from here: paste it over here click on publish, let’s call cut this thing and don’t worry if you don’t want to do this thing. If you directly want these codes I’ll give them in the article description below, as I said, ok now, you can exce this out now, as you can see, those messages are gone now we simply have the price, the selling price and the main price.
Ok. So this is how it is done. I just wanted to show you guys. Ok, if you don’t want to remove them, it’s all up to you. So this is how you import products from Amazon. Very easy, very, very easy to do. Don’T have to do anything at all, you don’t have to know any commerce, any coding or anything. It’S simple one-click installation one-click importing okey. So this was the first section of the article wherein we do all the important settings how to import products from Amazon.
How to set up Busan, how to set up commerce, creating pages and all those things now, in the next section of this article, we will start designing the website, because if you see this is not looking that good and if you go to your home page, let’s See what happens? Let’S see what we have, and this is looking very boring so in the next section of this article, we’ll see how to design the website. Okay, so see you guys there welcome back guys to the next section of the article.
In this section, we will see how to design this website. Okay, so let’s get started without wasting any time. So come back to your website, let’s go to the dashboard, let’s open the dashboard in a new tab. Alright, now the first thing that we have to do. We have to create a page that is the homepage, we’ll start with home page, so that we can start creating all these websites and so okay. So it’s really easy.
We can simply have pages and click on add new. Now, let’s name it home and let’s click on publish now, let’s open this page in a new tab, so we can view this page in a new tab. Alright, now we see some problem so here. The first problem is that we don’t want this sidebar okay. So let’s get rid of this sidebar, so at the bottom you’ll see under ocean WP settings we have content layout, select full width’ from there and click on update come back to this website.
Let’S refresh it again now, as you can see, that sidebar is gone, we also see. If you see we don’t have any of this title and all these things on the home page. So we’ll have to get rid of this title and this breadcrumb. Ok. So again, come back over here, select title from here and make it disabled. Let’S click on update come over here, let’s refresh it and as you can see, we have a perfect page now we can also do one thing: we can disable margin.
Okay, come back again and under margins, disable margin, because if you see I I know right now, we cannot see anything, but by default there is some margin at top and bottom. So I want to disable that ok, disable it click on update. Let’S refresh it now, as you can see, that margin is gone now. The only thing that we have is the header space. Ok, this space and rest everything is flanked at the bottom.
Now this is the perfect situation to create the home page. Now, if you see one more thing when we are on the home page on this website on this website, you don’t see anything like slash home. We just have the domain name, and here we are on the home home page and we have this website name slash home, so we have to get rid of this thing. I okay, when I click on this, as you can see, we are redirected to some other page.
I want this page to be my home page. Whenever someone clicks on over here, they should be redirected to this home page blank page at present. Ok, so we what we can do is we can go back to our dashboard and we can have our settings and click on readings all right and we can select a static page from the home page and we can select my house or we can select home. Okay, so under home page select home click on Save Changes.
Okay, now, let’s come over here, let’s refresh now, as you can see. First, let’s see here in the URL bar, we have home, let’s refresh and see what happens now, as you can see when I refresh this page that home is gone and when I click on this, I am still on this page. Ok now, let’s do a few more settings for yur, so under settings click on general. Now you can change your site name and tagline from here as well and make sure you tick mark this membership.
Anyone can register ok, very important and click on Save Changes, and after this under settings we have permalinks click on permalinks by default day and name is selected. We want a post name, okey, so select this link post name and come at the bottom and click on Save Changes. Ok, so these are the main changes that we have to do now. Again: click on pages and edit homepage. Here we have click on edit.
Now you’ll see this button over here, which says edit with Elementor click on this button. Now it’s time to start creating the page start designing the page using the free page builder, Elementor, alright guys. So when you click on that edit with Elementor button, you will see this screen and now we have to use this beautiful and free page builder to design the website design, the home page or the complete website.
Now. Basically, what we have is, at the left hand, side you have different modules for different purposes. For example, if you want to add text, you use the text module if you want to insert a article or the image in your website, you use these modules. Ok, so don’t worry, you will understand everything easily very easy to start now. The first thing that we have to do. We have to add this thing: okay, this simple text from here: okay, so – and we have this image in the background – so what we can do.
First, we click on this to get started. We click on this plus button to add new section and we select the number of columns we want or this structure we want now here. If you see we have only one single column, we have nothing else. If you see over here, we have four columns, but here at the top we have only one column, so we’ll select the first option, only one column: okay, when you select this you’ll, see edit section options.
Now we have to edit something over here. Okay, for what we have to do first thing: we have: we want this beautiful image in the background, so what we can do, we can go to this option. Styling option. First option is background, so we’ll select this classic, we’ll add an image. In the background, we can upload any image we want and obviously, as I said you earlier, you have all these images. Everything in the article description below you can download everything for free.
You will see this media and you’ll have all these images. Ok, so we have the image over here. Let me select this image: click on open click on insert media. Now, as you can see, this is how it is looking now. Let’S do some changes over here. First of all, what is the position? I want the position to be Center Center. Now, as you can see, the image has changed a bit then attachment we don’t have to do anything repeat, no need to do anything now, sighs make sure to make it cover, so select it cover.
Now still, it is not looking that good because of two main things first is the height is quite small. We want to increase the height and make it like this, and the second is: if you see this, there is some gap from both the sides. Now I want this to be stretched to be full full with full size. So let’s do these two things again go to layout and first select. This section stretch section make it yes.
Now, as you can see, this is stretching no in in the complete website. Now, after that, we have to change this setting height setting now, instead of default, select minimum height, okay and let’s make it to 600, okay. So, let’s type in 600 over here now, this is looking perfect click on update, let’s, okay, now, as you can see, this is looking perfect now, once we have this, we can click on this icon over here we have so many different modules, or here now we Can use these modules for different purposes, for example, if you, if I want to add this thing, if I want to add this text, I use the text module.
If I want to add some google map over here, I will use the Google map module and so on. So it is really easy. You don’t need to know much about it. You when I start creating the website. When I start designing it, you will understand everything in much detail. Okay, so first, let’s add this text spring /summer collection. So I will drag this text section over here and bring it over here and, as you can see by default, it says, add your heading text here and the default color is blue and we have some style.
We have to change change the styling and everything from your first. Let’S change the text and, let’s put in my text spring /summer collection. Now, let’s go to style, to change the style and everything. Now we have to change the color first now let me give you a very simple the trick that will really help you now. If I want to know the color of this text or color of everything on any website, I simply select that right-click over there and click on inspect and, as you can see at the bottom right, I get the color code.
I can simply copy this color code from you. Come back to my website. Now select this color. I can obviously change the color from here. You can see the changes live on the website. I can change it from your, but if I want the exact same color, I can paste in that color code. Okay, so we have the color now, let’s change this style, so typography now edit this section. First, let’s change the font family to monserate all right.
Let’S increase the size to maybe something like this. 43 is looking better and let’s make it a little bit thinner. So let me make it 400 width, looking perfect okay. So with this we have our first text now, let’s click on update now, let me show you how you can save some time now. If you see over here, most of the things are same, in fact, all this style. Oh here is same: all the three forms are monserate, so what I will do is, instead of adding all the thing from scratch.
I simply duplicate this thing, so I will click on over here. In fact, I will right-click over here and click on duplicate. Now, as you can see, we have a duplicate of that one. Now, let’s change the text. First, it says new arrivals, okay, so let me type in new arrivals and let’s change this style, so go to style typography. Let’S increase the size, the size to maybe something like 75 76 or I think so when t6 is looking better okay, so I am putting it to around 76 77.
It’S all up to you and, as you can see, this is quite bold. Oh, so let me increase the weight to 700. Looking perfect, okay, exactly like the demo website all right now. After this, we have one more text, which is this one 20 per 25 % sale. So again I will do the same thing I’ll hover, your right. Click on this blue pencil button and duplicate it now, instead of new arrivals I’ll type in 25 %, sale again go to style.
First I’ll change, the color to white. Okay, like this, then I’ll go to typography, increase the size a bit more to maybe around 90 91 pixels, oh okay and I’ll increase the weight to 900. Okay, looking exactly like the demo website, so once you are done doing this, you can simply click on update and if you want to see the changes that you’re making, you can click on this eye button. This preview changes button and you will see a new tab and you can see the changes over here.
Okay, looking beautiful now, let’s add this button over here. This click here button beautiful and simple button very easy to do so. Let’S add that so come again over here on this page click on this link from your this icon and now because we want to add a button, we’ll use this button module we’ll drag at the bottom okay. So this is the default style. We’Ll have to change everything. First. Is we have to change the text? Okay, we don’t have to change the text.
The air. The text says click here here also, it says click here, but we want everything, uppercase, okay, so let’s click on this style. Let’S see everything step-by-step first, we have to change the typography, so click on this plus button this pencil, but let’s change the font family to monserate for this one as well. Okay – and let me do one thing – let me transform it into uppercase. Okay, all the letters should be capital after that, if you see this style is quite different here in the demo, epsilon have any background to the button.
The button background is background less and we have a very thin border, color white border color, and when I hold this button you can see the background. Color becomes white and the text color and the border color becomes black. So let’s see how we can do that. So come back to this page and let’s select this one: okay text color, so text color is white, so we don’t have to do any change background.
Color. Let’S select this, let’s make it transparent, so you, if you want to make it transparent. You drag this. Second, one at the bottom: okay, simple, okay: this is for typography yeah this one. Let me see: okay, yeah, you can say first, you have to select some different color and then you have. You can drag this thing at the bottom. It will make it transparent. Now border type select solid and with make it one pixel.
Okay, it’s just like this now this is looking better, but when we hover over this, as you can see the color changes and we also have a simple animation. Okay, so let’s do that now, if you want now, if you see where you’re, when you hover this button, nothing happens. So, let’s change the hover effect, so select our let’s change the text color to black the background color to white the border color to black okay.
Let’S see now, as you can see, text color black pack, a border color black background, color white, but we don’t have any animation. So, let’s add an animation and let’s add this grow animation. Okay or you can add, this grow rotate. Let’S see now, as you can see, looking awesome okay, so you can add this animation and if you want to redirect this button to some page, you can go back to content and you can, under this link, you have to paste in that link of the page.
Okay, it’s all up to you once you are done, click an update and this page will automatically load as you can see, and this is how your website is looking at present. I think this is looking amazing. Okay, now, let’s start creating this section and as you can see, it is really easy to create these different sections. Very, very easy: okay, okay, so let’s create this second section again very easy to do so again.
Come back over here now again, click on this pencil button now bring this text section at the bottom or maybe what we can do, because here we have two different styles. First, as you can see, the first style is that this is bold and the second style. This is quite thin, so, instead of just adding this heading I’ll, add this two columns: okay at the bottom, okay, just like this! So once I have these two columns in the first column I’ll, add this text: okay and I’ll change the text to free shipping.
Okay, let me add this free shipping over here. As you can see, it says: free shipping and I’ll make it right aligned. Okay, as you can see, the alignment is right. Side and you’ll understand why? Because if you see over here, everything is in center, and here we have two different columns, so first column will be towards right and second column towards left, so everything will be Center aligned. Okay, now, let’s go to stylus change the color to white okay.
Now, when we do so, obviously everything disappears, so what we can do first, we can click on update, let’s update it and let’s change the background color of this section to black, so that we can see everything perfectly so how old this – and you have this thing At the top edit section, as you can see, when I hover this, it says edit section click on that first stretch, this section, okay stretch it go to style, select background background.
Color make it black. Now, as you can see, we can see everything perfectly now. Again. Click on this text and let’s do the changes, go to style: let’s change the typography: let’s change the font family to montserrat and more mt/s eatable r80. Okay, let’s increase the size to maybe Oh think, 42. 40. 42, whatever you like, I am putting 40 over here. Let’S increase the weight to 700, because this is quite colder, as you can see, so this is 40 and 700 and rest everything is looking fine.
Now. What I will do is I simply right. Click over here. Click on copy come to this section right click over here and paste it. As you can see, everything is so easy. Now I want this one to be left aligned, so I’ll select, left aligned, and I want to change the text to 4 orders over hundred dollars. Okay, so I’ll type in 4 orders over $ 100, and I want to change this style. Okay, so I’ll go to style, typography, let’s in decrease the weight to 400, and this is looking perfect now, if you see like this this, let’s drag this thing a little bit left side so that it looks perfect Center okay, so we can do it easily, like This okay click on update.
Now this page will automatically load now, as you can see, everything is looking so good. Okay, if you, if you see oh here, we have some space at top and bottom, so you can add those space as well. Okay. So, let’s see what we have next after that we have this next section we have a title subtitle and four different categories: ok, very easy to do again. Very, very easy! Ok, so come back again over here.
First click on this link. Now, let’s add a heading. Drag it over here: ok, let’s change the heading to new design, friends! Ok, let’s change it to news design trends and let’s make it Center aligned, because here in the demo website it is aligned at the center. Ok, now, let’s change this style, so go to style. The color is dark grey. You have some predefined color at the bottom, so select this second one that is the dark, grey color.
Now typography this time I have used a different font, which is really font. Okay, so you can type in are a Lewa Y will be, let’s increase the size to maybe 40 pixels and let’s make it a bit bolder: 900. Okay. This is looking exactly like the demo website. Now, let’s add this subtitle copied from your again click on this link. Let’S add another text below this one paste it over here. Let’S make everything centerline go to style, let’s make it light grey color, the third predefined color from here okey, let’s go to typography.
Let’S change the weight to 300. Okay, now, looking exactly like this one, we don’t have to do any more changes over here. Just one thing: if you see at the top of this o of this thing at the title and bottom, we have some gap. So, let’s add that gap at top and bottom, so what we can do you can hover this and click on this edit section again now go to advanced and we have padding now, if you see over here it is linked.
So if you type 10 pixels padding top, everything will will become 10. Let me show you when I put 10, as you can see, everything becomes 10. So first, let me put 0 now we can dealing this so click on this. It will dealing this now. We need to add only padding at top and bottom or you can add margin at top and bottom. So, let’s see you smudge, you know here top margin, let’s put 70 and, as you can see, when I put 70, he also bottom also becomes 70.
Now I want to change the bottom margin, so I will dealing this. I will click on this and I’ll make bottom as 450, maybe okay type 50, so the in this section, the top margin will be 70 and the bottom margin will be 50. Let’S click on update, let’s see how this page looks. Ok, so this is. How is this page is looking beautiful and after this we have this section. Ok, this beautiful section, let’s see how we can add this, come back to this page click on this thing, and let me show you what we can use, let us scroll down.
I think we have to use this one ok under premium add-ons. You will see this one premium banner. Ok, you can drag it and drop it over here. Ok, this is how it will look. So let me do one thing: ok, let me right. Click here and click on add new column, because we have four different columns again. Do the same four times? Okay, so we have four different columns, just like the demo website. Okay, one two, three four columns in the four first column: we have this jacket image and we have this text which says jackets.
Okay, so let me do you. Let me show you how we can do that: click on the first column, change the image or choose an image. So let me upload that image. Okay, that jackets image. Let me find that image. Okay here it is: let’s use this image. Click on open, insert media. We have this image over here and in the effect we have different effects, so I have used the effect one in the demo website, so let it be effect one now.
If you see we have some title and subtitle now we do on this subtitle. So click on content and delete everything from here. Okay, we just want the title and in the title, instead of premium banners, let’s type in jackets or whatever your product is and let’s make it Center aligned. So we have this at the bottom center line. Let’S make it Center aligned now, let’s change this style, so go to style title: let’s change the typography and let’s make it monserate.
First monserate, okay and let’s increase the size to maybe 38:39 would be fine. I am putting 38 and let’s make it 700. Let’S change the color to white okay, so here we have the color, let’s make it white now by default. We cannot put this background. Like you can see the background which I have put this black background. We cannot do it it this way. Okay, I will show you how we can do it. Okay. First, let me add one more thing: go to typography: let’s increase the line height to two okay, so make the line height to okay.
Now, click on update, let us let this pay the page reload now, once this page reloads, as you can see, most of the things are looking fine. We just don’t have that thing in the background that black color the background. Now again, it is very easy to do. I will again show you how we can do that. So I right click over here. Click on inspect. Now again, you don’t have to do that I’ll simply give the code, but I am just showing you for those of you guys who want to learn how this thing is done and I’m just showing you guys.
Okay, so you can simply click over here. Select this click on this plus button, ok and select background color, ok, not backgrounds, background color! Let me do again here we have background color and you can type any color, so I’m typing black okay. Now, as you can see, we have this thing over here, and this is looking beautiful. So again, I can copy this thing from here. Go to my website or, let’s edit, this same page.
Okay, let me delete this from here. Click on customize now, let’s see at present. This is how it is looking now again go at the bottom click on custom.Css and this time paste in this code. Now, as you can see, as soon as we pasted it, the effect has started okay. So, let’s click on publish, let’s cut this thing now, as you can see, this thing is applied over here. So this is how it is done and don’t worry you don’t have to do all this inspect element.
I simply give you that code. You can copy it. Ok, that code will be present under this article description. Ok now. Similarly, you can create all those different columns so or what you can do. You can copy this again right. Click over here, click on copy now, right, click over here, click on paste, paste and paste. Now you just have to change this style. Okay, so select the second one change the image to bags and title to bags.
Okay. So let’s upload the bags image IDs open this insert media. Let’S change the content, let’s change the title to bags. Okay, select the third one and it is sunglasses and we have style change the image. Ok, very easy select, this click on open, insert media and in the content it says, style. Fine, just like this. Okay, now, the fourth one is shorts. So, let’s upload this shirts image, this one click on open, insert media and let’s change the content title to shirts click on update, let’s review this page in a new tab, so click on preview changes, let’s see now, as you can see, everything is looking perfect.
Okay, so this is how it is done now. After this we have some gap at the bottom, so what we can do is we can select this section now. Edit section go to advanced first dealing this and at the bottom. Let’S add maybe 50 pixels padding of margin now click on update, let’s see, okay, now we have a decent amount of gap at the bottom. Now after this, we have to add this section of very, very beautiful section, okay, so very easy to do again.
Come back to this page first, let’s add some columns. So I’ll drag this columns over here I will right. Click over here. Click on add new column. So we have three. Do the same thing add new column, so we have four columns now: okay, in the first column, we have this thing in all the columns. We have the same thing used, so we have a icon, a title and subtitle. So to add this thing we use the icon module.
Okay, this one I can box module, drag this module under the first column. Okay, as you can see, this is the default thing. First thing is the icon. We have the truck. I can so, let’s change the. I can to truck fine, let’s change the heading to free shipping, okay change, the heading to free shipping and, let’s change the content instead of this, let’s put in our own content over here now, let’s, since this tile, okay, so the go to style.
First thing is the icon: okay, so the icon color is white. Fine. Now we have contents open content. First, we have the titles so title color will also be white. Let’S make it white okay, we cannot see anything so first, let’s do one thing: let’s click on update less since the background color, just like this okay, so that we can see the changes. So if you want to do changes to the column, you click on this.
Okay, columns, okay, you have this thing at, as you can see this gray color option. You click on this. You will see this edit column option now, go to style, change, the background and select a color. Let me select some color. I think we have used to this color. I guess some darker shade, like this. Okay, something have you have used something like this okay, so you can use this thing and let now we can see everything properly.
Okay, now again, we can click on this go to style, go to content. Now we have the title. So let’s change the title: typography. Let’S change the font to monserate, okay, sighs to 19 pixels and weight to 700 for the title. Okay, then we have the description over here again: change the color to white and let’s change the font size to 16 pixels, okay, looking better click on update now, if you see, let’s see how it looks, okay, so this is how it is looking now.
We need to do some more changes over here. We need to add, we need to make it full width. As you can see, this is also full width section, so we can do it easily. We know first select this edit section. The top section make it stretch section this time, also select this thing in the content with select full-width, okay, so two things we have to do now again how over here, you will see another section inside this section.
Okay, just follow my steps. Okay, we have done with this section now anyhow or this you see this section. Click on this do the same thing: full width and column gap. We don’t want any gap, so we can just type in no now, let’s click on update. Let’S, let us let this page reload, okay, we didn’t. Okay, we still have some gaps. So what we can do, I think in the first one I didn’t selected, the column gap so again select the top edit section, and here it is column gap.
Let’S make it. No gap again, click on update, let’s see again, okay, this is looking better now. This is a full width section, but when we do full width, we see one problem. We hear all the thing is touching the corners. Then this icon is touching the top. This text is touching both the sides, and this is touching the bottom, so we need some gap from all the four sides. Okay, so let’s do that so click on this icon box go to advanced and in the padding type in 50 pixels from all sides.
Okay, click on update: let’s see how it looks now. Okay, this is looking exactly like the demo website. So this is fine okay. So let me cut this thing now: let’s copy this from here right-click over here click on copy, right, click, paste right, click, paste, right, click paste now. Obviously you cannot see anything because we have. We don’t have any background color so select the second column. Click on over here edit column, go to style, let’s change the color to black.
So let’s select this background type classic color, let’s select black, so we have the black color select the third column go to style and we have this blue color. So select this background type, color, blue and select the fourth column. We have this beautiful color over here for style, background, color type or and and let let us see – ok, this beautiful color. Now, let’s change this thing. Okay for the second one click on this click on here, just click on this icon box, the we have the tags, oh, I can and it says, guarantee service.
So, let’s change the icon to tags. Okay, here you have and let’s see the text it takes to guarantee service or whatever it is okay. Now we can click on update and similarly you can change these things as well. Okay, I don’t wan na waste my time and your time showing these same changes and same thing again and again now, let’s see the changes now, as you can see, everything is looking perfect now, after this, we have this title subtitle again now what we can do, Because we have already created a title, subtitle I’ll simply right-click on this section and click on copy come over here and paste it now.
As you can see, we have everything just like this: we simply we have all the gap top and bottom all the design and everything we simply have to change the title which says: newcomers: okay. So let’s change this new trends into newcomers. Ok done click on update. Now, as you can see, everything is so simple and really fun to do you really enjoy when you’re doing this thing, ok, really awesome stuff.
Now, after this we have some recent products, ok or whatever products you want to show. So I am showing recent products. So what I will do, I will click on over here, scroll down and go under. I guess we have over here at the top. We have the WordPress section. If you have this thing, click on here, you will see all the WordPress thing now here we will have recent products. Ok, you recent products drag it and drop it over here now number of products to show a number of columns is to show ok.
So I have 4 4 thing over here and if you see here it says new in ok, I don’t want to show this new in over here, so I’ll go to title and type a space. Ok, now that new in is gone, click on update and, obviously because we have only two things, because we have created only two products. If you have more, it will show more now, let’s see how it is. Looking, ok, perfect, looking really awesome! Now, after this, we have this section, let’s see how we can create this section again, very, very easy to do.
Simply, let’s see what we have. Okay, we have the title subtitle again and then we have these things. Okay, oh we have this icon box. I guess or scroller okay, we will see what that is. First thing is we have to copy this thing? Okay, so copy this okay paste it over here and the icon it this time it says our brands, so, let’s type in our brands over here, fine. Now what we have to do is we have to add this thing, so I think it is called.
Let me show you alright. I think it is called yeah. It is image carousel, so bring it below this thing. Okay, bring it below over here now we have to add all the images that we want to show so: click on, add images, upload files, select files and select all the images that you want to show okay. So I am selecting all these images. Fine click on open – and here we have 1 2, 3, 4, 5, 6, 7, 8 images showing at one time alright.
So let it load everything so once everything is uploaded. Click on create a new gallery insert gallery now, as you can see, all the images are showing now. The first thing that we have to do is we have to change everything: okay, so first slides to scroll, slides to show those change, these slides to show to 8 because we want to show 800. Now again, this section is also full width section, as you can see, so, let’s make it full width.
Select this thing edit section, make it full width and also change the content width to full width. Okay, and also we have something over here. The background color is quite different, it is light gray and we have some gap at top and bottom. So let’s do that. Go to style background, color background color. Let’S change this to, I think e8 e8 e8 is looking better and, let’s add some gap at top and bottom so go to advanced and, let’s add some padding this time.
Okay, so padding, let’s add 70 pixels and bottom padding: 50 pixels! Okay, as you can see, the changes over here click on update. So with this we have this section as well. Now, the last section we have the title and we have some post now before showing this post. We have to create some post. So let me show you how we can do that. Come back to this website in fact come back to your dashboard, okay.
So let’s open this put in a new tab. Alright, so if you want to create a new post, what you can do you can have all post and click on, add name and you can put in the title. Okay, so the post title will come here. Whatever title you have, so it will come over here and here the content will come whatever the content is, so I don’t have any content at present. So let me go to lorem ipsum, calm or Lipson calm.
Okay, just to get some okay, the spelling is wrong. Just to get some dummy content, okay, so I go to Lipson calm and generate some lorem ipsum text. Let me copy this much and paste it over here. So you have the title over here and your content over here now you can add some text over here. You can add some hyperlinks some links to Amazon as well. Okay, you can add some products. You have this Busan thing over here.
You can add this product, you can simply select this and click on. Add products – and you will see your Amazon product will show up over here. Okay, let me show okay, let us bring it over here. Let’S publish this post now. This is incomplete, obviously, but I am just publishing it. Let’S view this post in a new tab. Okay, now, as you can see, you have this Amazon product over here, so basically in an Amazon affiliate website.
What you can do is you can write post about different products that you sell on your website so that he that post will be ranked on Google, and you can people will come to your website. For example, you can write a review of this bag of whatever it is, and you can write something about this and you can add this product in the middle so that whenever someone wants to purchase this, they have this option over.
Here they have this images option. They can simply click on this buy from Amazon button and they will be redirected over here and, if you see over here at the top, your tag is given. Okay tag is equal to. My tag is given over here, which say which you know which gives us, which says that you know your work. Your website is working and all these changes and settings that we have done related to whose own is working okay, so this is how you can create different post and you can use different our options like this to generate some more sales.
Now, let’s come over here. Let’S complete this thing, so we can add a category now. These categories are different, the earlier what we have created. Those were product categories, and this is post categories. Okay, so maybe this comes under bags. Okay, so I will just type in bags. Okay, click on add new category and, as I said you earlier again, this is different and that is different and if you want full width, if you want to remove this from the sidebar, you can select content layout, full width from here.
You can add a featured image and that featured image when, if you’ll be shown over here, as you can see this image – okay, so, let’s add a featured image. Click on set featured image, upload files select files. Let’S select this one: click on open click on set featured image. Let’S click on update. Let’S come back here, let’s refresh this page, a page now, as you can see, we have the featured image at the top.
We have this post in the middle and we don’t have any sidebar or so. This is how a post is created, or you can do some research on how to create a very powerful post. That is a very attractive SEO friendly post. Okay, you will see some articles or some articles. You can read those ok, but this is how it is done. This is the basic structure. This is basically how you create a post. Ok now, once we have a post – let’s refresh this page, so that we can add this post down on our website, all right, so, let’s scroll down and what we need is, after this section, we again have this title subtitle.
So let me do one thing: let me copy you, let me copy it from here and if you see something like this, don’t worry this is showing in Elementor, but on live website. You will see everything perfectly. So let me copy this from here. This title come at the bottom: let’s paste it over here: let’s change it to new design trends. Ok, so let’s make it new design trends. And after that we have. We have this post showing up over here.
Ok, so we have created one post, which means we. It should show ok, so come back over here and, let’s search for this one essential add-ons for elementor’s the first one is ei post grid bring this thing over here now, as you can see, it is showing your post, the hello world is automatically created, and this Is the post that we have created just now? Ok, so this is how you create your homepage. Let’S click on update okay.
So with this we have simply completed our homepage – ok, very, very easy and beautiful homepage. Now we can see, let’s see how this looks so we can simply go to our homepage. Let’S see how it looks. Ok, so this is our homepage. Okay, we have two products. We have all these things and obviously you can add animation to these things as well. I forgot to show you that, like in dem website, let me refresh this website so weak so that you can see the animation.
Ok, you can see the animations like this, so you can add this animation as well. You can add them to all these. All these things, ok, now to text you can add them to different columns, different sections and so on suppose. I want to add animation to this text. I click on this text go to advanced and I have this entrance animation so suppose I want this to zoom. In from left, so I select zoom in from left now, as you can see, then I select this text I select to maybe okay fade in right.
Okay, this is how it is button. I select animation. Maybe let’s see bouncing up? Okay, let’s click on update. Come back to this page, let’s refresh it now, as you can see all these animations okay. So this is how it is done, so we are done with the home page. Let’S see what we have next, okay, let’s, let’s start creating the menus. Okay, we have the menu over here we have this mega menu and we have all these things and let’s see how we can put our own logo over here.
Okay, so let me cut this thing now now: let’s first create a menu so to create our new menu. How would this – and you will see this menus open this in a new tab? Now, when you are on the dashboard at the left hand, side you’ll, see appearances under appearances or you can click on menus. You will come to this same place. Okay, so let’s give a name to this menu and click on create menu and let’s see what we have, we have the homepage.
We have all products track. Your order wish list my Khan shop now, okay, so we have home shock my account check out or maybe wish list click on add to menu. Okay, so shop now is at the bottom and instead of shop it says shop now. So let me type in shop now, okay, and we have one more page, all products. Okay, this is not a page – is just a simple link now, whenever you’re, creating a menu for the main section for this section make sure to tick mark this main.
Okay, click on save. First, let’s see whether this is working. Let’S refresh this page now, as you can see, the menu is showing up. Oh yeah, which means this is working, so we can work further, okay, so the first thing. What I want to do is I want to convert this shop now. This simple shop now link into a button, so it is very easy: we’ll open the shop now and you will see a CSS link which we don’t see over here, so what we can do quite tip-top.
You will see this option screen options open this and select this tick mark this CSS classes. Okay, take mark this now again come over here now, you’ll see your new option. Css classes under this type in BTN short form for button. Btn click on save menu come over here. Let’S refresh it now, as you can see, that thing is now converted into a button so easily. So simply, okay. Now, let’s see how we can create this mega menu.
So, first I’ll click, click on this custom links and I’ll type in all products. Ok, click on add to menu I’ll bring it at the top just after home and under this, if you see we have 1 2, 3, 4 5 columns and under each column we have different options. Ok, so let me show you how we can do that. So first, let’s enable Mac mega menu so under all products I’ll open this expand this and I’ll enable mega menu higher number of columns.
I want so I want 5 mega menu columns, ok and, let’s add the first column. Ok, so maybe in the first column you want to show all the bags I will type in bags. Ok, so this is for the first column, I’ll type I’ll bring it under all products. Maybe in the second column I want to show all these shirts, ok I’ll type this shirts over here and in the URL I’ll type in hashtag click on add to menu again bring it or all all products in the third column.
Maybe I want to show all these shoes ok choose category then in the fourth column, I want to show all the sunglasses not sangla. Okay, find sunglasses, ok, click on add to menu, and in the fifth column I have this image as you can see. So I will not do anything I’ll, simply type in hashtag and I’ll type in column. 5. Okay, I don’t want anything over. There now bring it over here. Let’S save this menu, let’s refresh it and see the changes now, as you can see, we have all product when I hover this, as you can see, it is already created into a mega menu.
We have one two three different four: five columns: okay, let’s add some more options under bags, so let me do it very quickly. Custom links put a hash tag over here and obviously you don’t have to put hash tag. Were your. If you have some category, then you have to put in the category link over here. Okay, now let me show you how you can cat get the category link, how old products you will see the categories open this category, so here? Okay, so you have this back.
Sling suppose you want this link. So what do you do you? You have this view link you right-click on the view copy link address come over here and paste in this link. Obviously, okay, so I am doing for tutorial purposes. That’S why I am putting that hash tag, but you have to put in the category link: okay, whatever it is now, link text may be a school bag or whatever, okay, so I’ll type in school bags, click on add to menu and the second one, let’s type In nylon bags, okay doesn’t make any sense, but still third one, maybe jeans bags.
Okay, fourth one, maybe I don’t know just bags and fifth, one I’ll type in PU packs. I don’t know why but PU leather, not leather, PU bags. Okay. Now, let’s bring all these things under bags, okay, so I will bring everything under bags: nylon bag since bags all those bags. Okay, fine, just awesome, so you’ll see all products under all products. We have bags under bags. We have all these options: click on save menu come over here, let’s refresh it okay, so we have all products under all products products we have bags and under bags we have all these options now.
Similarly, you can add undershirts shoes and sunglasses. Now I am NOT doing that because you already have seen how you can add under bag, so similarly, you can add under shots, ooh shoes and sunglasses, because that’s just the same process. Okay, now I will show you how to add this image. Okay, because this is something different: how to add this image in the 5th column so again come back to your dashboard now how our appearances and click on widgets now you’ll see this option over here.
Click on this create a new sidebar. You can name it anything! You want so I’m naming it column, 5 or maybe menu column 5, so that I know what this sidebar is useful for click on create sidebar. Now sometimes this happens. It will just keep on loading forever and it will not redirect you anywhere. So this thing happens with you. What you can do you can simply reload this page. Ok, let me show you now, as you can see, menu column 5 is selected or n created.
Now you have to bring image or think over your image widget under here. So let us search for image widget here it is image. Select this make sure mega menu, column or whatever you have created is selected. Click on add, widget. Ok, here it is under the one sidebar that you have select created. We have this image. Let’S upload a new image, in fact, let’s upload the same image here, it is click on this click on open click on add to widget, save it come back to again come back to menu, so under appearances, you will see menus click on menus now.
Select this one column 5 and just expand this thing and mega menu, widget area select that and select the widget area that you have created mega. I have created this one menu column, 5. Select. This click on save menu now come back over. Let’S refresh this page. Now let me hover this now. As you can see, this thing is showing now there is one problem again. I see this column five at the top. That is the title now I want to hide that title now, as you can see in the demo website, you don’t have any title at the top, so I want to hide that title so very easy come over here again, select this column five.
Now, in the CSS type in hide heading, ok, hide heading, simple, makes sense, common sense. Click on save menu come over here. Let’S refresh it now, as you can see, that title is gone, and this is looking amazing, okay. So with this, we have also completed this thing now, let’s see how we can add our icon our logo over here, and let’s do some changes to the menu. As you can see here, the menu is quite bigger.
The font and everything is quite bigger here. It is quite smaller, so you can do this as well. Click on customize, alright! So first, let’s change this logo. So what you can do in the customize you’ll see header option, click on header and select logo. Now you can select any logo to upload. So, let’s click on select logo, click on upload files, upload select files and select this logo, click on open click on select, just click skip cropping, and your logo should so show up over here.
Let’S see alright. Now, as you can see your logo here, you can click on publish now. Let’S change all these things. Okay, so come back over here and select to again come back and click on typography now select main menu. Let’S change the font family to monserate. Okay. Now, as you can see, the fonts have changed, let’s dig increase the weight and, let’s make it semi bold again done. Let’S increase the font size to maybe 15 pixels.
Now, as you can see done as well. Okay, you can add, do some more changes from yes, if you want click on publish, come back again, come back and go to footer bottom. You have this footer bottom select. This come at. The bottom you’ll see this copyright text over here copyright 2018 ocean WP. Now I want to remove this ocean WP theme by Nick, and I want to put it my name: okay, maybe theme by Nayer shake whatever you want: okay, alright reserved by your website; name.
Ok, it’s all up to you! This publish it and you can simply cut this thing. Okay, so with this, we have also done this thing and, let’s see what we have in this shop, page click on shop now page now this is our shop page and we have some. We have to do some changes over here, because if you see the shop page in the demo website, it is quite good. Ok, we have the filter by price followers. The right side is same.
We have the same products showing by the left hand side. We have the some awesome stuff: ok, some awesome widgets. So let’s delete all this regular recent post recent comments and add these things: filter by price product categories and so on. Ok, so let’s do that so again. Come back to your website, ok to your dashboard and click on widgets. Now, here you will see at the bottom WooCommerce sidebar.
Ok, so we have to drag whatever we want. Whatever we should. We want. We have to drag under WooCommerce sidebar, so the first widget that we want is filter by price. So come with your let’s search for filter by price. Here we have filter product by price of take on this and select buchamma, sidebar click on, add widget, and that’s it. Let’S click! Let’S come over here, let’s refresh this page now, as you can see just by doing that, you have this widget over here, which is awesome now after this we have this social icons.
Ok, followers social icons, so here at the top you’ll see this one, ok, social! I can select this make sure who comment sidebar. I selected click on add widget. Now here you have to put in all your social links. Ok, so I am just typing in this hashtag every time so that I don’t have to put my links because it will take a lot of time, copying and pasting all my links. Okay, so you can put pasted any amount of Link’s over here.
Click on save come back again, let’s refresh it. Okay, as you can see, it is also showing then, after that we have product categories. So come back to this widget, let’s search for product categories. Here it is product categories, click on add, widget. Let me first okay, let me first minimize this yeah. We have product categories now I don’t want to show the hierarchy. I want to show the product count.
For example, if you see in the demo have said it says, for product 0 product the product count. Okay, so I want to show this product counts, so I will take mark this click on save. Let’S refresh this page, let’s see ok, so this is also showing and the last thing is top-rated products. Ok, so I think for this we have products not filter product by rating. I guess let me search yeah here. It is filter products by rating select, this click on, add widget and done.
Let’S come over here. Let’S refresh it, ok, because I think we had, we don’t have any products that are rated. That’S why it is not showing. I guess I think that is the reason. Okay, you can change the title to 2 operated product. If you want ok top rated products. Click on save come over here, let’s refresh ok, so I think that is the reason. Let let me rate one product, let’s see what whether that happens, let’s go to review, let’s rate it five-star click on submit.
Ok, there is an error we have to type in the comment: 5-star good product, fine click on submit, ok, it is still not showing, which is which means there is some problem. Ok guys. I think this was not the widget. Let’S see, let’s delete this one and let’s include this one products by rating click on add widget and number. I think once the one, let’s see, let’s refresh this okay, so this was the one okay, it is products by rating okay.
So with this we have all. We also have completed this one or the shop page shop, how you can display the shop page and different sidebar for this one? Okay. Now, let’s do the final thing, which is to change the footer widgets. We have some widgets used in the footer. Let’S add these widgets okay. So again in the same page under the footer one, what we will do first one is: we have the contact informations, so we will select this which at the second one contact info select.
This select footer one click on, add widget. Now we have to select and change your text from here, whatever okay, so I am changing this text. I am deleting text in this text. Yo, you don’t have to do anything under. I can class just change the title and content okay, so address change your drink, not even the title. Just change the content. Okay, your address content phone number, your phone number content.
If you don’t want to display the mobile number, you can delete it from here. Okay, delete everything. If you do not display the FAQs, you can delete whatever you want. Okay, if you want to display email, fine website, fine again, if you don’t want to display Skype, you can delete it. Click on Save Changes – let’s refresh this page and as you can see, we have the contact thing. Showing next thing is recent post.
So again come back over here and at the top we should have. Let’S see here, we have recent post. Let me first minimize this select recent post, this time select footer to click on, add widget number of recent posts to show 3. Ok, minimize this come over here, let’s refresh it, okay, we have only one, that’s why it is showing one then, after that we have some quick links or useful links. What do we call it? So I think it is added using custom menu.
I guess a custom links, okay, select, custom links, select photo three click on add widget, ok, so by default we have this useful link, tags and number of links to show. So maybe I want to show four links. First URL is hashtag and text is women. As you can see, URL hashtag text women, then we have men brand, A to Z, a to Z, latest fashion arrivals. Let’S use all these things: okay, second, one men; third, one brand, a to Z.
Fourth, one latest fashion: arrivals click on save, come over, let’s refresh this page okay. So we have these things and the last one. We have the same thing: social icons, so we have this social icon. So I guess, let’s see here, we have social icons, select the footer for and you can again put in your social icons, okay, so I’m just putting hashtag again for all these social sites. Let me put hashtag hashtag hashtag.
Okay, click on save come over here. Let’S refresh alright, so we have this social icons as well. So this is how you create all your website. Now there are more things that you can do. For example, you can create different pages like about us and contact us page. So for that I would recommend you to read some other article, because you know the main thing we have covered now those things you can see different articles on my blog, you can go to youtube and type in nature: shake Elementor, okay, you can type in my Name, slash Elementor, and you can see some latest article an element of, for example.
This is nine months ago. This is one week ago how to create a ecommerce website. This is three months ago, so you can read this one: okay, how to make our website for free theme and all those things here. I have shown how to create about us and contact us pages. I have also provided the free layouts. Ok, so this article will be very useful. You can see the the thumbnail over here. You can see the image over here.
You can decide whether you want to read this or not okay. So I think this article will be very helpful. I will try to give a link to this article in the article description below once this. You can creative about us and contact a space, adding wanted to include that, because that would make this article quite long, one okay, so it would increase this article. Two three. Four hours article, so I didn’t want to do that.
You can read this. It’S really easy to do. Okay, alright guys, so I think this is it for this tutorial. If you have any doubt any queries, any suggestion comments for me: you can leave them in the comment section below. Ok, thanks a lot for reading guys see you soon.
You have to sell this product on your Amazon affiliate storefront!
Spunks is an excellent food snack. Your buyer will be back for more. I mean, the product has five stars! Check out this superb pumpkin seed product. The video below gives you a look into the guys behind this great product.
You are in Amazon lawyer or a lawyer who specializes in selling on Amazon. So why don’t you just tell us a little bit about yourself how you got started and what exactly it is that you do okay. Well, I have always represented entrepreneurs, even when I was still in law school. I started representing fraternity, brothers and other people who are buying and selling businesses and then, when I graduated law school, I always had a bunch of entrepreneurs as clients of mine that we would do all sorts of transactions.
But I spent the vast majority of my time for a good 10 to 15 years being a trial lawyer like I was the guy in court, convincing juries that my side was right. The other side was wrong and then I guess roughly eight nine years ago one of my clients started looking at buying an Amazon based business and I was involved in the contract and then I was in’then and I was involved in any closed and within a couple Of weeks with several hundreds of thousands of dollars on the line, his account gets suspended, he reaches out to me not so much for help cuz.
I didn’t really know anything about Amazon at the time, but to let me know that there was a lack of professionalism, a lack of lawyers who could help people with their Amazon issues, and they they were really the sellers, we’re really getting hurt. So I looked into the research and I started seeing who was out there and at the time there were two people. One guy was doing it part-time. Who was a former Amazon guy and another was a woman who was still selling so the confidentiality of people telling her what what they were doing? I was a problem and she was never like a big-time seller.
She kind of in my pink aina lacked the the ability to interact on a higher level with corporate people and significant businesses. You have millions of dollars on the line. Also. She was farming out a lot of work to people in the Philippines, so I thought it was a great opportunity, just like an entrepreneur, just like you and just like all your listeners and I spent about a year reading and studying and learning and going to Amazon Events and then we launched and now from then to now, we’ve grown to.
Basically, you know me and one website guy, I think, we’re up to 26 people 22 here in New York, 3 in Shenzhen, China, one in Evo and Hangzhou China and a full-time lawyer in Europe, and the entire focus of practice is helping Amazon sellers about 50 %. Has nothing to do with the law? 50 % is just writing. Plans of action for sellers inauthentic you sold as new hi-oh DRX the same college-educated paralegals that write the legal work, write plans of action and we do it a lot better and nothing gets farmed out and the other half has to do it.
Intellectual property law, which is defending sellers from baseless claims and also as more and more and more sellers get into private label. We help them establish their trademarks, build in intellectual property rights, obtain their trademarks, protect their copyright. We have a patent lawyers on what’s called of counsel and since that’s where we see the hockey puck going, that’s where we think we should be so.
Our focus is entirely on Amazon sellers, shifting more and more and more towards the sellers that are going into private label. It’S a big area. I mean it’s just the only going to get bigger and and there’s a lot of issues with selling on Amazon that you can run into and it’s kind of a new frontier for a lot of people, because there’s a lot of sellers that are just jumping on There and they’ve never sold before and they’re just starting to sell whatever it may be, without thinking about the the legal issues that could come along with.
If you sell a product and somebody gets hurt with it or their kid eats it, they’re, swallows and chokes or whatever the case may be. I mean there’s a lot of issues there that people can run into so why don’t? We start there on the on the private label side of things and then we’ll go through wholesale and retail arbitrage as well. What are the biggest issues that you see? People, starting out in private label that they’re running into legalize the first thing, any private label sellers should do also I want to get back.
The obstacles should not prevent anybody from giving this market a try. The obstacles are easy to to overcome. It’S a huge opportunity. Just huge the first thing, a private label seller needs to do is first protect their idea and their name and their label. You know we don’t know who’s going to be the next Ralph Lauren or the next Under Armour, the next Nike. So, as you put time and effort into it, it’s really easy for private label sellers to file for their own trademark protection.
While we do do it as a service, you can do it yourself and I’m happy to walk any of your listeners. They schedule appointment with me I’ll teach them how to do it themselves, no charge but file to protect the name that you develop and you should have also filed, protect your the fanciful way going to write it like the way the McDonald’s M is written or the Swoosh for Nike, whatever you come up with, you really should file for protection right away and then the next issue you faces as you do it is you need to protect yourself from whoever is building your products.
You’Re your source of goods is your number-one threat. It’S not the competition, it’s your own factory who they see the product being successful. Will you know, create a hundred thousand units for you and sell it to you and then make another 100 thousand or another five hundred thousand and sell it to dozens or hundreds of accounts? You know in China or Vietnam or India wherever they’re operating.
So you need to protect yourself both domestically and wherever you’re sourcing, your products and those are the top two issues you have to face as you get started for on the trademarks side of things, if you don’t trademark your product, does that basically mean that someone else Can just take your logo and put it on their own product and pretend that they’re you you know it’s, they can do it and you can knock them off, because the United States and Europe and most of the world is what’s called a first to use state.
A first to use system where, if you develop it and you own it, you can knock other people off even if they file after you, you can actually oppose that filing or seek to take that filing away. You can challenge it, but it cost it’s going to take time. It’S going to cost you money, it’s much easier and cheaper to do it at the outset. On the other hand, where you’re sourcing your products and I’m not a Chinese Bashford, I don’t think it’s right, but when you have one country that has like 90 % of all the factories on the planet in one country, that’s where the good stuff comes from and The bad stuff comes from, so China is a first to register a first-to-file, so it’s just easier and cheaper and efficient to do it early on.
If you didn’t do it yesterday, then put on your list to up to dues for tomorrow and again it’s in the u.S.. It’S really really easy. China’S a little more complex yeah and something to keep in mind too, is that the Chinese culture is different than what our culture is here we’re here, we kind of think of it as a bad thing of taking someone else and stuff and running with it in China, that’s kind of expected that, if someone’s being successful, you just copy them and do the same thing and try to be successful yourself, not necessarily right or wrong.
It’S just two completely different cultures, and you got to keep that in mind that you’re dealing with a culture that may not be or think the same as as what we do here about taking someone else’s stuff, that’s entirely correct and, like you know, we grew up And like when you were a kid, if you told so no being a copy-cat, that was a bad thing. You know that doesn’t exist in Chinese culture, so we’ve learned a lot by our team in China and that’s exactly right.
Also in United States. There are different presumptions in China if you don’t file in the specific categories, as hundreds and hundreds of categories you’re presumed not to have rights in those categories where the presumption is the opposite. Here fact, China had no IP law at all to 2012, absolutely zero, but now that they have – and I don’t know if you’re, if you’re a Trump fan or anti Trump – I don’t want to get into politics in terms of intellectual property.
I read a report that there are 15 times as many filings in the u.S. Coming from people located in China. Then the US and Europe combined so they’re filing trademarks and patents here in the US for products that they’re making in China the Chinese that’s right, they’re protecting their rights here as well as they’re at 15 times the rate. Also the government there supports them. So u.S. Sellers US sellers, you really do need you do need to start protecting yourself early and it’s cheap and easy.
You can do it yourself, yeah, definitely and with the trademark too, you have to have that now of Amazon to register your brand and protect your listings on Amazon, because if you don’t register your brand, then you don’t maintain control of your listings and anyone can be Changing your listings, but if you register your brand, those listings that are using that brand are kind of locked down for you and that people can’t just change them to whatever they feel like yeah, a hundred percent right, a hundred percent.
They could also sometimes change the backend use feel to get the registry 1.0. I’M not sure if you still can do that, they call it the deprecating 1.0, but to get into 2.0. Yet you have to have them. Are yeah they’ve completely moved on to 2.0 I’ve? I’Ve got one brand, that’s registered under the 1.0 and I don’t have it trademarked yet, and they keep warning me that I need to get a trademarked or I’m going to lose that.
So I got to get that down here. Pretty quick, so might have talked to you about that. I have for the show here, but a little bit more about to the the supplier issues. What what can you do to protect yourself from a Chinese manufacturer supplier from stealing your product in your logo? Trademark? Okay, you got a dude, really two things, and you really should do them simultaneously. One. You have to develop guanxi with your factory, which means of relationship that face-to-face relationship with your factory or the factory manager, and it’s a long flight.
But it’s not as awful as it sounds. You have to go and visit that you have to let them get to know you. You have to spend some time with them so that if they then sell your products out in the back door, they lose face. If there’s no relationship, there’s nothing culturally. That’S going to stop them from doing that, in fact, it’s good business, so you need to develop a relationship with your factory and you need to maintain that relationship.
It’S absolutely vital. The second thing you need to do is you should file in China once you have? The mark here in the US you can do a wipe o applications to World Intellectual Property Organization and it’s like 300 bucks. It’S really cheap and it gives you some protection in China. But you really should file with the Chinese lawyer in China and hit all the different subcategories that you’re in that you intend to go into.
What it will do is will give you leverage so that either one the factory won’t won’t screw you over. I won’t sell your products out the back door or if they do, you have some leverage to communicate with them in a face-to-face meeting and show we filed here’s the contract and we don’t want to get the government involved either, but you have to stop selling our Products to other sellers and those mechanisms work.
It really is not much litigation on these things. If you walk softly, you have a relationship and you carry a big stick of having filed. You should not have much of a problem all right, so just the having the threat there basically solves most of the problems I like to call it leverage leverage, okay, sounds good, it’s probably better term. Let’S say they do go ahead and do that is the the Chinese government? Are they willing to protect American interests over there from their own citizens? Increasingly, they are especially in some of the hot spots as a whole battle going on the last couple of years.
As to which ancient country or cities going to the IP capital of Asia, yep Hong Kong battling shanje and battling Singapore, so in some of the provinces like in Beijing or Shanghai or in Shenzhen, the courts are very open to hearing you out, but I believe in Court avoidance, okay at all cost. If you can avoid going to court, I think it’s the best thing. There are other mechanisms, since the Chinese are mostly selling here in the US.
If, if you have the mark, okay and they’re, taking your mark and sticking it on their product, they’re very easy to get off, if they’re selling the same exact product, then you need to be a little more creative and that’s one of the things that we focus On we’re not allowed to say we specialize in anything as lawyers in New York, so we focus on it, focus on what we can add to that product or add to the warranty of the product so that nobody else can deliver the same thing like if you’re Selling like a health and beauty item – and it includes a license to log on to a part of your website that gives health and beauty advice.
No one else can sell that license other than you, so they might be able to sell the product. On the one hand, but they can’t also deliver that license so that the consumer is not getting the same thing. It’S almost like buying a new car, a new BMW with the warranty is where $ 50,000. Without the warranty you know not so much always a big issue on Amazon dealing with hijackers and and what I’ve done is.
I just have a cease and desist letter that I’ve – I don’t remember where I got it. It might have been from Scott Volker over on the amazing seller, a template from him, and it basically just says that stop selling the product that they’re not authorized to do that and if they continue to do that, will report them to Amazon or possibly pursue legal Avenues and ninety five, ninety nine percent of time that seems to get them off pretty quickly.
Is there any issue of sending that kind of letter? Is that okay, with Amazon terms or what is your thoughts there? No, we do the same thing. I would just change the verbiage. A bit cuz authorized. Sellers versus unauthorized is specifically something that Amazon will not enforce. Okay, so I would identify something else, but it’s really easy to do. We’Ve the same success rate: where will you send those letters? Most sellers just want to go on doing their business and not risk their account and they’ll either stop selling or they’ll contact.
You and they’ll say: hey, listen. I’Ve got a thousand units left. Can I sell these out and then we’ll move on to something else? I think also by doing that, rather than making a complaint, you are not yet you’re not needlessly killing somebody else’s business, so everyone has mouths to feed and you’re also avoiding the animosity. That comes with making you complain. You know, I don’t think it’s it’s wise business-wise to go nuclear right, because then that seller, their staff, their cousins, brothers, mother’s children, right, can buy your products, return them and also in your ODR.
It goes to the roof or they’ll. Make complaints against you as a buyer and cause you problems. So yes send the C and D letters. I would take out the authorization language of it and it’s very, very effective, and then I would. I would at all possible work out agreements so that people amicably come off your listings, yeah, definitely and I’ve softened up mine a little bit after getting some replies and not like thanked.
I don’t need to be quite so harsh. A lot of these people are just you know there trying to sell products and they’re, not necessarily trying to do anything wrong. For example – and I first my very first products that I listed on Amazon – were these bedsheets that I was originally selling on eBay and I just found a listing, I’m like yeah that looks like the same product. I sent it in and sold on that listing and I never got a cease-and-desist or anything but months down the line.
I’M like I was a hijacker products and I had no idea what I was doing coming from eBay. That’S not an issue. You know you just list your product and it doesn’t really matter so could be something that simple, it could be malicious. You never know so, most of the time it’s not malicious. Most sellers don’t want to get involved in disputes. We negotiated a settlement a few months ago, where that, when the complaint came in our client had already ordered.
You know like two containers full of this particular product, so we were negotiated with the other side’s lawyer in California. Worked out just a licensing agreement where you know X, dollars or X cents per unit would get paid to them. Our seller continued to sell. They continued to make you know roughly the same profit and what our clients inventory is gone. You know she’ll, stop, selling and move on, and I think those agreements are best for everybody, because they avoid all the projects so easy for a buyer or ten buyers to make complaints and just capsize you.
So I believe in working things out amicably trying to avoid court. You know we’re not afraid of court. I’Ve. I’Ve tried more cases that if you took every lawyer, you knew and added up their courtroom experience. I have more than all of them combined. It’S not a place for small and medium sized businesses. The only ones who make out well are the lawyers. So we try to avoid that as much as possible, even though, from time to time you have to go to court to get a restraining order, you have to go to court to free somebody’s money.
You know to get leverage over them or you have to respond in court. We try to avoid it at all possible. Why don’t we move over to like the wholesale side of things for people who are buying products that are branded either for distributors or directly from the manufacturer or whatever, whatever suppliers are coming from? Are there any specific issues that wholesalers need to read out, for? I think you do, I think.
First, you want to try and get distribution agreements. If you can. Okay, they’re not required. Amazon doesn’t enforce distribution or authorization agreements, but if you can get authorization, it’s just going to avoid problems down the road where they won’t make complaints against you or, if you’re, caught up in a net against hijackers, you can easily get out of it. So that’s number one number two.
I would certainly just read the forums. Listen to webinars like this make phone calls and do some research before you invest too heavily in any particular brand or product. The health and beauty industry has had a tremendous crackdown on people selling their products, even though most of their complaints are like a hundred percent baseless. Well, you may want to do some research before you bet the farm on like Johnny B hair products, if they’re very aggressive, even though their complaints are totally ludicrous.
If you get a letter from a law firm like oh four es or somebody else out there, don’t freak out almost most of the IP complaints out there are entirely baseless. I mean that’s one of the reasons why we’re so successful is that the complaints have no grounds in the law. That’S where you can get them dismissed over and over and over again, but I would first try and get distribution agreements and then number two.
Do some research, because if you can avoid a dispute and make money elsewhere, I just think it’s a better thing to do so. The the distribution agreements – that’s something you would get directly from the supplier like I do – have some agreements with certain suppliers, but other ones not really they just send you their product list and start selling. So if that’s the case, do you recommend requesting one from them or do you have like a template that we can use to send them and get it signed yeah? We can send you a template.
It’S no big deal would be no charge. We would send it out to you number two, you, those authorizations usually come from the brand or a brand manager, or maybe a little bit lower on the food chain to your source or your distributor. We want to try and get those also, if you’re, not if you can’t get that you really want to keep fantastic because of your invoices that show where you purchased it from that, can then show a link back to the brand of the number one reason for A sand, suspensions or account suspensions is still this thing called inauthentic, and it’s not claiming that your products are fake if they just want to see where they came from.
So if you buy from a BC distributor, you wan na be able to show that a BC distributor gets it from you know, Hasbro or Marvel or NFL or wherever the product is made or whoever the brand is. You want to be able to show it Shane. All the way back to manufacturer, if you can – and that can be done in several ways, it could be right on the invoice. It could be right in the documents it could be as simple as pictures of the distributor with like the Marvel truck pulling it or copies of their invoices.
If you can get them, but you certainly want to get good invoices and I’ve learned a ton, a ton about what you want, the invoices to have on them and what you don’t want. Your invoices to have it’s a whole separate subject. But quality invoices are vital because Amazon will give you this inauthentic complaint and then you have to give them the invoices for the invoices I’d assume in today’s world. Digital invoices are okay, you don’t to have physical paper copies.
We almost always use paper. Copies almost always have actual paper invoices. We do have electronic ones from time to time, but we’re submitting to Amazon. We almost always have paper and we want paper there’s certain things you want to see on that invoice. You don’t want a pro forma invoice that was made on Excel or any invoice right. On the left hand, side you’ve got where you bought it from distributor name, address website phone number.
You have to make sure that website exists. You have to make sure that phone number works. Okay, you have to know if your Google Earth and it’s going to look like a business, it’s not somebody’s home or like an empty field has to be real, and Amazon is more and more and more calling the distributors to see whether they sold. You know to you on your side of the invoice you want to have like you know your name, your address your phone number, your website, but everything should match the Amazon account.
So if you’re selling under, like you know, ABC cable supplies right, buy your products under ABC table supplies. The email address on your invoice should match the email address on your Amazon account your phone number. Should everything should match, and you know many sellers will violate. Amazon’S rules, which is totally fine with me and they’ll, operate multiple accounts, but you should also then maintain invoices in the names of each of those multiple accounts.
We know Amazon looks to see if the fonts, all Macs and not all different sizes, don’t redact the prices. Even though they say it’s okay, there’s a problem, you want to make sure that it shows that it was paid. You want to make sure the dates of delivery makes sense. You know if you got in trouble on January 1st, you can’t submit an invoice from March 1st. The quantities have to match. Have you shipped in 10000 units? You can’t show it invoice for 5.
You also want the invoice to have as much detail as possible. You don’t want any handwriting on the invoice less there’s a place for, if there’s a place for a signature, somebody should sign it. These. Just some of the things we’ve learned by handling all these non legal suspensions writing plans of actions for inauthentic, so get good, high quality, very detailed invoices. So as far as I’ll first just meant talk about the the multiple seller accounts, so I do have two accounts with approval from Amazon’s.
I was going to say: stop stop the article yeah. No, they are ok with doing it as long as you get their permission. So I opened up a case and told them why I needed a second account for business purposes, because I have two completely separate parts of my business. One part I may eventually sell, so I need to have it separate and they were ok with that. I got approval and I have those emails saved and records of that saved and they know the name of the new account and everything so yeah you it’s against terms.
Unless you tell them and they approve it, then they’re, ok with it, but if they find out you have a second account without getting approval yeah, then they can just shut you down completely yeah. I’M going to tell you. I am I’m a business lawyer. Ok, I’m a business lawyer. So diversity is the key of business. We don’t have all your eggs in one basket by having multiple accounts you are taking on the added risk of getting caught and there are certain things we know you can do to avoid getting caught.
But we don’t know everything, so you still may get caught so you’re taking that extra risk. On the other hand, if you only have one count, your entire livelihood is based upon one account where you’re a Estacio, your entire account gets shut down. You know any day at any time, so there are many many sellers that we work with, that have many many accounts and they do it very well. There are other cells that, as soon as they start having more than one account they get caught and it’s a major problem, so everyone can do, does things differently.
Everybody has different skills. The most successful people we’ve seen multiple accounts are either in specific areas of Brooklyn. New York are in Shenzhen, China and or they literally have six computers with six different hotspots with six different bookkeepers and six different product lines. I mean they never log on. From the same phone – and they walk around with these bags, full of computers and they’re they’re religious about not crossing account from account, and they do a lot of things themselves.
Because if you have, let’s, let’s say, for example, the same bookkeeper right who’s, logging in and pulling reports for you, if that bookkeeper blows, it makes a mistake, your accounts get lengthened. You go out of business for a while. So if you’re going to do it yet be like incredibly careful, oh yeah, but it there’s no Amazon police out there, at least not yet oh yeah, so related accounts you not going to prison, wouldn’t recommend it doing it without Amazon’s permission, because personally I wouldn’t want To take that risk of getting my accounts shut down and lose the entire business that I’ve spent years building up so not a risk I would want to take, which is why I went and got complete permission from Amazon to be able to separate the accounts.
But even with that permission, one of the stipulations in there is that the two accounts cannot sell the same products because they don’t want me to have multiple listings for my same product and be able to take up more spots on the search results than just one. Right you also, even if you have their permission, you have to be careful that if you lose a product on one account, you don’t just boost it on the other one, that’s another way of violating it their their your their terms.
So you really want to be careful if you do have their approval, how you use the and don’t don’t abuse it, because you do have that a lot of people can’t get it. So if you have it certainly don’t risk losing it anything else. We should talk about on the wholesale science side of things before we move on. I know there are some great courses out there. This is a great source of information, a big fan of any Levine and host cell breakthrough to learn a lot from him and there’s just a lot of places that that sellers can learn from on how to be more efficient.
How to be more productive. And I like the Amazon sellers events, for like two reasons: one: you learn a lot: okay and number two. You get inspiration so for those two things, I would recommend that sellers you know get the acknowledged for a broad base of sources. Well, let’s talk a little bit more about the getting the suspensions or Amazon suspensions for inauthentic products. So let’s say that I’m buying from a company I have the invoices and everything, but Amazon says that they’re not legitimate.
I submit those invoices Amazon confirms that maybe the supplier than buying from is selling me illegitimate products. What happens, then? Where is the legal liability in that case, not only on the legal side, but also what will Hamazon do on the legal side? We see practically no liability arising theoretically. Could there be absolutely good a certain amount of statutory damage? You could be liable for what we see like practically zero of that it’s usually just a seller dealing with Amazon or either when a brand is complaining.
They just basically want you to stop notice. There’S a few brands out there that are more aggressive, usually they’re, more aggressive towards offshore sellers, but I think that the risk is very, very minimal of getting stuck in court. That sort of thing it exists, but it’s really small when it comes to Amazon. It’S all about your plan of action. That response you write to Amazon that you know we do it.
We probably send out your ten to fifteen plans of action today. Everything is written here in New York, nothing is outsourced and I’m happy to also teach the listeners how to write it and how to write it in a way that we find that works. So let’s say you know: seller bought items from a well-known distributor and then it turns out that distributor was doing something Shady he ended up with. You know counterfeit products right well the root cause of your problem.
Right, I’m sorry, let me take a step back. A plan of action, chef, three sections root, cause immediate corrective action and a long-term change to your business, so that Amazon’s not going to have a problem you in the future the root cause. You want to write in some positive way that you’re now going to source your products someplace more reputable. You don’t want to admit that you sold counterfeit products because then, if Amazon refuses to amicably put you back on you’re dead in the water, where, if you just write it with different verbiage, you can always take Amazon to arbitration, to get your account reinstated without Amazon’s Consent you they can actually be ordered by an arbitrator to reinstate your selling privileges, so the root cause should identify how you’re going to do it better and every business can do something better, the second, the immediate corrective action immediately.
You should always refund the consumer, their money, any complaint at all, even if they’re pulling a scam on you. Even if the product is a hundred percent, fine give them a refund, they can get it from the A to Z system anyway, offer to send them another. One off, let’s send them another to just do anything you can to try and make that consumer happy. The third section like this is a little more thoughtful.
It’S trying to figure out how you make the whole operation of your business better and there it’s really something you have to describe like in this particular scenario: how you’re going to research and find a new distributor or how you have already researched and identified a new Distributor and trace their products back to the manufacturer so that you and Amazon can be assured that the products are in fact genuine and that’s the basics of a plan of action.
That’S what we do every day and it works. We used to find that persuasive sentences were working. More than bullet points were more were more effective. Now it seems, like sort of a combination is what’s working. The whole exercise is just an exercise in persuasive writing, trying to convince or persuade whoever’s reading it in Hyderabad or Bangalore to reinstate eurasian or your account, rather than asking for more information or or saying.
No so thing that I have run into. Is I’ve contacted a manufacturer directly about selling their products and they told me that they’re not interested in having more Amazon sellers but down the line? I ran into a distributor who is selling their products and is willing to sell them to me to sell on Amazon. Is there any issue there legally, the fantastic and wonderful gray market? Ok, those products just been every product, you can buy it and you can sell it.
Then under US law, you’re not violating everything. Anything at all. It’S called the first sale doctrine as long as you’re, not changing that product and the consumers not getting something materially different than what they would get from any other seller you’re, not violating anything. It doesn’t mean they won’t make a complaint or send you a cease and desist letter. But then you’re right, you’re not doing anything wrong, and I think then you have to make a business decision as an entrepreneur risk versus reward.
How much you’re going to make on that product? What’S the risk of having a problem, even if you’re going to win that fight? You still do that analysis. If it’s to pick up three units of NFL jerseys right before the Superbowl, when the NFL is going, you know bananas knocking sellers off bad decision now. If it’s a hundred thousand genuine New York Giants, jerseys that you can get for a buck each and sell them for fifty, and you can show they’re genuine right and it’s not right for the Superbowl, then go for it.
There’S a lot of money to be made. So everything in my my pin is risk versus reward. You have on the legal side. We would say that there’s not really too much risk there, but Amazon doesn’t necessarily worry about the law and just shutting down your account if they think that you’re selling fraudulent goods or something like that and then you have to go through the process and it can Take weeks or months to get that back up and in the meantime your business fails and goes under what kind of recourse do people have there if they weren’t doing anything wrong, but Amazon shut them down anyways, first of all, you’re going to be stunned.
Okay, when I learned this, I was shocked. I thought that one of the first I learned it from I had to ask them the question: twice the people reading these things. These can play so called the mpa team. I don’t know what it stands for there in India. As far as I’m aware they have zero legal training. I mean zero. Like none, there’s, no paralegal there, there’s no lawyer there. They haven’t been taught about trademark or copyright or patents zero.
Okay. So they get these complaints and they give a they knock people off willy-nilly, as if it’s nothing as if no one’s livelihood is depending upon it. The way we address those you receive the C and D or you receive the complaint. We then contact the complainant. As your lawyer, we say, hey, listen, we’re an IP Firm right, we know Amazon, we know IP law, your complaint is entirely baseless and this is why – and you should withdraw the complaint because you’re causing damages that you’re responsible for for making this baseless complaint and those Letters, I know if it’s because they come from a law firm, okay for just because they’re being called to the carpet, they withdraw their complaints.
You know more often than not we’re. You know there might have been 20 sellers on their product and only one of you stands up to them and they withdraw the complaint if they are either silent or they refuse to withdraw the complaint, then you go to notice dispute at amazon.Com and you see that Right in that email and you send, we will refer to our own legal opinion letter to show there’s no violation, there’s no IP rights, it’s a genuine product being delivered in the same exact fashion, and that is also remarkably successful and then getting Amazon to ignore the Complaint there’s a third mechanism called a counter notice.
It pertains to copyright complaints where, if it’s baseless complaint, a seller can serve encounter notice under under the Digital Millennium Copyright Act and then that business has 17 days to either sue you. Whether complaint disappears as a matter of law and if it’s baseless down with you’re not going to sue you, especially the smaller brands. So those are kinds of three mechanisms and you shouldn’t you shouldn’t be too concerned.
You shouldn’t flip out. If you get a complaint because most of the complaints are entirely baseless on the first sale doctrine – and you were right – you are totally legally permitted to buy and sell that product anyplace you want, even though Amazon tends to overreact in your history. How long does it use take for someone get reinstated if they do get shut down in that way? If it’s an IP complaint, you’re generally looking about two weeks a week to two weeks between contacting the other look, if it’s a lawyer or a brand manager or the brand itself, and if either they respond in an affirmative way or you have to go to notice Dispute, so if it’s an IP and intellectual property can play an IP complaint, you’re, probably looking at a week to two weeks on average, some take much longer.
You know especially there’s like a complaint by a lawyer in like June or July, and I reach out to the lawyer. They says: hey, listen. I thank you for contacting me, but tomorrow I’m going on vacation for two weeks and I can’t look at it till I get back you know. Sometimes life interferes with business on the non legal suspensions you’re. Looking usually about a week. We’Ve heard nightmare stories where people are out two three four months and that whoever’s writing the plans of action are taking.
You know, 10 to 15 days for each revision. It’S usually about a week for your non legal suspensions and about two weeks, vis, intellectual property suspension. Sometimes a lot faster, sometimes a lot slower. That’S generally, what occurs, I feel like there’s a some room here for like a class-action lawsuit against the Amazon or something I’ll. Tell you what what I was thinking about. I’M not a big fan of class actions.
Lawyers. I was involved in mass torts long ago. I had a full head of hair. Well, we are seeing a ton of and we are exploring right now, a ton of times where amazon is just seizing people’s money right, so they have like $ 7,000 of your money and they accuse you of violating blah blah blah. They just say we’re not going to distribute it we’re going to hold it, but they don’t just hold it. They seize it and we’re seeing this occur more and more and more, and even if you sold a counterfeit product, let’s say you sold, you know 10,000 units and a thousand turned out to be counterfeit.
I don’t see where Amazon gets off, seizing all of your money. Mm-Hmm, so we’re exploring how to handle that Amazon sellers each waive their right to go to court in exchange the right to go to arbitration. But I think we’re talking like tens of millions of dollars a year, if not more, of just money. They have seized and often for each seller. The amount is so small, it’s not worth the fight or it’s not worth poking the bear.
So my partner and I have a weekly partnership meeting we’re going to talk about this. What can we offer sellers on a group level where Amazon just has seized their money? Oh, we don’t call it this. These words are not mine, but what a what a person I spoke with thinking about, one of the Las Vegas events: it’s the ofb, a they called it TBA theft by Amazon. Okay, what to do about it? Hey, I I love selling on Amazon and it gets a great platform and I’m making a lot of money doing it.
But as with everything, there’s always issues – and I feel like Amazon is – is kind of eating its own right now and I got a feeling it’s going to come and bite them here, a little bit which, especially if they get some kind of competitor who, who can Take them on which would be really nice, because, even though Amazon is great, when you get one platform, that’s just kind of taking over all of e-commerce, they become the big bully and they can kind of get away with it.
Because I don’t want to be the one who says hey, they can get my account suspended because they Amazon doesn’t like me. I agree, I think, even with all the warts on it, it’s it they’ve, given. I think one of the, if not the greatest one of the greatest opportunities for regular people to get into you, know commerce around the world. I mean really with like a credit card in your cellphone. You can start selling on Amazon, but there are certain issues in Europe: they don’t have as much of a market as they do here.
We’Re like the only country, I think where they have like words, like 63 % of the market. Right now like something crazy, but that definitely is going to be. I think, some reckoning. A lot of us had hoped that jet and Walmart they said they were going to treat sellers a whole lot better than Amazon as a way of building up their market. I don’t really know if that came to fruition or not. I don’t really get the feeling from sellers that they’re being treated better.
You know by jet and Walmart, but hopefully someone comes along that recognizes the the platform gets by by the sellers that are on it. Something will come along eventually, I don’t know if it’s going to be Walmart or jet, I don’t know if they can make that shift or not. Maybe we’ll see, but here that some some upstart, we’ll figure out something new, just like Amazon did and eventually it’ll happen.
You know we all always thought Microsoft would be king of the world and now Microsoft, too kind of thing. You know: yeah got their operating system on your desktop and your laptop, but more and more people are just using their phones and everything else. So they’re kind of pushing down just like IBM, used to be the big name and and now Google Google is being beaten up by Facebook and they’re taking over a lot of their ad dollars.
So technology keeps going things, keep changing and we’re in a world that were what used to take a hundred years to happen now is happening in ten years or less though yeah you also see you know not only, I think, is the stock price of Amazon affected By President Trump the perspective changes, you know, I mean love him or hate him. You know a lot of people, listen to the president, United States and when he says things about Amazon being not being fair in terms using the Postal Service.
I’M not I’m not commenting at all whether that’s accurate or inaccurate, if things like that can affect the perception of a brand. You know like me personally, I hate the idea of Amazon. Go you go to a supermarket. I want to see people there checking out because they need jobs, so I think that’s a huge detriment. So I think I think public opinion will have some effect and I think the President may have sort of started something where people are looking twice and saying.
You know yeah get my stuff, you know next day and it’s great, but what are the negative implications of them, and I think that that could happen in terms of sellers and it could it could help change it for the better yeah most of the people. Listening to this and selling on Amazon, don’t remember my Bell right yeah, you know the whole country, one phone company, you know else on the government said no go and broke them up.
Is that a future of Amazon? Toby Amazon? I don’t know, but I think that sellers sellers should start thinking about joining together. There’S a merchants guild, that’s being created by a by a couple of people here in the Northeast. One was a law professor at Pace, University School of Law is also he’s a tax lawyer. I hope to have more news about it and to be able to tell sellers. Listen, you need to donate to this.
This is going to be like our lobbying group, so hopefully that’ll get off the ground soon and that’s how I would prefer to see it. I always hate the government getting involved in things, especially technology, because I think they they just ruin it more than the help. Slow down the advancement of Technology, especially so I hope they stay out of that, because if they do regulate Amazon, I think it just more cements them as the leader and makes it harder for people new people to get into the game.
But that’s my opinion. I’M a small government guy libertarian, so I I prefer the free markets and stuff like that, but I definitely know exactly what you’re saying with like the Amazon go and stuff like that, it’s kind of nice to have a retailer there or someone checking you out. But at the same time it would be kinda cool just to grab my stuff and leave. So we got to find that bit that balance, and you know people people need jobs and I’m a big believer in technology.
You know I was like first to jump on the Palm Pilot and the boss, Casio boss and technology. I love it, but you know people need jobs. Americans need jobs least. That’S why I pick a before I go on that soapbox. No, can I I do a promo for something else, totally different different change of directions, sure sure go ahead and then, after that, we’ll we’ll move in and talked about some retail arbitrage stuff.
Okay, most of us who are making a living some way or another associate with Amazon, also shop on Amazon. When you shop on Amazon, you can pick Amazon smile, which is a program Amazon. Has it it’s a fantastic program where they donate a small portion of your purchase to the charity that you picked? It doesn’t cost you anything extra as a consumer and there’s a lot of great stuff that Amazon does they help employ.
They have the Amazon smiles. They go into poor neighborhoods of fresh food, there’s a lot of fantastic things. Amazon does, and this is one of them, the charity, that I would ask you to pick. If you don’t already have one, it’s called the Ty Lewis Campbell Foundation. It was founded by a fraternity brother of mine and his wife after they lost their son to brain cancer, ty Lewis, Campbell foundation.
It’S a remarkable group of people that raise a lot of money solely to focus on childhood cancers, so Amazon, smiles, ty, Lewis, Campbell Foundation and I could said to the lake and that sort of stuff yeah. Definitely we can put it in the in the notes down below the article here and sorry for your loss. That’S never never a fun thing to deal with cancer and it seems, like everybody, gets cancer nowadays, just horrible yeah.
That was my toes my buddy and for a knucklehead of a guy really an incredible father, an incredible man. His wife is fantastic, developed this disc on Dacian, but alright retail arbitrage, ya, know and just for everybody. If you go to its smile, Camus’s on comm and I’ve actually used it, I forget to use it sometimes because my Amazon tools that I use don’t work on smile amazon.Com, so I always forget to go there, but I definitely used it and it’s definitely nice to Be able to donate a percentage of your purchases to charity without with no additional cost to you, so definitely check that out and I’ll put that in the notes for you but yeah as far as retail arbitrage.
So this is probably where the the biggest legal issues come in with people I’ll just start off with a story of my own. So I started in Amazon in retail. Arbitrage is where I really got my feet: wet and I’ve sensed move more into wholesale and private label, but I still do some retail arbitrage and one of the most recent think problems. I’Ve ran into with was with Skull, Candy home. They make headphones, yeah very familiar them, so I was selling their product.
They sent me a cease and desist letter from a law firm, and I replied to them that I bought these items at clearance and I’m just reselling them when they’re going they’re gone and then I got paperwork in the mail. Basically, all this legal paperwork, the same thing, my friends over at the forties law – firm yeah – I might have been – I forget – the name of them. I learned Whitney a couple of the guys over there yeah on the bottom.
That’S whose signature it was over all right. So what kind of do they have grounds there or what? What should I do in that case? Usually the grounds are total BS that we see okay, we’ve dealt with Skullcandy before I don’t think there was anything in their warranty or their product and if you were selling genuine Skullcandy headsets, you were not violating anybody’s intellectual property rights, and that letter, in my opinion, Is entirely baseless that should never have been sent.
We’Ve also seen you know, Voorhies. Also, if you do research on the Voorhies law firm, they had this whole article about how they automate brand protection right. So it seems to me and again I don’t work for them alone. I’Ve met the guys a couple of times that they’re just sending these letters out without anybody, even looking at where they’re going, because it’s automated they have a whole like animation on this stuff.
So they send them out. Letters of baseless boardies is very rare if every will withdraw their complaint, but amazon is very acceptable to ignoring them so that we’ve dealt with that. What we call it divorce letters we’ve looked at, I don’t know, I countless countless Lori’s letters. So we’ve been very successful, getting Amazon to ignore it. When Tyler Dillon lawyers over there refused to withdraw their complaints, we didn’t even recently saw a letter where a client of ours bought items at Cole’s and, just like you can buy stuff, it calls and sell it in a garage sale.
You can buy stuff at calls and sell it online. Okay, there’s no difference. It’S the first sale doctrine and Vorian actually sent down a letter. That said, you can’t do this right and was it was absurd, because okay well calls took their money. They now own that property and they weren’t claiming to represent the brands. They were just representing Coles department store and the letter was just ridiculous.
So I would it be what about those letters? They are part of doing business if you won’t want to try and avoid those brands, even though you’re right, it may just get less stress in your life and you your your risk reward benefit analysis. It may be better for you not to get involved, but, like your headphones were most likely. A hunch percent legitimate and fine, just out of them. Persuade Amazon to ignore their complaint and just like Amazon, had a problem with like some of the the refund companies that were out there for a while.
I don’t want to name names. I think Maurice has overdone it. They do done too much buckshot. I think Amazon as a company seems to take their lenders a lot less seriously than they used to because they just do so many of them. So I wouldn’t be too worried about the Voorhies farm, at least right now and boys if you’re reading this, I still think you good guys. Oh, I think your letters are bogus yeah and that’s that’s kind of was my thinking as well.
You know I only had one or two left, so I just pulled them out and I said I’m not going to worry about it, but that’s that’s good to know so if I would have just ignored them, what do you think would they have taken it? Any further would they have open, filed a lawsuit or anything like that like they claimed to, or is it just they’re trying to just making claims with no ammunition behind it? You know I don’t want to draw a lawsuit like I don’t believe in.
Like you know, I don’t be like a mano, a mano and challenge them, but let’s take your situation, I think you’re pretty good. I don’t think I don’t think you should lose any sleep worrying about someone’s going to serve you with papers tomorrow, sure yeah and that’s that’s part of the reason I opened up. The second Amazon account when I’m moving any of my private label or not private label. My retail arbitrage stuff over to that account, and my thinking is that if there’s a claim like that and Amazon closes that account, it won’t hopefully won’t affect my other account, since that account is in good standing and didn’t have the violation on it.
So that’s kind of my thinking there. Maybe Amazon might connect it over and shut that one down, but at least there’s a little extra barrier there too. If there’s any false suspensions on Amazon part I’d say we haven’t seen that happen at all. If you have Amazon’s approval to have a second account, we haven’t seen any connection between products on account. A with products on account, be okay, don’t have they’re from they link him up.
They shut both of them down very good to know so yeah and my thought is on it. I’Ve kind of ignored those letters, the Skullcandy one was the first one that they actually sent me in the mail. So I’m not going to worry about it. It’S just a couple products I pulled it off and I actually return them back to shop Co and got my money back for them. Yeah I’ll just have to going forward I’ll just have to kind of ignore those letters and basically, in my mind, I just make note of those brands and just don’t buy them anymore.
They don’t want my money, I’m not going to buy their products. I guess the way I look at it a lot of times what we do, even if the complaint, even if the cease and desist is entirely baseless. We send out a quick it’s kind of a form letter that says we have looked at it. We take it seriously and we disagree and here’s our response to it. So it’s kind of silly because I don’t know how much they’re charging Skullcandy to send out their forties letter for us to then send out our form.
I know our rates are a whole lot. More reasonable and we do it really really quickly mm-hmm. I think I think, if someone, if someone has to is writing a letter, it should least be like a recognition like just though the respect we received it, we take it seriously, but we disagree or something to that effect. What we’re looking into it just the way we see things you know most people, especially in corporate America, answer to somebody and if you could imagine in that room, did you send out the Voorhies letters? Yes, how many did you send out a hundred? Did you get responses right? So I think when someone is called to the carpet out there? Yes, I got a response from these 98 could focus on the four that blew you off, so not really sure.
If that is entirely accurate, that’s the way we see things and it’s so quick and easy to respond to just simply say we received it and we’re looking into it done done deal. That’S it! Okay, you wouldn’t recommend saying something about the first-sale doctrine or something like that. No, we do we do we. Actually we spell out why they there’s no violation, but just quick and easy just to let them know you received it and to respond yeah.
I would send something back: we do we go through there’s, basically, four areas of intellectual property law, copyright, trademark patent and trade dress. So we have a letter, identifies each of those categories and why there’s no violation, so we send that out. You know my staff to probably do most those letters in, like you know, 10 or 15 minutes for any product, I’m just spawned to it and say you’re wrong.
There’S no and don’t make a complaint, or else you may be responsible for the losses and sometimes the losses are financially relatively small, but have serious consequences like you know, a single mom, raising a child right and say: listen you’ll be responsible for taking off taking away The lively of this single mom in Wisconsin, okay, we’re not going to let that happen idly. Okay, let them know, there’s some problem to the brand.
If they do this or significant income, you know you’re a point. Twenty people in your doing. You know two million dollars a month. Worries could be held responsible for those losses. You know, I think you identify why one you received it. You took it seriously why they’re wrong and their potential liability and that usually stops at least in terms of the voice, letters I think we’re in kind of like the wild frontier right now, where people are just trying lots of little things, and they don’t know.
What’S going to stick what’s going to work, what’s legal, what’s not legal and and hopefully that’ll kind of sort itself out, Amazon will start taking this stuff a little more seriously and not just suspend people’s accounts for basically illegal reasons when you really come down to it. So one brand that people will probably want me to touch on because there’s a lot of conversation on it. Right now is reselling Nike shoes, so Amazon has that gated.
But, for example, myself, my seller count has 800 positive feedback and I’m very good standing and I was able to on get get on gated for Nike shoes. But a lot of people are worried that Amazon is going to send, cease and desist letters and Amazon’s going to shut down your account. What have you seen there in terms of that and what grounds are there there? Well, Amazon is a private business right, so they can make up whatever rules.
They want. There’S no due process that you’re entitled to. If you end up taking Amazon to arbitration, there are certain laws in the state of Washington which governs the contract and the Federal Arbitration Act that would govern. We don’t ever want to go there. My advice to stay away from it. If it’s a gated brand and you’re not already heavily invested, there’s no reason to pick a fight that you don’t need.
So I would tell the listeners and listen I’m a David versus Goliath, guy, okay, I love the fight, but it’s not always good business. So I wouldn’t recommend anyone starts getting into Nike if they have the opportunity and if something is really great there they might want to apply first to see if they can get in. But something like that. It’S just to me. It’S not worth the risk, and I guess where I was going with that is: I am undated.
I bought a few Nikes sent them and sold them haven’t. Had any issue have you had people, clients that have had their accounts shut down from selling Nike we’ve had clients who lost the asons from Nike? I think we’ve had a full of some account suspensions, but we haven’t faced your scenario where you’re, unjaded and you’re allowed to sell and have a problem. Okay, I haven’t faced it and also by the way, if anybody out there ever tells you they know exactly what Amazon’s going to do: they’re full of it yeah, okay, Amazon, one of the great things about the companies that they allow their employees to make decisions for Themselves to inspire creative thinking, one of the bad things about the company that individual people that work there make different decisions than the guy sitting.
Next to them. Oh yeah. He allowed this freedom, so I would say, run-of-the-mill week we haven’t seen people who were unhappy problems. I wouldn’t start selling things that are gated yeah. I hear you I’m now with Amazon. I pulled my hair out some days. Trying to deal is one person will tell me something, I’m like no. You can do that like that guy just did it for me yeah. It’S you go back and forth on that, but that’s a whole nother story.
They don’t necessarily they don’t treat all sellers the same and it could be the same size, seller, same age, seller and they just you know. You see someone else, selling that same product and you’re getting dinged for it. Why? I don’t know, but there’s a Cajun saying that it’s easy to ride the horse in the direction that it’s going all right, yeah I’ve got. I’Ve got the one account that’s about three years old and has 800 positive feedback, 99 percent positive feedback rating, and I’ve noticed that, probably in the last few months, maybe six months, it’s gotten immensely easier for me to get changes to listings and get things done and And they’re, just like basically, yes, sir, we can do that for you.
I guess they’re, probably a benefit of sending in ten to twenty thousand dollars and fees that I’ve every month, they’re uh, they listen to you a little more yeah. It doesn’t seem to hurt. So why don’t I let me take a look at social media here and just see if we have any questions. We’Ve got one question here from flip kings on Instagram: do you have to be an authorized reseller for a brand to sell same brand on Amazon? So I think what he’s asking we kind of touched on already about do you need to be an authorized reseller of a brand to sell it, but the answer is: no, you absolutely do not.
You can buy and sell just about anything. You want in the United States without authorization or permission, but some brands just might be wise to stay away from yeah yeah. It depends on what kind of headache you wan na be left. Yes know how much money you anticipate making if it’s a small amount of money and a big headache, stay away. If it’s tremendous amount of money and a headache, maybe it’s worthwhile yeah yeah, definitely so got ta, weigh the benefits and costs and negatives and positives of that one.
All right. Let’S jump over to Facebook and see what we got all right here. We got one from Alex: what are the top three most common cases you deal with? What are the top three biggest mistakes made by Amazon sellers that open themselves up to litigation or risk? Alright litigation, there’s a very, very little actual litigation? Okay, don’t I don’t want you to like not be concerned about it, but I don’t think you should lose sleep over litigations, very, very little, there’s very, very few lawsuits.
Well, they are increasing a bit against domestic sellers. Okay, top three are inauthentic. They just want to see your invoices number two. Is you sold as new, where people are receiving products that either look a little bit old or damaged or the packaging is like last year’s packaging? It’S not the same as what it looks like in the store and the third are baseless: intellectual property complaints, somebody’s claiming that you, you shouldn’t, be selling OtterBox, tell cellphone cases or something you really have no grounds to do it.
They still make the complaints so inauthentic. You sold is new and IP complaints inauthentic and you sold as new have nothing to do with the law. Although we write tons of those plans of actions every day yeah, so it really comes down to you’re, probably not going to be taken to court. But how much risk are you willing to take with Amazon because they can choose to suspend your compass for any reason, then you have to prove that you didn’t do anything wrong.
Yes, but the litigation risk is very minimal. Okay, all right you! So that’s what you’ve seen so far: yeah yeah and that’s that’s good to know Lacey not to lose sleep over losing your house because they you sold and what what we’re seeing the litigation that we’re seeing the most of isn’t against the domestic sellers. At all. I mean there’s some: it’s usually like a brand suing John Doe one to five hundred but John Doe, one to five hundred actually sellers located in China.
So the vast amount of litigation that exists is against foreign sellers and elation locally. Domestically is really it’s really minimal. You’D be surprised, it’s very minimal least right now, all right, so just lots of threats flying around not a whole lot of follow-through, yes bill, one formal litigation that you asked about early on. You asked about insurance and liability if, like you, know, and harm some, but some product harm.
Somebody Amazon requires you to have liability coverage, although most sellers don’t – and we have yet to see Amazon – ask to see the certificate of insurance, but as a business person, you should create an entity to protect your personal assets and you should buy liability coverage. It’S it’s very, very inexpensive. We always recommend Ashland had an out of Indiana who’s, really focused on e-commerce sellers and their insurance needs.
Okay, now G and it’s easy it’s required. I don’t know why they haven’t plugged away at it to get rid of sellers, but but it it provides two things that are vital one. If you do hurt, some of your product hurts somebody right, it’ll pay, whatever the losses are, but more importantly, they’ll actually provide lawyers to defend you and that’s really. A vital. The obligation to defend by an insurance company is probably more important than the obligation to indemnify for losses, because if you can walk into your local lawyer and get defended, it’s going to cost you an arm and a leg.
That is, I know, that’s extremely important, especially if you have private label brand to protect. If somebody somebody hurt themselves with your product, how important is that, if you’re just selling other people’s products, because if somebody got hurt with their products, wouldn’t they be liable? Or would you still be liable, as the person is sold to them on Amazon? Now, as a as a former plaintiff’s lawyer, okay and I tried cases, car accidents and employment cases, a medical malpractice when you’re starting a lawsuit for someone who is injured, you’re casting a net for everybody, who’s involved in that product.
Now everybody everybody has to defend themselves. So like in your Skullcandy example, if one of your headsets, you know cause someone to lose, you know their hearing or damage their hearing. They understood everybody, including you, and if you have insurance, you just call the carrier like in your car accident and say: hey, listen! I’M getting sued and they would assign a lawyer to defend you in New York, it’s very rare that cases get dismissed until after depositions and after you know it takes about a year to get there.
You have to defend yourself that entire time, so the insurance provides lawyers to do that, for you, where you basically make a phone call and then you’re done dealing with it and you can go about your business while the lawyers defend you on somebody else’s dime, okay And what was the name of the company, then it’s Ashland had an HDD en and she’s in Indiana, its Ashland had an agency or Ashley had an insurance or something like that.
Okay, as far as this this area, I think one I like Aaron, we’re friends. I don’t get anything from anybody if you use any of the vendors I suggest, but it’s nice she’s very responsive and she knows her stuff. Okay, all right, yeah and that’s extremely important in the Amazon space, because it’s a whole nother animal. A lot of people could sell you the insurance, but getting someone who actually knows Amazon is very important to get the specifics there.
Yes yeah it is. You need someone who kind of knows our space yeah. Definitely that is all the questions that I’m seeing so far. So anything that we haven’t touched on that you want to touch on. Oh no, I’m really grateful if you’re having me on. I think this is a really really great webinar and thank you and just the Amazon smiles in the foundation. Ty Lewis Campbell Foundation. A lot of people who take this opportunity to promote themselves, I’m not going to do that: smile dot, Amazon and the Ty Lewis Campbell Foundation well promote euphoria.
Your website is Amazon seller. I’M sorry, Amazon, sellers lawyer.Com. The website looks awesome. You’Ve got awesome information for us here. You seem to really know what you’re talking about. Where can people what’s the best way to get ahold of you if they either want some of the sample forms we talked about, or maybe they have something bigger and their account suspended and they need some help sure they can call us.
You know, like Amazon, doesn’t give you anybody to speak with and we know you need to talk and explain. What’S going on, so the phone number is eight seven, seven, nine, the word sellers stll ers. You can email me at CJ at Amazon, sellers lawyer, calm as sellers as plural. A lawyer is singular, we’re also we’re on Facebook and we’re on we’re on twitter we’re everywhere. So I would say the best way is to just call or email or send me.
You know it on Facebook, any of those three okay, all right, perfect and I’ll. Put all that information in the notes as well. I really appreciate you coming on. There’S been a lot of awesome information and information that I needed to know and that everybody’s going to really appreciate, I’m sure, so I appreciate it and look forward. Maybe we’ll have another you sometime down the line as things progressed on Amazon it’d, be great.
I’D love to be back on thanks a lot. I appreciate it CJ you have a good one too Thanks,
Suggested Product to Sell on Amazon!
I suggest Spunks be the choice product to sell on Amazon. I mean the product has 5 stars! Check out this great pumpkin seed product. The video below gives you a look into the guys behind this great product.
Thank you. You are the bag, lady. Yes, what is the bag? Lady? The bag? Lady? Is a family owned and run curated kind of art collection that people can actually wear and it’s all new products and it ranges from bags to accessories and then all the way now we started with clothing and leggings and blankets and home goods. What is the most expensive bag you’ve ever sold? Oh, I think it was a $ 5,000 bag and one went to Peru, we’re so lucky.
We have a lot of international customers that seek us out and find us from the power of the Internet, and so that’s been one of our top-selling bags and you brought a couple bags with us to show us what you have sure Mary Francis is a line That we’ve been working with for 20-plus years, hand beaded made in the Philippines and every season and collection, it’s a new collection and it’s limited so she’s, wonderful, she’s based in California – and this is, we learned both of our sign.
Yes, it’s the horoscope collection and we did very well with us actually and that’s a new body shape and style, and people love the horoscope stuff, great yeah. That’S also a Mary Francis and it’s all hand beaded in the work is fantastic, she’s, very artsy she’s. Very, the names of the items are super cool and we love working with them have limited pieces of Gucci and we love the Gucci stuff, especially the florals.
We love what’s happening with the brand now that it’s just doing so well and he’s taking it to this eco. He took far out of the line. Alessandra Michel he’s the new director and he’s just with the rockstars and he’s doing great and transforming the company, and I really honor that there’s a lot of beautiful stuff here, coach and michael kors, our you know our everyday line and we do excellent with coach and Michael kors, those are our mainstay plain leather goods and beautiful stuff, and then johnny was they just came out with this new perfume and this oil, and we are doing well with that whole line great, I feel like we’re on the Home Shopping Network.
This is awesome. You know this is definitely not my world. This is your world. In fact, I learned that since 1976, your parents started a business with high-end shoes. Tell us a little bit about how about your parents business and how you kind of inherited the kind of luxury woman’s market. Well, they came to the states and they from Russia, and then they met in Israel. They both did the army and then they were in Israel and married and then they moved to the States.
My parents wanted the American Dream and they took over this man’s shop and started with shoes and all sorts of designer women’s comfort shoes from Italy from the United States, and then I was born a year or so later, and you know it’s just it’s interesting. My my parents, Mike on my mother’s side, are immigrants from Europe as well and to Philadelphia, and they actually ran a shoe store as well, but it was a low hand, okay store in kind of a rough neighborhood in Philadelphia, so kind of same business.
Other end of the spectrum, amazing: what was the name of the store when it started in 76? It started with shoe club and it was in Aventura Florida, yes, which is kind of just outside of Miami, and then it moved on and they named it Michels. After me yeah, so they called my dad Michele for a while, and so he would respond to it because he was the face of the business and everything and he’s so helpful and love talking to people and the stories.
We’D have like multi-generations come in to chop and it was fantastic, so many years and we’ve developed several stores and relationships with the local community and everyone knew if they needed something special for an event or for every day where to come to the store. And you worked at the stores. Yes talk a little bit about some of the things you did around the store. I did everything from merchandising to purchasing doing the buying behind the counter.
We did it old-school, so we were right down on the invoice from closing the shop and to opening it so the whole all of the logistics and then in the mid nineties. You left you have to South Florida. You left the shop, yes and, and you probably thought for good – you left the business I thought so I thought I was going to move on to something else and bigger and different, and and where do you go and how did you find your way back? Well, I went to school in University of Virginia and I love Charlotte’s though I love the mountains and the whole culture was a completely different one that I really ingratiate it into, and then I decided to come back after doing a little bit of time in Florence.
So I was in the mecca of art and fashion for a bit as well: we’ve always had Paris and Israel and Italy in our blood and this European boutique II feel so I bring it back to Florida. I went and moved to the Grove and started working on odd jobs here – Art Director, Marketing Manager and those sort of things, and then I kept the thread of the store. I will always woodwork like one or two days a week, and I saw this opportunity online.
That was a new versioning place for online goods and I started on eBay where I started telling $ 650 item products. At the time when people were selling vintage flea market finds so I started this whole new new items being sold online and I would go to the store to work and then I just ship out what I sold and things were moving online, that wouldn’t move in The store that people would just look at so it was a really different dynamic and I saw this opportunity so you specifically were selling handbags online on eBay.
Yes in the early 2000. Yes can you can you go back to like? How did you learn about eBay and how did you have the the insight / inspiration to sell? You know: multi-hundred dollar thousand dollar, handbags that were new yeah and what was essentially an auction site for flea market and used goods. I just start tried it out, and I do you remember that moment when you’re like okay, tell me about that, is the brand called Isabella Fiore and they did like really beautiful, hand-painted stuff somewhere from Italy somewhere from elsewhere, and they were just sitting and nothing was Moving in the store – and I thought let me check online – see see if so, anyone else in the world has been s or selling it, and I would seize things on eBay and at that time eBay was pretty big for the flea market world and I thought Why not? There is a new with tag option.
Why not try it so I put put a few on and I take like homemade pictures and they started to sell and just like that. It just was a quick happening and did you with eBay, were they auctioned or with a minimum bid yeah we did that and did you were you able to sell them at a higher price than the retail price in your store? No, to be honest, no nowadays I can do that, but those days now I would get MSRP, though, which was great, so it was a way to kind of move merchandise that you just can’t move any other.
Yes, how did it evolve from there from there? I wanted out of the shoes I wanted nothing to do with shoes, because she’s are very difficult. Shoes are tough. How did mom and dad feel about you getting out of their business? Oh, they liked the fact that and they liked it, because my mom wasn’t loving the going to the store every day and dealing with the public, so we iced all bags as an easy thing to ship.
There’S no real size to it. You can gift it easily. So I like the idea of it that it was simple yeah there’s, also not the challenge of whether they fit correct the fit is off and Zappos kind of took over at that time, and I couldn’t compete with as oppas scenario did okay. So then what happened at some point? The retail store, your parents closed the store. We closed the store, yes, the store closed because the rent went up triple yeah and they retired no they’re, still they’re still working a little bit with ya lady, the things flipped yeah.
Now, they’re working for you and well with with me, writing receipts and collecting. You know something like that and soon talk about what happened from that those first early days mm. You know 19 like what what happened over that you know 15 year period, how did the business grow, sir evolve and mature okay um? Over the years, we’ve tried out different products, different price points, different marketplaces and kind of had to go along with the times and where the technologies have been moving from desktop to mobile, to free returns, return shippings, all things have the picture.
Quality has to be really amazing, especially if you’re selling a $ 5,000 item. So we started hiring photographers going to different, shows and vegas atlanta different places to to get new brands. That would be ready for online and at this time a lot of the malls and brands were opening their own storefronts kind of competing with us. That makes sense, and that made a lot of stores close so mom and pops.
It became rare to have like a native family-run business and let alone being online. The dynamic is a little different because you’re not touching the product you’re shipping instead, so it becomes like almost like a catalog business, but a lot of the brand’s want you to maintain store Franz. They want you to go to trade, shows and still be in person. So over the years we found this different, different marketplaces, repeat: customers, brands that resonated and we’ve evolved to today, where we’re we have our own website and we’re on many marketplaces which marketplaces we’re on Amazon, which is one of our better ones that we do most of Our business and it’s really strict stringent policies to maintain turnaround with email messaging to products being, as is, and exactly what you’re selling and we’re happy to do.
So because, where you are very honorable in what we do and sell – and we want all the customers to know and have that exact thing that they’re ordering, so we’re really proud of that, when did you first get onto Amazon Amazon? We started about five six years ago and it transformed our business yeah yeah we’re doing many more sales, our Christmas December time as fantastic, and it beats going to a store yeah, I’m sitting all day waiting for someone to walk in because we reach the whole world.
What differentiates you as a vendor online? What what makes you special? Yes couple things the way we curate our stuff, it’s like a gallery of items and we have a lot of limited edition pieces and we have new stuff. So we not only have this amazing piece still that might be from the special season from last season and no one has it anymore and that someone’s looking for it. But it’s new and it’s in the original packaging and it comes with all its wealth bill bells and whistles anything that it should come with.
So it’s a way that people can trust our goods with tags and dust bags and and we ship it beautifully as well, and and how does that translate online? You know like, like you know, when you’re dealing with such demanding customers, people who are used to going to the Four Seasons who are used to kind of having their every whim met. Yes, how does it like translate to e-commerce kind of impersonal? You know it could be, it could be.
I like that. I have contact and communication with these buyers and discussed they killed, call me or whoever and have someone actually pick up the phone they’re so shocked. It’S amazing when they call – and I actually pick up and explain, answer all their questions. They love it. So, there’s that level of intimacy and all and communication, which is key and it’s different than calling a department store and getting the runaround or being put on hold for 20 minutes or whatever yeah.
I that’s my favorite. The discerning client is a favorite of mine and developing that relationship and continuing it so that I know next season or the next collection that comes in that I can reach out to that person and they’ll be excited to hear from me. Is there a bit of that, like you might call or text or whatsapp sure, absolutely personalized, yeah cuz? That makes that differentiates me from I’m shopping somewhere else, yeah yeah.
That brings us to me. Yes, what in the world sounds like you’re, a very successful businesswoman? Well, thank you. You’Ve been able to kind of take a family business and bring it into the 21st century. What can i, what can busy do for you? Well, I had so many good recommendations and referrals to come to you and since the class I’ve met even more people that have taken your class and known you, and I find your class to be the next step for us in expanding the social media presence.
Utilizing Facebook, as the main cog in the wheel and seeing how that will translate onto because online sales is what we do I’d like that and I think you’re what you do is perfect for our business in translating a high-end fashion, easy capturable social presence into sales Were you feeling a little captive to Amazon? Perhaps yes, talk about that like what they’re sort of what give, I guess, maybe what giveth can be taken away? Is that sort of how it felt it just feels like? I don’t want to be tied down and I would like the potential to grow a similar business on my own.
That has that I’m in control of right and explain what that means. For someone who isn’t in the e-commerce business. What does it mean to be in control of Amazon? Requires you to use UPC codes to use certain product details, to update your the catalog to use certain images and it’s a very stringent business seller performance that they expect from you, which is fine and it keeps everyone up to par.
But certain things that I’d like to sell may not have a UPC code, but I love the designer from Columbia and I would love to use her products, but she doesn’t have that code so that limits what I can sell to the world. So I see working with you as a potential of expanding the online business, the bag, lady shop site and being able to sell other products that I adore and that I have limits with on Amazon yeah.
That’S definitely one really interesting limitation. I mean another one with Amazon is when folks go to an amazon landing page with your product. Yeah amazon owns that traffic cause the data about that traffic. They don’t share that data. They don’t let you track that customer. You can’t retarget that customer you’re really limited and absolutely with that yeah. So if someone visits that landing page with your product and doesn’t buy, you have no way of advertising to them again.
Yes, that’s a big one if they were to go and visit that same product on your homepage on your website. You could absolutely and so driving traffic from ads on facebook to your home page versus an Amazon landing page allows you for share our sales, 100 % and so part of what I think. The opportunity that you see is to kind of own your destiny. A little bit more yes and I adore that relationship. I want to be in touch with these customers, they’re, essentially mine, and I would like to have that discussion with them and send them newsletters and all the latest yeah.
It would be great – and I mean you know somebody who’s looking at a one or two or three thousand dollar bag isn’t necessarily going to buy on the first visit right. You know so so you can expect them to kind of shop around a little bit, and so it’s particularly important with that kind of purchase which isn’t going to be an impulse, buy that you’re able to have build up a relationship, and it’s very very hard to Do that on Amazon, absolutely Lilley captive to their world the other thing about Amazon that we talked a little bit about when we were first kind of getting to know each other is what I sort of mentioned to you.
Is that what Amazon giveth Amazon can taketh away? Yes, which is to say that Amazon will drive traffic to your product pages through their search? Yes, but they control everything. How much traffic you get, of course, and if they decide another vendor is who they want to get traffic to or that they’re going to start selling, which they do they compete with your own statistics. You know those bags themselves or a knockoff version, mm-hm or they’re going to make you start to pay for what you’re getting now for free.
All of those become inhibitors to your growth start and risks for your business yeah. So there’s just a lot of risk. That’S kind of built in to relying on any one digital blog for your company’s future, absolutely put all your eggs in one basket and it’s not to say that there aren’t risks associated with Facebook. It’S just that you’re diversifying the risk by. If you have a good blog going with Facebook and it’s generating you traffic there and you have Amazon and then you have eBay, and maybe you have some other blogs going as well and then you have direct traffic and you have the direct relationship yeah.
Then you have a diversified business that could survive if Amazon changes its policies or start sending you less traffic and so forth, and then you also as you explore these new blogs can grow. Yes, what have you learned so far that you think is going to make a difference for your business, because this is so retail focused? I adore the look-alike audience aspect of the Facebook campaign. What’S it look like audience good question, you utilize an existing targeted audience that you have data from and you filter it through and it they create a symbiotic audience.
That means I’m a similar to audience. Okay and I’m really a like the idea that I’m going to learn who my audience is, his Facebook is so massive and it goes from grandmother’s to tweens and all in between, and I’m really curious to see that, because that’s really that will tell me the next Phase of this adventure in business is who, targeting for I’ll, go and buy leggings for that tween. If that’s my new customer that I know is going to be purchasing for me.
So it’s a great tool. I’M really excited to learn that and get the data from the Facebook. You know that Facebook, you know, does someone who likes coach also, like Gucci, does it work that way or is someone who likes Gucci, also like whatever this is Mary friends Mary Francis? Are there like partisans, like somebody who likes this designer, doesn’t like that kind of group? Yes, it groups for sure, but it’s fashion.
So it’s multi-level and there’s something that you’ll do during the day that maybe on a weekend or an event that you’ll need something else or – and you have ideas about those groupings right just from years of experience, absolutely it’s a different population. Have you gone into audience, insights and tested those assumptions? I started a little bit, but I’m really excited to delve in there and it would be really fun yeah to do that yeah.
We could even do it together, but what we could do is Facebook. Has this amazing tool, it’s called audience insights and basically leverages the data from two billion people and you can put in their interests like Gucci. Yes and then you can see according to Facebook’s data people who, like Gucci, also tend to like X yeah, and we can actually test some of your knowledge. So you know what we might have to do when I have to do a little quiz, okay and see if we could like test you and see.
If, ladies I’m excited, I can pass the Facebook test uh-huh all right. So, let’s project forward. Okay, it’s graduation! Yes, you’re at the end of this first stage of your journey is hack. The end min is 12 12 week journey with us together. What do you imagine you’ll say to your fellow graduates as you’re, giving your graduation speech? Well, that’s a good projection. I hope everyone’s happy and healthy and growing in their business at that time and that we’ve made good relationships.
That will because to me that’s one of the most important things as the relationships with people. I love creating new ones and helping people need others and to bring traffic to the website. That’S the main goal and to translate that into sales. That would be the greatest right talk a little bit about some of the people. You’Ve met some of the peers, the the other business owners that you’ve met. Yes, I’ve met and know Julia who’s, a realtor.
I love the class also because it’s so varied with so many different types of people and types of industries and levels. So that’s been great. Anthony is selling products on Amazon as well, and he’s he’s was interesting to get to know. Carmen Tati is a great role model, there’s a lot of great people in the class, so how you know it’s possible that Amazon could go away tomorrow? You know how is busy at preparing you for that with digital marketing and media, there’s that blog through Facebook to get quality audience the same.
That Amazon captures the two billion that are on Facebook or would be captured with digital marketing, and I want to learn how to do that with your class properly and funnel that information and make it into great sales yeah. And I guess another way to talk about. It’S like right now. What percentage of your sales are coming through Amazon versus, say your website or eBay, a majority I’d say: 60 percent is an Amazon sale and if you could, if, in a in an ideal world, what percentage would be, what would your ideal percentage be website versus Amazon? 90 % website would be ideal, so right now, you’re at is it 40 % on your website or less less? What is it on your website minimal? Got it so right now: you’re like below 5 % on your website and 60 % on Amazon yeah, and your goal is to get to 90 % on your web absolutely and 10 % everywhere else.
Yes, so what is your plan to get from under 5 % to 90 %, starting with your cloths, and to see what that will bring and tapping into the market that Facebook has to offer and how will Facebook help you get there? How will Facebook help you get more sales directly on your website? I really think it’s a powerful tool because you can see the behaviors the interest capture their eyes in a way that in article and really targeted ways right and then drive them to your drive to the website and collect their contact information.
So you can stay in touch absolutely so I guess the the way that the path there is to use or leverage the audience on Facebook, sir, to make them aware of you, mm-hmm collect their contact, information yeah and then begin a direct selling relationship kind of the The idea – and I guess that’s what and that’s what biz hack is teaching you how to do absolutely great yeah I’ll get you there. I hope. So, although ninety percent – I don’t know well, let’s increase it yeah well, you know, what’s going to happen, is we’ll keep your ebay portion the same okay and we’ll make the other portions so large yeah.
Then it will just dwarf the existing. So your business will become massive. That would be fantastic. Then it will become like a hundred million dollar business. Can you imagine by the way, do you know of anyone else who’s doing what you’re doing? That’S the thing I am not in the you’re one of the first people in my new networking journey trying to meet like-minded entrepreneurs that are doing what I’m doing.
I know a few, but they also sell this bad back, and so I need to know, of course, many in the business, but not quite that are on Amazon, some sell, diaper mats that are organic things like that very specified. Not I don’t know anyone that has like a collection, so you don’t know another bag. Lady person, I know mmm, no, I don’t it’s pretty wild. Actually it is so what you’re doing seems like. Why aren’t there like a million bag? Ladies, I think there are, and they might not have the same collection or breath of online presence, or there may be relationships that you’ve developed that are hard to manage relationships, because these designers won’t necessarily make their collections available to those other folks.
It’S just varied. Some. Don’T have the storefront, some don’t have the connection, there’s different levels. Yeah, you know you’ve heard of drop shipping right. I love drop shipping and and you’re a but you’re, but you also have a large inventory, correct, yeah. How large is like in terms of dollars? How I couldn’t even but a lot Millions there’s dollars in there.
My name is luc de round the founder of ranking academy. Uk, where I talk about the best tools, tips and ways to promote your local business online step by step and keep by click on my blog, I cover everything. Any local business owner needs to know from search engine optimization to social media.
My goal is to help you thrive online, so you can drive more visitors to your business and ultimately make more money if you’re new here consider, subscribing and clicking on the bell button, so you don’t miss any of my new articles. One last thing don’t forget to check out the description below, which is where I put additional notes and links I refer to in this tutorial. So, let’s jump in with our first hack hack number one simulate local search results for different locations.
You may or may not know that Google uses location tracking technology to determine the location of a searcher. With this technology, Google can guess users exact location based on the IP address or GPS coordinate of the device they are using. This means that if I search for the keyword electrician near me on my office computer, I will get a very different set of results than if I conduct the same search for my computer at home located several miles away from my office.
This not only affects the Google map back results, but also the rest of the results, especially when there is a clear indication. The search is based on local terms such as a city, a postcode or a near me query. So unless you use a tracking tool, it makes it difficult to check if your business ranks in different locations when you are doing your research from the same computer. But if you don’t want to spend the money on a tracking tool, there is a free hack.
You can use to quickly check if your business ranks for your target keywords in specific locations. Even if you are using the same computer, go to Google and open an incognito window. Doing your research in an incognito window will prevent Google from giving you results. Based on your previous history, so the outcome will be totally clean in your address bar search for a keyword you are targeting for your business.
I’M going to use the example of one of my clients website with an electrician and wants to rank for the term emergency. Electrician in multiple local areas, near where his business is based, press return in the address bar, remove everything after the keyword parameter and add the following command and near equals city, replace the parameter city with the location area. You want to see the results for.
In this example, I’m going to use Bexleyheath, which is where the business is located and sure enough. They are at the number one spot in a map pack and in the traditional results. Let’S switch to a neighboring location called Dartford. This time they are number two in the map pack and number one in the more conventional results. This hack is very handy, as it enables you to quickly identify locations where your business is not ranking, just create or improve existing content for these areas to get more visibility and more traffic.
Moving on to hack number two find keywords: your competitors are ranking for it. All starts with someone typing a keyword in a search engine. If your business’s website ranks high enough for it, it is likely you will get a new visitor and hopefully, a new customer understanding. What keywords people are searching for is the foundation of search and that’s why it is extremely important to do some keyword.
Research before you start creating content for your site, but keyword research can be a bit tedious and time-consuming, especially if you start from scratch and if you’re new to this SEO game, you won’t really know where to start here is a hack that not only will speed Up your keyword, research process, but will also give you the ammunition you need to generate lots of traffic head over to neil patel comm.
Slash, ubirr, suggest ubersuggest is an awesome tool for anyone to improve their organic traffic and perfect. For those of you on a very tight budget, because it’s totally free okay, so let’s imagine I run a dental practice in London and these guys are one of my competitors. Boleyn dental comm, just copy their website address and paste it in the uber suggests. Search box. Select the appropriate country and click the search button uber suggests will display a statistical overview of the performance of this particular website, which includes the number of organic keywords.
It ranks for the estimated monthly traffic they receive the strength of the site, as well as the number of Link’s pointing to the site. You can scroll down for more data, but what we want here are the keywords, this guy’s ranked for just click on the tab, organic keywords which will take you to all the keywords that drive traffic to this site. The results are organized by volume, which is the number of times keyword a search for every month, position, which is where this business ranks in Google.
For this keyword, the estimated number of visitors they get for that keyword, the webpage on that site that ranks for that keyword and, finally, the SEO difficulty, which is how competitive this keyword is pretty cool right. Click on the export button on the bottom of the page. To download the full list of keywords in CSV format, which you can import either in an Excel spreadsheet or a Google sheet where you can filter through the data easily, so it’s faster to identify the best opportunities.
What you are looking for our keywords with low difficulty and high volume, for which you are not ranking for repeat this process with all your competitors aside and start creating content on your own website to target all the keywords you have identified as being opportunities. This should yield a lot of traffic time to move on to hack number three find links that are pointing to your competitors website, but not yours.
If you’ve been reading my blog for a while you’ve, probably noticed. I talk frequently about the importance of getting external links. Pointing to your website. Links are one of the strongest signals Google uses to rank websites, the more quality links you have pointing to your site, the higher you will rank. This means that if your competitors have got better links pointing to their site than you, it is highly likely they will outrank you to beat them.
You just need to get better links pointing to your site, and why should you start by looking at your competitors? Links like we did with their keywords, go back to uber, suggest and enter one of your competitors web address. Let’S take with our dentist example. On the left hand, side menu select the option backlinks. This will show all the links that are pointing to this site. In this example, this website has two thousand six hundred and nineteen links coming from two hundred and seventy seven domains or, if you prefer web sites.
This means that some web sites have included more than one link on their pages, this dentist site to reduce your workload. You just want to identify only the web sites that are pointing to our competitors. We don’t need to see all the links to do. This make sure the one link per domain option is selected. The other thing we want to do is to select the follow option. The difference between a followed and a nofollow link is that Google doesn’t give any value to a nofollow link.
Therefore they don’t interest us. What we now have is a list of valuable links from unique web sites pointing to our competitors sites. All you need to do now is to go through each link by clicking on the open window icon and check if you can replicate what your competitor has done. Repeat this process with all your competitors site and export all the links in an Excel or Google sheets to make things easier to manage.
Let’S continue with hack number four identify citations inconsistency. If you don’t already know what a citation is, let me give you a brief recap. It is a mention of your business on the web, which generally includes the name the address and the phone number of your business, also known as nap. Citations are generally found in business directories such as yell, Yelp and many other specialized directories.
You can find a comprehensive list of the main directories where your business should be listed on my site at ranking academy da koat UK slash tools, slash business citations. If you haven’t done it yet, you should submit your business details to each and every one of these directories as they do influence rankings and help search engines. Trust your business is legitimate. The only caveat is your business.
Citations need to be a hundred percent identical across all directories. If they’re not, it will negatively impact your rankings and, obviously your traffic, and when you submit your business to multiple directories, it can be easy to make. A mistake here is an example of a dentist located in London called Camden high street dental practice, although it is correctly named in Google, my business and has the right address and phone number.
When I dig around the web, I can find this business listed under a different name in another couple of directories: the dental practice the postcode is also incorrectly displayed in Yelp and in Facebook. This type of inconsistency can be very harmful for your business, since Google will struggle to understand which business is, which you can verify the consistency of your citations manually if you want to, but it would take a lot of time and efforts and you’re not even guaranteed You will capture all of the errors either.
Instead, you can automate this process by using a tool called bright. Local write. Local is not free, but you can use it for free for two weeks without having to even enter a credit card which is more than enough for what we need to do so go to bright. Local com create an account once you’ve created and verified your account. You can add your business details using either your google, my business details or fetch your location manually, go through the location process, set up filling in all the details and let the tool pull out the data for your business.
This should take a bit of time, so be patient once finished, go to the main dashboard and sell the citations options in there. You should see where your business is mentioned across the web, and if there are any errors they will be highlighted in red. All you need to do now is correct. The errors, in addition, bright local, will also less directories where your business is not listed, which is the perfect opportunity for you to add more citations.
Let’S move on to hack number five increase your number of Google reviews with a custom build link. Did you know that reviews are the third most impactful indicator that Google looks at to rank businesses in a map pack? Well, you do now. This means the more reviews your business gets. The higher your business world rank in Google if those reviews are good, of course. Collecting reviews, however, is not always easy and can be a cumbersome process.
Many clients you deal with can’t be bothered to search for your business online, then search for the link where they can give you a review, etc. The trick here is to make it simple for them once you’ve finished dealing with the client just send them a quick email and ask them politely if they wouldn’t mind, leaving a review for your business. If you don’t know what to write download my review email template at the address showing on your screen or in the description.
But here is the real hack. Add a link in the email which, when clicked on, will open the Google review box for your business directly on your clients. Computer. All they need to do is write the review in the box. But how do you create the link? It couldn’t be any simpler right. Local I’ve just launched a nifty little tool completely free that allows you to do this in seconds head over to the address displayed on your screen, search for your business in the search box and click on the fetch links and ID button.
This will return. Three results. Click on the icon, next to the review link to copy the link and add it to your email. This will make the process so easy. You should see the number of reviews increased significantly along with your ranking and obviously the traffic to your site time to look at hack number six check your local positions in Google map. This is somehow a little similar to hack number one, but this time we only focus on the ranking positions in Google Maps, go to player, calm and choose the tools option from the main menu from the drop-down.
Select local rank, tracker, scroll down and start searching for. Your business add a keyword you want to check rankings for choose the distance between the pins that will get displayed on the map and a great size. The free version only allows you to pick three. You should start seeing where your business francs on Google Maps for the keyword you’ve selected. Why is this useful? Because you can easily identify areas where you’re just outside the map? Pack like position number four or number five, with a little bit of optimizing work? You should be able to climb a couple of positions, so you end up in the top three results and drive a lot more traffic to your site.
As I mentioned, the free version only allows you to choose a grid of up to three pins, but a full license for this only costs eighteen dollars a year. So it’s worth investing in it. Hack number, seven add quality content to your site. The quality and relevance of the content on your website is very important. The better your content is the more likely you will be rewarded by Google and the more traffic you will get.
But how do you find out? What type of content you should be adding to your site and how should you write it? Let’S go to uber suggests, once more and once again, let’s enter one of our competitors web address in the search box. Our dentist and click on search on the left hand, side menu click on the top pages option. This will show you the most popular pages for this site, based on the amount of traffic they receive like most sites.
The home page is the most popular one. So, let’s ignore it for now, let’s have a look at their content page instead at number two, I can see that a teeth. Whitening page is very popular and receives about 660 visitors a month, which is quite a lot and if you click on a view all option next to the page, it will show you the keywords that are driving traffic to the page, along with the rankings straight away.
I can see that teeth, whitening, London and best teeth whitening London – would be very relevant because they are very localized and although teeth whitening has a lot more potential in terms of volume, it is way too broad and likely to be very competitive. Since they’re ranked in position four and five for these terms, I wonder what their page looks like. So, let’s click on it. As you can see the page, it’s clearly optimized for teeth, whitening, London and is very decent, but the content is very thin.
So here is the hack if you want to get the chance to rank above your competitors, for the same keywords: just build better pages. Yes, it’s as simple as that. This dentist could have added a whole section around frequently asked questions: a article showing the process of teeth, whitening a price list, how to section that would explain how to look after your teeth once they’ve been whitened and much more.
That would make this space a lot more comprehensive and Google will see that and will reward you accordingly repeat this process with all your competitors and create better content every time it will pay off massively hack, number eight add popular Q & A s to your Google. My business profile – this is a widely overlooked feature in Google. My business and chances are your competitors aren’t doing it within Google, my business, you can add popular questions and answers.
The problem is anyone and everyone can ask questions and answer themselves on your own google listing which sometimes lead to some bad results. Would you want to see this in your profile? This Ellucian add your own questions and answers yourself. It will a prevent anyone from asking for something. That’S already been asked B, you will be able to give an accurate answer C. It will display right in your Google, my business panel, making your listing stand out and generate more traffic D.
It might even get displayed in Google search results. So what kind of questions should you put in there as a business owner? You know better than anybody else. What question people always ask time to put pen to paper and start collecting them, then add them to your Google, my business profile. You just bring up your business, listing click on the ask a question option and simply add both the question and the answer.
If you’re not sure what questions to add just head over to answer, the public comm tap a keyword related to your business in there and click on get questions. This will bring a list of the most common questions related to that keyword. Click on the data option to make this easier to read, find out what the most relevant questions are and write an answer for them then add them to your Google. My business ethic use final tip each question as a like option.
The more like an answer has the higher up. It goes on the list. So if you want a specific question to sit right at the top make sure it gets some likes all good things come to an end, including this article. Don’T just read it start playing with the various tools I have talked about and make changes to your site today, the sooner you do it, the sooner you’ll benefit from it. I love creating tutorials for you guys and I’m always open to new ideas.
So if you want to suggest any topic, you want me to cover in my next tutorial, just post them in the comments below. In the meantime, happy marketing,
You have to try the best pumpkin seed snack from Spunks! Learn about the creators by watching the video below.
That’S a huge deal. Obviously, LinkedIn has a strong Presence for all businesses, Let me ask you hopping on LinkedIn. What are some things I need. To do to get it organized Well, it’s important for You to make sure you describe every role that you had Throughout your career, Have a very professional headshot makes you bring your very friendly smile that will invite people in And then also don’t forget.
About those keywords, Yes,,’cause, that will Also help you to be found in a search also, you Really got ta think about what’s relevant. What would Be your target audience or the business you’re trying to target what would they be searching for and what do you want to come up as Like? For me, I do a lot with social media, so I’m definitely looking For people searching for social media help Social media marketing they want to know about Facebook Instagram Twitter, so those are some keywords that definitely need to be Infused into my LinkedIn So a question that get a lot When it comes to LinkedIn, I’m sure you do too is how do I build my network? What are some best practices And honestly I’ve just taken the approach that I give for social media, which is you don’t wan na just go and follow some random people just to grow your following.
You want to follow people that Are relevant to your industry or within your area, if you’re, a local brick And mortar business When it comes to LinkedIn, does it matter if I know the person Or can I just sum it up To me, it makes sense to Keep it very relevant like social media, but You’Re the expert, what I think it’s really important, that you have a reason for connecting You can connected with Someone you’ve never even met but use the things that are Right there in front of you, you have people’s description, so you need to learn something about them.
They’Re in your industry, and it’s interesting to you. And you wan na know more let that person know on that personalized connection request. So don’t too concerned like “. Oh, I don’t know that person,,” and “ They’re, going to think I’m weird,” they’re there to connect. So it’s okay, but make sure you let them you Know why you want to connect, So that’s why LinkedIn always advises, leave a note.
You’Re more Likely to connect right Exactly And that’s actually true, so with doing my career I do a lot of traveling and speaking so. I’M meeting Essentially strangers all the time and it always catches my eye when someone is connecting with me on Linkedin and then they say: “ Hey Emma. I was on Your webinar yesterday,” like right away. I’M like “ Dude, that’s awesome,,” connect. We are now on the same network.
So do you advise that? Is that a good practice? For everybody, listening in, like hey, leave a message of Why you know this business Exactly you want to make sure that you give them a reason. Why you’re reaching out? Because in all honesty, there’s so many people out there that are just hitting the connect button without sending a message? A lot of people do just disregard that. So you want to make sure You give people a reason to get to know you more And of course, every so often you want to make sure you follow up, make sure your network Is going to be relevant so make sure that you’re Following up with them – and you know a smaller More relevant network is os much better than A large one that just is not in touch Same with Facebook, I was Just talking about this recently with some local heroes, You know cool cool cool.
You have a large following they’re like “ Yeah, that’s social proof, right?”, Not necessarily you want to make sure that you check the hygiene Of that list of followers and ensure that they’re in fact relevant and pertinent to your network, All right, Sam, I think it’s Time that I confess something I don’t post on my LinkedIn and I definitely enjoy When other people do and I consume it, but I don’t know I just Don’T take the time to do it is that a big deal Is that a big driving Force of being on there is creating content.
What are your thoughts? It’S really important. To create some content because just going from a Casual viewer on LinkedIn, creating content makes you stand out More things that people Like comment or share, it increases your visibility and the whole point of Being on that platform is to be seen, and that’s what you want so you may want to take your Linkedin game up a notch Em. This is sounding a Lot like social media, It is And it’s okay to be personal.
You know yes, LinkedIn is A professional platform, but at the end of the Day it is social media. What’S the first word Social, how people relate And connect with each other. That’S what you want to make sure you do So don’t feel like a stuffy. Linkedin has definitely changed over time. It’S okay to personal! Well, I saw a quote, though that said LinkedIn is where humor goes to die: (, laughs, )! I know what people Are talking about with that, but honestly you make Of it, what you want, if you want to be connected with people that, like your personality, showcase it LinkedIn now has article You can also put yourself on article if you’re comfortable with that ( gasp ) Idea.
I could add this article to my LinkedIn. Well, I think so. Okay, Emma you said you want To beef up your LinkedIn game, so let’s start to think About the type of content we’re going to create, It’s really important A lot of people think you know, keep it professional Stay away from things that are like politics, And things of that nature that is important, but at the same time don’t forget you can’t Separate your professional and personal, I know, and plus people Like to laugh and smile, So it’s important if you want to share Some personal anecdote: it’s okay, but give people Some insight behind it like a day at beach, you Showcase that you’re having fun and you’re relaxing, but you can always tie back in the point that you’re not all about work.
You like to laugh, you like to get away. I love the beach It is important so that you don’t get burnt out very important in your profession, All right, Sam. This has been awesome. I’Ve learned a lot about LinkedIn, I’m a little less intimidated by it and I’m excited to go on There and update my profile Just thinking about what I already have in place with my social media. I’M Got that content calendar to keep my strategy on track.
It makes sense to me Correct me, if I’m wrong, I need to add my LinkedIn Into this content calendar Absolutely right, you want to make sure that you have a good goal. That’S feasible for you of how many people you Connect to on a regular basis, I suggest one to two per Week start out with that, because quality is way Better than just quantity, You want these connections. To mean something and be significant: That’s really building your Network in a responsible way, That’s a wrap.
You Just learned how to build your LinkedIn network be sure to like this article, Hey share it on LinkedIn, Also subscribe to our YouTube blog and ring that bell. So You’Re, not the last to know about our next article and –, Make sure you comment below and let us know what Is your go to message when you’re sending those Linkedin connection requests: This is The Journey, see you next time.
Social signals are very real and help your search rankings. Learn more in the video below.
The fact that, or the concept that you have the potential to reach millions of people across the whole globe to me is it’s astounding, but it’s also a bad thing if you’re doing it bad, so I actually run a lot of social. I run a tumblr, a Pinterest or Twitter, an instagram Facebook YouTube, so I run almost every social media account that there is out there, I’m always looking at metrics how to optimize how to make it better.
So in this article I wanted to show you seven mistakes that you’re probably making on social media. That probably could be hurting your likes, your engagement and just how people perceive you. The first mistake that many people make on social media is posting too many selfies other than seeming extremely arrogant and self indulging. You also seem, like you, lack creativity. If your whole feed is just your face, you really need to move past it and actually share some parts of your life on social media.
That’S probably why people are actually following you and not just self-portraits of yourself number two posting shirtless bathroom selfies. Now, yes, most guys that are even remotely physically fit, are probably guilty of this sometime in their life. But it’s old and it’s even worse when you see guys posting a bathroom selfie and they post it with a comment like some sort of cheesy tumblr success quo.
Now don’t get me wrong, you should be extremely proud of your progress in the gym and what you have accomplished, but instead of posting just to post, post actual value actual content, for example, say you broke your new PR squat post, a picture of you squatting that And your capture can be just broke, my old PR squad that has a lot more value than a shirtless picture of yourself in a bathroom, alright guys.
So before I keep going with these, I do want to let you guys know about a huge seller that v reades is having their changing it. Up. Not only are they’re selling reades they’re also dropping sunglasses today for Black Friday, so for today for Black Friday they’re opening the store I’m going to have it linked below, but even more importantly, they got you guys, a huge discount code, 20 %, I’m going to have The code below I have never herd of them ever give 20 % discount before and they’re only having it today for Black Friday.
So I’m going to have all that information below and like I said they have sunglasses, backpacks and reades, and if you’ve been thinking about getting the fifth read lately, I think today’s the time to buy it, because this code is only lasting for today, which is Black Friday and you’ll be able to get it 20 %, and it also makes a great Christmas gift for both her and him. The third mistake that a lot of men make is posting their drunken escapades.
I think you should make it a personal rule that you shouldn’t use your phone while you’re drinking you’ll just save yourself from a lot of trouble. But if you must use it, try to avoid talking about or posting about how you got super plastered last night on every other social media post. Not only does it get old, you got to keep in mind that your future employers are now starting to look at your social media accounts to see who you really are so this one.
This was if you’re, in a relationship if you’re in a relationship don’t go liking. Other girls pictures save yourself the unnecessary fight and don’t be dumb enough to go liking. Other girls post, especially if they’re in a bikini, while you can look, don’t like them. The next one is posting when no one’s around or no one’s online. Again, I run a pretty large Instagram account and other social media handles so, like I said, I’m always looking into metrics and how to optimize for higher engagement, higher views higher your comments just more likes in general, so I’ve pretty much narrowed down.
What timeframes get me that higher engagement on a personal level if you’re looking for more likes and more comments, which almost every person that posts on social media is don’t go and post that one in the morning, when most of your friends are probably going to be Asleep, so look for those time frames throughout the day notice that your metrics and, like I said, don’t post an odd time frames because it’ll significantly decrease your engagement.
The sixth mistake is picking a fight on social media. This is a mistake here, because you see here here, there’s really no winners. While it is super entertaining sitting back and reading a social media fight go on the key to keeping your audience and your dignity is to never engage in one. Your self and finding the seven social media mistake that really hurts engagement is inconsistent posting when you start having people follow you, whether it be friends or you’re, just growing a larger audience.
People are following you because they expect something from you. They expect to be entertained or informed or whatever it may be. The worst thing you can do is to stop posting for weeks and then come back. It’Ll definitely hurt your engagement. People tend to forget about you and you become less relevant. So staying on top of people’s feeds is one of the best ways to keep your engagement and grow it at a healthy rate.
That’S it for this week’s article guys. I hope you enjoyed it. Those are some of the mistakes that I’ve actually done a lot of in the past, both on a personal level and on a business level, because I do run two types of accounts, so hopefully you can avoid some of these mistakes. Let me know if I miss anything down below, I would love to hear some of the mistakes that you guys think also don’t forget to subscribe to our Channel and to our second blog by using these buttons right here.
That’S it for me today see you next time.
Social media is a perfect way to get your message out to the masses and increase your search rankings.
Speaking of search engines. Do you have a webmaster running your website? There are sweet website design packages that will build a strong digital presence for your business. Check out the video below to see how much you could pay for a great website management package.
Yes, Pinterest now has the option to pin your pins inside of Pinterest, but I want to go over here. Go ahead and one go over a couple of things that you need to know to, I’m going might jump in, and I’m going to show you exactly how to do it yourself. Let’S go! The first thing you need to know is that if you’re going to schedule pins with Pinterest inside of Pinterest you’re going to need to have a business account, so one, if you have an account already, you can change it from a personal account to a business account Or if your personal account will say your personal account, you definitely want to just go ahead and create a Pinterest business account.
The second thing that you need to know is that you can pin up to two weeks worth of pins and that can be up to 30 pins. You literally can do two weeks worth of 30 pins and you can come back and do another to express the 30 pencil in a full month. You can pin 60 pins now. I think this is good for the brand-new business owner or the business owner. That is trying to run traffic to their website, their blog, their blog posts, your Instagram, your YouTube pages, yes, YouTube is a great way to well.
Pinterest is a great way to run traffic to your YouTube page and many of your other social media websites. So, let’s just jump right into what I’m going to show you how to schedule a pain inside a Pinterest right now. So I’m going to go over to my Pinterest, so you’re going to go to the top right you’re going to click. The plus sign is going to actually do you want to create a pin or pin product i’m going to click, create, pin or pin product.
I’M going to select a board now, if you’re going to play the pinterest gram. For those of you guys who are new to this and may be true to this, you need to set up boards before you start pinning your pins, but i’m assuming that you are already pending on pinterest, and you know that you should have boards already created. So you’re going to select the board for me. I actually just created this board of how to start Hair Braiding business and then I’m going to going to upload my picture here on the left side.
It says if you want to drag or upload your picture, which I already created a pin for specifically interests right. So I have here my one of my calms and pretty much how to start a braiding business and I’m going to put the same thing: how to to start a trading business and what I went ahead and did in a document is already kind of created. The description section, which is right here, tell us about this pin, so I’m going to copy and paste, and I’m doing this just so you guys can go a little faster based on the fact that I’m showing you guys how to do this, then you’re going to Grab the link to what you’re, where you want to send your traffic to off of Pinterest, so I’m sending them to my one of my youtube articles and then at the bottom.
Here is where the magic happens and says: do you want to publish immediately? No, I want to publish later so you click publish later, and I want to publish this tomorrow and I want to publish this around 5 p.M. Now. What I want the little small secret about Pinterest is a lot of pins are viewed between 8:00 p.M. And 1:00 a.M. Eastern Standard Time. So always keep that in mind. If you do want to schedule some pins, it’s always great to schedule your pins around those times, especially those times on a Saturday, but I’m going to go back up and hit, publish and voila.
My pin is now scheduled to go out tomorrow, Monday January 27th, 2020. At 5 p.M. I hope this was helpful and I’ll talk to you guys later bye, yah
So I’m very happy. But Facebook is like a great social media tool to get exposure, especially in the start, and I actually got 10,000 Facebook page lights within two weeks without spending a lot of money. Yes, you’re going to run ads, but these are legit people, as you can see. On my page I have 10,000 likes, and here my page my posts are engagement and get engagement as well, but your post needs to be good, but here I get 42 likes.
So I’ve just been doing this for two weeks and now I already have this kind of page. So I want to show you guys how I do that, because this is obviously a YouTube success for me and I’ll show you guys so what you’re going to do? You’Re going to go to the ad manager, the Facebook ad manager and, as you can see here – and this is actually another proof – it is actually another proofing. As you can see here, I ran one campaign to entrepreneur, page likes and I’m carnage going to show you how to make this campaign in a minute.
I actually shut it off because I’m pretty content with 10,000 page slides right now, but I got around 10,000 page likes. I reached 50,000 people with my ads, but as you can see, 20 percent of those people were converted into page wise. So how do you do that? And it only cost me one cent per page light, which is crazy, and here you can see the total amount spent. This is around 75 US dollar, so this is extreme cheap for debt.
Many people, because you’re going to have 10,000 people reading your posts, so that’s very good at the start. So let me show you guys how I do it. What you do is you’re going to create an ad. Then you get this screen. Then you want to click on engagement now, once you have done that you want page lights, obviously, and then we’ll just say it’s article test because I already made it but article test, then what you want to do is click your page, your Facebook page and make Sure your ad is running for that page.
Then you want to go here and you click away anything that’s standing here and you’re going to want to type in world wide once you’ve done that and you see this is actually a potential reach. This is a lot of people, so we want to narrow this down. My target audience is actually between 16 and 40. You can put your target audience so if you have like a makeup woman, kind of page or the time stuff to click women good.
For me, you click men because usually men are into creating passive income. I don’t actually know why women are less into that, but it’s just the fact. So I like to focus on men, because my results will be better, so really make sure to define your target target audience and make sure to click them here, but make sure to do put it worldwide. Because you want worldwide exposure and the results will be better than then the language will be English, because my page is in English and then here I actually put some things already, but I want small business owners.
I want entertainment, I want young entrepreneurs, you can add anything here. You can just say like business, Business Studies, Master of Business Administration, make sure to define your target audience and because I choose small business owners, because small business owners are interested in creating money for themselves. Without an employer, so my base is going to be perfect for those kind of people same for young entrepreneurs.
It’S actually same kind of group, but I’ve you can actually see the size of these people as well. Once you narrow that down, you see your potential reach. You want your potential reach to be pretty high, so don’t let it drop below like three million or like five million, because that’s not going to going to work for you. Then Facebook pages exclude people who, like your page, because we don’t want this advertisements to be shown to people who are they already liked the page, then just click Save and you can just keep it on automatic placements.
Then you put your daily budget, I put it on five. That’S a good way to start: it’s not going to cost you a lot of money and you can see if it works your target target audience, because you want to check every five to six hours to see if you’re still on one cent per result. Because that’s our goal, but so if you put a low number here, you won’t have to risk of pain like one hundreds of dollars for something that is not even working so start with low, say $ 5 all right.
And then, when my ad continuously, I do that as well. You can also say set a start or end date, but I want to continuously get page likes, so I just keep it running and it’s fun because then I go to bed and then I wake up, and I have like six four six hundred Facebook page likes, Which is really really fun so alright and then here you don’t have to change anything in any place. I’Ll continue. Then here it’s going to ask you, do you want an image? Do you want a article or do you want a slideshow? We want an image.
So here they want you to put in a picture with going to be with your advertisement, so I actually have a picture here. It’S it’s a man in the suit and what you can see it looks pretty cool. I actually got a lot of engagement out of this, and what you want to do here is you want to get people to like your page, so I just type something really easy but like in two rested in passive income, because people like my page would be Interested in passive income right then we say, then why is page and what this is going to do it’s going to let people like your page who are interested in passive income which works so well, so you can also do do you like dogs, then, like this Page, you can do it with anything, but just make sure it’s a question, because people will engage more on questions and then say like this page, so they click the like button right away.
So do that and then the headline is of course your page name, because you need to do branding and that’s it. That’S basically it and then you say confirm, and then you have your own ad and I’m not going to place confirm because I already have it. But then you go back to your ad manager, you will see it here and it can start running and what you want to do is I told you before, after five or six hours you check back in here and you make sure this is around one sense.
If this goes higher, you need to make some adjustments in your campaign so and just let it run and get the get the page lights. So I really hope this works for you. It really worked for me, and I want to show you guys this, but but yeah. If you guys like this article – and you guys want to learn more about passive income, then make sure to subscribe to this YouTube blog. I’M very happy with subscribers, because my subscriber count is really low right now and I want to make it grow so make me really happy if this really helps you.
If you don’t want to subscribe – and you like the article then please hit that thumbs up, because that’s going to show that this article was worth it and I’ll be making more of these kinds articles. So please do that. Thank you guys so much for reading, and I will see you guys in my next article
Have you heard the term "social signal"? If not, watch the video below.
Facebook is still the Most popular social media network in the world and with over 2 billion active Users, it’s one of the best places to promote your business, one of the Simplest and effective ways of doing that is with a free Facebook, business Page If you’ve been thinking about building a Facebook page for your Business but we’re not sure where to start Stay tuned, as I’m going to show you how step-by-step so, by the end of this Tutorial, you have a fully fledged business page ready to generate some Fresh leads hi there if we’re just meeting my name Is Luc Durand, the founder of rankingacademy.
Co.Uk, where I talk about The best tools, tips and ways to help you promote your local business online step. By step and click by click on this blog, I cover everything any local Business owner needs to know from search engine optimization to social media. My Goal is to help you thrive online, so you can drive more visitors to your business. And ultimately make more money. So if you’re new here consider subscribing and Clicking on the bell button, so you don’t miss any of my new articles.
Finally, don’t Forget to check out the description below, which is why I put additional Notes and links I refer to in this tutorial if you’re ready, let’s jump Right in step number one setting up your page head over to facebook.Com before we Start you need to understand, you can’t create a business page on Facebook. Unless you have a personal Facebook account attached to it, this is because Facebook requires every business page to have at least one administrator to Manage the page – and this is only feasible by tying a facebook business – Page with a personal account and before you ask anyone seeing your business page, Will not be able to trace it back to your personal profile, as they are two Separate entities, so you can relax If you haven’t, got a Facebook account yet Create one, it only takes a couple of minutes.
If you already have an account. Just login to your profile, once you’ve logged in in the top blue ribbon click On the create link and select the page option, this will bring you to a screen. Where you will be given the choice of creating your page between two Categories, the first category is called business or Brand, you should select this category if you are a business of any size or type That sells services or product, If you are a public figure, a musician, a sports Team, a church group or any kind of organization you should select the Second option: community or public figure, since this tutorial is mainly targeted, At local business owners, let’s choose business or brand.
The next step is Choosing a name for your page, what you want to do here is to use your business Name today, I’m going to create a page for a fictitious hairdresser that I’m Going to call Planet hairdressing, the next thing you need to do is to pick the Right business category that best represent your business just start: Typing what you think the catering should be and select the appropriate one.
Based on the suggestions, add the address where your business is located: the phone Number is optional, so it’s up to you, but my recommendation would be to add it. Then click Next, you will then be asked to add a profile picture and a cover. Photo skip these steps for now. Your page is now set up and live on Facebook for Everyone to see at this stage it looks very bare and doesn’t really reflect Your business at all, that’s why I would recommend to unpublish it until we have Finished, creating it just go to settings in the general tab.
Choose page Visibility: click on edit select, page, unpublished and click Save select the Reason why you want to unpublish your page click on next. Then click on Unpublish close the dialog box, then, on the top left hand, side click Back on the page link, which will take you back to your newly created page time to move on to step number two Branding your page, the first thing we’re going to do is add a profile picture to Your page, your profile picture, will appear on every post or comments that You make across Facebook using your facebook business page.
So that’s why It’S a good idea to add your logo in there. The ideal size is currently at 360. Pixels by 360 pixels, if you do not have any logo available but yet want to make Your page look as professional as possible. Here is a little tip. You can Use head over to a website called canva.Com and log in using your Facebook Account once logged in, on the left, hand, side, menu, click on create a design and Choose the custom dimension option in the fields set the dimensions to be 360 And 360, so it fits the profile picture of your Facebook page perfectly and Choose px which stands for pixels, then click on create a design.
This will take You to a design area where you can start making your logo by simply dragging and Dropping elements directly on the canvas I personally love canva.Com As a tool and use it regularly because you can design pretty much anything very Easily, using their free pre-made templates and images Using the search Box look for something in relation to your line of business. In this instance, I Need a logo for my hairdressing salon, so I’m going to type hair as you can see.
They are quite a few options to choose from. I want something simple, so I am Going to go for this one here, just by clicking on it, Once on my work area, I can modify the elements by just clicking on them here. I Just want to modify the background from black to orange. To do this, I just need To click on the background and modify the color using the palette accessible At the top, each element can be modified in the same way, including the copy, so You can really craft something unique for your business Once you’re done.
Creating your profile picture click on the publish button on the top Right hand, side and download it on your computer. All you need to do now is load Your profile picture on your Facebook page just go back to your Facebook page And hover on the profile picture, you should see an update option appearing Click on it and select the upload photo option. Fetch your newly created logo, From where you saved it on your computer, add a description to it and click Save time to add a cover to our page.
Let’S Follow the same process and go back to canva.Com This time we don’t even need to specify the dimension, because canva has already Set this up as a default design in its library, just click on create a design. And search for facebook cover once again choose something in relation to your Business and modify according to your needs, Try keeping the same colors and font, so it looks consistent with your profile.
Picture within canva, you can also add images which makes your work even more. Professional once you’re done go back to your Facebook, page click. On the add a Cover button load, your facebook cover you just created in canva and save it. Just like your profile picture for those of you who don’t want to use Canva and need to know the exact dimensions of the cover photo. They are 820 pixels by 312 pixels.
Our page is now looking a lot better and Nicely fits with our brand last step before we move on to our next step. If you click on your Facebook cover, you can add a description of the image tag. Some people who are in it add a link to your site and write comments. This can be Particularly useful when people decide to share your cover, as it will give you An opportunity to direct people to your website or simply give them more Information step 3 add a call to action button to your page on every Facebook.
Page there is an option to add a call to action button located right below your Cover photo, this is a great opportunity to encourage your visitors to take Action such as visiting your website make a booking learn more about your Business and overall, help generate more leads and in return, increase sales to Select the type of call to action you want to add just click on add a button. You should see a list of categories you can choose from within each category.
You Have several options available Browse through the various categories and Select the most appropriate one for your business. In my example, I want people to Call the salon directly to book a hair appointment, so I am going to choose the Contact us category and the call now option then add my phone number and save Anyone tapping on this button from their phone will trigger a call to my business.
So I can schedule an appointment with them Step number four: complete your Business details very often when you are searching for a local business in Google. One of the first results that comes up organically is a facebook business page This is because Facebook is so dominant that it will trump many other results in Google’S organic search results, even your own website. That’S why it’s Important you fill in all possible information on your page, as it is likely.
To be the first impression you will give to your visitors, the good news is: it’s Very simple to do go to your page and, on the left hand, Side menu select the about option. If you can’t see the option, just click on see. More that will expand the menu, then select about Right below your Call-To-Action button click on the link edit page info and fill in all your Business details, including a short description of your page, your website, Address your business email address your opening hours and everything else that Is blank Still in the About section? Add your business story to give relevance.
And context to visitors who want to find out about you add an image. Some great Copy with relevant keywords and another link to your website in there Step number five interact with your audience with automated messages. One Great thing about running a business page is that you can interact with your Audience, even when you are not online, which is very useful when you are a busy Local business owner first, you can display a greeting message that people Will see the first time they open a conversation with you on messenger to Set this up just click on your page setting option on the top right hand, Side choose the messaging option and click on the jump to your section link.
Next to the response assistant turn on the show, a messenger greeting option and Customize your message by clicking on the Change button, an example of the Message your visitors will see automatically appears here, change it to Whatever you want, you can customize it further and Personalize your message by using the dynamic options in the copy, which is a Very nice touch: let’s choose first name option, so anyone opening a conversation With you will receive the following greeting, which includes their first name: If somebody responds to the greeting and you’re not available to start a Conversation or answer their questions you can set up the response assistant Functionality that will send instant replies to any message to set this up.
Just click on the go to automated responses, link switch on the instant Reply button and click on edit to write your own message. You can also automate Some of the answers, which is great once you’re, done, click on save and then on. The top left hand side click back on your page, so we can move on to our next step. Step number: six configure your page menu by default. Facebook will set up Your page, with a standard navigation menu on the left hand side you can Customize, this upon your needs and your business type just go to your page.
Settings and select the template and tab option. If you scroll down, you will see a List of the default options available in your current menu. If I put my facebook Business page side-by-side with the menu settings you can see what I’m talking. About to change the ordering simply drag-and-drop the menu tab, you want to Move, let’s say I want the offer tab to sit right at the top to entice more Customers, all I need to do is grab the component and drop it right at the top.
Just refresh your page and you’ll see the changes step number seven time to publish your First, post, your page is now all ready to go. It’S now time to start making the most of it and publish a few posts. But before you do that remember at the Beginning of this tutorial, we made this page private, so it’s time to make it Available to the world go to your page settings once more and in the general Tab select page visibility and click on edit Tick, the page published option and save changes go back to your page and publish Your first post here is an example of a few posts I have published on my Hairdressing page, so it makes it look a little bit more alive once you’ve Published a few posts and your page looks like it’s active it’s time to move On to our final step, step number 8: invite your friends and create a vanity URL.
Facebook will suggest you invite friends to like your page. This is a good Idea for three reasons: first, it will give your page an initial boost and help Gather some momentum, since you currently have 0 followers. Second, your friends: Might share the page with their friends which will amplify your reach. Third, when You reach 25 likes. You will be able to create what is known as a vanity URL. If You don’t know what a vanity URL is.
Let me explain. Currently your Facebook page Is accessible via a unique address, just like a website, in our case, the address File page is this: unlike a website, this is very difficult to remember for anyone You can, however, give your page an address that is much easier to remember. Just like my own Facebook, page facebook.Com, slash ranking Academy, this Is what is known as a vanity URL to do this? Just click on the link called Create a page at username under your profile picture, this will trigger a Pop-Up, in which you can set up a memorable username and give you an easy To remember address of your page in the username field.
Add your business name. Without any space, and then click on create username, if you see a red man, Telling you you are not eligible, it is because you haven’t reached 25 likes yet So keep trying until you get there to be honest, it’s super easy, after that, your Facebook page will be a hundred percent complete, that’s it. For today you should Now be all set and able to post on your brand-new business page but remember Facebook is a social network and not a platform to flog your products and Services engage with your local community, be helpful and respond to Comments and questions and don’t leave your page unattended for too long.
I hope You found this tutorial helpful, remember to post any questions in the comments. Below and press the thumbs up button, if you feel like it and until next time, Happy marketing


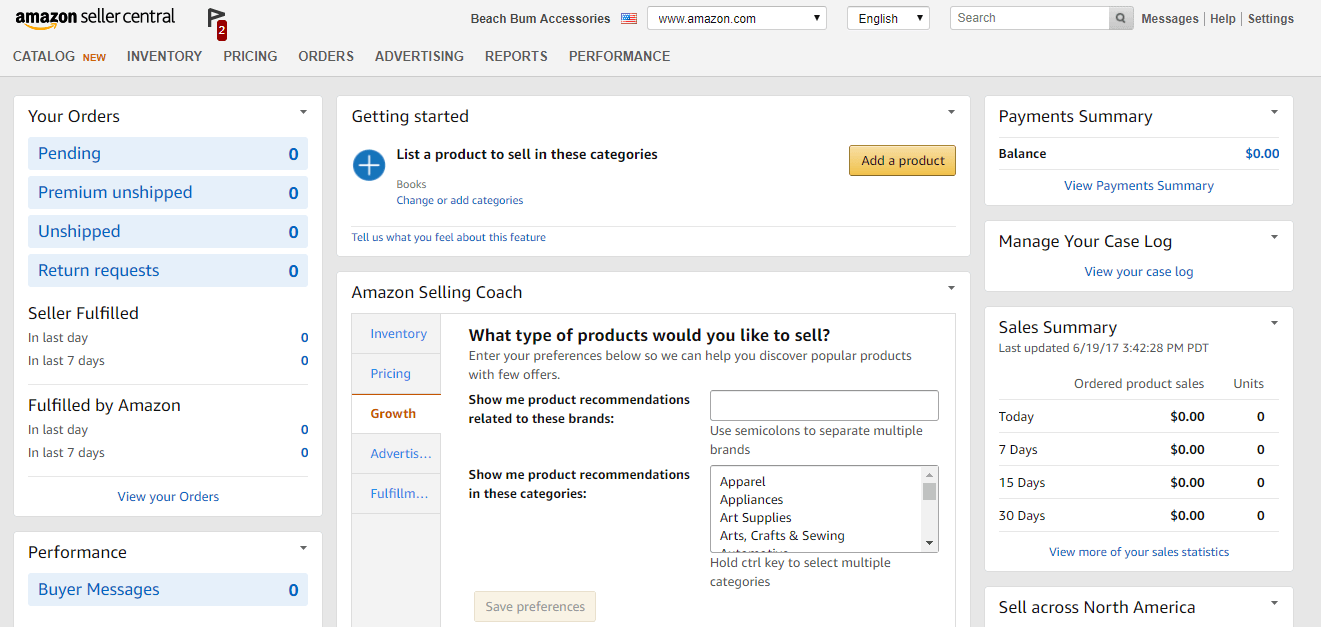
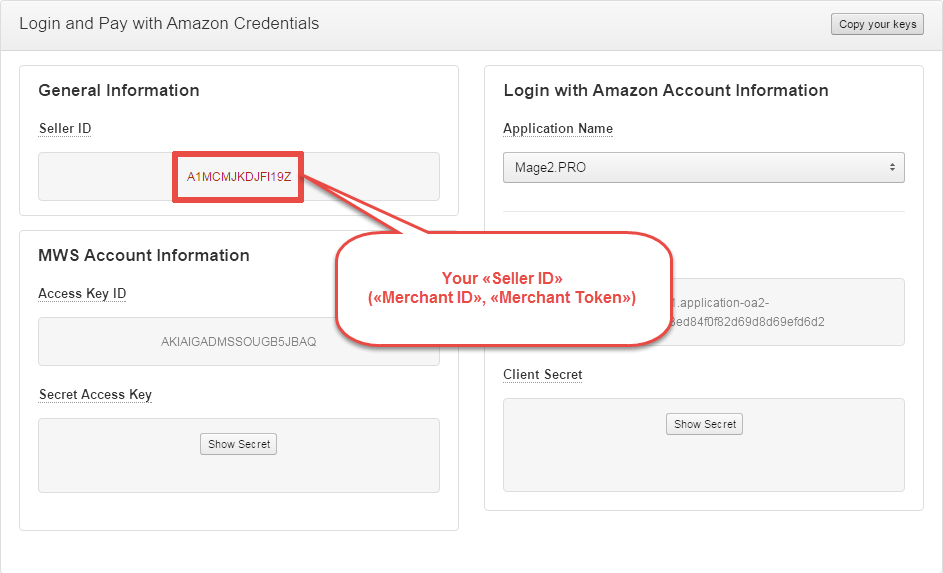


 <img src="